Home  |  Forums  |  914 Info  |  Blogs
 
914World.com - The fastest growing online 914 community!
 
Porsche, and the Porsche crest are registered trademarks of Dr. Ing. h.c. F. Porsche AG. This site is not affiliated with Porsche in any way.
Its only purpose is to provide an online forum for car enthusiasts. All other trademarks are property of their respective owners.
 

Welcome Guest ( Log In | Register )

2 Pages V  1 2 >  
Reply to this topicStart new topic
> installing Dakota Digital CHT, I got some questions...
914 RZ-1
post Mar 6 2023, 08:48 PM
Post #1


Porsche Padawan
***

Group: Members
Posts: 683
Joined: 17-December 14
From: Santa Clarita, CA
Member No.: 18,230
Region Association: Southern California


I'm getting ready to install a Dakota Digital CHT. Here are my questions:

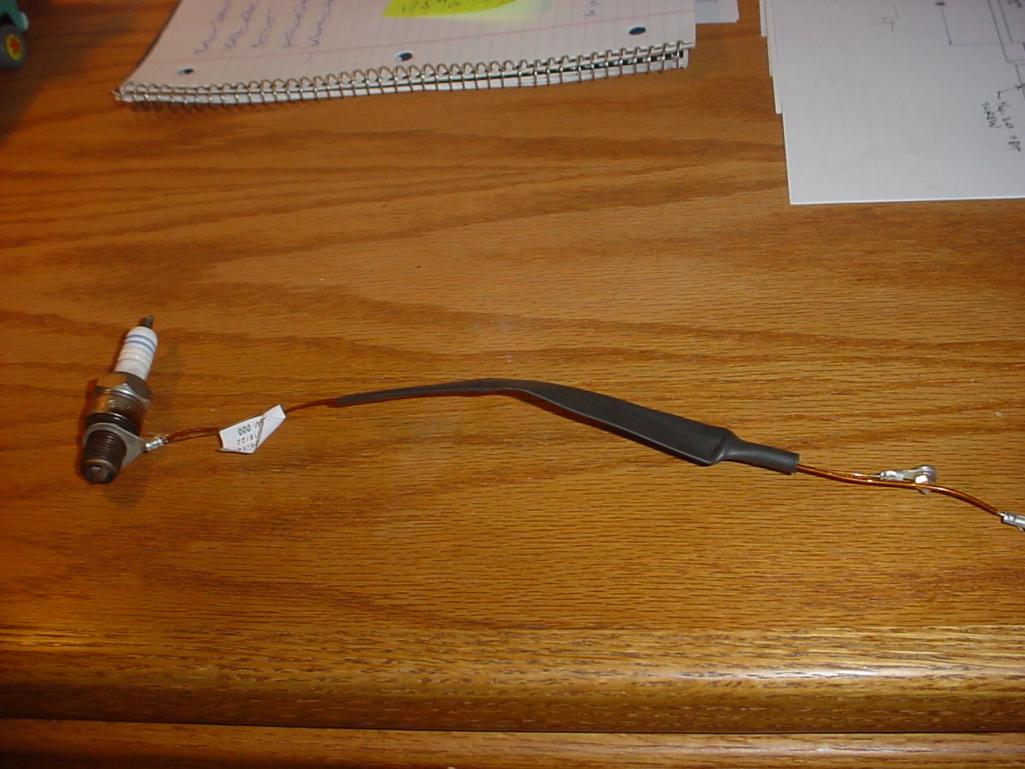
1. What is the shrink wrap for on the copper wire? Mine came with it as shown in the photo. Do I shrink it once installed? It seems too big to shrink down over the wire.

Attached Image

2. I'm installing this on #3 cylinder. Looks like I'll have to bend the spark plug connector. Has anyone done this, or must I grind out a space for it?

3. What circuit should I install this on at the fuse box? The red wire goes to "fused +12V with key on".

4. Is the blue night dimming input required? If so, where does it go on the fuse box?

5. Any tips for running the wire in the engine bay? I was planning on running the wire from the firewall on the driver's side, to the trunk wall, then along that to the #3 cylinder location. The other way would be along the fire wall, but then wires have to cross over the engine and a bunch of other spaghetti to get to #3.

Thanks!
-Jeff
----------


Attached thumbnail(s)
Attached Image
User is offlineProfile CardPM
Go to the top of the page
+Quote Post
nditiz1
post Mar 7 2023, 06:15 AM
Post #2


Senior Member
***

Group: Members
Posts: 1,186
Joined: 26-May 15
From: Mount Airy, Maryland
Member No.: 18,763
Region Association: MidAtlantic Region


1. That shrink goes over the screw terminals once you connect it to the long lead wire.

2. I have done it both ways. It's nicer when it lays flat, but I had the engine out and the tin off.

3. I believe I just jumped off the center console wiring for 12v

4. I don't remember having a separate wire for dimming, but this could also be jumped off the center console light wire to go dim when the lights are turned on

5. I ran it over to the battery then along with the wiring harness through the large grommet hole. Then, through the firewall coming up through the heater lever. Similar to how the center console wires go to the engine for temp.
User is offlineProfile CardPM
Go to the top of the page
+Quote Post
VaccaRabite
post Mar 7 2023, 06:46 AM
Post #3


En Garde!
**********

Group: Admin
Posts: 13,442
Joined: 15-December 03
From: Dallastown, PA
Member No.: 1,435
Region Association: MidAtlantic Region


Grind/file a groove into the head for the sensor to lay flat. Put heavy grease around the spark plug hole to grab filings and keep them from going into the head. Its a pain in the butt to pull spark plugs if it gets bent around the head, as the ring tend to wrap around the plug.
Zach
User is offlineProfile CardPM
Go to the top of the page
+Quote Post
76-914
post Mar 7 2023, 08:49 AM
Post #4


Repeat Offender & Resident Subaru Antagonist
**********

Group: Members
Posts: 13,500
Joined: 23-January 09
From: Temecula, CA
Member No.: 9,964
Region Association: Southern California


Very accurate gauge. Do they still come with that 12ft lead of did they get around to shortening it a bit?
User is offlineProfile CardPM
Go to the top of the page
+Quote Post
FlacaProductions
post Mar 7 2023, 09:38 AM
Post #5


Senior Member
***

Group: Members
Posts: 1,581
Joined: 24-November 17
From: LA
Member No.: 21,628
Region Association: Southern California


As others have said, the shrink tube is for after your get it all in place and to cover the two screw terminals. I'd wait to do the final shrink until after you get it in and are happy with everything.

I put mine on #3 without a groove in the head. Just bent the ring up a little bit and had no issue putting it in with the plug. Be patient and don't cross thread the plug.

I got power, ground and dimmer connections by jumping from the appropriate connections on the other gauges in the console. Just used single-to-double spade connectors. Keep from running a longer line to the fuse panel.
User is online!Profile CardPM
Go to the top of the page
+Quote Post
FlacaProductions
post Mar 7 2023, 09:42 AM
Post #6


Senior Member
***

Group: Members
Posts: 1,581
Joined: 24-November 17
From: LA
Member No.: 21,628
Region Association: Southern California


QUOTE(76-914 @ Mar 7 2023, 07:49 AM) *

Very accurate gauge. Do they still come with that 12ft lead of did they get around to shortening it a bit?


Nope - options are still "a lot of extra", or "too short" but I just gathered all the excess and zip-tied it into a bundle. It sits on the bottom of the console behind the gauge panel.
User is online!Profile CardPM
Go to the top of the page
+Quote Post
GregAmy
post Mar 7 2023, 10:51 AM
Post #7


Advanced Member
****

Group: Members
Posts: 2,294
Joined: 22-February 13
From: Middletown CT
Member No.: 15,565
Region Association: North East States


QUOTE(FlacaProductions @ Mar 7 2023, 10:42 AM) *

QUOTE(76-914 @ Mar 7 2023, 07:49 AM) *

Very accurate gauge. Do they still come with that 12ft lead of did they get around to shortening it a bit?

Nope - options are still "a lot of extra", or "too short" but I just gathered all the excess and zip-tied it into a bundle. It sits on the bottom of the console behind the gauge panel.

EGT and CHT leads can be very easily shortened; after all, they're just wires. The trick is realizing that you need to thread the wires out of the braided lead (or trim it) and then heat-shrink the end of the braiding to avoid fraying.

https://thesensorconnection.com/videos/how-...be-sensor-cable
User is offlineProfile CardPM
Go to the top of the page
+Quote Post
Chaznaster
post Mar 7 2023, 06:40 PM
Post #8


Member
**

Group: Members
Posts: 297
Joined: 22-November 15
From: Concord, MA
Member No.: 19,389
Region Association: North East States


I cut the channel. It seats in nicely with that done.

Attached Image
Attached Image
User is offlineProfile CardPM
Go to the top of the page
+Quote Post
914 RZ-1
post Mar 8 2023, 07:30 PM
Post #9


Porsche Padawan
***

Group: Members
Posts: 683
Joined: 17-December 14
From: Santa Clarita, CA
Member No.: 18,230
Region Association: Southern California


The shrink wrap is on backwards. I just cut it.

I bent the connector. I was able to screw on the spark plug by hand. How do I tell if it's seated properly? I don't want to tighten it with a wrench only to find I've mangled it. I can't see in there very well. Any tips or tricks for seeing in there? There has to be a way to do this without taking the engine out.

I ran the wire from the cabin thru a hole by the hood release, along the firewall, over by the battery and over to #3. There was already wiring I ran for the oil temp and oil pressure gauges, so I just followed that.

Thanks!
User is offlineProfile CardPM
Go to the top of the page
+Quote Post
Geezer914
post Mar 8 2023, 08:44 PM
Post #10


Geezer914
***

Group: Members
Posts: 1,406
Joined: 18-March 09
From: Salem, NJ
Member No.: 10,179
Region Association: North East States


The problem I have is getting the gauge to read F. I touch the leads together and it shows F but after I hook it up it reads C.
User is offlineProfile CardPM
Go to the top of the page
+Quote Post
iankarr
post Mar 8 2023, 10:46 PM
Post #11


The wrencher formerly known as Cuddy_K
****

Group: Members
Posts: 2,473
Joined: 22-May 15
From: Heber City, UT
Member No.: 18,749
Region Association: Intermountain Region


QUOTE(GregAmy @ Mar 7 2023, 11:51 AM) *

QUOTE(FlacaProductions @ Mar 7 2023, 10:42 AM) *

QUOTE(76-914 @ Mar 7 2023, 07:49 AM) *

Very accurate gauge. Do they still come with that 12ft lead of did they get around to shortening it a bit?

Nope - options are still "a lot of extra", or "too short" but I just gathered all the excess and zip-tied it into a bundle. It sits on the bottom of the console behind the gauge panel.

EGT and CHT leads can be very easily shortened; after all, they're just wires. The trick is realizing that you need to thread the wires out of the braided lead (or trim it) and then heat-shrink the end of the braiding to avoid fraying.

https://thesensorconnection.com/videos/how-...be-sensor-cable

As I understand it, the wires can't be cut/shortened because the gauge has been calibrated for resistance through a known length
User is offlineProfile CardPM
Go to the top of the page
+Quote Post
Geezer914
post Mar 9 2023, 06:14 AM
Post #12


Geezer914
***

Group: Members
Posts: 1,406
Joined: 18-March 09
From: Salem, NJ
Member No.: 10,179
Region Association: North East States


They sell different lengths of wires. How would the gauge know what length you are using?
User is offlineProfile CardPM
Go to the top of the page
+Quote Post
GregAmy
post Mar 9 2023, 06:31 AM
Post #13


Advanced Member
****

Group: Members
Posts: 2,294
Joined: 22-February 13
From: Middletown CT
Member No.: 15,565
Region Association: North East States


QUOTE(iankarr @ Mar 8 2023, 11:46 PM) *
As I understand it, the wires can't be cut/shortened because the gauge has been calibrated for resistance through a known length

Negative, it's not. Notice that there's not a different gauge supplied whether you choose the long or short harness...?

Trim away.

GA
User is offlineProfile CardPM
Go to the top of the page
+Quote Post
Montreal914
post Mar 9 2023, 07:33 PM
Post #14


Senior Member
***

Group: Members
Posts: 1,554
Joined: 8-August 10
From: Claremont, CA
Member No.: 12,023
Region Association: Southern California


To my knowledge, classic K-type thermocouple (chromel +/alumel -). You can do what you want with the wire as long as you don't switch the polarity. Plenty of wire and yellow connectors around if you want to quickly disconnect for engine removal. Again polarity... (IMG:style_emoticons/default/smile.gif)

https://www.amazon.com/Temperature-K-type-T...=A2Z11XO0S3YBCN

https://www.amazon.com/Twidec-Female-Thermo...C153&sr=1-4
User is offlineProfile CardPM
Go to the top of the page
+Quote Post
ogdougy
post Mar 9 2023, 07:57 PM
Post #15


Newbie
*

Group: Members
Posts: 49
Joined: 9-May 22
From: Arizona
Member No.: 26,536
Region Association: Southwest Region


Correct. Thermocouple output is measured in voltage (mVs and then fed through an amp to get a better reading).
User is offlineProfile CardPM
Go to the top of the page
+Quote Post
FlacaProductions
post Mar 10 2023, 10:03 AM
Post #16


Senior Member
***

Group: Members
Posts: 1,581
Joined: 24-November 17
From: LA
Member No.: 21,628
Region Association: Southern California


QUOTE(Geezer914 @ Mar 8 2023, 07:44 PM) *

The problem I have is getting the gauge to read F. I touch the leads together and it shows F but after I hook it up it reads C.


I had that issue as well - just have to follow the directions precisely.
You didn't flip-flop the connections did you? In other words - the long end connects to the short end in both places. If you're installing, this should make sense (I hope...)

User is online!Profile CardPM
Go to the top of the page
+Quote Post
Geezer914
post Mar 10 2023, 12:37 PM
Post #17


Geezer914
***

Group: Members
Posts: 1,406
Joined: 18-March 09
From: Salem, NJ
Member No.: 10,179
Region Association: North East States


Wire connected long to short, short to long. I'll give it another try.
User is offlineProfile CardPM
Go to the top of the page
+Quote Post
914 RZ-1
post Mar 10 2023, 07:11 PM
Post #18


Porsche Padawan
***

Group: Members
Posts: 683
Joined: 17-December 14
From: Santa Clarita, CA
Member No.: 18,230
Region Association: Southern California


You can get wires that are 6, 10, 14 and 18 ft w/ a 1/2" ring, or 18 ft with a 14mm ring.

14 ft seems to be long enough.

The directions state that "These cables cannot be extended with standard wire."
User is offlineProfile CardPM
Go to the top of the page
+Quote Post
914 RZ-1
post Mar 10 2023, 07:13 PM
Post #19


Porsche Padawan
***

Group: Members
Posts: 683
Joined: 17-December 14
From: Santa Clarita, CA
Member No.: 18,230
Region Association: Southern California


Back to my question:

I bent the connector. I was able to screw on the spark plug by hand. How do I tell if it's seated properly? I don't want to tighten it with a wrench only to find I've mangled it. I can't see in there very well.

Any tips or tricks for seeing in there? I'd like to hear from those of you who did not take the engine out.

Thanks!
User is offlineProfile CardPM
Go to the top of the page
+Quote Post
FlacaProductions
post Mar 11 2023, 11:19 AM
Post #20


Senior Member
***

Group: Members
Posts: 1,581
Joined: 24-November 17
From: LA
Member No.: 21,628
Region Association: Southern California


I bent mine, screwed in the plug by hand until it resisted and then put the socket on it and gently snugged it up. I dunno...it just felt right and the depth looked right and the engine ran fine and the gauge read right. I could see that the wire hadn't spun so i called it good.
User is online!Profile CardPM
Go to the top of the page
+Quote Post

2 Pages V  1 2 >
Reply to this topicStart new topic
1 User(s) are reading this topic (1 Guests and 0 Anonymous Users)
0 Members:


- Lo-Fi Version Time is now: 13th May 2024 - 02:59 PM