|
|
|
Porsche, and the Porsche crest are registered trademarks of Dr. Ing. h.c. F. Porsche AG.
This site is not affiliated with Porsche in any way. Its only purpose is to provide an online forum for car enthusiasts. All other trademarks are property of their respective owners. |
|
|

  |

| ctc911ctc |
 Oct 10 2023, 05:20 PM Oct 10 2023, 05:20 PM
Post
#1
|
|
Senior Member  Group: Members Posts: 1,331 Joined: 9-June 18 From: boston Member No.: 22,206 Region Association: North East States |
1974, 2.0, 27K miles, all original.
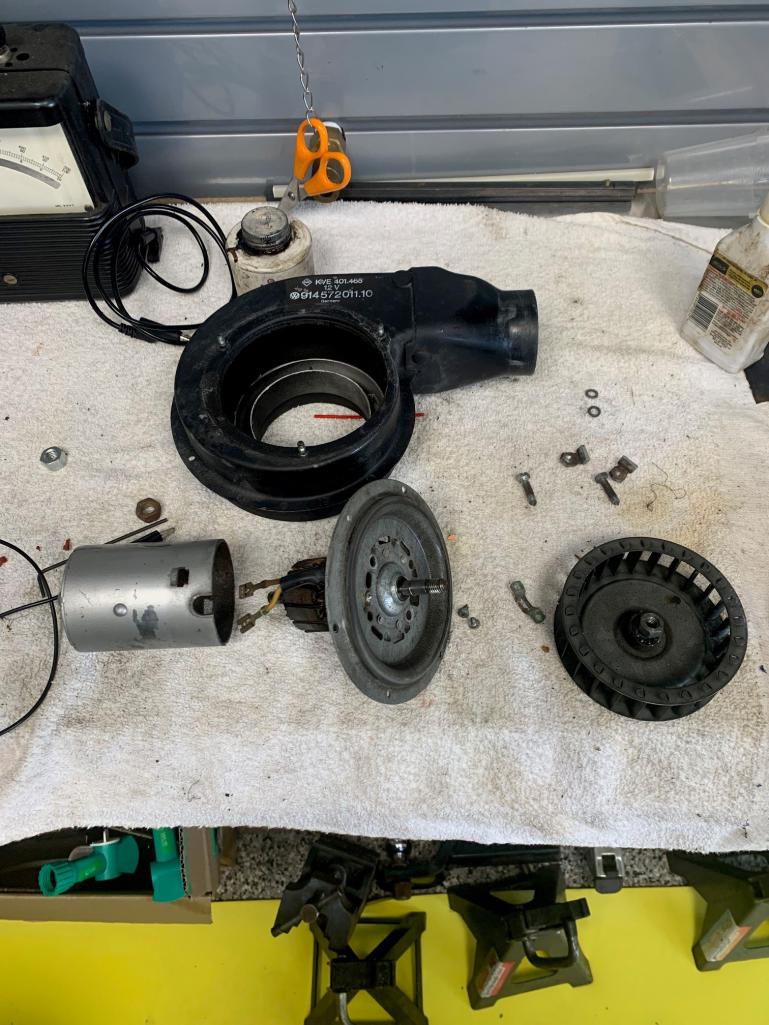 The fan motor started to make a loud racket - bearing noise (whine) and clacking (hitting something while turning). It had sounded and worked fine last year. Time to take a look! I removed it and put it on the bench. At first I thought the clacking was the cage hitting the housing. There were some marks on the housing that showed it had made contact some time in the past, however, the Squirrel cage was spinning true and the marks were a bit old, so I concluded that it was most likely something deeper. Investigating into the fan motor is not a straight forward task, taking it apart is a bit of a challenge, so here is the method I came up with. 1. Since the motor, when powered on the bench with a motorcycle battery, was turning and still making the bearing and clanking noise, fixing it should hopefully be just cleaning and lubing, worthy of repair (IMG:style_emoticons/default/chowtime.gif) 2. The dis-assembly starts with removing the squirrel cage. This is done by removing the nut on the motor shaft. My shaft threads were/are a bit buggered and there is no shaft key. This results in the cage spinning freely when the nut is loosened. There is nothing to hold onto for countering the wrench torque of turning the shaft nut counterclockwise. Turn the nut and the shaft turns. No way to torque the nut beyond the buggered threads........HHHhhhhmmmm SOOOOOOO, I went back and forth with an electric drill and a socket about 100 times until the nut cut through the buggered portion from the kinetic force of the nut hitting the buggered thread. Worked fine, just took patience.......and 2 battery charges. 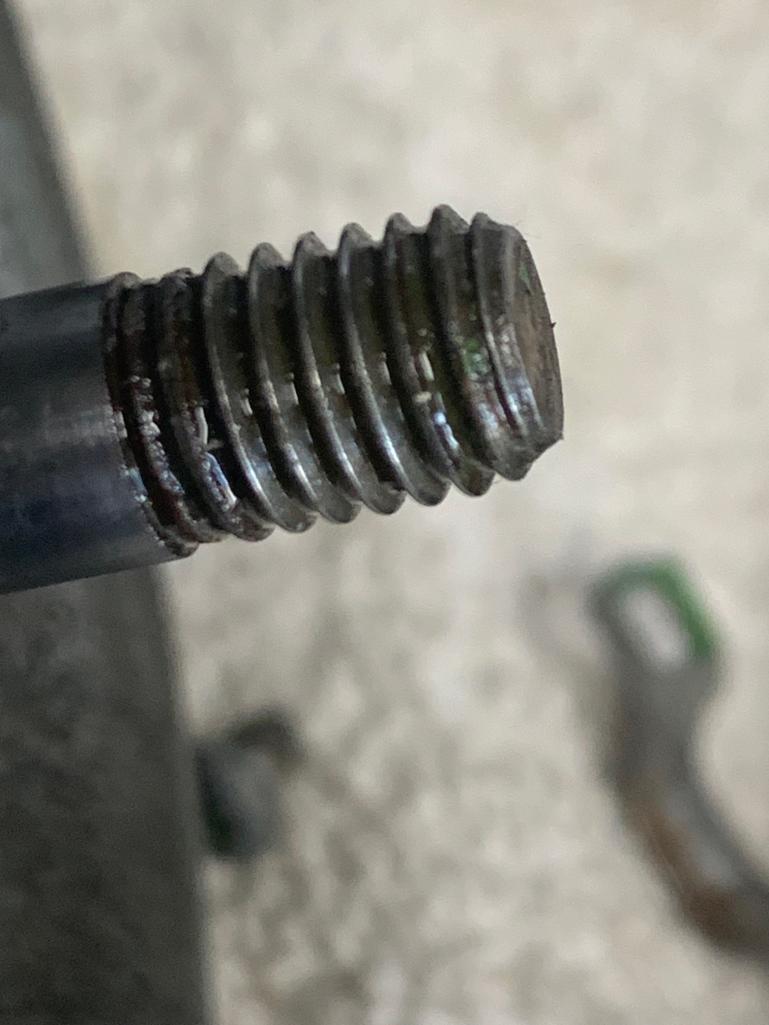 3. After the squirrel cage is removed, the face-plate needs to come off. This plate has two bolts, remove these - note the nut side of these bolts is what the two odd ears (nubs) are on either side of the motor case. These hold the face plate and ALSO need to be adjusted/positioned to center the fixed bearing (in the face plate) with the magnets in the case. The other bearing is a floating bearing in the bottom of the case - more on this later. 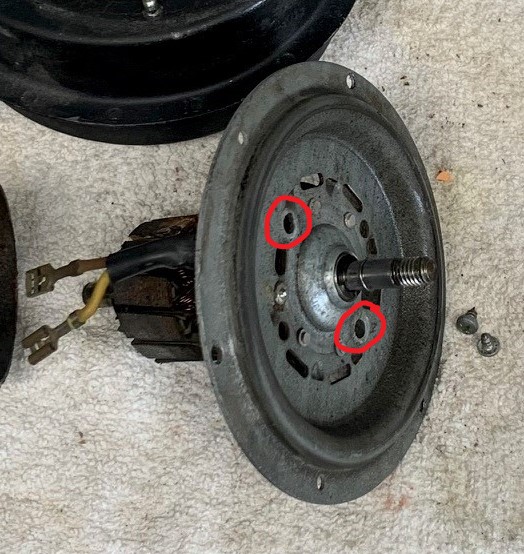 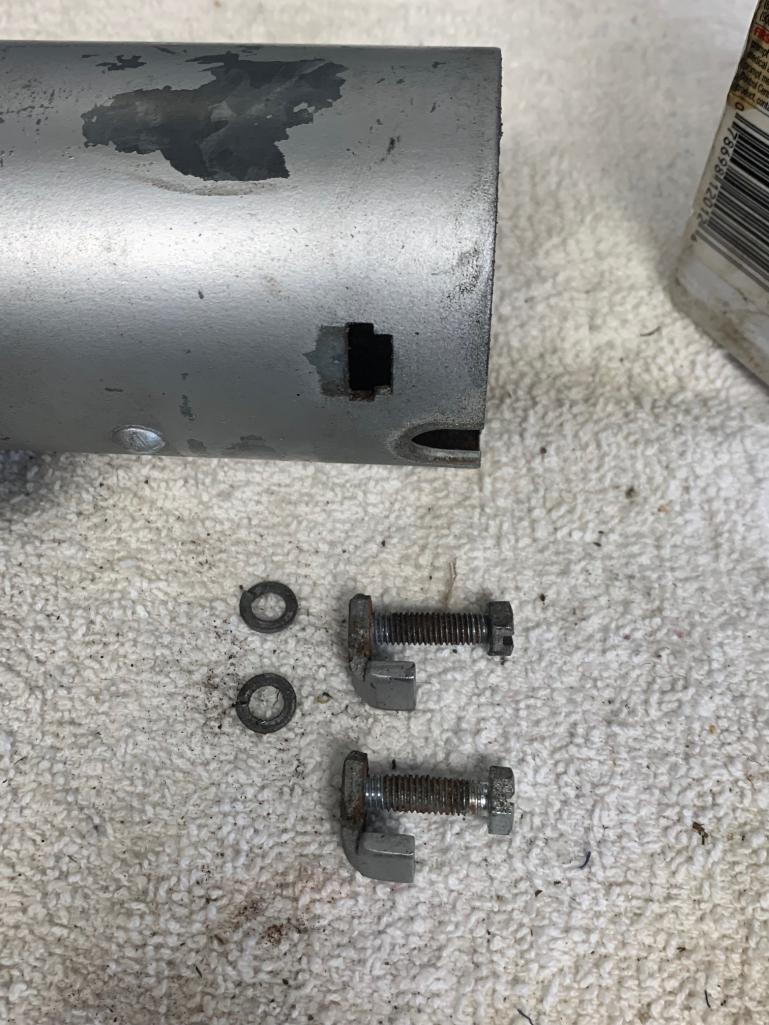 There are a few things things to look for once the face plate is out. A. The Commutator - this can be worn which will result in intermittent current flowing to the windings. Look for a groove where the BRUSHES touch the commutator. This motor has a very small duty cycle, look closely and you will see that there is no groove. However, if your car is in a cold part of the world, and the motor has been used every time the car is used, this may have resulted in this part of the motor being worn through. This can be fixed by turning of carefully filing the copper commutator plates into the proper shape - Skill level is a 10+. Most of these motors in the US should have little wear on the commutator. BUT, for nearly all electric motors (vacuums especially) this is a main point of failure. 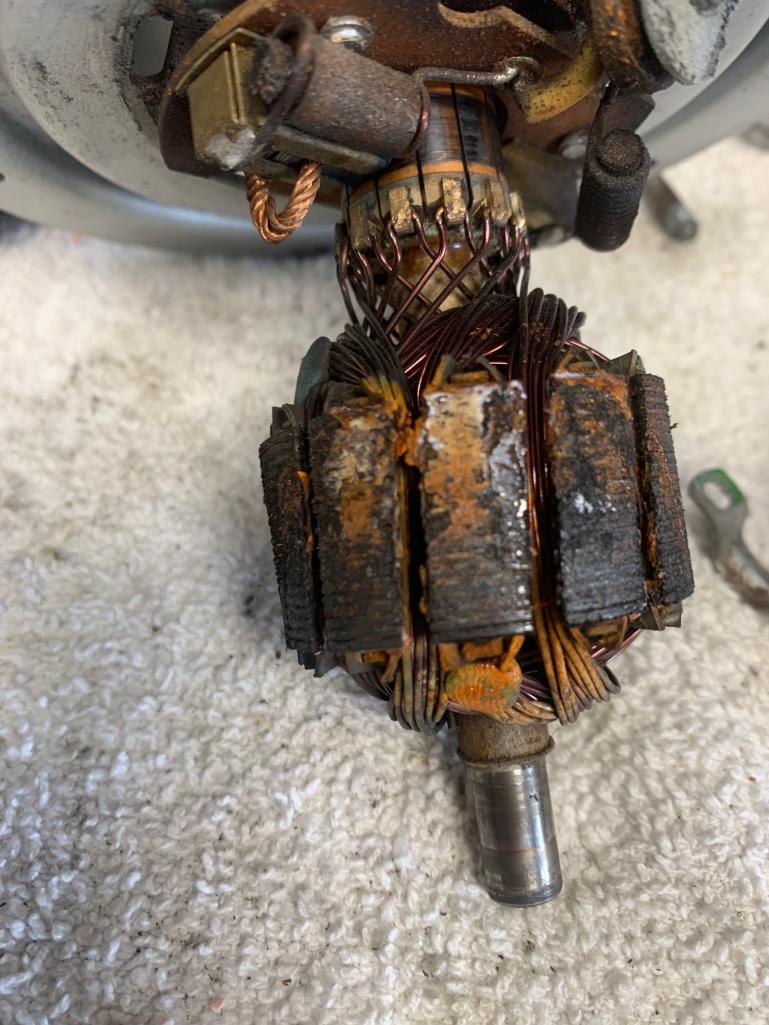 B. The BRUSHES - These are Graphite bars that are designed to wear, if they are very short or broken they should be replaced. This are easy to find, measure the size and get busy on ebay. They can also be filed to the correct size if what you have is close. They are inside the copper housing with the copper braided wire attached to them. 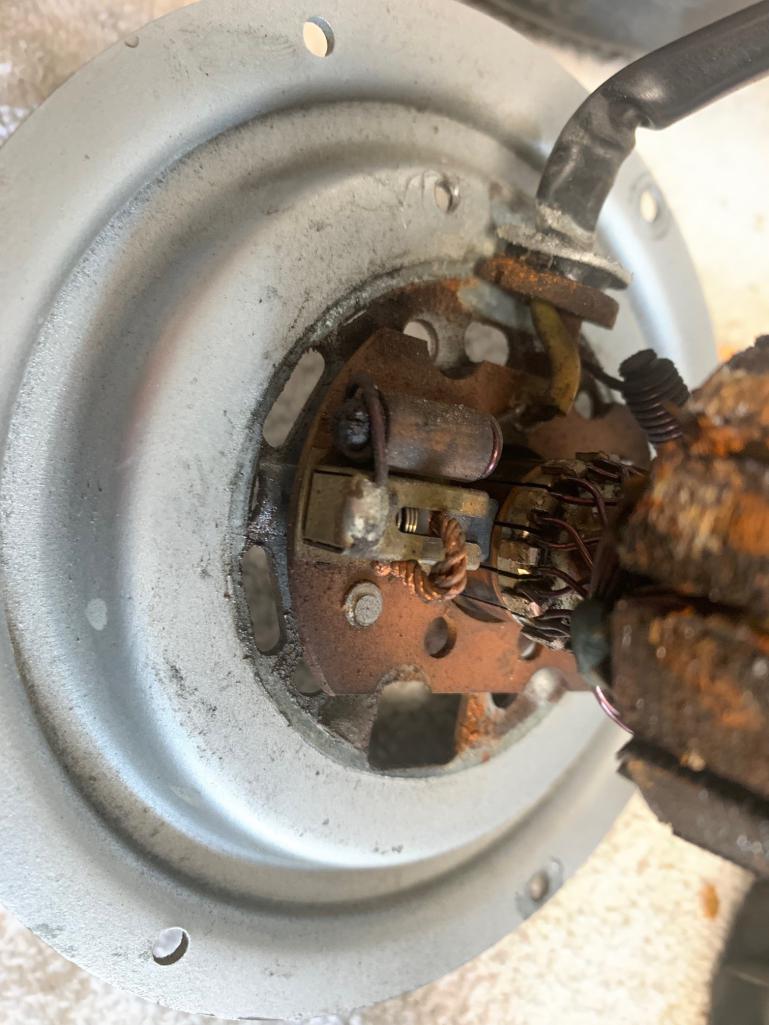 C. Rust on the Ferrous parts (mine was a problem). These cars can sit for decades and the steel will collect moisture from temperature cycling while sitting during the summer. D. If there are broken or burned armature wires, get a new motor - if you are super motivated, these can be rewound..........not for the meek! 4. The rotor needs to be round. The rust on my rotor (see above) was making the motor work in a very noisy way, this needs to be ground down. I did this with a hand file. If you cut any of the armature wires, the motor will not work or will pulse when operating. I cleaned the rotor as best as i could and then sanded the rotor until it was shiny. 5. Now, looking at the bearing at the other end of the housing it was rusty (from the rotor steel parts) and also the bearing was very dry. Needed cleaning and greasing. The bearing could be removed but it is a very interesting system for the motor bearings so I did not drill out the pressed in pins (Rivets?) that were holding it on the bottom or do they hold the bottom to the assembly???? Not sure.... 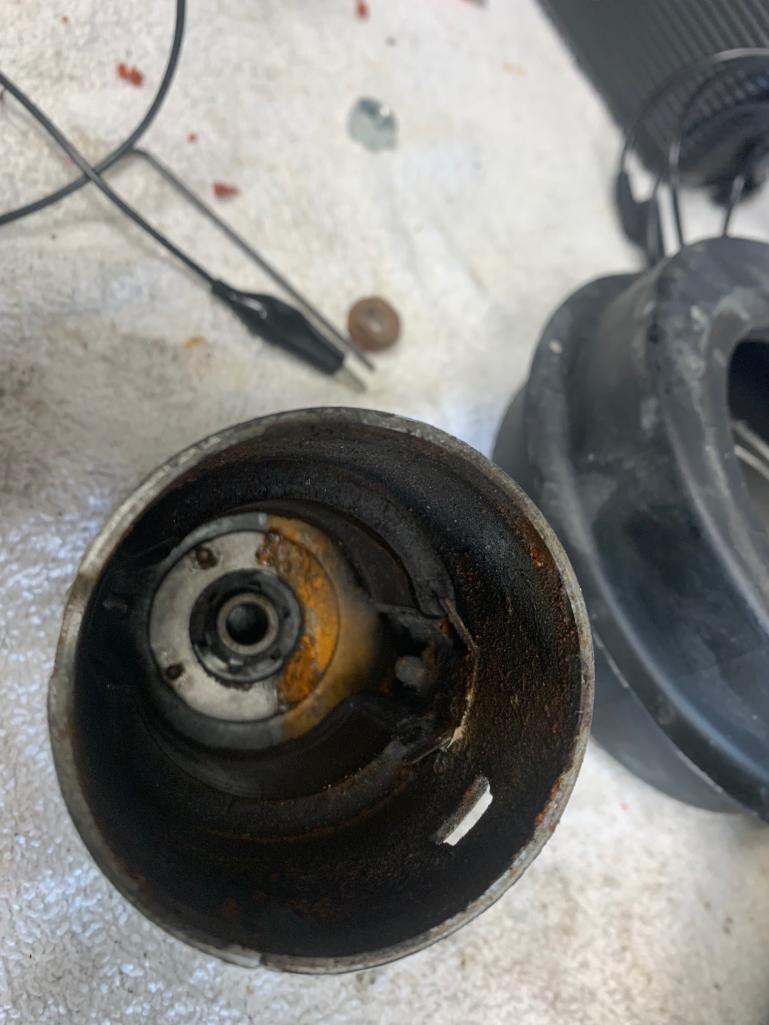 This bearing is a floating bearing, it is designed to move a few mm in a plane that is 90 degrees from the shaft axis. In short, the rotating assembly finds its own center from the magnetic force between the rotor and the stater magnets on the interior of the case. I put a dab of grease in the bearing after it was cleaned and i was ready to assemble. 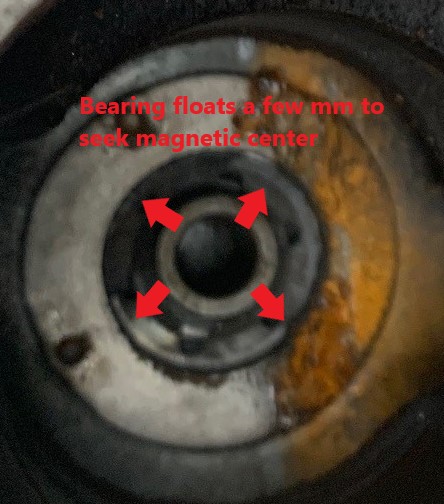 After I got this cleaned (used a lot of spray electric cleaner) and the rotor filed down nice and smooth, I then assembled it all back together. This is where the trick comes in. The face plate can move around a bit and it needs to be in the right position to achieve the center position for the top of the Rotor axis. I firmed the bolts but did not torque them, hooked the motor (no Squirrel cage) and listened to it. I could hear the rotor hitting the magnets internally and moved the face-plate around until the noise was minimal. If I remember right (I have had 6 of these cars) all of them made a little noise which cannot be heard when the engine is running. I then put it all back together and drove around with the heat on during a crisp New England day - With the Targa Top off of course! CTC911CTC Attached image(s) 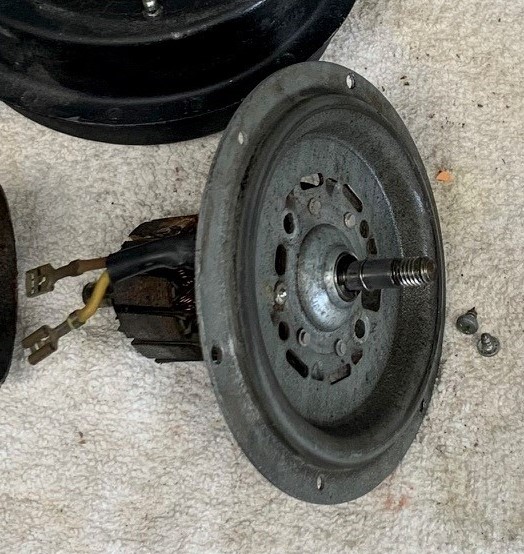
|
   |

 
|
| bahnzai |
Oct 11 2023, 04:47 AM
Post
#2
|
|
Member Group: Members Posts: 371 Joined: 26-July 06 From: Columbia, SC Member No.: 6,509 Region Association: South East States |
Thanks for the write up and great details. I don’t think I have ever seen it addressed in a thread. Nice!
|
|
|
|
| 930cabman |
Oct 11 2023, 04:54 AM
Post
#3
|
|
Advanced Member Group: Members Posts: 4,715 Joined: 12-November 20 From: Buffalo Member No.: 24,877 Region Association: North East States |
QUOTE(bahnzai @ Oct 11 2023, 04:47 AM)  Thanks for the write up and great details. I don’t think I have ever seen it addressed in a thread. Nice! (IMG:style_emoticons/default/agree.gif) (IMG:style_emoticons/default/agree.gif) Very thorough, thanks for documenting |
|
|
|
| ctc911ctc |
Oct 11 2023, 10:35 AM
Post
#4
|
|
Senior Member Group: Members Posts: 1,331 Joined: 9-June 18 From: boston Member No.: 22,206 Region Association: North East States |
added a few more pics, corrected spelling, grammar, etc.
|
|
|
|
| wonkipop |
Oct 11 2023, 03:47 PM
Post
#5
|
|
914 Guru Group: Members Posts: 5,571 Joined: 6-May 20 From: north antarctica Member No.: 24,231 Region Association: NineFourteenerVille |
nice work.
i'm filing your thread away. can see that it might come in handy one day. (IMG:style_emoticons/default/beerchug.gif) (IMG:style_emoticons/default/beerchug.gif) |
|
|
|
| SirAndy |
Oct 11 2023, 07:39 PM
Post
#6
|
|
Resident German Group: Admin Posts: 42,483 Joined: 21-January 03 From: Oakland, Kalifornia Member No.: 179 Region Association: Northern California |
Nice write-up, i added a link to this thread to the classics forum:
http://www.914world.com/bbs2/index.php?act=SF&f=5 (IMG:style_emoticons/default/beerchug.gif) |
|
|
|
| ctc911ctc |
Oct 13 2023, 03:15 PM
Post
#7
|
|
Senior Member Group: Members Posts: 1,331 Joined: 9-June 18 From: boston Member No.: 22,206 Region Association: North East States |
I will need to take another pass at the grammar, however, thank you!
QUOTE(SirAndy @ Oct 11 2023, 07:39 PM) Nice write-up, i added a link to this thread to the classics forum: http://www.914world.com/bbs2/index.php?act=SF&f=5 (IMG:style_emoticons/default/beerchug.gif) |
|
|
|
| Archie |
Apr 29 2024, 03:23 PM
Post
#8
|
|
Member Group: Members Posts: 197 Joined: 23-September 09 From: Western Canada Member No.: 10,844 Region Association: Pacific Northwest |
Thanks very much for that. Just what I needed!
|
|
|
|
| Dion |
Apr 30 2024, 06:21 AM
Post
#9
|
|
RN Group: Members Posts: 2,930 Joined: 16-September 04 From: Shepherdstown, WV Member No.: 2,766 Region Association: MidAtlantic Region |
Awesome write up!
|
|
|
|
| dr914@autoatlanta.com |
Apr 30 2024, 09:36 AM
Post
#10
|
|
914 Guru Group: Members Posts: 8,240 Joined: 3-January 07 From: atlanta georgia Member No.: 7,418 Region Association: None |
good careful work! Funny that we have at least 100 GOOD used late model heater blower fans on the shelf, and maybe two good early model ones and 70 bad ones that DO NEED rebuilding
|
|
|
|
| r_towle |
Apr 30 2024, 12:34 PM
Post
#11
|
|
Custom Member Group: Members Posts: 24,705 Joined: 9-January 03 From: Taxachusetts Member No.: 124 Region Association: North East States |
Fantastic.
So, when I finally tackle the 4-10 heater fans in my 84 911……you gonna show me how? |
|
|
|
| Artfrombama |
Jan 28 2025, 08:22 PM
Post
#12
|
|
Artfrombama Group: Members Posts: 461 Joined: 21-January 24 From: One of the chosen few Member No.: 27,870 Region Association: South East States |
My fan started to make a horrible noise last weekend.
Turned out, the (fan side) bearing had dried out and had seized on the armature shaft, then the bearing spun in the bore which caused excessive end play then the armature dropped and caused the fan to rub the end plate. Tightened up the bearing bore with a couple of sockets and a press. Re-lubed the bearings and seems to work as new again. |
|
|
|
| TonyA |
Jan 28 2025, 09:15 PM
Post
#13
|
|
Nachmal Group: Members Posts: 707 Joined: 17-November 16 From: Hilltown PA Member No.: 20,596 Region Association: North East States |
Thanks, Just in time
|
|
|
|
|
1 User(s) are reading this topic (1 Guests and 0 Anonymous Users)
0 Members:

|
Lo-Fi Version | Time is now: 21st June 2026 - 03:17 AM |
Invision Power Board
v9.1.4 © 2026 IPS, Inc.