|
|
|
Porsche, and the Porsche crest are registered trademarks of Dr. Ing. h.c. F. Porsche AG.
This site is not affiliated with Porsche in any way. Its only purpose is to provide an online forum for car enthusiasts. All other trademarks are property of their respective owners. |
|
|


| friethmiller |
 Dec 13 2023, 10:09 AM Dec 13 2023, 10:09 AM
Post
#541
|
|
Senior Member  Group: Members Posts: 1,130 Joined: 10-February 19 From: Austin, TX Member No.: 22,863 Region Association: Southwest Region |
So, I finally decided to create a build thread for my 2nd 914.
Quick Story: Last summer (6/2022), I found this car listed on FB Marketplace and it intrigued me. It was listed as a ’72 but some of the pictures were telling me that this thing was probably a ’74 and possibly an LE. Against my better judgement, I decided to call. The man who owned the car told me that it was, in fact, an LE and that the “72” was a misprint. I told him I’d come pick it up and pay him his asking price of $1000. So, I rented a U-Haul trailer for $68 (incl. insurance), and drove 4 hours from Austin to Leonard, TX, which is about an hour northwest of Dallas. Got the car home without issue and shoved it into a storage unit for a month while I got things prepared at my house/garage. Unfortunately for me, I had promised my wife that I wouldn't restore another car "in our garage". So, I'm stuck in the backyard [for now] attempting to restore a very rusty, old car. It’s kind of a pain when it rains and have to cover everything up, but I prefer being outside. Condition: Poor! To say that the floor pans were a little rough, was an understatement. The car had been sitting in a field with all the doors/hoods off for years. This is never a good thing. When I saw the car in person, it had about 5 inches of wet leaves in the bottom. The trunk replacement was a "hack" with no welds to the transmission support. I can’t imagine driving the thing with the backend loose like that. The hell hole was in horrible condition with about ¾ of the passenger side longitudinal ripped open with rust. The list goes on. However, it did have its original 2.0L (minus FI) + transmission, and the dealer installed A/C. To be honest, the condition didn't bother me at all. I love restoring and repairing these cars. Plus the COA (or whatever they call it now) came back as a CanAm package car. This thing needs to be saved! I’m going to do my best to bring back this bumblebee. I've got a lot of pictures to post but here are some of the initial pics.  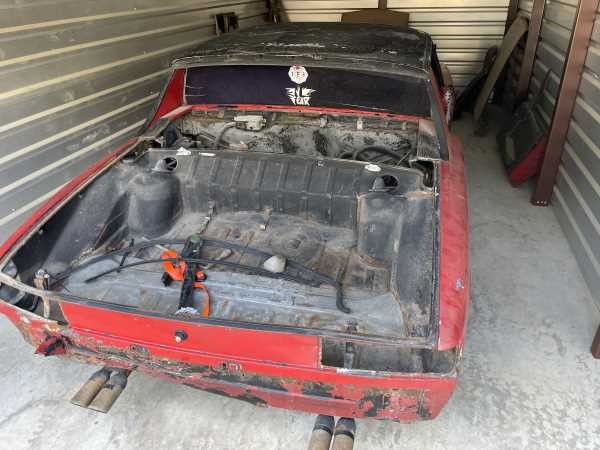 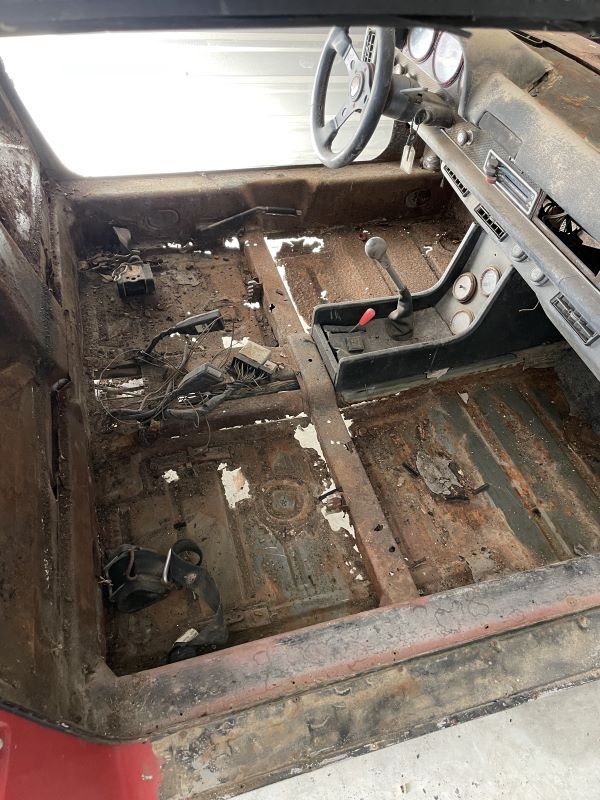 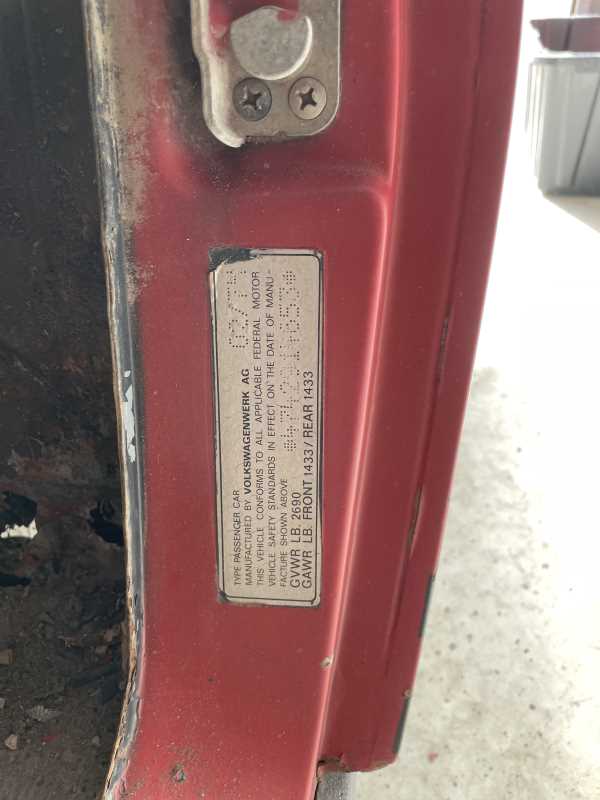 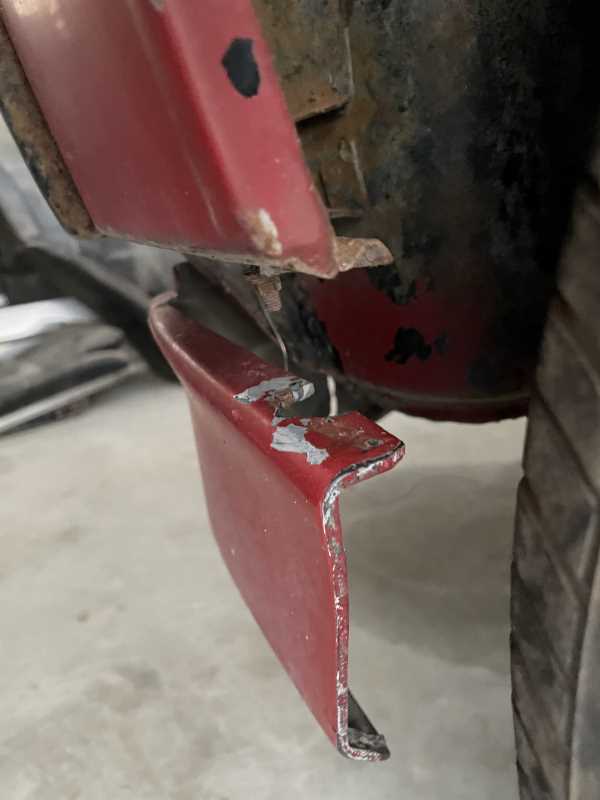 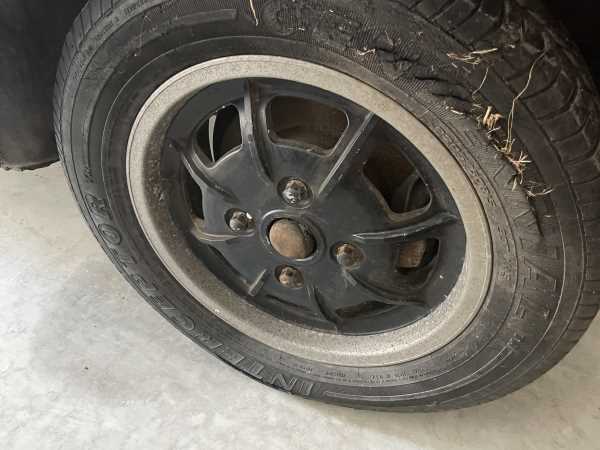 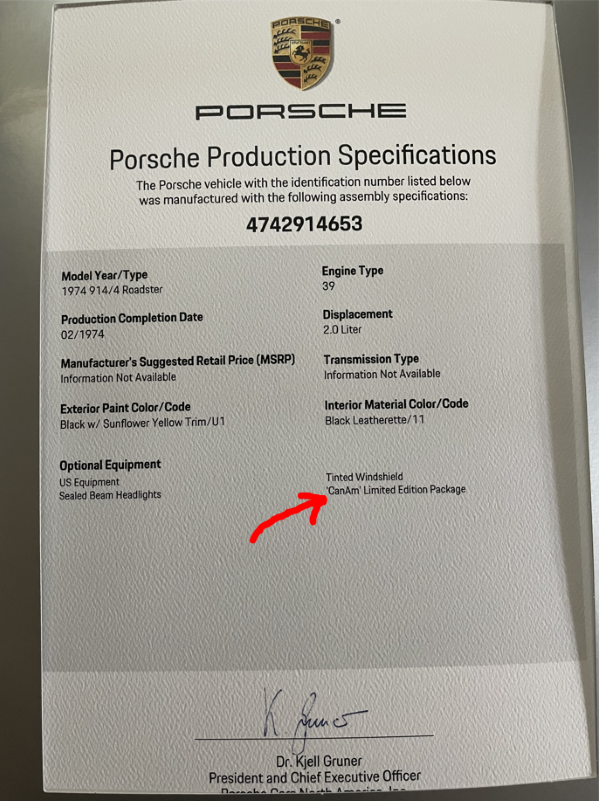 |
   |

 
|
Posts in this topic
 friethmiller Fred's Backyard LE Restoration Dec 13 2023, 10:09 AM
 dstudeba That looks like some work ahead of you! Look ... Dec 13 2023, 10:28 AM TonyA congrats Dec 13 2023, 11:07 AM krazykonrad :popcorn: Dec 13 2023, 11:07 AM friethmiller Some additional tear down photos. Love the pic of... Dec 13 2023, 11:11 AM technicalninja I actually like the single carb for one reason.
I... Dec 13 2023, 11:29 AM
dstudeba That looks like some work ahead of you! Look ... Dec 13 2023, 10:28 AM TonyA congrats Dec 13 2023, 11:07 AM krazykonrad :popcorn: Dec 13 2023, 11:07 AM friethmiller Some additional tear down photos. Love the pic of... Dec 13 2023, 11:11 AM technicalninja I actually like the single carb for one reason.
I... Dec 13 2023, 11:29 AM
 friethmiller
I actually like the single carb for one reason.
... Dec 13 2023, 11:39 AM friethmiller Paint Removal: My daughter and I spent many hours... Dec 13 2023, 12:07 PM technicalninja You've already made serious progress. Some par... Dec 13 2023, 01:04 PM friethmiller
You've already made serious progress. Some pa... Dec 13 2023, 01:12 PM friethmiller Trunk Restoration (part 1): What a pain! The... Dec 13 2023, 01:07 PM technicalninja Nicely done Sir! :first:
Even re-used the pa... Dec 13 2023, 01:17 PM friethmiller Trunk Restoration (part 2): With the pan in place,... Dec 13 2023, 01:24 PM technicalninja
LOL! Very impressive. Yeah, I refuse to te... Dec 13 2023, 01:32 PM friethmiller
I'm an even bigger believer in teaching my ch... Dec 13 2023, 01:56 PM Arkady
LOL! Very impressive. Yeah, I refuse to t... Dec 13 2023, 11:38 PM 87m491 delete Dec 19 2023, 07:52 AM 914sgofast2 There is a guy on YouTube with the "CT" ... Dec 13 2023, 01:39 PM friethmiller
There is a guy on YouTube with the "CT... Dec 13 2023, 01:49 PM JeffBowlsby Your patience and foresight are resulting in excel... Dec 13 2023, 02:05 PM burton73 My opinion is you've got a great car as an inv... Dec 13 2023, 02:59 PM friethmiller
Yea you will not have the date of the karman body... Dec 13 2023, 03:04 PM technicalninja I have Datsun Z cars...
Not Chevrolet Z cars...
O... Dec 14 2023, 12:30 AM Arkady
I have Datsun Z cars...
Not Chevrolet Z cars...
... Dec 14 2023, 09:19 AM friethmiller Upper Firewall: I decided to start here with this ... Dec 14 2023, 11:29 AM technicalninja Awesome story and post!
You're real...
L... Dec 14 2023, 11:44 AM friethmiller
I think Fred is "sand bagging" us...
He... Dec 14 2023, 12:04 PM Arkady
Awesome story and post!
You're real...
... Dec 14 2023, 05:59 PM technicalninja
:D Thanks but I develop software for a living. ... Dec 14 2023, 12:24 PM friethmiller
You're close enough to me to be of assistance... Dec 14 2023, 03:06 PM iankarr Awesome work! Thanks for sharing the journey a... Dec 14 2023, 07:13 PM friethmiller
Awesome work! Thanks for sharing the journey ... Dec 15 2023, 08:34 AM bkrantz Outstanding work and attitude. And you seem to be... Dec 14 2023, 08:00 PM friethmiller
Outstanding work and attitude. And you seem to b... Dec 15 2023, 08:44 AM bkrantz
[quote name='bkrantz' post='3117962' date='Dec 14... Dec 15 2023, 07:54 PM jhynesrockmtn I am in awe! Dec 14 2023, 08:37 PM pfreiburger Totally agree with all of the above, it is a real ... Dec 14 2023, 10:49 PM friethmiller Inner Firewall / Transverse (12/2022): Before I co... Dec 15 2023, 09:29 AM friethmiller Tunnel and Crossbar (12/2022): After purchasing a ... Dec 15 2023, 09:43 AM Aerostatwv Awesome work! At first glance, I thought you w... Dec 15 2023, 10:12 AM friethmiller
Awesome work! At first glance, I thought you ... Dec 15 2023, 11:16 AM technicalninja The wildest thing is he's doing this in the DI... Dec 15 2023, 11:49 AM friethmiller
Are you planning on painting it in the dirt as we... Dec 15 2023, 12:24 PM technicalninja Looks like you kicked ass on the first paint job a... Dec 15 2023, 12:33 PM friethmiller Rear Fender Removal (1/2023): The following photo... Dec 16 2023, 09:50 PM friethmiller Passenger Side Longitudinal - Part 1 (1/2023): It... Dec 18 2023, 11:02 AM technicalninja Nasty!
Now I'm worried about my heater tu... Dec 18 2023, 11:51 AM Jamie
Nasty!
Now I'm worried about my heater t... Dec 18 2023, 11:56 AM friethmiller
I CHARGE extra in those instances!
More if I ... Dec 18 2023, 12:20 PM technicalninja Had a cat that CLEARED a 2500 sq foot attic of roo... Dec 18 2023, 12:25 PM friethmiller Passenger Side Longitudinal - Part 2 (1/2023): Ok... Dec 18 2023, 02:18 PM technicalninja Wow!
Your restoration of that looks great... Dec 18 2023, 03:02 PM friethmiller Yes! I have them but you are assuming I know ... Dec 18 2023, 03:21 PM Geezer914 Like the dog said when he back into the grind ston... Dec 18 2023, 03:49 PM friethmiller
Like the dog said when he back into the grind sto... Dec 18 2023, 04:39 PM friethmiller Passenger Side Longitudinal - Part 3 (3/2023): St... Dec 18 2023, 08:28 PM friethmiller Inner Fender Replacement (3/2023): Before getting... Dec 19 2023, 05:03 AM friethmiller Rocker Panel Replacement (3/2023): I finally get ... Dec 19 2023, 05:15 AM friethmiller Fender Support Repair (4/2023): The final step in ... Dec 19 2023, 08:29 AM Root_Werks Really coming along! Thanks for sharing all t... Dec 19 2023, 12:30 PM friethmiller
Really coming along! Thanks for sharing all ... Dec 19 2023, 03:46 PM friethmiller Outer Hell Hole Repair (4/2023): Here we go! ... Dec 19 2023, 04:05 PM friethmiller Inner Hell Hole Repair (5/2023): The first photo s... Dec 19 2023, 07:30 PM bkrantz Nice!
(Once again, I have to wonder what the ... Dec 19 2023, 07:50 PM friethmiller
Nice!
(Once again, I have to wonder what the... Dec 20 2023, 11:59 AM Superhawk996
Nice!
(Once again, I have to wonder what the... Dec 20 2023, 02:13 PM friethmiller
Nice!
(Once again, I have to wonder what th... Dec 21 2023, 10:09 AM Superhawk996 That’s quite a project - :headbanger:
:trop... Dec 20 2023, 02:22 PM technicalninja You should make a "Project Book" in a pa... Dec 20 2023, 02:45 PM friethmiller Up in Chicago for a few days. I’ll post more wh... Dec 21 2023, 09:15 AM friethmiller Inner Rail/Fender Repair - Part 1 (6/2023): After... Dec 23 2023, 09:00 PM friethmiller Inner Fender Repair - Part 2 (7/2023): In the ini... Dec 23 2023, 09:26 PM friethmiller Inner Fender Repair - Part 3 (7/2023): The follow... Dec 23 2023, 09:38 PM friethmiller Inner Fender Repair - Part 4 (7/2023): With the in... Dec 24 2023, 08:37 AM friethmiller Rotisserie (10/2023): Having completed the repairs... Dec 24 2023, 11:22 AM friethmiller Back Panel Install (11/2023): Even though the car ... Dec 24 2023, 10:24 PM wonkipop this thread is great.
my old dad (who has left th... Dec 24 2023, 11:17 PM friethmiller
this thread is great.
my old dad (who has left t... Dec 25 2023, 10:12 AM rick 918-S Man you In deep! Nice progress. Dec 25 2023, 01:31 PM friethmiller Passenger Inner Suspension Console Replacement - P... Dec 28 2023, 08:27 AM friethmiller Passenger Inner Suspension Console Replacement - P... Dec 28 2023, 10:32 AM friethmiller Passenger Inner Suspension Console Replacement - P... Dec 28 2023, 10:50 AM friethmiller New Battery Tray Install (12/2023): While I had th... Dec 28 2023, 09:45 PM friethmiller Gusset Reinstall and Engine Mount (12/2023): Wit... Dec 29 2023, 09:08 AM friethmiller Trunk Bottom (12/2023): Another area that received... Dec 29 2023, 10:20 AM East coaster Great work! Dec 29 2023, 06:00 PM friethmiller
Great work!
Hey thanks! Stay tuned. I ... Dec 29 2023, 08:05 PM technicalninja Truely impressive!
:popcorn: :popcorn: :p... Dec 29 2023, 08:32 PM friethmiller
Truely impressive!
:popcorn: :popcorn: :... Dec 29 2023, 08:49 PM friethmiller Drivers Side Longitudinal - Part 1 (12/30/2023): ... Jan 1 2024, 11:02 AM SirAndy Awesome work!
:trophy: Jan 1 2024, 12:41 PM JeffBowlsby Those heat duct mufflers are available new if you ... Jan 1 2024, 12:58 PM friethmiller
Those heat duct mufflers are available new if you... Jan 1 2024, 06:37 PM technicalninja What you are accomplishing with this thread has ch... Jan 1 2024, 03:42 PM friethmiller
What you are accomplishing with this thread has c... Jan 1 2024, 05:53 PM friethmiller Drivers Side Longitudinal - Part 2 (12/31/2023): ... Jan 1 2024, 08:49 PM friethmiller Drivers Side Longitudinal - Part 3 (1/1/2024): Mos... Jan 2 2024, 10:19 AM friethmiller Drivers Side Longitudinal - Part 4 (1/6 - 1/7/2024... Jan 7 2024, 08:10 PM Dion Just catching up on this thread. Simply amazing. W... Jan 8 2024, 08:15 AM friethmiller
Just catching up on this thread. Simply amazing. ... Jan 8 2024, 10:02 AM
friethmiller
I actually like the single carb for one reason.
... Dec 13 2023, 11:39 AM friethmiller Paint Removal: My daughter and I spent many hours... Dec 13 2023, 12:07 PM technicalninja You've already made serious progress. Some par... Dec 13 2023, 01:04 PM friethmiller
You've already made serious progress. Some pa... Dec 13 2023, 01:12 PM friethmiller Trunk Restoration (part 1): What a pain! The... Dec 13 2023, 01:07 PM technicalninja Nicely done Sir! :first:
Even re-used the pa... Dec 13 2023, 01:17 PM friethmiller Trunk Restoration (part 2): With the pan in place,... Dec 13 2023, 01:24 PM technicalninja
LOL! Very impressive. Yeah, I refuse to te... Dec 13 2023, 01:32 PM friethmiller
I'm an even bigger believer in teaching my ch... Dec 13 2023, 01:56 PM Arkady
LOL! Very impressive. Yeah, I refuse to t... Dec 13 2023, 11:38 PM 87m491 delete Dec 19 2023, 07:52 AM 914sgofast2 There is a guy on YouTube with the "CT" ... Dec 13 2023, 01:39 PM friethmiller
There is a guy on YouTube with the "CT... Dec 13 2023, 01:49 PM JeffBowlsby Your patience and foresight are resulting in excel... Dec 13 2023, 02:05 PM burton73 My opinion is you've got a great car as an inv... Dec 13 2023, 02:59 PM friethmiller
Yea you will not have the date of the karman body... Dec 13 2023, 03:04 PM technicalninja I have Datsun Z cars...
Not Chevrolet Z cars...
O... Dec 14 2023, 12:30 AM Arkady
I have Datsun Z cars...
Not Chevrolet Z cars...
... Dec 14 2023, 09:19 AM friethmiller Upper Firewall: I decided to start here with this ... Dec 14 2023, 11:29 AM technicalninja Awesome story and post!
You're real...
L... Dec 14 2023, 11:44 AM friethmiller
I think Fred is "sand bagging" us...
He... Dec 14 2023, 12:04 PM Arkady
Awesome story and post!
You're real...
... Dec 14 2023, 05:59 PM technicalninja
:D Thanks but I develop software for a living. ... Dec 14 2023, 12:24 PM friethmiller
You're close enough to me to be of assistance... Dec 14 2023, 03:06 PM iankarr Awesome work! Thanks for sharing the journey a... Dec 14 2023, 07:13 PM friethmiller
Awesome work! Thanks for sharing the journey ... Dec 15 2023, 08:34 AM bkrantz Outstanding work and attitude. And you seem to be... Dec 14 2023, 08:00 PM friethmiller
Outstanding work and attitude. And you seem to b... Dec 15 2023, 08:44 AM bkrantz
[quote name='bkrantz' post='3117962' date='Dec 14... Dec 15 2023, 07:54 PM jhynesrockmtn I am in awe! Dec 14 2023, 08:37 PM pfreiburger Totally agree with all of the above, it is a real ... Dec 14 2023, 10:49 PM friethmiller Inner Firewall / Transverse (12/2022): Before I co... Dec 15 2023, 09:29 AM friethmiller Tunnel and Crossbar (12/2022): After purchasing a ... Dec 15 2023, 09:43 AM Aerostatwv Awesome work! At first glance, I thought you w... Dec 15 2023, 10:12 AM friethmiller
Awesome work! At first glance, I thought you ... Dec 15 2023, 11:16 AM technicalninja The wildest thing is he's doing this in the DI... Dec 15 2023, 11:49 AM friethmiller
Are you planning on painting it in the dirt as we... Dec 15 2023, 12:24 PM technicalninja Looks like you kicked ass on the first paint job a... Dec 15 2023, 12:33 PM friethmiller Rear Fender Removal (1/2023): The following photo... Dec 16 2023, 09:50 PM friethmiller Passenger Side Longitudinal - Part 1 (1/2023): It... Dec 18 2023, 11:02 AM technicalninja Nasty!
Now I'm worried about my heater tu... Dec 18 2023, 11:51 AM Jamie
Nasty!
Now I'm worried about my heater t... Dec 18 2023, 11:56 AM friethmiller
I CHARGE extra in those instances!
More if I ... Dec 18 2023, 12:20 PM technicalninja Had a cat that CLEARED a 2500 sq foot attic of roo... Dec 18 2023, 12:25 PM friethmiller Passenger Side Longitudinal - Part 2 (1/2023): Ok... Dec 18 2023, 02:18 PM technicalninja Wow!
Your restoration of that looks great... Dec 18 2023, 03:02 PM friethmiller Yes! I have them but you are assuming I know ... Dec 18 2023, 03:21 PM Geezer914 Like the dog said when he back into the grind ston... Dec 18 2023, 03:49 PM friethmiller
Like the dog said when he back into the grind sto... Dec 18 2023, 04:39 PM friethmiller Passenger Side Longitudinal - Part 3 (3/2023): St... Dec 18 2023, 08:28 PM friethmiller Inner Fender Replacement (3/2023): Before getting... Dec 19 2023, 05:03 AM friethmiller Rocker Panel Replacement (3/2023): I finally get ... Dec 19 2023, 05:15 AM friethmiller Fender Support Repair (4/2023): The final step in ... Dec 19 2023, 08:29 AM Root_Werks Really coming along! Thanks for sharing all t... Dec 19 2023, 12:30 PM friethmiller
Really coming along! Thanks for sharing all ... Dec 19 2023, 03:46 PM friethmiller Outer Hell Hole Repair (4/2023): Here we go! ... Dec 19 2023, 04:05 PM friethmiller Inner Hell Hole Repair (5/2023): The first photo s... Dec 19 2023, 07:30 PM bkrantz Nice!
(Once again, I have to wonder what the ... Dec 19 2023, 07:50 PM friethmiller
Nice!
(Once again, I have to wonder what the... Dec 20 2023, 11:59 AM Superhawk996
Nice!
(Once again, I have to wonder what the... Dec 20 2023, 02:13 PM friethmiller
Nice!
(Once again, I have to wonder what th... Dec 21 2023, 10:09 AM Superhawk996 That’s quite a project - :headbanger:
:trop... Dec 20 2023, 02:22 PM technicalninja You should make a "Project Book" in a pa... Dec 20 2023, 02:45 PM friethmiller Up in Chicago for a few days. I’ll post more wh... Dec 21 2023, 09:15 AM friethmiller Inner Rail/Fender Repair - Part 1 (6/2023): After... Dec 23 2023, 09:00 PM friethmiller Inner Fender Repair - Part 2 (7/2023): In the ini... Dec 23 2023, 09:26 PM friethmiller Inner Fender Repair - Part 3 (7/2023): The follow... Dec 23 2023, 09:38 PM friethmiller Inner Fender Repair - Part 4 (7/2023): With the in... Dec 24 2023, 08:37 AM friethmiller Rotisserie (10/2023): Having completed the repairs... Dec 24 2023, 11:22 AM friethmiller Back Panel Install (11/2023): Even though the car ... Dec 24 2023, 10:24 PM wonkipop this thread is great.
my old dad (who has left th... Dec 24 2023, 11:17 PM friethmiller
this thread is great.
my old dad (who has left t... Dec 25 2023, 10:12 AM rick 918-S Man you In deep! Nice progress. Dec 25 2023, 01:31 PM friethmiller Passenger Inner Suspension Console Replacement - P... Dec 28 2023, 08:27 AM friethmiller Passenger Inner Suspension Console Replacement - P... Dec 28 2023, 10:32 AM friethmiller Passenger Inner Suspension Console Replacement - P... Dec 28 2023, 10:50 AM friethmiller New Battery Tray Install (12/2023): While I had th... Dec 28 2023, 09:45 PM friethmiller Gusset Reinstall and Engine Mount (12/2023): Wit... Dec 29 2023, 09:08 AM friethmiller Trunk Bottom (12/2023): Another area that received... Dec 29 2023, 10:20 AM East coaster Great work! Dec 29 2023, 06:00 PM friethmiller
Great work!
Hey thanks! Stay tuned. I ... Dec 29 2023, 08:05 PM technicalninja Truely impressive!
:popcorn: :popcorn: :p... Dec 29 2023, 08:32 PM friethmiller
Truely impressive!
:popcorn: :popcorn: :... Dec 29 2023, 08:49 PM friethmiller Drivers Side Longitudinal - Part 1 (12/30/2023): ... Jan 1 2024, 11:02 AM SirAndy Awesome work!
:trophy: Jan 1 2024, 12:41 PM JeffBowlsby Those heat duct mufflers are available new if you ... Jan 1 2024, 12:58 PM friethmiller
Those heat duct mufflers are available new if you... Jan 1 2024, 06:37 PM technicalninja What you are accomplishing with this thread has ch... Jan 1 2024, 03:42 PM friethmiller
What you are accomplishing with this thread has c... Jan 1 2024, 05:53 PM friethmiller Drivers Side Longitudinal - Part 2 (12/31/2023): ... Jan 1 2024, 08:49 PM friethmiller Drivers Side Longitudinal - Part 3 (1/1/2024): Mos... Jan 2 2024, 10:19 AM friethmiller Drivers Side Longitudinal - Part 4 (1/6 - 1/7/2024... Jan 7 2024, 08:10 PM Dion Just catching up on this thread. Simply amazing. W... Jan 8 2024, 08:15 AM friethmiller
Just catching up on this thread. Simply amazing. ... Jan 8 2024, 10:02 AM  |
1 User(s) are reading this topic (1 Guests and 0 Anonymous Users)
0 Members:

|
Lo-Fi Version | Time is now: 11th January 2026 - 01:42 AM |
Invision Power Board
v9.1.4 © 2026 IPS, Inc.