|
|
|
Porsche, and the Porsche crest are registered trademarks of Dr. Ing. h.c. F. Porsche AG.
This site is not affiliated with Porsche in any way. Its only purpose is to provide an online forum for car enthusiasts. All other trademarks are property of their respective owners. |
|
|

  |

| Tim17 |
 Jan 5 2024, 03:30 PM Jan 5 2024, 03:30 PM
Post
#1
|
|
Member  Group: Members Posts: 67 Joined: 3-December 23 From: Newburyport, Massachusetts Member No.: 27,769 Region Association: North East States |
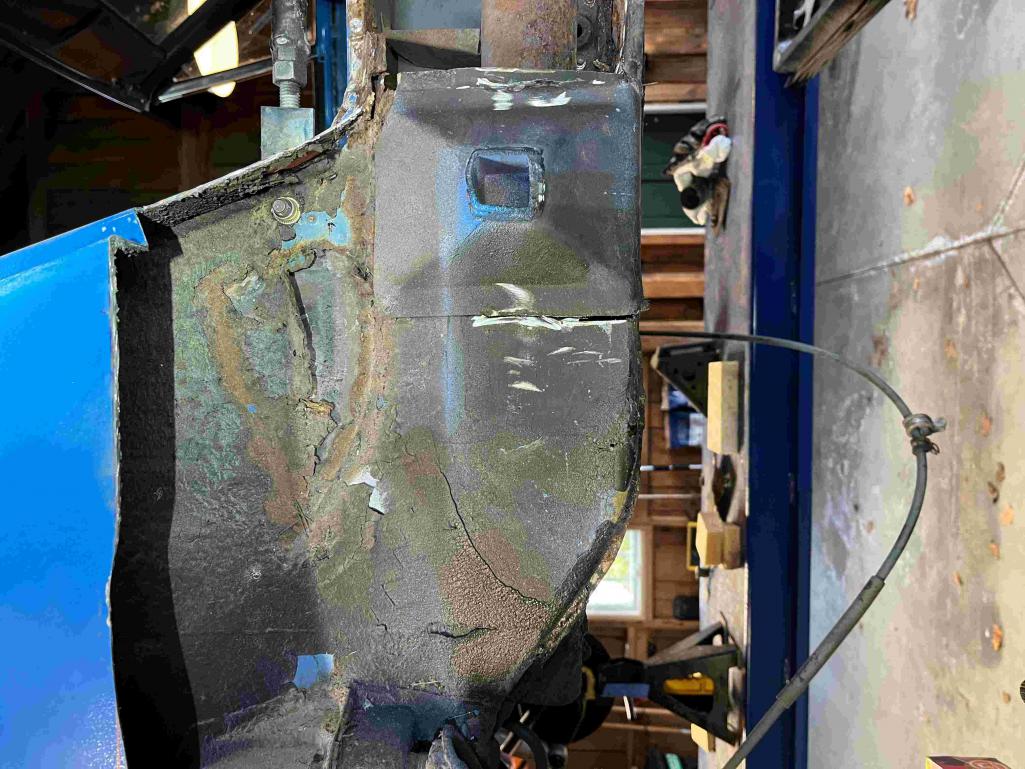
The previous owner told us the hell hole and longs had been done and he seemed like an honest car guy. So that was dumb and naive of me. It was clear that a bunch of work had been done around the hell hole, which looked good from the engine bay. When we got it home and on the lift we were faced with a rusted out lower firewall.
Ordered a firewall repair panel. We pulled the engine today and cut out the lower firewall and it’s pretty ugly. 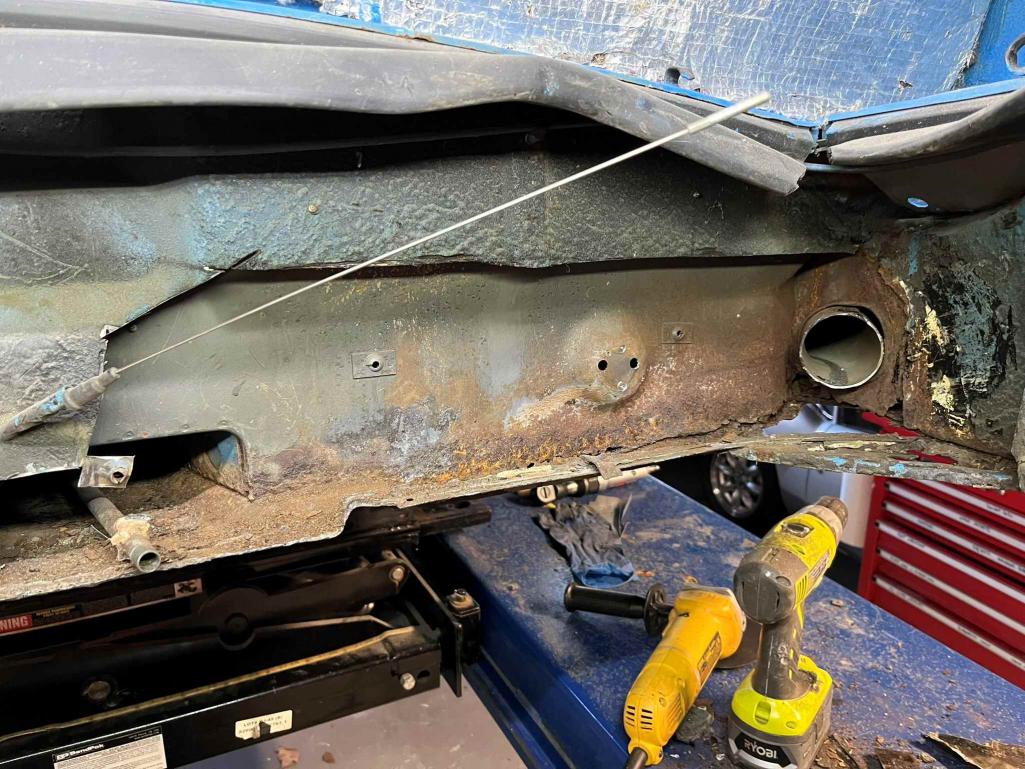 |
   |

 
|
| Tim17 |
Jan 5 2024, 03:35 PM
Post
#2
|
|
Member Group: Members Posts: 67 Joined: 3-December 23 From: Newburyport, Massachusetts Member No.: 27,769 Region Association: North East States |
There was even an epoxied in piece of heavy gage sheet metal in the corner that’s now open under the heater duct.
( I wanted to add more pictures but was told I exceeded the limit for this post). Need to figure out how to compress iPhone photos. The bottom of the RH long is pretty rusted. I understand I need to take off the RH door and brace between the upper hinge bracket and the seat belt mount before going after the rust long. I’m trying to figure out the best way to support the chassis on my 4 post lift with a punky long and a rotten firewall. So that I still have access to repair the long. Would appreciate suggestions, or links to relevant posts. |
|
|
|
| Root_Werks |
Jan 5 2024, 03:49 PM
Post
#3
|
|
Village Idiot Group: Members Posts: 9,026 Joined: 25-May 04 From: About 15NM from Canada Member No.: 2,105 Region Association: Pacific Northwest |
Oh boy! Yeah, there's more to uncover for sure. Oddly, had a 914 with similar rust that was very localized (lucky). Like maybe just that small area sat in something? Was able to patch it up and move along.
(IMG:style_emoticons/default/welder.gif) |
|
|
|
| tygaboy |
Jan 5 2024, 03:55 PM
Post
#4
|
|
914 Guru Group: Members Posts: 5,844 Joined: 6-October 15 From: Petaluma, CA Member No.: 19,241 Region Association: Northern California |
QUOTE(Tim17 @ Jan 5 2024, 01:35 PM)  There was even an epoxied in piece of heavy gage sheet metal in the corner that’s now open under the heater duct. ( I wanted to add more pictures but was told I exceeded the limit for this post) Resize your pics to make them smaller. I use MS Paint... |
|
|
|
| Geezer914 |
Jan 5 2024, 04:24 PM
Post
#5
|
|
Geezer914 Group: Members Posts: 2,328 Joined: 18-March 09 From: Salem, NJ Member No.: 10,179 Region Association: North East States |
I had to repair the lower firewall also. Rear window was leaking. PIA.
|
|
|
|
| Tim17 |
Jan 5 2024, 04:34 PM
Post
#6
|
|
Member Group: Members Posts: 67 Joined: 3-December 23 From: Newburyport, Massachusetts Member No.: 27,769 Region Association: North East States |
I ended up jacking up the back of the car by the suspension to get it high enough to pull the engine onto the lift.
The RH long was too weak to use as a jack point. I figured out the photo resizing. 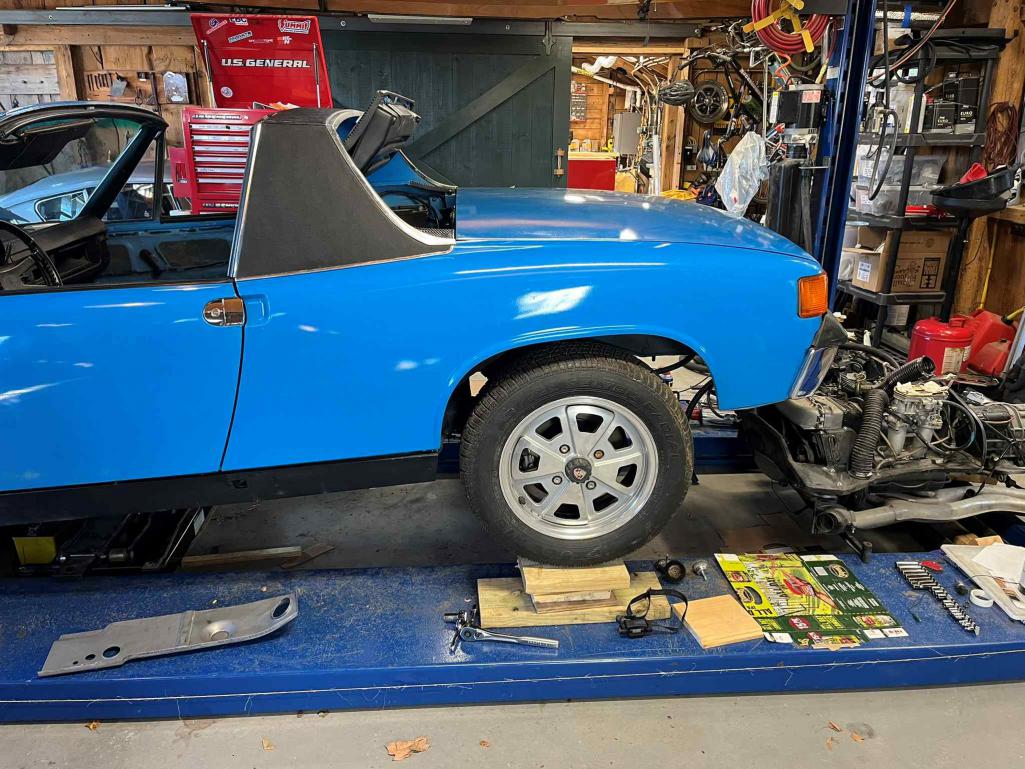 Here's the engine sitting on the lift. 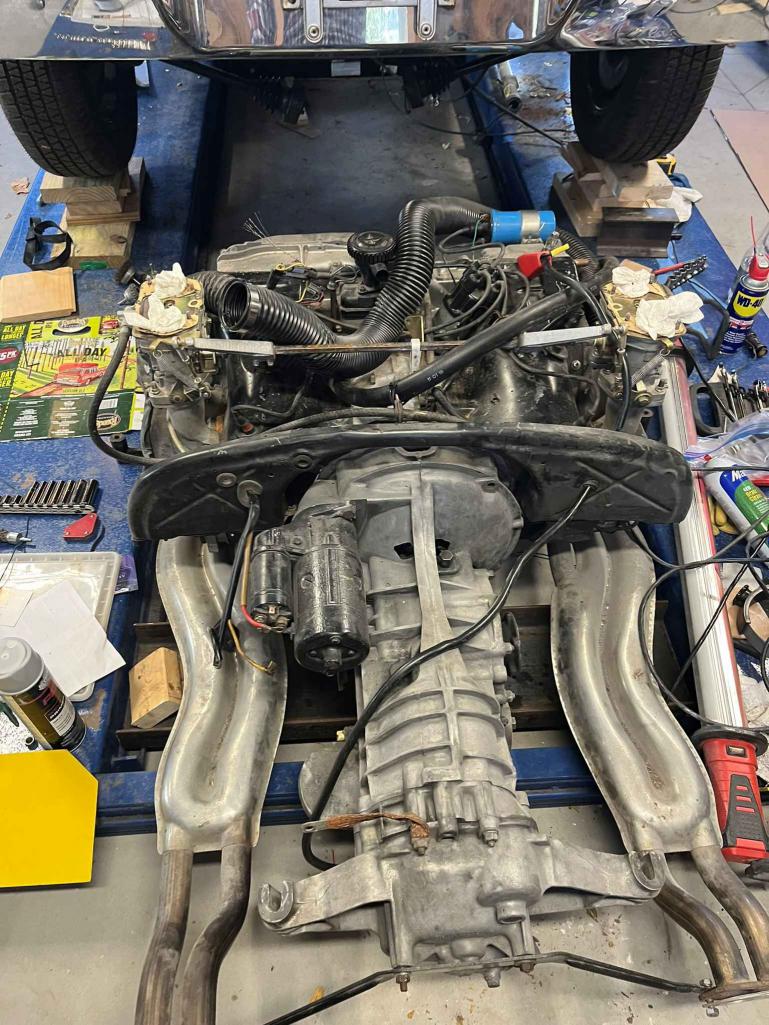 Tim |
|
|
|
| Tim17 |
Jan 5 2024, 08:17 PM
Post
#7
|
|
Member Group: Members Posts: 67 Joined: 3-December 23 From: Newburyport, Massachusetts Member No.: 27,769 Region Association: North East States |
Looking for recommendations on putting this back together straight.
If I brace the door opening with a rod, and fix the firewall area and the hole in the pan, could I then support the car under the firewall and again at the transmission mount point by making up a support frame at each location. At that point open up the long to figure out what needed to be replaced? Tim |
|
|
|
| Superhawk996 |
Jan 6 2024, 09:46 AM
Post
#8
|
|
914 Guru Group: Members Posts: 7,947 Joined: 25-August 18 From: Woods of N. Idaho Member No.: 22,428 Region Association: Galt's Gulch |
QUOTE(Tim17 @ Jan 5 2024, 05:30 PM) The previous owner told us the hell hole and longs had been done and he seemed like an honest car guy. So that was dumb and naive of me. (IMG:style_emoticons/default/av-943.gif) I’m laughing with you not at you. Welcome to 914ville. (IMG:style_emoticons/default/welcome.png) I’ve come to the conclusion that many peoples definition of fixed is quite different than my own. You look to be on a good path toward a better fix than epoxy. (IMG:style_emoticons/default/laugh.gif) Been there - done that Spend some time reading build threads. Intro from Montana by Brent Brock who we unfortunately lost this past year. Brents thread is a wealth of information and is heavily documented with photos and funny life events. RIP Brent. http://www.914world.com/bbs2/index.php?showtopic=307290 And bringing out the dead by Jeff hail is an all time classic. http://www.914world.com/bbs2/index.php?showtopic=76791 My own rustoration is linked in the signature Many others have walked this path and brought back cars in far worse shape than what you’re dealing with so far. 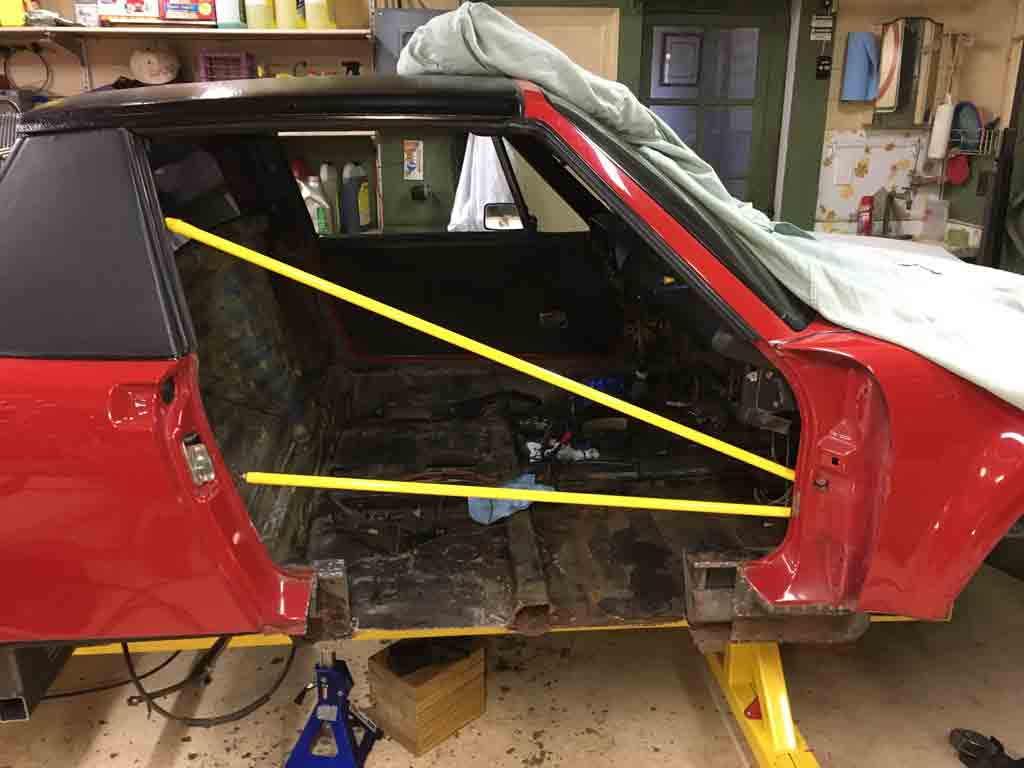 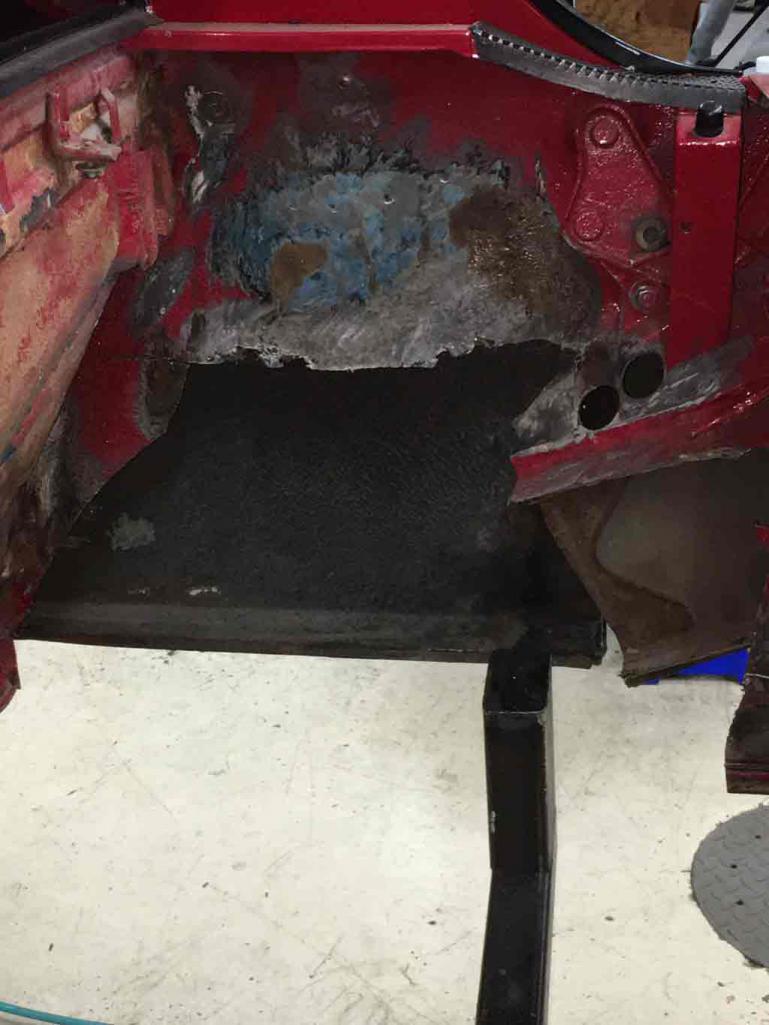 |
 |
|
| Tim17 |
Jan 6 2024, 10:38 AM
Post
#9
|
|
Member Group: Members Posts: 67 Joined: 3-December 23 From: Newburyport, Massachusetts Member No.: 27,769 Region Association: North East States |
QUOTE(Superhawk996 @ Jan 6 2024, 10:46 AM) QUOTE(Tim17 @ Jan 5 2024, 05:30 PM) The previous owner told us the hell hole and longs had been done and he seemed like an honest car guy. So that was dumb and naive of me. (IMG:style_emoticons/default/av-943.gif) I’m laughing with you not at you. Welcome to 914ville. (IMG:style_emoticons/default/welcome.png) I’ve come to the conclusion that many peoples definition of fixed is quite different than my own. You look to be on a good path toward a better fix than epoxy. (IMG:style_emoticons/default/laugh.gif) Been there - done that Spend some time reading build threads. Intro from Montana by Brent Brock who we unfortunately lost this past year. Brents thread is a wealth of information and is heavily documented with photos and funny life events. RIP Brent. http://www.914world.com/bbs2/index.php?showtopic=307290 And bringing out the dead by Jeff hail is an all time classic. http://www.914world.com/bbs2/index.php?showtopic=76791 My own rustoration is linked in the signature Many others have walked this path and brought back cars in far worse shape than what you’re dealing with so far. @Superhawk996 Thanks for the response, it’s perfect. I had already been looking at some of your revival of the dead 914, and your fabrication skills are very impressive. Most people would run from that project (me too), but you took it on as a challenge. I’ll spend some time looking at these other links. Tim |
|
|
|
| Tim17 |
Jan 9 2024, 06:55 PM
Post
#10
|
|
Member Group: Members Posts: 67 Joined: 3-December 23 From: Newburyport, Massachusetts Member No.: 27,769 Region Association: North East States |
Got the car on jack stands and all leveled out using my buddy’s laser level in preparation for probing the passenger side long. There’s a number of areas along the long that have rust holes at or near the bottom.
Working on building and installing 2 door braces for the passenger side before doing anything to the longs. I was encouraged that the body lines are pretty straight to start with. Attached thumbnail(s) 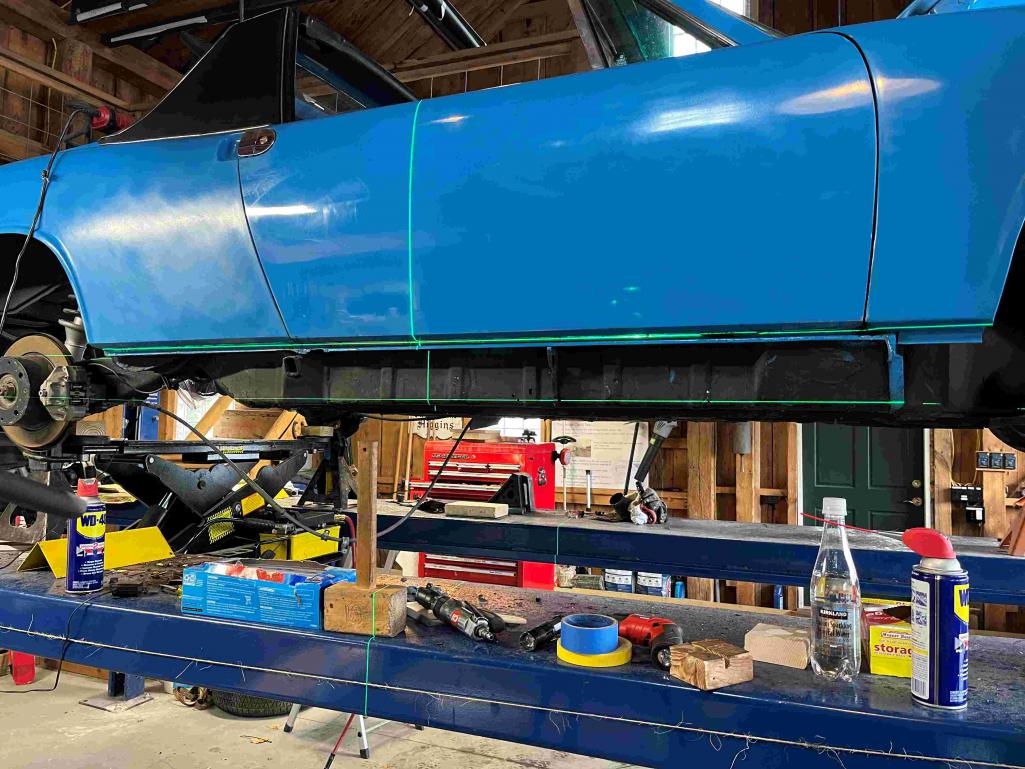
|
|
|
|
| ctc911ctc |
Jan 10 2024, 01:20 PM
Post
#11
|
|
Senior Member Group: Members Posts: 1,340 Joined: 9-June 18 From: boston Member No.: 22,206 Region Association: North East States |
Love the laser - model and make? QUOTE(Tim17 @ Jan 9 2024, 07:55 PM) Got the car on jack stands and all leveled out using my buddy’s laser level in preparation for probing the passenger side long. There’s a number of areas along the long that have rust holes at or near the bottom. Working on building and installing 2 door braces for the passenger side before doing anything to the longs. I was encouraged that the body lines are pretty straight to start with. |
|
|
|
| Tim17 |
Jan 10 2024, 07:56 PM
Post
#12
|
|
Member Group: Members Posts: 67 Joined: 3-December 23 From: Newburyport, Massachusetts Member No.: 27,769 Region Association: North East States |
QUOTE(ctc911ctc @ Jan 10 2024, 02:20 PM) Love the laser - model and make? QUOTE(Tim17 @ Jan 9 2024, 07:55 PM) Got the car on jack stands and all leveled out using my buddy’s laser level in preparation for probing the passenger side long. There’s a number of areas along the long that have rust holes at or near the bottom. Working on building and installing 2 door braces for the passenger side before doing anything to the longs. I was encouraged that the body lines are pretty straight to start with. He got it on Amazon, IMAYCO laser level. Tim |
|
|
|
| Tim17 |
Jan 11 2024, 05:58 AM
Post
#13
|
|
Member Group: Members Posts: 67 Joined: 3-December 23 From: Newburyport, Massachusetts Member No.: 27,769 Region Association: North East States |
QUOTE(ctc911ctc @ Jan 10 2024, 02:20 PM) Love the laser - model and make? QUOTE(Tim17 @ Jan 9 2024, 07:55 PM) Got the car on jack stands and all leveled out using my buddy’s laser level in preparation for probing the passenger side long. There’s a number of areas along the long that have rust holes at or near the bottom. Working on building and installing 2 door braces for the passenger side before doing anything to the longs. I was encouraged that the body lines are pretty straight to start with. He got it on Amazon, IMAYCO laser level. Tim |
|
|
|
| Tim17 |
Jan 11 2024, 04:09 PM
Post
#14
|
|
Member Group: Members Posts: 67 Joined: 3-December 23 From: Newburyport, Massachusetts Member No.: 27,769 Region Association: North East States |
It's been great having this forum to get all the help figuring out how best to save this 914. I've been reading a lot of posts and have some great examples to follow. Plan is to remove the inner rocker panel to expose the extent of the rust damage. Will replace the rocker panel with a new one and aim to fabricate patches for the rest.
My friend Chris and I finished building and installing the door bracing.  and we drilled out spot welds on the threshold and inner rocker 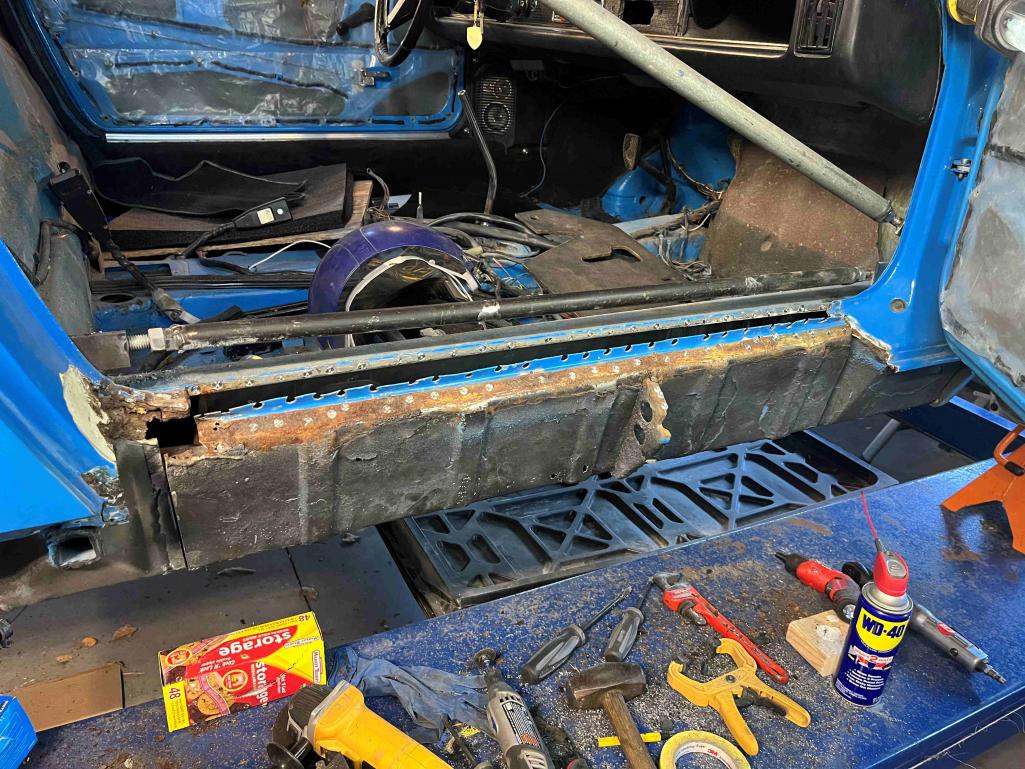 once off, we can see solid metal on a lot of the inner long, but the bottom is rusted out 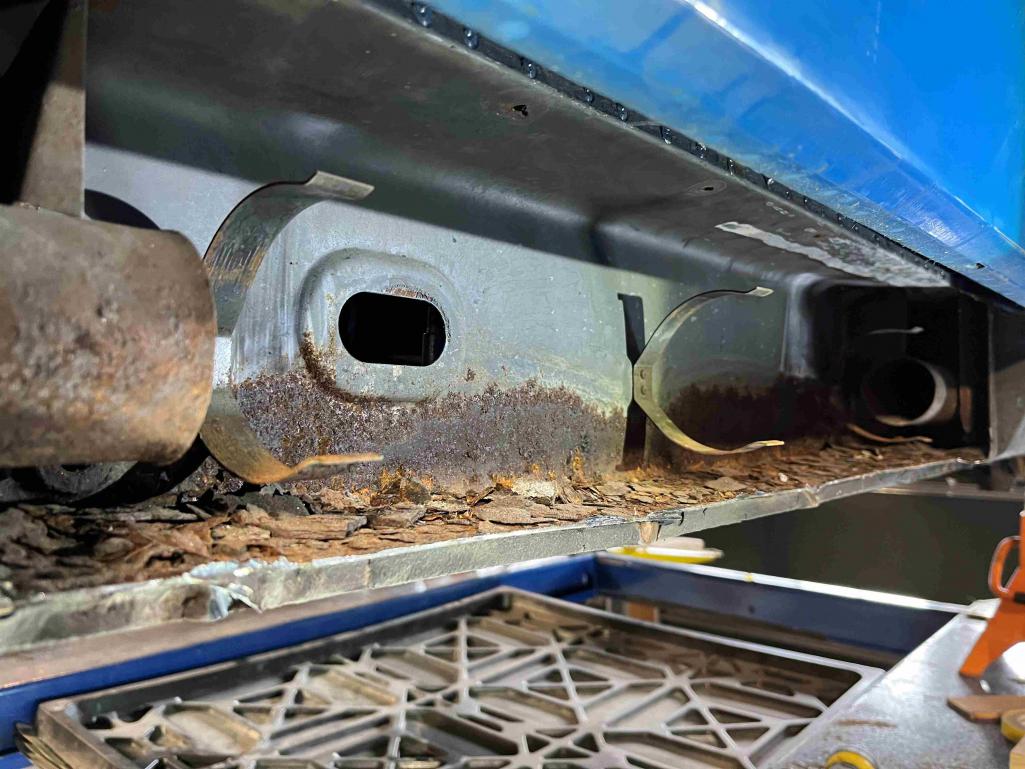 Tim |
|
|
|
| Tim17 |
Jan 11 2024, 04:18 PM
Post
#15
|
|
Member Group: Members Posts: 67 Joined: 3-December 23 From: Newburyport, Massachusetts Member No.: 27,769 Region Association: North East States |
Unfortunately, there's hell hole damage to the top of the long/ rocker behind the fender that we can't access, so out comes the air saw to open the fender. the air saw cuts a really narrow kerf, and cuts fast, but I'm no good at following a straight line.
 The aft portion of the long with the bend is rotten at the bottom and there's more damage on the inside we need to get to. Before we destroy the geometry, we fabricated a patch panel by bending, stretching and shrinking metal. My 1st use of the shrinker and stretcher but it's looking pretty decent. 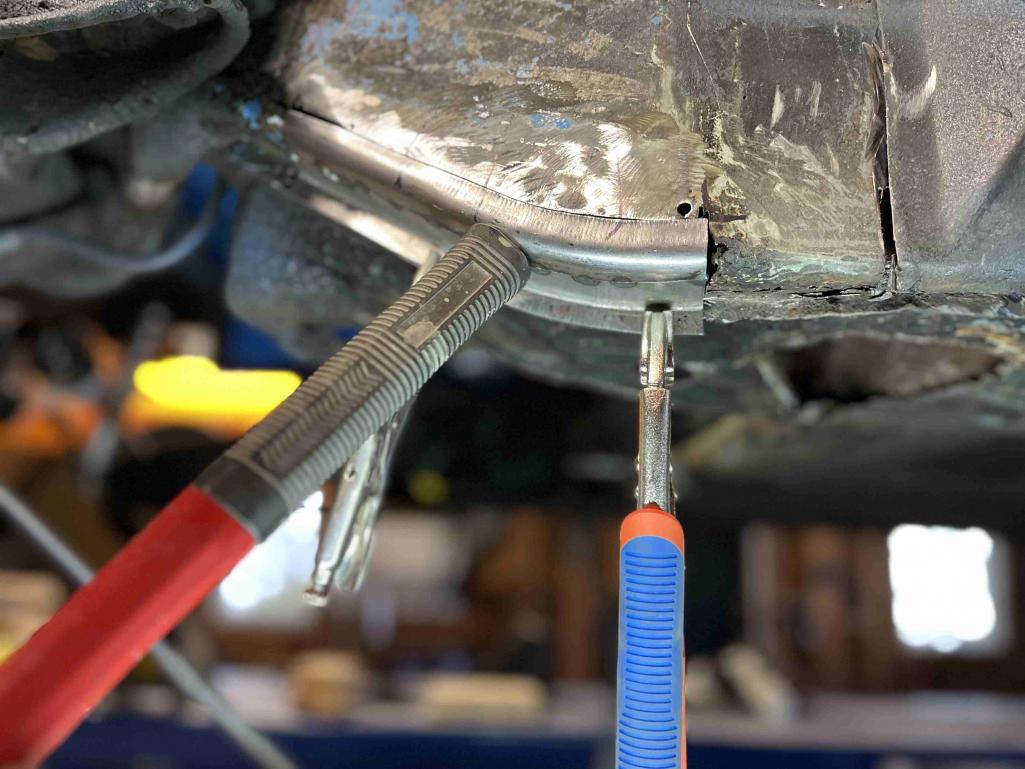 Tim |
|
|
|
| Tim17 |
Jan 13 2024, 01:41 PM
Post
#16
|
|
Member Group: Members Posts: 67 Joined: 3-December 23 From: Newburyport, Massachusetts Member No.: 27,769 Region Association: North East States |
Picked up this 30" HF sheet metal brake on sale yesterday and mounted it on the wall.
Bent up a short length of 18g sheet into a U as a test. It did fine but I could see the movable jaw deflecting which will only deflect more with wider stock. Thinking about adding more rigidity to this. Anybody else modified one of these? I still think its a great value at $63. 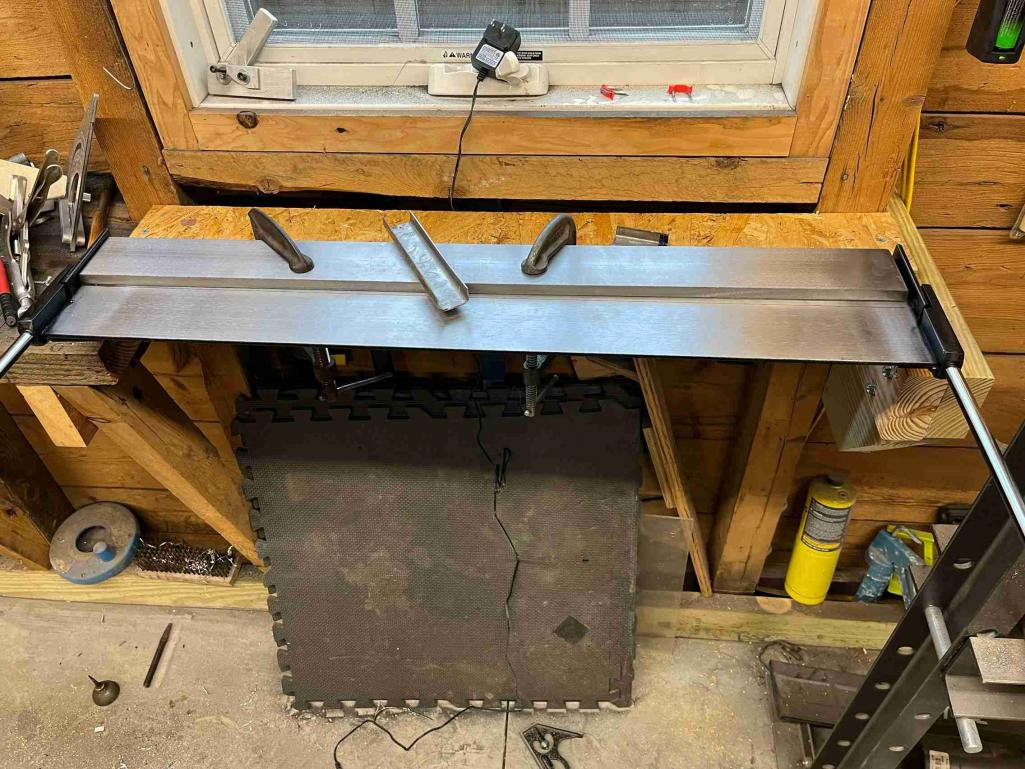 Tim |
|
|
|
| Superhawk996 |
Jan 13 2024, 01:59 PM
Post
#17
|
|
914 Guru Group: Members Posts: 7,947 Joined: 25-August 18 From: Woods of N. Idaho Member No.: 22,428 Region Association: Galt's Gulch |
(IMG:style_emoticons/default/aktion035.gif)
And you’re off to the races. Glad to see it being opened up and properly done. On the rear fender - the lack of a straight line cut works in your favor later. Can only go back on the same way vs being able to slide fore/aft. (IMG:style_emoticons/default/laugh.gif) |
|
|
|
| Tim17 |
Jan 13 2024, 02:49 PM
Post
#18
|
|
Member Group: Members Posts: 67 Joined: 3-December 23 From: Newburyport, Massachusetts Member No.: 27,769 Region Association: North East States |
QUOTE(Superhawk996 @ Jan 13 2024, 02:59 PM) (IMG:style_emoticons/default/aktion035.gif) And you’re off to the races. Glad to see it being opened up and properly done. On the rear fender - the lack of a straight line cut works in your favor later. Can only go back on the same way vs being able to slide fore/aft. (IMG:style_emoticons/default/laugh.gif) Thanks, my RH door gap is a bit tight at the bottom. My braces are turnbuckles, and I ca move the top gap but not the bottom by turning the turnbuckles. In the process of fixing the inner long I’ll be separating the floor from the long and replacing some floor material as needed. To adjust that door gap at the bottom I’ll need to make a cut through the inner long load path. How far across the floor (outboard to inboard) do you think I’d need to cut to soften the structure enough to push the lower door jamb back by 2-3 mm? Tim |
|
|
|
| Tim17 |
Jan 13 2024, 02:53 PM
Post
#19
|
|
Member Group: Members Posts: 67 Joined: 3-December 23 From: Newburyport, Massachusetts Member No.: 27,769 Region Association: North East States |
QUOTE(Superhawk996 @ Jan 13 2024, 02:59 PM) (IMG:style_emoticons/default/aktion035.gif) And you’re off to the races. Glad to see it being opened up and properly done. On the rear fender - the lack of a straight line cut works in your favor later. Can only go back on the same way vs being able to slide fore/aft. (IMG:style_emoticons/default/laugh.gif) @Superhawk996 Thanks, my RH door gap is a bit tight at the bottom. My braces are turnbuckles, and I ca move the top gap but not the bottom by turning the turnbuckles. In the process of fixing the inner long I’ll be separating the floor from the long and replacing some floor material as needed. To adjust that door gap at the bottom I’ll need to make a cut through the inner long load path. How far across the floor (outboard to inboard) do you think I’d need to cut to soften the structure enough to push the lower door jamb back by 2-3 mm? Tim |
|
|
|
| Superhawk996 |
Jan 13 2024, 07:40 PM
Post
#20
|
|
914 Guru Group: Members Posts: 7,947 Joined: 25-August 18 From: Woods of N. Idaho Member No.: 22,428 Region Association: Galt's Gulch |
I would take out the rear portion of the floor before cutting the long load path to adjust door gap. This is assuming that you are going to have to replace a portion of the floor to fix the bulkhead rust damage.
The more material you take out, you’ll be amazed at how it softens up the chassis and lets the turnbuckle door braces move things. The other thing is the chassis will be stronger if you don’t have two structural panels just being joined by a butt weld. The other thing is the need to account for metal shrink as weld cools. I.e., if you set the door gap perfect, then do the butt weld to rejoin what you’ve cut, you’ll find the gap tightens as the weld cools. The other thing is that when you start welding in rear bulkhead pieces, you’ll find that weld shrink pulls the long toward the center. That pull may help your door gap situation. The whole chassis will have moved around as the structure rusted and lost stiffness over the years. The other thing is that on my car, I found part of the lower rear door gap was controlled by the door jamb sill. I had a bit of a fiasco that needs to be repaired in the future because I was holding that gap with silicon bronze and then it moved when I overheated things allowing the silicon bronze to reflow and my gap moved. (IMG:style_emoticons/default/headbang.gif) Some of this would vary depending on order to remove or install. In unibody construction the parts are all inner related. It’s sort of trial and error, learn as you go - at least it was in my case. My advice is don’t try to set door gap too early. Keep an eye on it as you do other work. Keep it close to what you want but don’t sweat it too early before you get an idea of how other work moves it around |
|
|
|
|
1 User(s) are reading this topic (1 Guests and 0 Anonymous Users)
0 Members:

|
Lo-Fi Version | Time is now: 15th July 2026 - 07:05 AM |
Invision Power Board
v9.1.4 © 2026 IPS, Inc.