|
|
|
Porsche, and the Porsche crest are registered trademarks of Dr. Ing. h.c. F. Porsche AG.
This site is not affiliated with Porsche in any way. Its only purpose is to provide an online forum for car enthusiasts. All other trademarks are property of their respective owners. |
|
|

  |

| Tim17 |
 Jan 14 2024, 06:27 AM Jan 14 2024, 06:27 AM
Post
#21
|
|
Member  Group: Members Posts: 67 Joined: 3-December 23 From: Newburyport, Massachusetts Member No.: 27,769 Region Association: North East States |
QUOTE(Superhawk996 @ Jan 13 2024, 08:40 PM)  I would take out the rear portion of the floor before cutting the long load path to adjust door gap. This is assuming that you are going to have to replace a portion of the floor to fix the bulkhead rust damage. The more material you take out, you’ll be amazed at how it softens up the chassis and lets the turnbuckle door braces move things. The other thing is the chassis will be stronger if you don’t have two structural panels just being joined by a butt weld. The other thing is the need to account for metal shrink as weld cools. I.e., if you set the door gap perfect, then do the butt weld to rejoin what you’ve cut, you’ll find the gap tightens as the weld cools. The other thing is that when you start welding in rear bulkhead pieces, you’ll find that weld shrink pulls the long toward the center. That pull may help your door gap situation. The whole chassis will have moved around as the structure rusted and lost stiffness over the years. The other thing is that on my car, I found part of the lower rear door gap was controlled by the door jamb sill. I had a bit of a fiasco that needs to be repaired in the future because I was holding that gap with silicon bronze and then it moved when I overheated things allowing the silicon bronze to reflow and my gap moved. (IMG:style_emoticons/default/headbang.gif) Some of this would vary depending on order to remove or install. In unibody construction the parts are all inner related. It’s sort of trial and error, learn as you go - at least it was in my case. My advice is don’t try to set door gap too early. Keep an eye on it as you do other work. Keep it close to what you want but don’t sweat it too early before you get an idea of how other work moves it around Ok, good input. Thanks! Tim |
   |

 
|
| Superhawk996 |
Jan 14 2024, 11:20 AM
Post
#22
|
|
914 Guru Group: Members Posts: 7,947 Joined: 25-August 18 From: Woods of N. Idaho Member No.: 22,428 Region Association: Galt's Gulch |
The other thing, gotta start proof reading . . . And stop starting every sentence with the phrase “the other thing”.
English was never my favorite class - much rather be in industrial ed class welding! (IMG:style_emoticons/default/lol-2.gif) Keep posting your progress. Love seeing these rusted out cars getting fixed properly instead of cobbled with rivets and epoxy like the old days! |
|
|
|
| Tim17 |
Jan 16 2024, 05:20 PM
Post
#23
|
|
Member Group: Members Posts: 67 Joined: 3-December 23 From: Newburyport, Massachusetts Member No.: 27,769 Region Association: North East States |
We had the car supported at each wheel with jack stands and two support turnbuckles in the RH door frame but that didn't look good enough to start hacking away any more rotten structure on the right side. Added a jack stand under the rear suspension console. Went thru the scrap steel bin and found a section of steel beam, some square tubing from my old Factory Five Cobra rear suspension and a few other bits, to tie the rear transmission mount to the lift bed.
Now we have 3 points of support on the back end or the RH side, which is pretty secure. 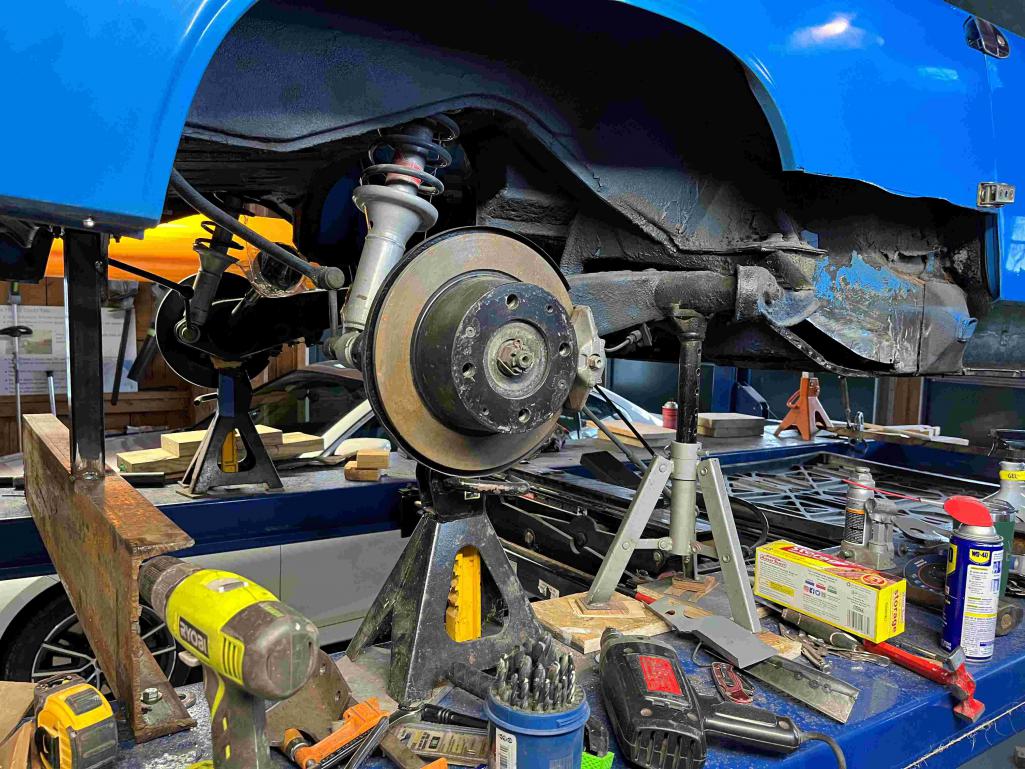 Up front, I moved my bridge jack under the aft lip of the front wheel well and shimmed some blocks into place, making a total of 5 points on support on the RH side. and 3 on the left. 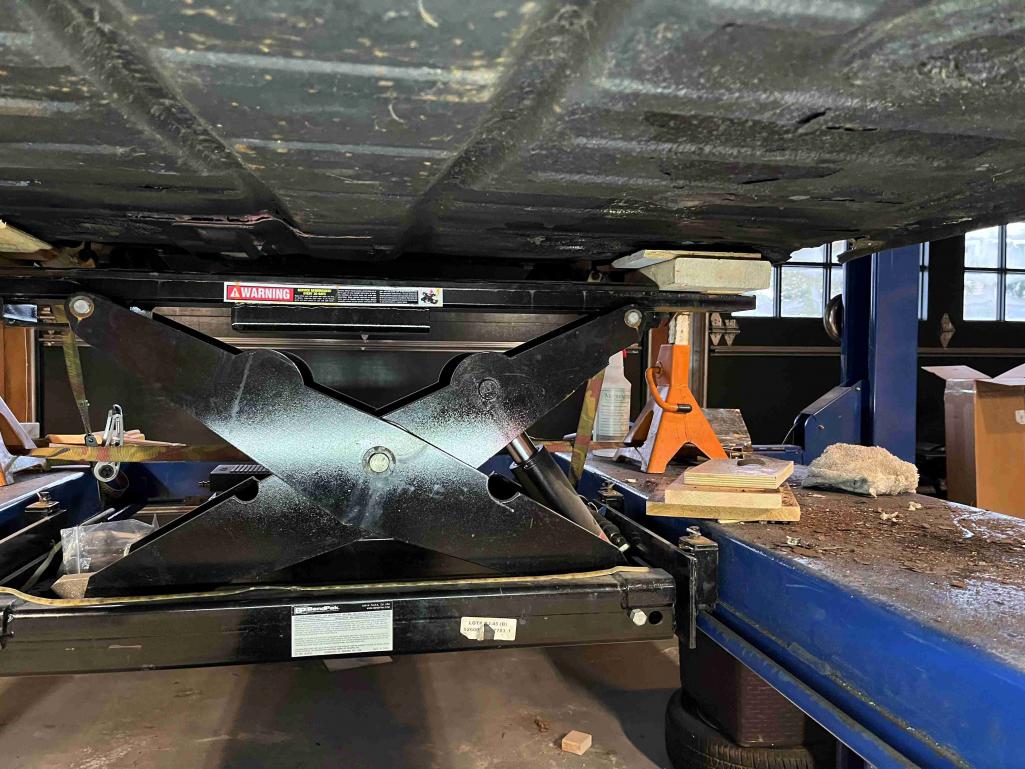 With the chassis stabilized, it was on with the rust surgery. Cut into the front end of outer rocker and lower A post sheet metal. There were more botched repairs up there. 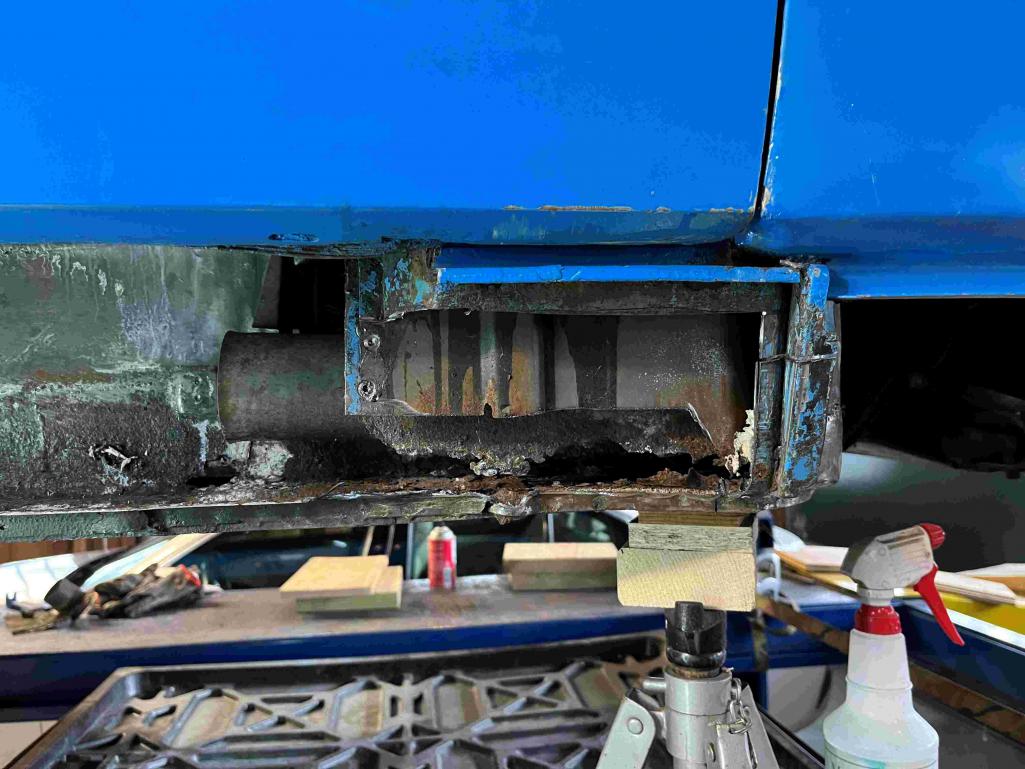 Received the new inner rocker cover from AA. Planning to use the whole thing except up front where it makes more sense to only replace the rotten bottom section. We have a pretty good idea now what we need to fab up for the inner long welded patch to mate with the inner rocker. Tim |
|
|
|
| technicalninja |
Jan 16 2024, 06:44 PM
Post
#24
|
|
Advanced Member Group: Members Posts: 2,531 Joined: 31-January 23 From: Granbury Texas Member No.: 27,135 Region Association: Southwest Region |
Might check out this thread. He's doing it in the dirt!
http://www.914world.com/bbs2/index.php?showtopic=368359 |
|
|
|
| Tim17 |
Jan 17 2024, 05:15 AM
Post
#25
|
|
Member Group: Members Posts: 67 Joined: 3-December 23 From: Newburyport, Massachusetts Member No.: 27,769 Region Association: North East States |
QUOTE(technicalninja @ Jan 16 2024, 07:44 PM) Might check out this thread. He's doing it in the dirt! http://www.914world.com/bbs2/index.php?showtopic=368359 Thanks for the tip, he is doing great work and taking great pictures along the way. Tim |
|
|
|
| hcdmueller |
Jan 17 2024, 05:55 AM
Post
#26
|
|
????????????? Group: Members Posts: 542 Joined: 4-February 06 From: UK Member No.: 5,527 Region Association: England |
Another great thread in the Classic section. Digging into Hell. Worth a look.
http://www.914world.com/bbs2/index.php?showtopic=16748 |
|
|
|
| Tim17 |
Jan 18 2024, 07:06 AM
Post
#27
|
|
Member Group: Members Posts: 67 Joined: 3-December 23 From: Newburyport, Massachusetts Member No.: 27,769 Region Association: North East States |
QUOTE(hcdmueller @ Jan 17 2024, 06:55 AM) Another great thread in the Classic section. Digging into Hell. Worth a look. http://www.914world.com/bbs2/index.php?showtopic=16748 Thanks, there’s a lot of commonality in rust locations, yet some different creative solutions and approaches to fixing it in these different threads. It’s all good in helping me figure out the best thing for my car, skills and equipment. Tim |
|
|
|
| Tim17 |
Jan 24 2024, 04:39 PM
Post
#28
|
|
Member Group: Members Posts: 67 Joined: 3-December 23 From: Newburyport, Massachusetts Member No.: 27,769 Region Association: North East States |
Made some headway on figuring out what needs to be replaced on the right inner long, and how to make the patch panels. The patch panels get bent on the brake to form the lower inboard bend radius. We made a tool to make the joggle for the floor joint and hold the part while we bend the outer flange down at a consistent 70 mm from the inner wall. By adding addition sheet metal strips we could make the deeper joggle for the front section of the long. Used the shrinker to make the curved flange for the forward end.
Once we get the whole straight length of inner long fabricated, will cut it in and butt weld it in place. One this that's fortunate is the the floor flange is in good shape except right in the hell hole area. Rather than drilling out the spot welds, I ground the inner long down until all I had was the floor flange. I'll be able to spot weld that joint without having to do a bunch of repair and grinding, or welding upside down. My air grinder is way too slow, so I looked for more ways to use my Dewalt angle grinder. I found grinder shaft extensions on Amazon that allow me to get in with flap disks and cutoff wheels in places I couldn't get to before. I also found an adapter on Ebay that will attach a 1/4"-20 Roloc arbor to the 5/8"-11 grinder. I don't think I be using my air grinder very much going forward. I'm using a full face shield, gloves and using the side handle on the grinder and it's pretty tame to control. Also cut out an entire section of rotted floor, rotted and previously patched lower forward firewall and jack mount plate. Planning to keep these together while we make up the individual repair pieces. Tim 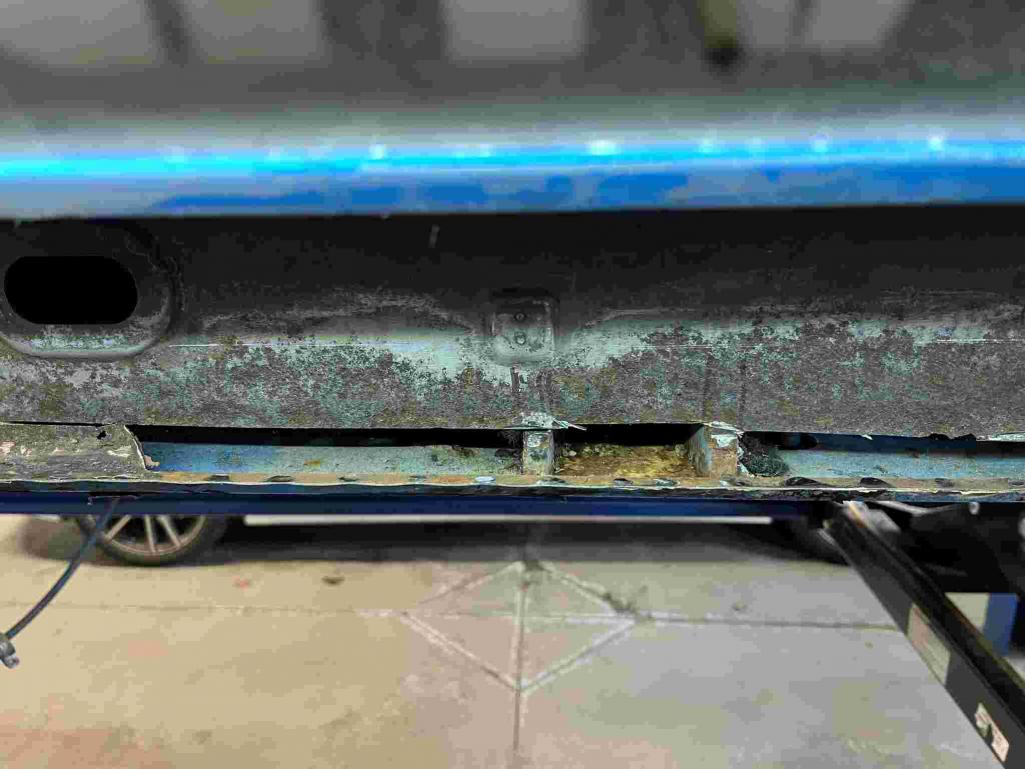 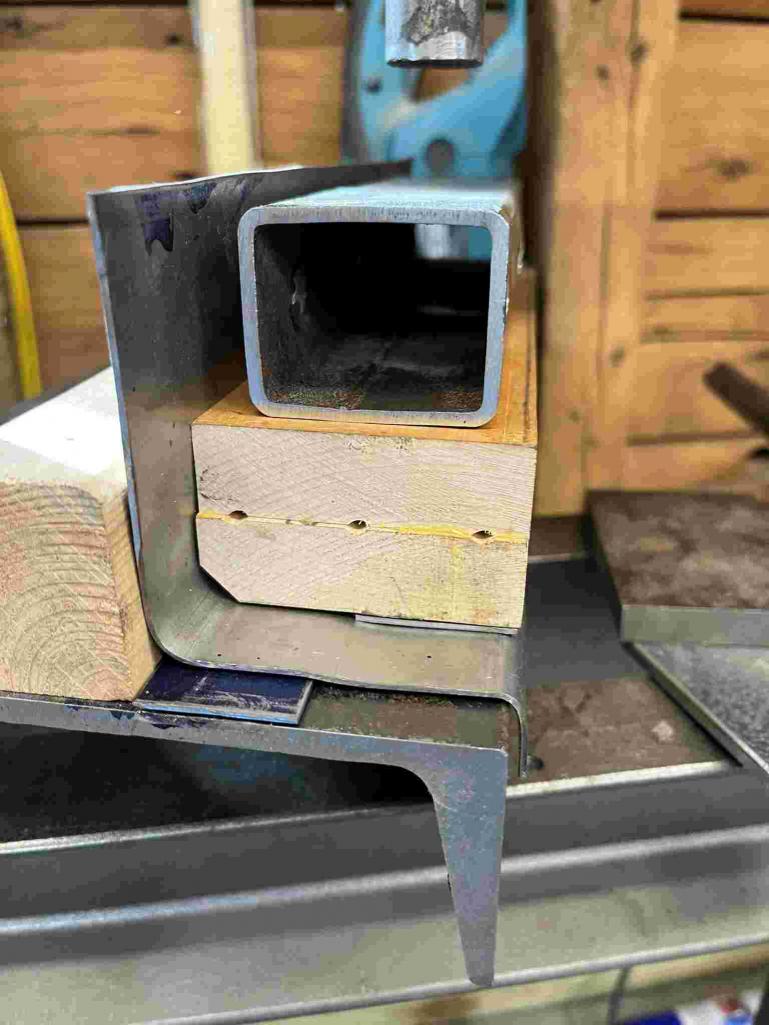 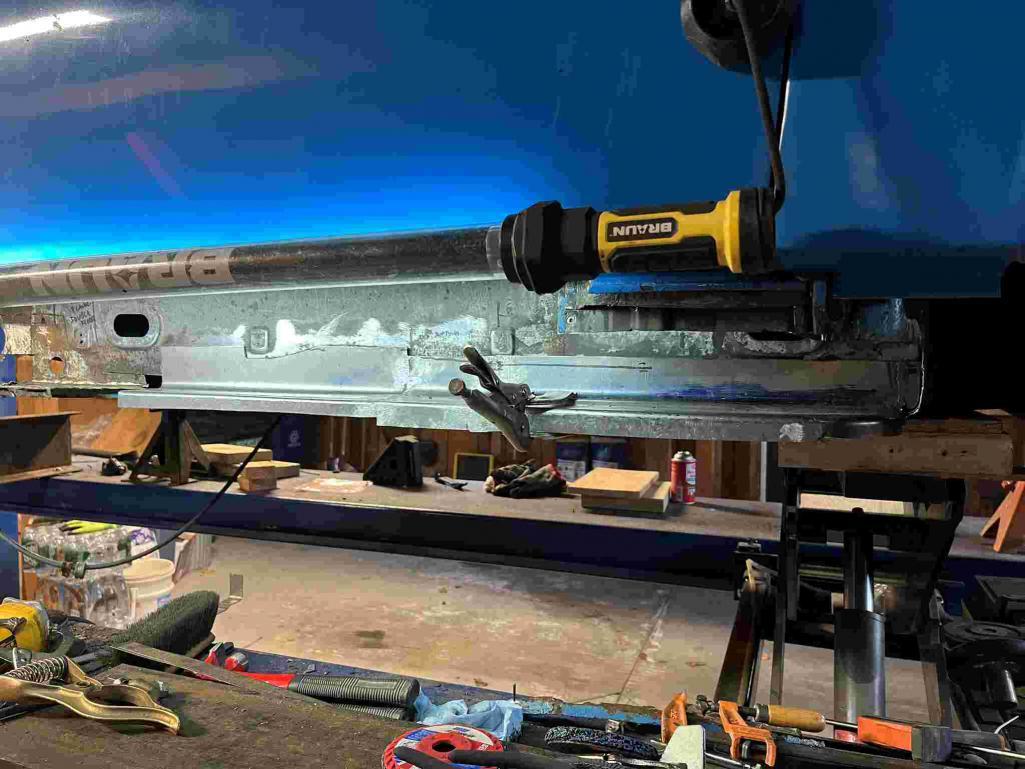 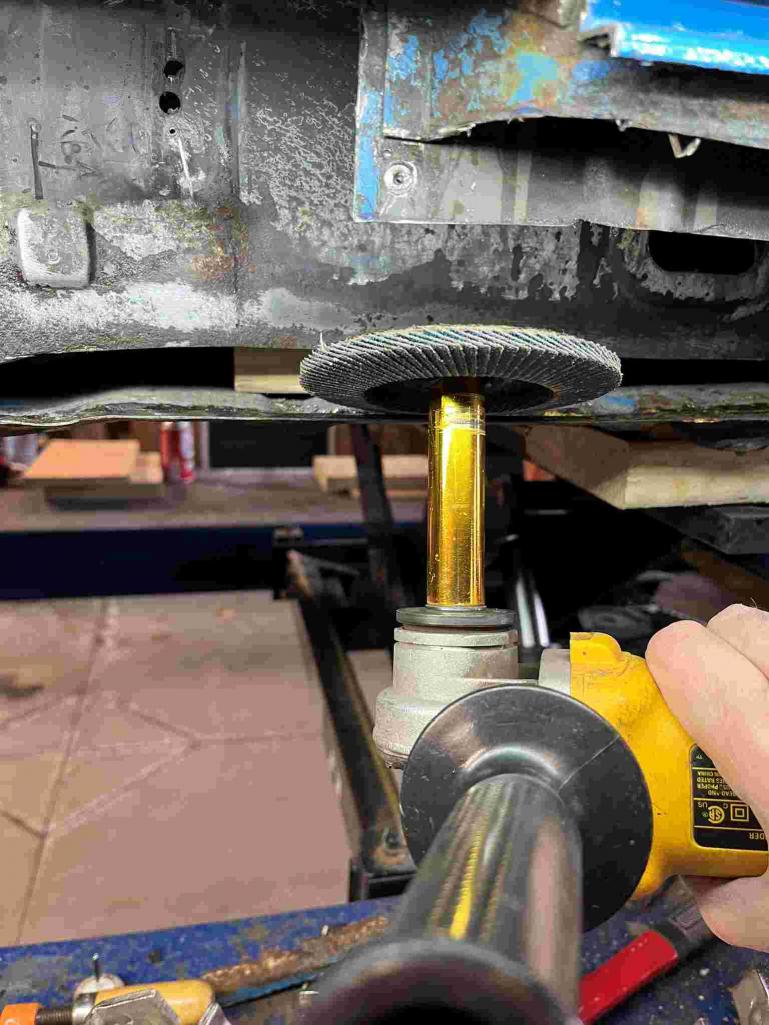 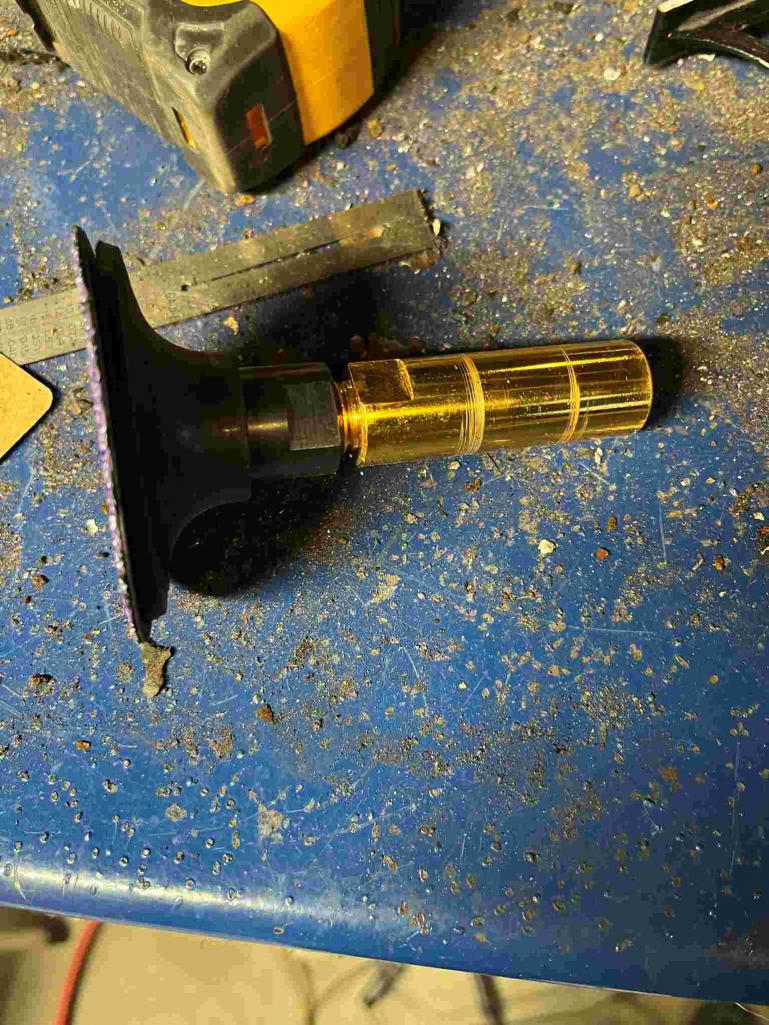 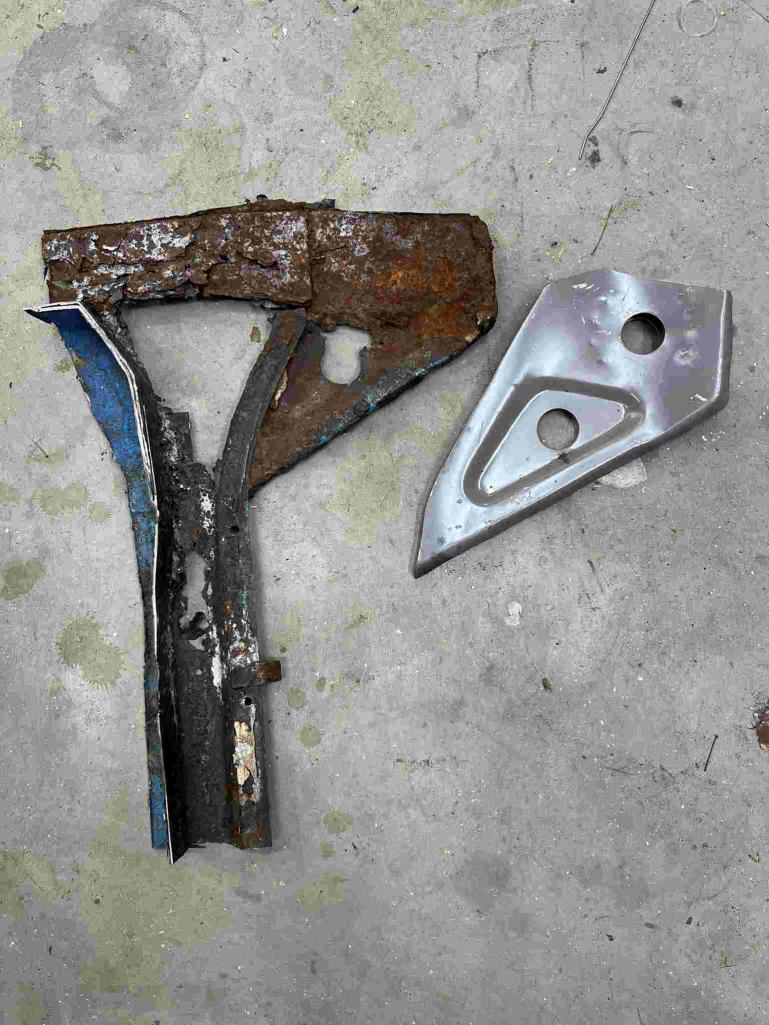 |
|
|
|
| worn |
Jan 24 2024, 06:56 PM
Post
#29
|
|
Winner of the Utah Twisted Joint Award Group: Members Posts: 3,624 Joined: 3-June 11 From: Madison, WI and North Bend WA Member No.: 13,152 Region Association: Upper MidWest |
QUOTE(hcdmueller @ Jan 17 2024, 03:55 AM) Another great thread in the Classic section. Digging into Hell. Worth a look. http://www.914world.com/bbs2/index.php?showtopic=16748 This place has a wealth of information. A picture plus a thousand words can work wonders. Me? I am the world’s worst car buyer. My TR6 required replacement of about half of the sheet metal. Then came the ‘72, with trouble from floor to firewall. Finishing the same old story with the ‘76. The thing is that I bought the cars thinking that each of them was OK. And then they weren’t OK. I couldn’t sell them because I didn’t want to pass the trouble on to someone else. Also, I didn’t want the cars to go to the crusher, before or after being parted out. So, years of welding ensued. I like welding, so maybe that is fine. This week I have been sewing seats to replace the old upholstery. Such fun! |
|
|
|
| Tim17 |
Jan 27 2024, 09:11 AM
Post
#30
|
|
Member Group: Members Posts: 67 Joined: 3-December 23 From: Newburyport, Massachusetts Member No.: 27,769 Region Association: North East States |
QUOTE(worn @ Jan 24 2024, 07:56 PM) QUOTE(hcdmueller @ Jan 17 2024, 03:55 AM) Another great thread in the Classic section. Digging into Hell. Worth a look. http://www.914world.com/bbs2/index.php?showtopic=16748 This place has a wealth of information. A picture plus a thousand words can work wonders. Me? I am the world’s worst car buyer. My TR6 required replacement of about half of the sheet metal. Then came the ‘72, with trouble from floor to firewall. Finishing the same old story with the ‘76. The thing is that I bought the cars thinking that each of them was OK. And then they weren’t OK. I couldn’t sell them because I didn’t want to pass the trouble on to someone else. Also, I didn’t want the cars to go to the crusher, before or after being parted out. So, years of welding ensued. I like welding, so maybe that is fine. This week I have been sewing seats to replace the old upholstery. Such fun! I seem to have a learning disability when I comes to buying cars from the 70’s. I bought a “rust free” 1970 Triumph GT6+ on BAT and ended up replacing a bunch of rusty and bondo repaired panels. I’m hoping this one will move forward faster than that did. Tim |
|
|
|
| Tim17 |
Jan 27 2024, 02:57 PM
Post
#31
|
|
Member Group: Members Posts: 67 Joined: 3-December 23 From: Newburyport, Massachusetts Member No.: 27,769 Region Association: North East States |
Took a shot at using MDF dies in my 12 ton press to form the corner of the floor rotted out under the hell hole. I wasn't sure if the MDF would be strong enough to stretch the metal in the corner, but it worked.
traced the shape onto paper from the section I'd cut out and made MDF and plywood male and female dies. The female die was bolted into threaded holed in a piece of steel. These screws also went though the sheet metal blank and a clamping piece of plywood to try and keep the flange flat. Following pics show the setup and the formed blank. I need to trim off the excess material but the flanges didn't distort. 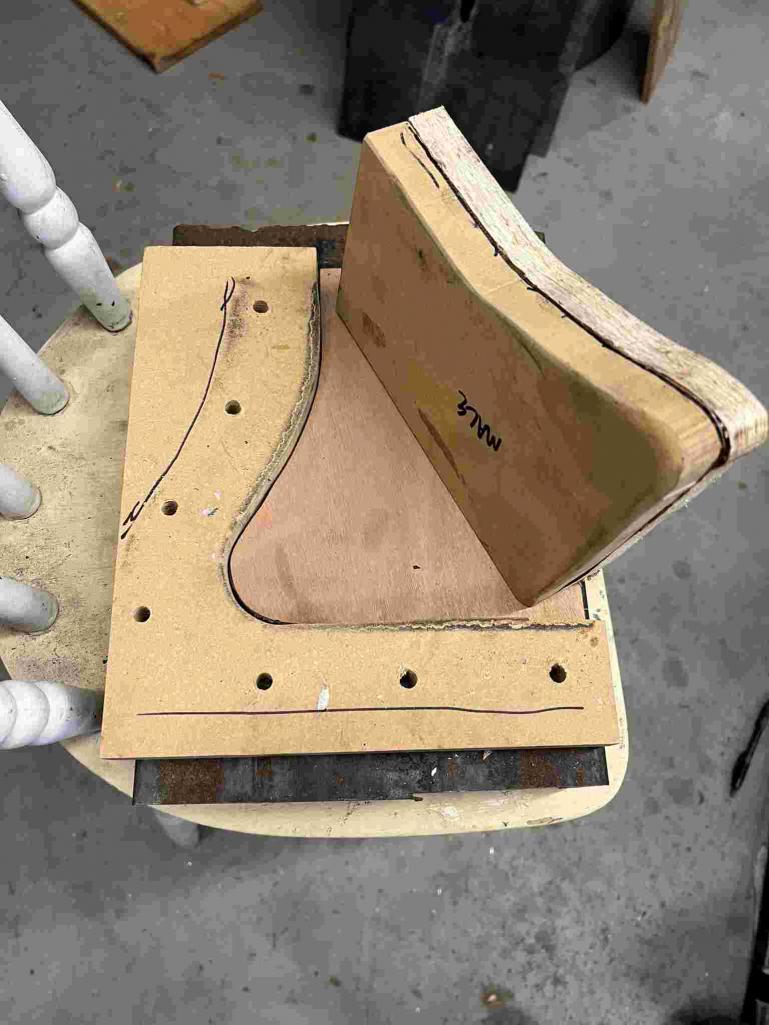 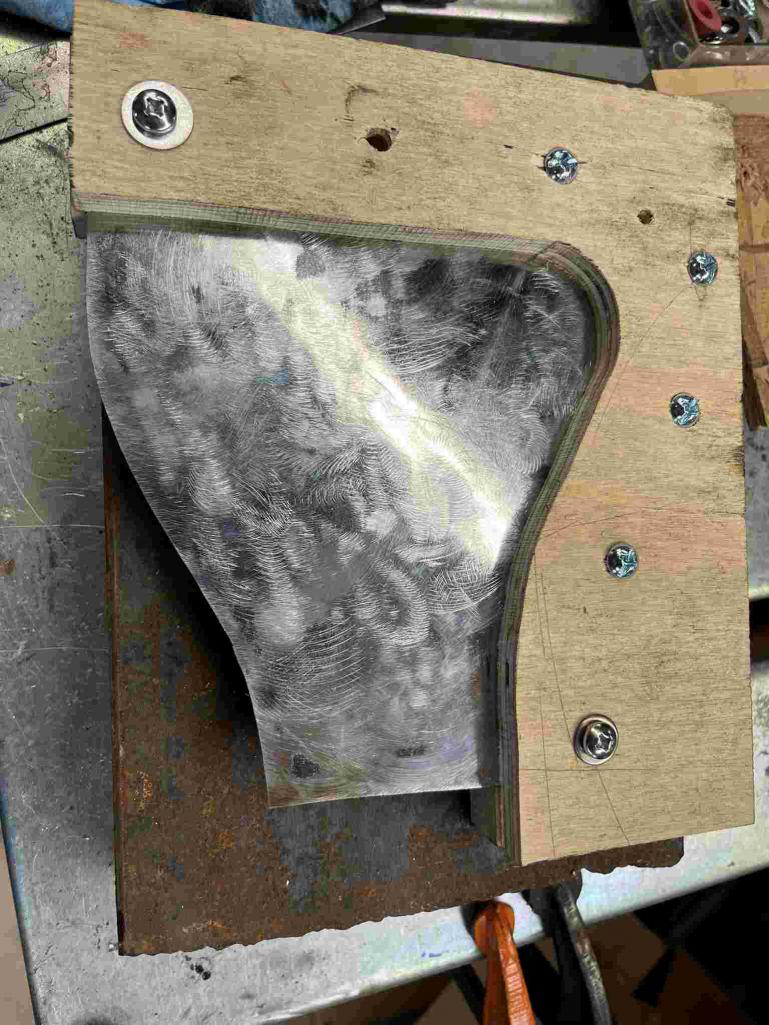 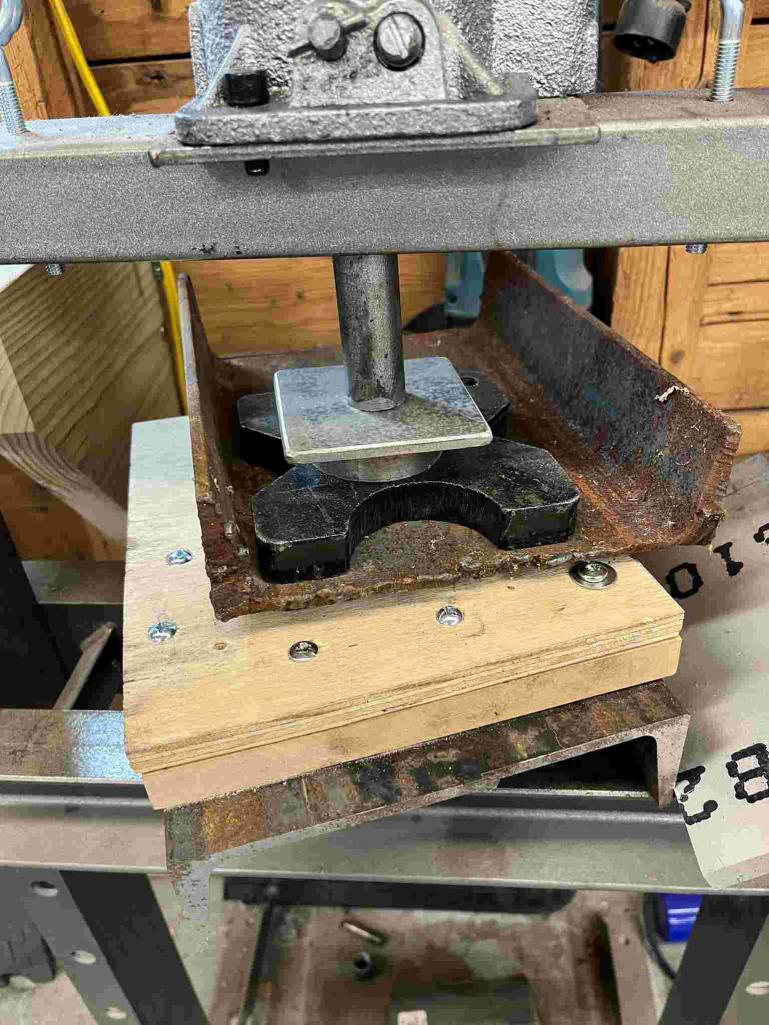 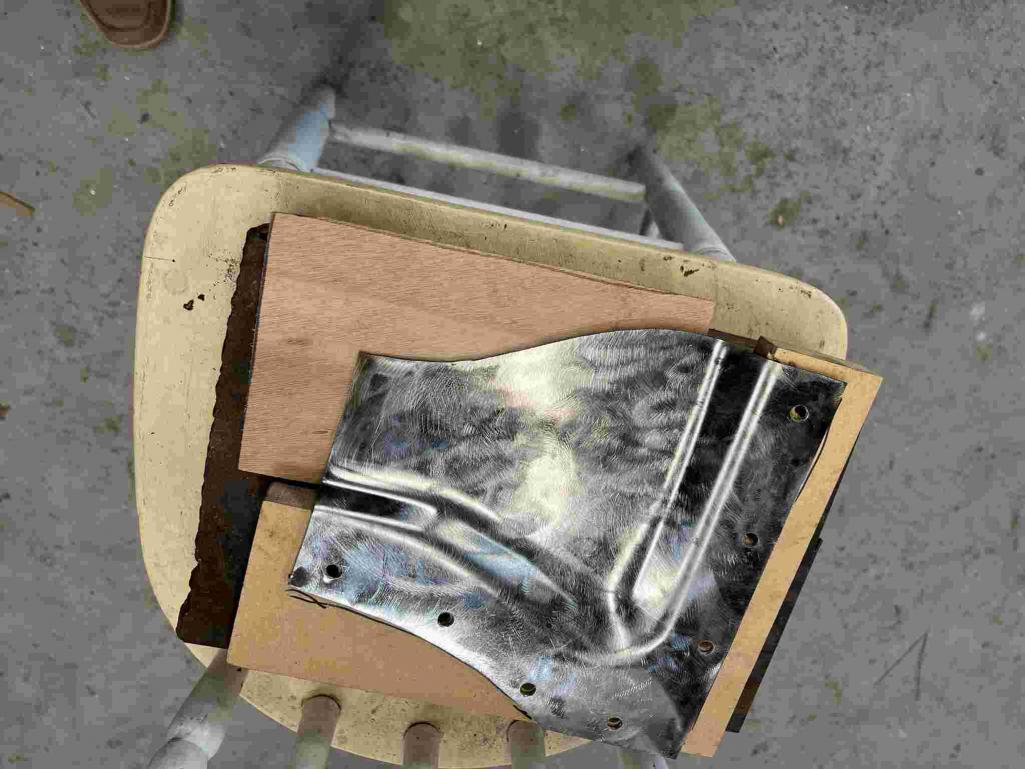 Tim |
|
|
|
| Montreal914 |
Jan 28 2024, 11:00 AM
Post
#32
|
|
Advanced Member Group: Members Posts: 2,167 Joined: 8-August 10 From: Claremont, CA Member No.: 12,023 Region Association: Southern California |
Beautiful work! (IMG:style_emoticons/default/smile.gif)
|
 |
|
| TRS63 |
Jan 30 2024, 02:34 AM
Post
#33
|
|
Member Group: Members Posts: 326 Joined: 14-September 20 From: Germany - Stuttgart Member No.: 24,690 Region Association: Europe |
You're doing a great job, keep at it and soon enough you will have fun in your 914!
Bests Antoine |
|
|
|
| Tim17 |
Jan 30 2024, 06:47 PM
Post
#34
|
|
Member Group: Members Posts: 67 Joined: 3-December 23 From: Newburyport, Massachusetts Member No.: 27,769 Region Association: North East States |
QUOTE(TRS63 @ Jan 30 2024, 03:34 AM) You're doing a great job, keep at it and soon enough you will have fun in your 914! Bests Antoine Thanks, looking forward to driving this machine. Tim |
|
|
|
| Tim17 |
Jan 30 2024, 06:47 PM
Post
#35
|
|
Member Group: Members Posts: 67 Joined: 3-December 23 From: Newburyport, Massachusetts Member No.: 27,769 Region Association: North East States |
QUOTE(Montreal914 @ Jan 28 2024, 12:00 PM) Thanks! Tim |
|
|
|
| Tim17 |
Jan 30 2024, 06:53 PM
Post
#36
|
|
Member Group: Members Posts: 67 Joined: 3-December 23 From: Newburyport, Massachusetts Member No.: 27,769 Region Association: North East States |
Made a milestone today. We’ve been doing part and rust removal from this car since we got it. Today I got to actually weld a new piece on. It was a small but therapeutic milestone.
Welded in the floor patch I had fabricated.  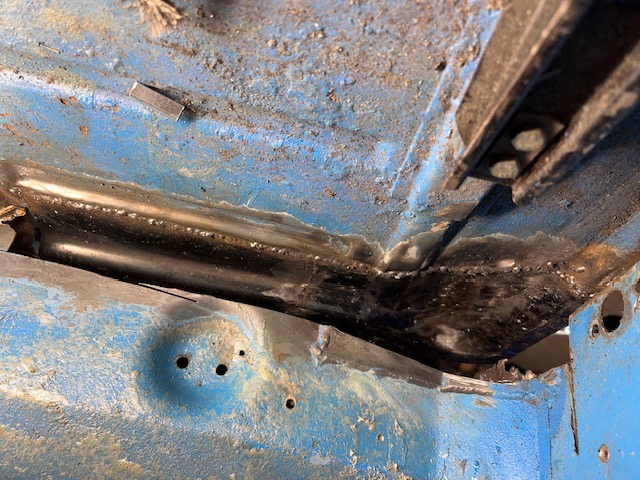 Tim |
|
|
|
| Tim17 |
Feb 1 2024, 03:54 PM
Post
#37
|
|
Member Group: Members Posts: 67 Joined: 3-December 23 From: Newburyport, Massachusetts Member No.: 27,769 Region Association: North East States |
Chris made up a tool for the flanged oblong hole in the inner long. He also made up the aft section and we cut the hole and formed the edge. Scribed and cut the long to get the patch pieces matched up for butt welding.
I was happy with how well his part matched up with the original oblong hole. 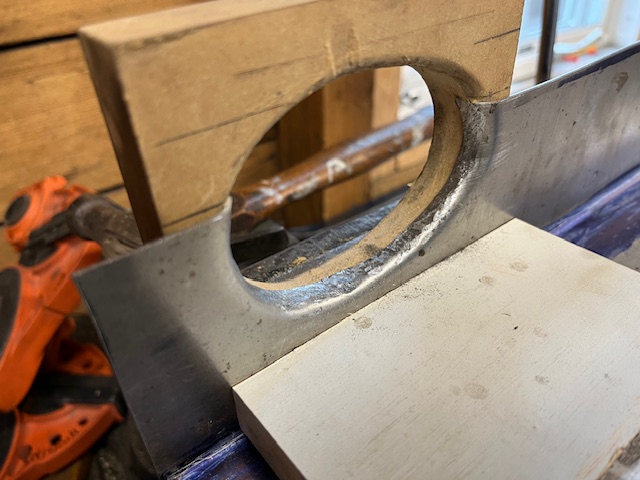 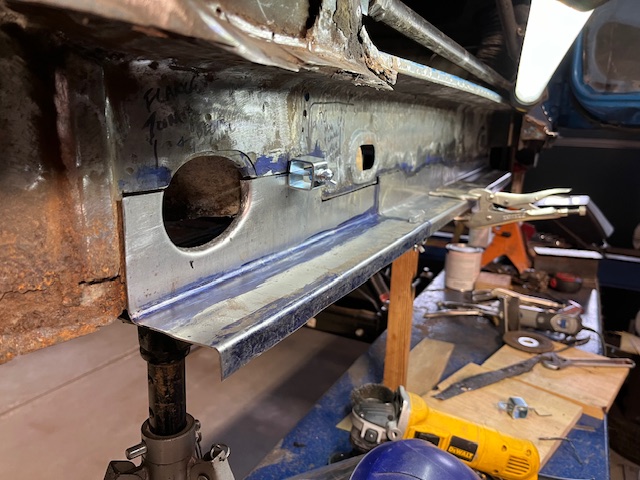 |
|
|
|
| Tim17 |
Feb 25 2024, 04:31 PM
Post
#38
|
|
Member Group: Members Posts: 67 Joined: 3-December 23 From: Newburyport, Massachusetts Member No.: 27,769 Region Association: North East States |
Starting to make some headway putting some structure back into the car. Chris and I have been cutting out bad metal and fabricating the pieces to replace them. Now we’re starting to get them welded back in. The fabrication work is a fun challenge, but it’s really satisfying to get the parts welded in and to feel the ridigity of the structure improving.
Found more rust in near the right front jack point, so needed to form a patch panel with the press. 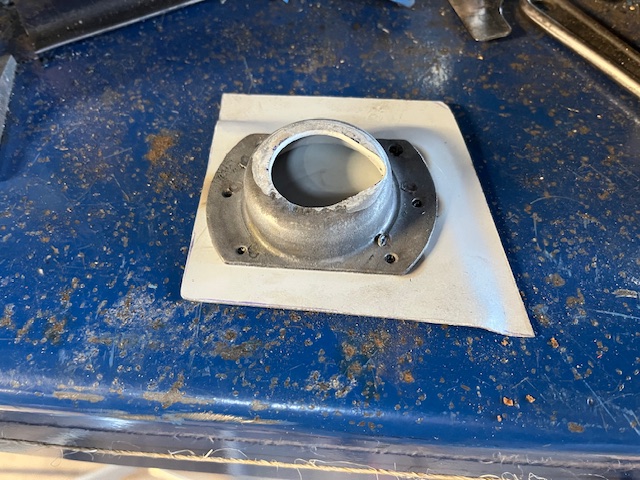 Welded in the interior firewall 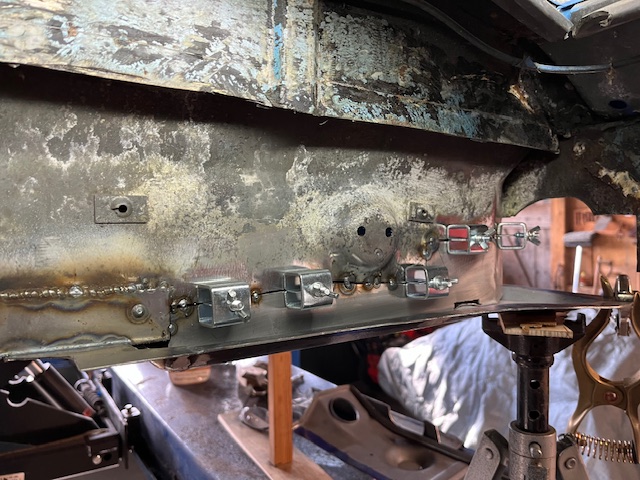 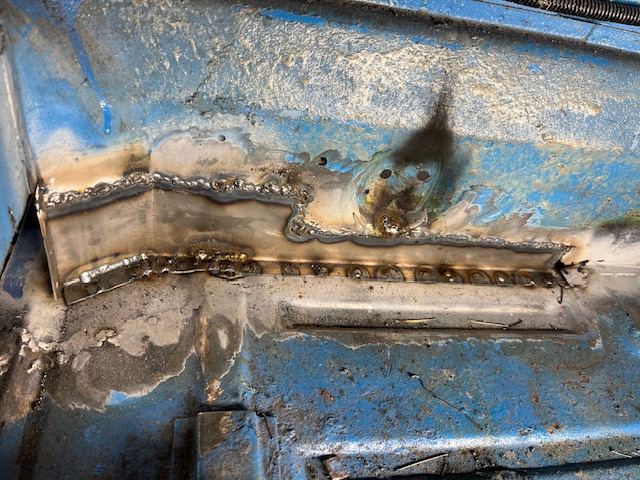 Got the front end of the right side inner long welded in today 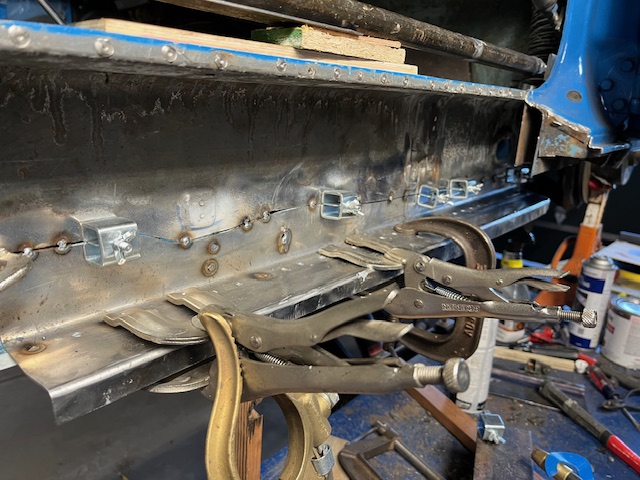 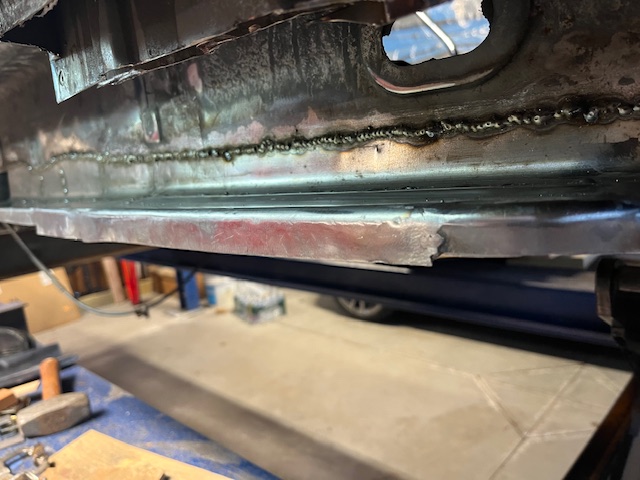 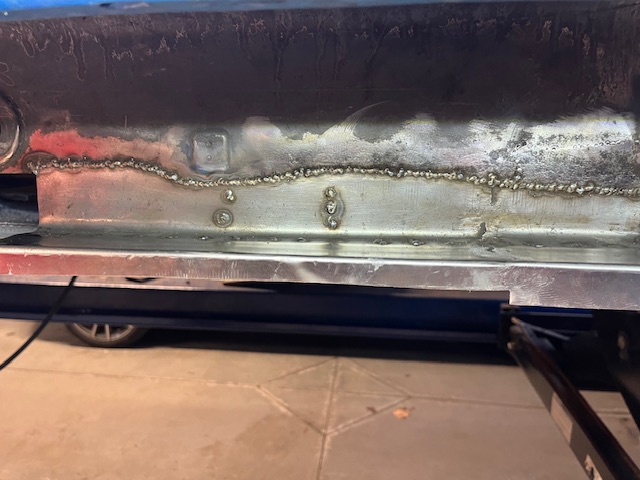 |
|
|
|
| Tim17 |
Mar 5 2024, 04:25 PM
Post
#39
|
|
Member Group: Members Posts: 67 Joined: 3-December 23 From: Newburyport, Massachusetts Member No.: 27,769 Region Association: North East States |
So it’s been 2 months since we started working on repairing the firewall. When we opened it up, we got a 914 awakening that so many people on this forum have been through.
Thank goodness for all you folks on 914 World laying out a roadmap for fixing this. Well, two months later we fixed enough other stuff that I could weld in the firewall patch panel. Definitely advanced my metal fabrication and forming skills on this car. I’m a better welder that I was, but still need to get better. It feels like an accomplishment, but there’s still a long road ahead. 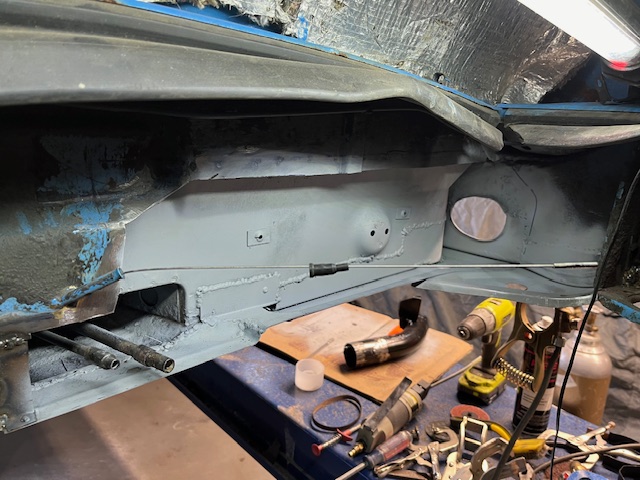 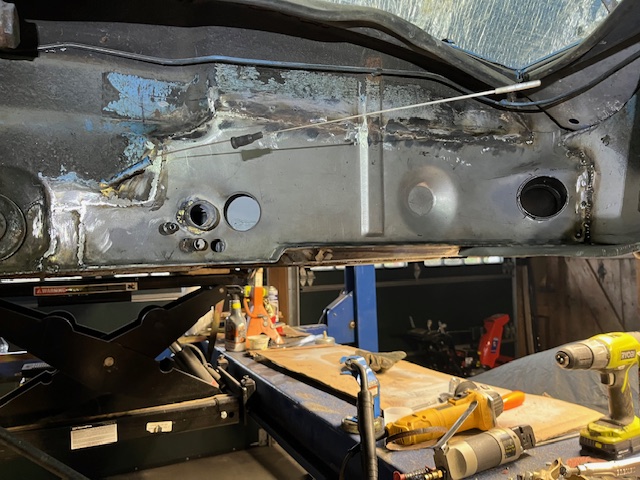 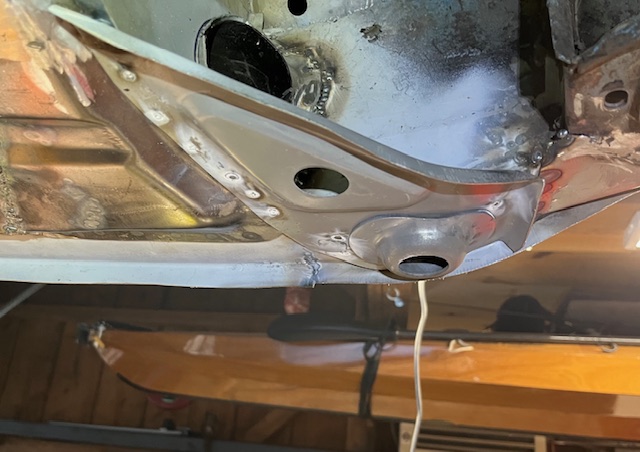 |
|
|
|
| friethmiller |
Mar 5 2024, 04:34 PM
Post
#40
|
|
Senior Member Group: Members Posts: 1,387 Joined: 10-February 19 From: Austin, TX Member No.: 22,863 Region Association: Southwest Region |
(IMG:style_emoticons/default/drunk.gif) Looking good! Keep up the great work!
|
|
|
|
|
1 User(s) are reading this topic (1 Guests and 0 Anonymous Users)
0 Members:

|
Lo-Fi Version | Time is now: 15th July 2026 - 08:40 AM |
Invision Power Board
v9.1.4 © 2026 IPS, Inc.