|
|

|
Porsche, and the Porsche crest are registered trademarks of Dr. Ing. h.c. F. Porsche AG.
This site is not affiliated with Porsche in any way. Its only purpose is to provide an online forum for car enthusiasts. All other trademarks are property of their respective owners. |
|
|
  |
| VaccaRabite |
 Mar 8 2024, 12:25 PM Mar 8 2024, 12:25 PM
Post
#41
|
|
En Garde!           Group: Admin Posts: 13,821 Joined: 15-December 03 From: Dallastown, PA Member No.: 1,435 Region Association: MidAtlantic Region 
|
I'd say that if you got 60cc measuring with your little syringe and your machinist got 60cc, then 60cc is probably right. Move to the next task. :-)
Pay attention to @cgnj 's post. You will need the stroker tubes and you will need to make your own pushrods. You will likely need shims between the rockers and the heads. EMS sells the shims. In the dark ages I just used a washer as a spacer too though. I did measure the thickness of the washers though so I could get them the same size. When you use the the spacers you may need to shorten the adjuster stem a tad or it will tap against the valve cover and scare the bejesus out of you! Zach |
| vjb206 |
 Mar 8 2024, 04:11 PM Mar 8 2024, 04:11 PM
Post
#42
|
|
Newbie  Group: Members Posts: 32 Joined: 23-December 19 From: New Jersey Member No.: 23,760 Region Association: North East States |
I honestly never thought about the pushrod tube length. Great call-out to start to prep for that step (not there yet). Thank you.
Where can I obtain a set for my specific additional length (either 0.14 or 0.15)? Re: all the valvetrain stuff: I am going to follow Ian Karr's pushrod and valvetrain geometry guidance. To that end, I contacted Tabari and am investigating all that needs to happen to go from my stock 1.7 set-up, to what I need. |
| vjb206 |
 Mar 8 2024, 04:11 PM Mar 8 2024, 04:11 PM
Post
#43
|
|
Newbie  Group: Members Posts: 32 Joined: 23-December 19 From: New Jersey Member No.: 23,760 Region Association: North East States |
@vjb206 I used a .140 shim. No head gasket. I lapped the cylinders to the head. Rods were machined as described in #5 in attached Tech Bulletin. I used Manton CrMo pushrods. Buy n extra pushrod and make your own adjustable push rod. The tips on the adjustable push rod that I used were not the same and caused measurement error. It is possible to stack washers in the pushrod tube bore to space out stock pushrods. EMS sells stroker tubes. EMS? Link me? |
| GBX0073 |
 Mar 10 2024, 12:14 AM Mar 10 2024, 12:14 AM
Post
#44
|
|
Member   Group: Members Posts: 179 Joined: 21-December 20 From: Illinois Member No.: 25,007 Region Association: Upper MidWest 
|
Rubber bands were mentioned found this picture to add
Attached thumbnail(s) 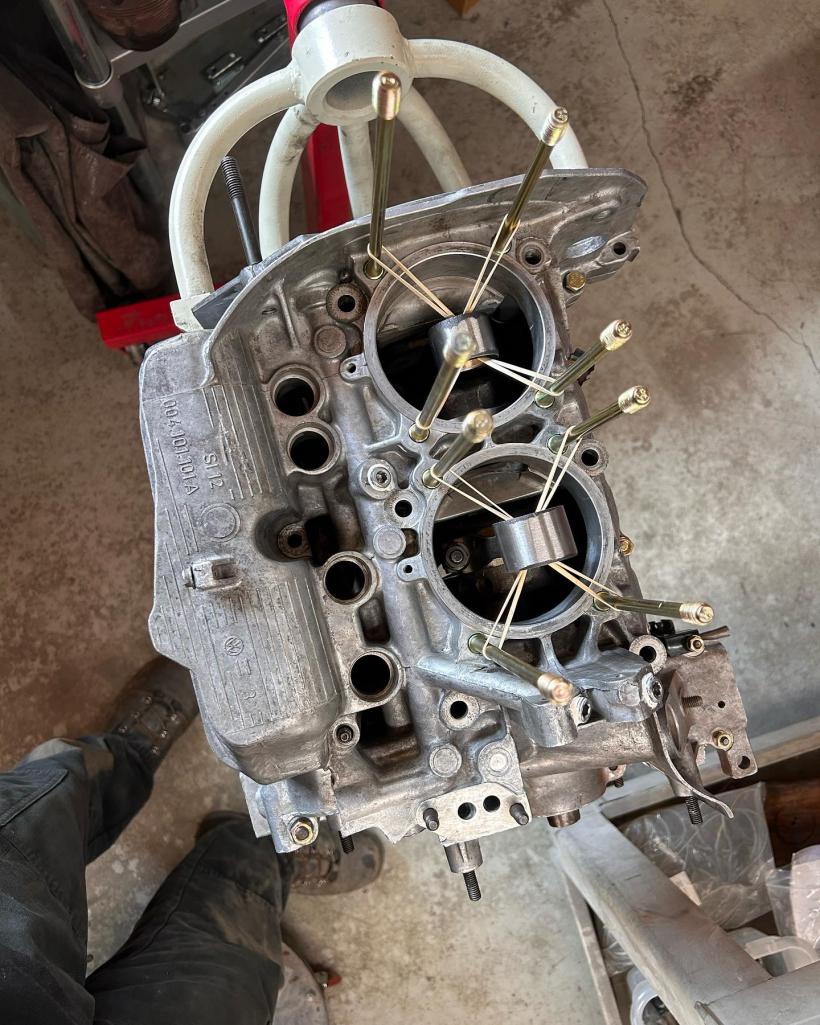
|
| technicalninja |
 Mar 10 2024, 12:26 PM Mar 10 2024, 12:26 PM
Post
#45
|
|
Advanced Member     Group: Members Posts: 2,531 Joined: 31-January 23 From: Granbury Texas Member No.: 27,135 Region Association: Southwest Region 
|
@vjb206 I used a .140 shim. No head gasket. I lapped the cylinders to the head. Rods were machined as described in #5 in attached Tech Bulletin. I used Manton CrMo pushrods. Buy n extra pushrod and make your own adjustable push rod. The tips on the adjustable push rod that I used were not the same and caused measurement error. It is possible to stack washers in the pushrod tube bore to space out stock pushrods. EMS sells stroker tubes. EMS? Link me? If you haven't figured it out yet. https://www.europeanmotorworks.com/vw/type-4-engine-parts This list is really good as well. Stickyed at the top of the "garage" page. http://www.914world.com/bbs2/index.php?showtopic=361087 I LIKE the rubber band idea! Best "rod holder" I've seen yet... |
| vjb206 |
 Mar 18 2024, 06:35 PM Mar 18 2024, 06:35 PM
Post
#46
|
|
Newbie  Group: Members Posts: 32 Joined: 23-December 19 From: New Jersey Member No.: 23,760 Region Association: North East States |
|
| vjb206 |
 Mar 18 2024, 06:36 PM Mar 18 2024, 06:36 PM
Post
#47
|
|
Newbie  Group: Members Posts: 32 Joined: 23-December 19 From: New Jersey Member No.: 23,760 Region Association: North East States |
@vjb206 I used a .140 shim. No head gasket. I lapped the cylinders to the head. Rods were machined as described in #5 in attached Tech Bulletin. I used Manton CrMo pushrods. Buy n extra pushrod and make your own adjustable push rod. The tips on the adjustable push rod that I used were not the same and caused measurement error. It is possible to stack washers in the pushrod tube bore to space out stock pushrods. EMS sells stroker tubes. EMS? Link me? If you haven't figured it out yet. https://www.europeanmotorworks.com/vw/type-4-engine-parts This list is really good as well. Stickyed at the top of the "garage" page. http://www.914world.com/bbs2/index.php?showtopic=361087 I LIKE the rubber band idea! Best "rod holder" I've seen yet... Yes! thank you! |
| vjb206 |
 Mar 18 2024, 06:40 PM Mar 18 2024, 06:40 PM
Post
#48
|
|
Newbie  Group: Members Posts: 32 Joined: 23-December 19 From: New Jersey Member No.: 23,760 Region Association: North East States |
Proper quench distance is far more important than staying under a specific compression ratio number. You take an engine with no quench that requires 93 and INCREASE the compression ration by decking the block (adjusting shim size on a T4) to achieve optimal quench and the engine can now run regular without detonation. The really wild thing is the higher compression engine will also require 5-7 degrees LESS timing to achieve MBT. MBT stands for Mean Best Torque and is how a steady state dyno tunes. You continue to add timing (at a specific rpm) until either the engine detonates (detonated limited timing) or you see no further increases in torque for additional timing. Also, your compression ratio is low enough already that a decrease of 1-2cc in compressed volume is only worth .1-.2 increase in compression. IE you end up with a 9.0 or 9.1 engine instead of an 8.9... Do some reading involving "quench". IMO it's the MOST important clearance to get right. Getting this wrong can be worth 10% less power and a requirement for higher octane fuel. For a customer job on a sub 4" bore with decent rods (h-beams) and forged pistons I want to hit .045. On my personal stuff I might go a tiny bit tighter. I'd run as tight as .041-.042. This clearance must be verified for all cylinders and the tightest used as the reference point for shim selection. Just noticed the baby syringe in the video. A real burette is far more accurate! I use a cow syringe in a pinch. They are really handy for chambers at or under 60cc as the cattle syringe is a 60cc unit. The cow syringe is also not as accurate as a burette but getting the measurement in a single syringe load helps accuracy and if you use the same syringe for each cylinder measurement you will be fairly balanced between cylinders when you are finished. What cam will you be using? Induction? Exhaust? This is REALLY REALLY valuable. Thank you for adding this. FYI I'm running a WebCam #163/86b and carbs. Exhaust I'm still working out. Finances may require me to re-use my existing exhaust. The dream is the Tangerine Racing w/ heater; but $$$$$ ¯\_(ツ)_/¯ |
| vjb206 |
 Mar 19 2024, 08:18 AM Mar 19 2024, 08:18 AM
Post
#49
|
|
Newbie  Group: Members Posts: 32 Joined: 23-December 19 From: New Jersey Member No.: 23,760 Region Association: North East States |
Just to close the loop here, I ordered a few shims just to start measuring with a non-proud deck-height and am taking more measurements around different areas of the piston.
(IMG:http://www.914world.com/bbs2/uploads_offsite/media.giphy.com-23760-1710857910.1.gif) Right now with a .150 shim I have .064-.068 deck height depending on where on the piston I measure. A few folks have guided me towards a .045 deck height as optimal for quench ( @cgnj , @technicalninja , etc.) so I'll need to wait for 0.13 shims to come in. Then I'll find time and do this for each I guess since I've been told I can't assume all cylinders will be equal. Lots of measuring and trial-and-erroring until I get as close to .045 as possible; taking as many readings as possible from various points along the surface of the piston. The 2270 recipe I'm following calls for 9.5:1 with 93 octane (which we have here in NJ), so I'll be a little under with an estimated CR of 9.2 (averaging out my various readings along the surface of the piston). I was originally thinking 9.0:1 "just to be safe," but I do realize now that's not the way to approach this. Thanks again for all of your help! |
| technicalninja |
 Mar 19 2024, 08:46 AM Mar 19 2024, 08:46 AM
Post
#50
|
|
Advanced Member     Group: Members Posts: 2,531 Joined: 31-January 23 From: Granbury Texas Member No.: 27,135 Region Association: Southwest Region 
|
I'd run 9.5-10 on that cam.
It's a good street cam for that engine (with the proper heads). cgnj is running that same cam on 10.3! AS long as he doesn't detonate that will be STRONG in the mid range. Too small a cam for compression makes more torque down low. At 9.0-1 that cam will be opposite for you. Screamer up top and less meat down low. Yours will be less prone to detonate than cgnj's IMO. It's all about dynamic compression, your engine at 9.0 versus his engine at 10.3 static will have a different dynamic compression ratio. His will be 2 whole points higher than yours with the same cam. I want to run AS MUCH dynamic compression as I can WITHOUT detonation! His engine may be iffy on 93, yours should work fine! I am VERY interested in how cgnj's set up works for him. The way he's going is the way I want too... |
| technicalninja |
 Mar 19 2024, 09:31 AM Mar 19 2024, 09:31 AM
Post
#51
|
|
Advanced Member     Group: Members Posts: 2,531 Joined: 31-January 23 From: Granbury Texas Member No.: 27,135 Region Association: Southwest Region 
|
Watch for evidence of exhaust back pressure if you re-use an SSI exhaust system.
At high load (when the restriction is the greatest) a restrictive exhaust will HOLD the heat in and this is a killer thing on an engine that is cooling system weak like the T4. I'm not sure what the back pressure limit is on an air cooled T4. Performance water pumper needs less than 1/2 a psi. Normal appliance car needs less than 2 psi. Water pumpers get noticeable weak at high load at 5 psi. I'm guessing an air-cooled will be MORE critical regarding back pressure than a water-cooled. You can plumb an old school fuel pressure gauge into the exhaust with a long piece of stainless tubing before the vacuum tubing as a heat sink. Never run this un-connected. The trapped air bubble keeps 1000-degree exhaust gasses away from your gauge. |
| burton73 |
 Mar 19 2024, 10:37 AM Mar 19 2024, 10:37 AM
Post
#52
|
|
Senior member, and old dude     Group: Members Posts: 3,925 Joined: 2-January 07 From: Los Angeles Member No.: 7,414 Region Association: Southern California 
|
Here is a picture of Marks 2270 RAT built 2005 Engen built by Jake in 2005
Note the shims and there was a thin coper head gasket. This bad boy spun a bearing and had a knock. George at EMS helped us with all machining parts and advice. We even took the Eng over to EMS to test fire it up on a pallet. Then EMS sent it over to PMB for the install in my old Blue 74 The pistons are KB and they are flat tops. I believe the pistons are used for Harley Davidsons. Note the positions of the wrist pins. Cylinder light hone and new rings. Rebuilt the HAM RAT heads all the parts came from EMS Note the oil tray with the RAT Jake touch. Jakes CD/DVD covered a lot, but it took advice from EMS as well as video review of Ian Karrs Utube and all the ones on Utube to just CK . Had to look at them over and over Jakes Vid helps but a person will still have a lot of questions. This is the video of Marks Start up. Frist time Vid of Marks 2170 RAT rebuild 1st startup https://youtu.be/gxArcFBDGGQ Best Bob B 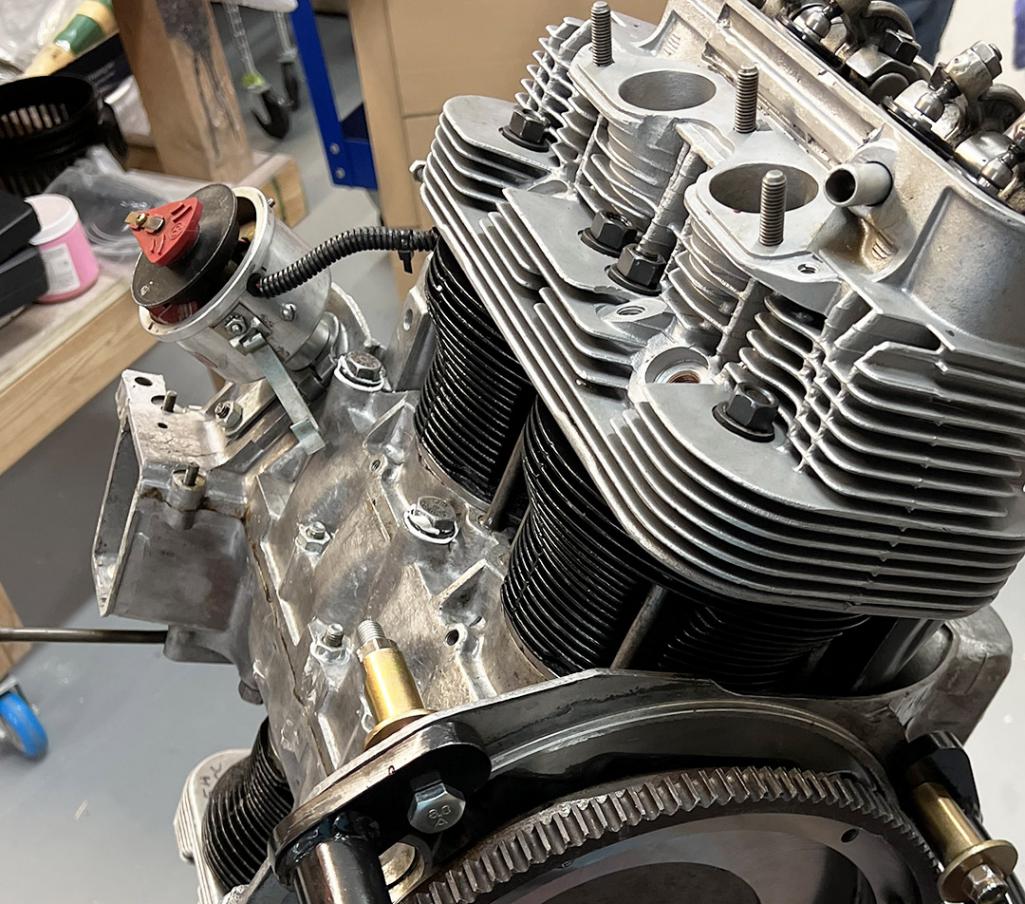 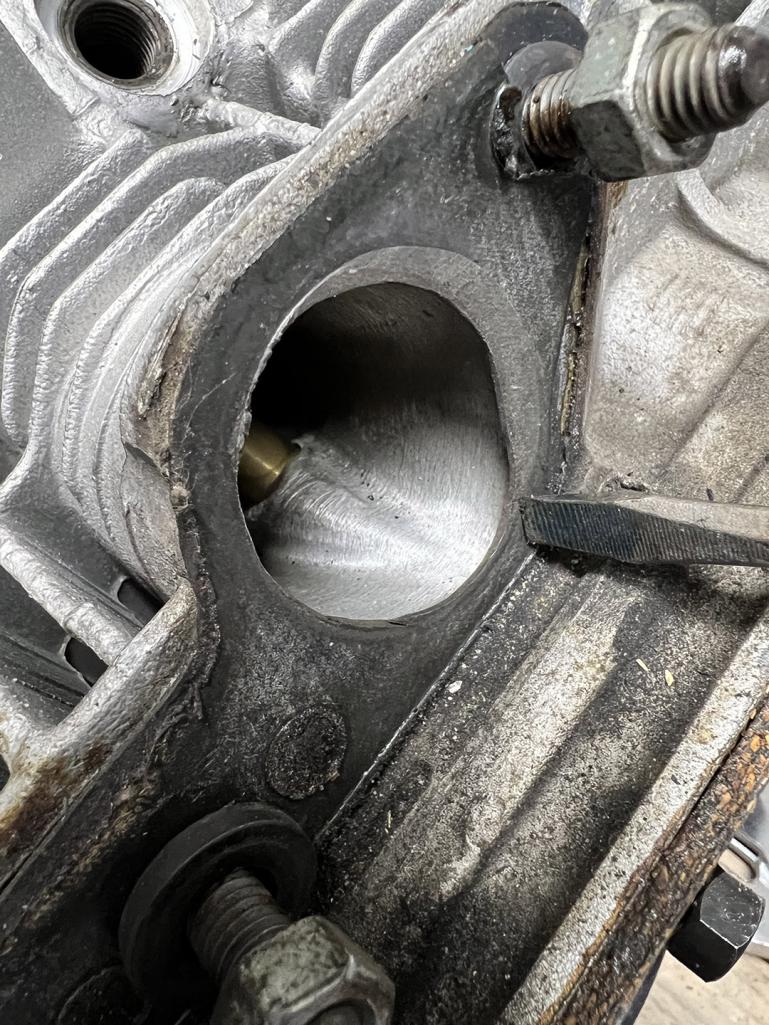 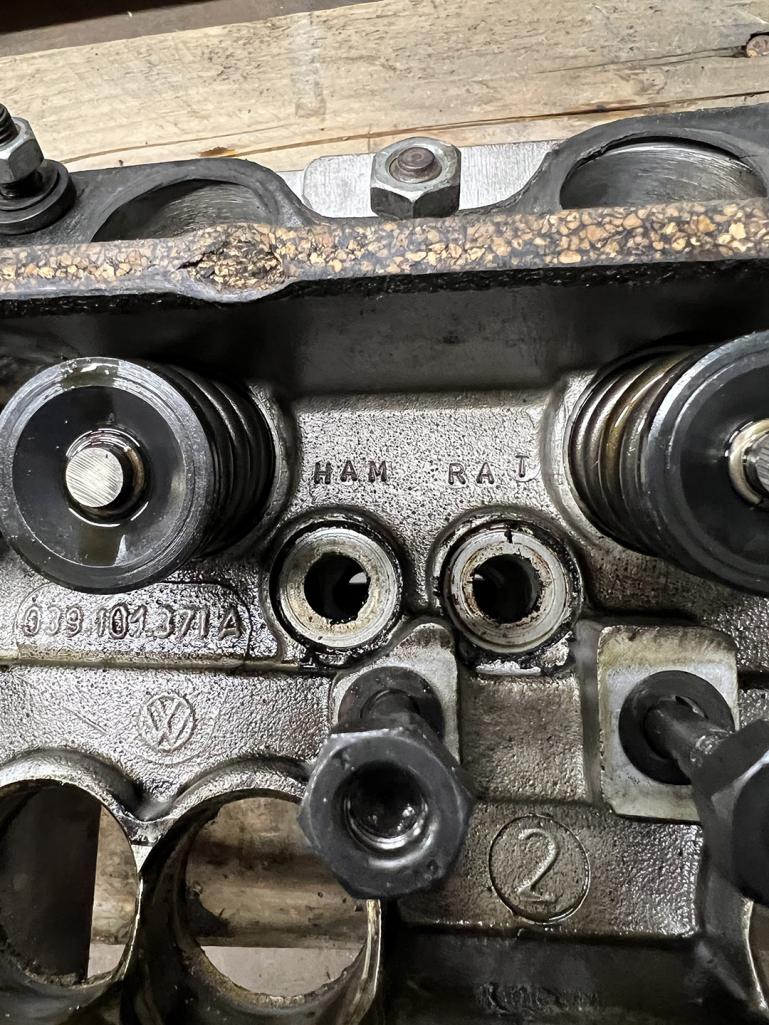 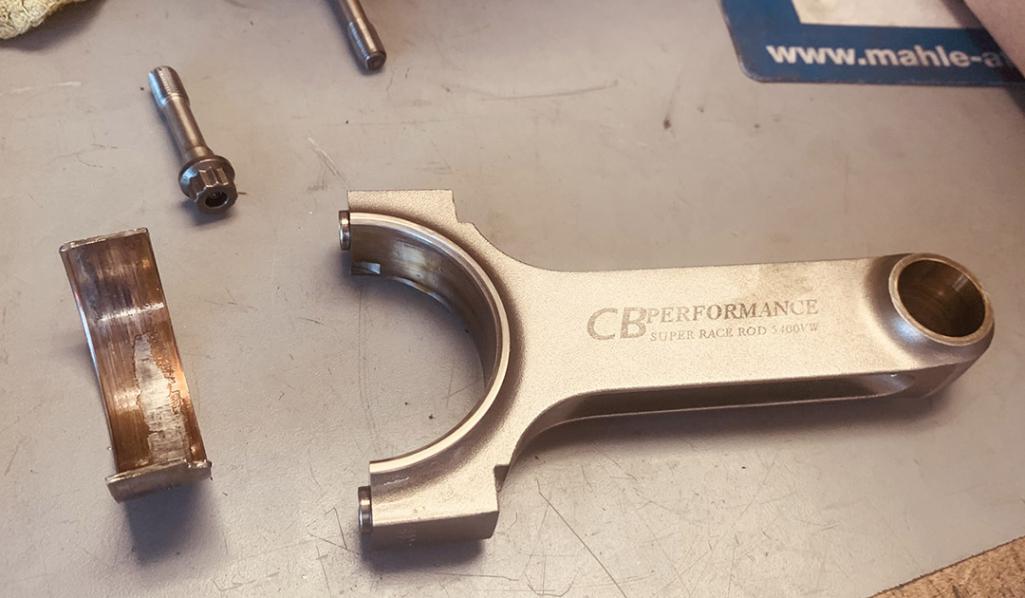 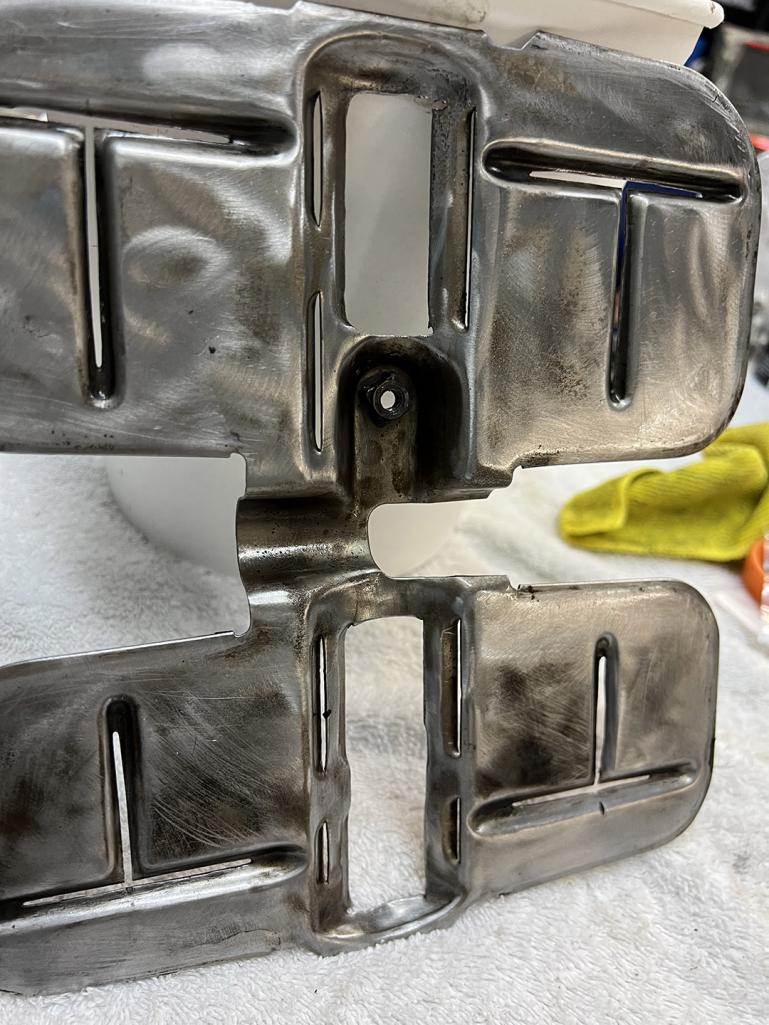 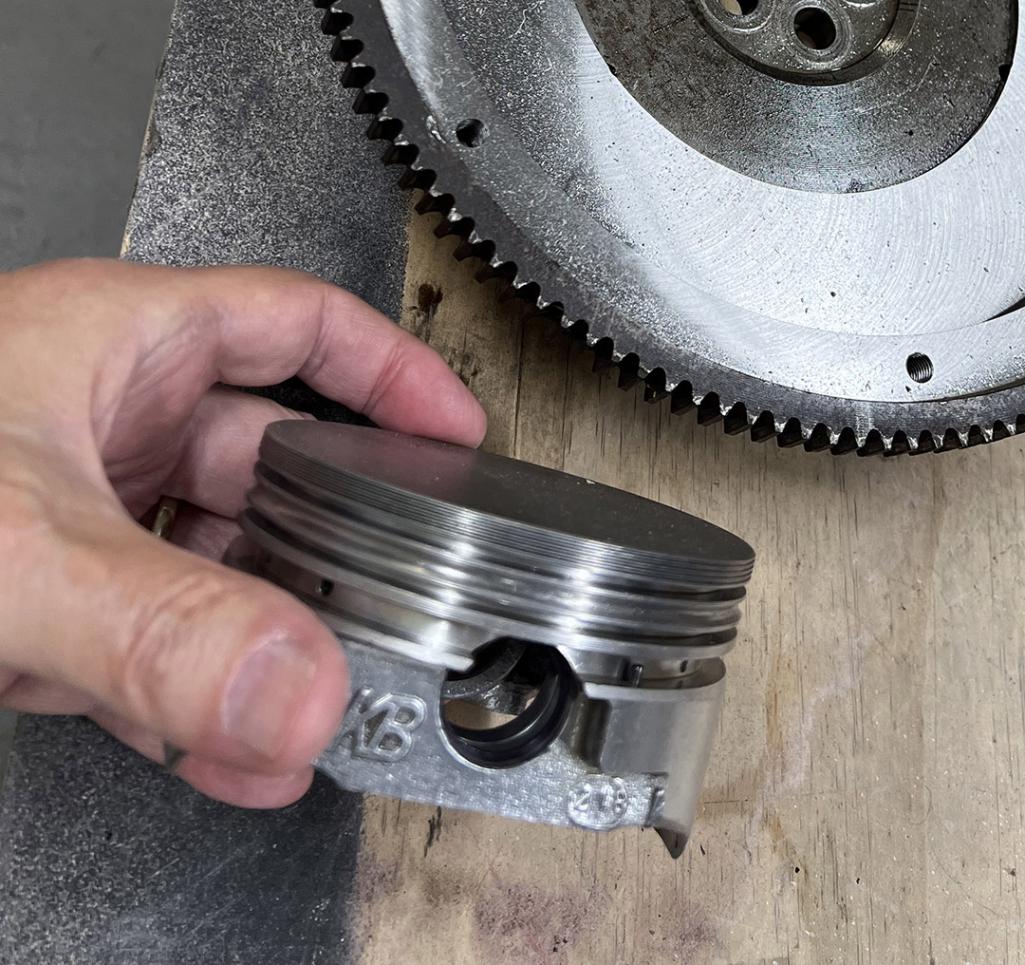 |
| cgnj |
 Mar 19 2024, 11:02 AM Mar 19 2024, 11:02 AM
Post
#53
|
|
Senior Member    Group: Members Posts: 698 Joined: 6-March 03 From: Medford, NJ Member No.: 403 Region Association: None 
|
@vjb206 Based on your measurements, I think your rods are 5.325. Your going to end up with a .140 shim. I don't think it is going to be worth the effort and expense to source a custom ground shim. It would be interesting to compare the sealing surface measurements of your cylinders to my honed OEM cylinders. I have a set of cylinders from EMW that I purchased when he was getting them made in Mexico. They are the same subject to my measurement tools and skill using them.
I see a valve pocket. Are those JE pistons? Mine are flat top. Did you measure the volume and add it into your chamber volume? @Tom Perso used KB pistons and ran 9.5:1. I believe he used 163/86b also. He kept me in the game when these were mystery motors. See his comments on this necro threaddark age 2270 build @technicalninja I rode my 2270 hard and put it away wet for 20 years. I leaked it down before I took it apart. It was around 96%. No signs of detonation. I had to replace bearings because of a self-induced bench stand running issue. Now you're going to have me looking for a knock sensor solution. |
| burton73 |
 Mar 19 2024, 11:58 AM Mar 19 2024, 11:58 AM
Post
#54
|
|
Senior member, and old dude     Group: Members Posts: 3,925 Joined: 2-January 07 From: Los Angeles Member No.: 7,414 Region Association: Southern California 
|
Mark to show shim on the RAT rebuild 2270
Bob B 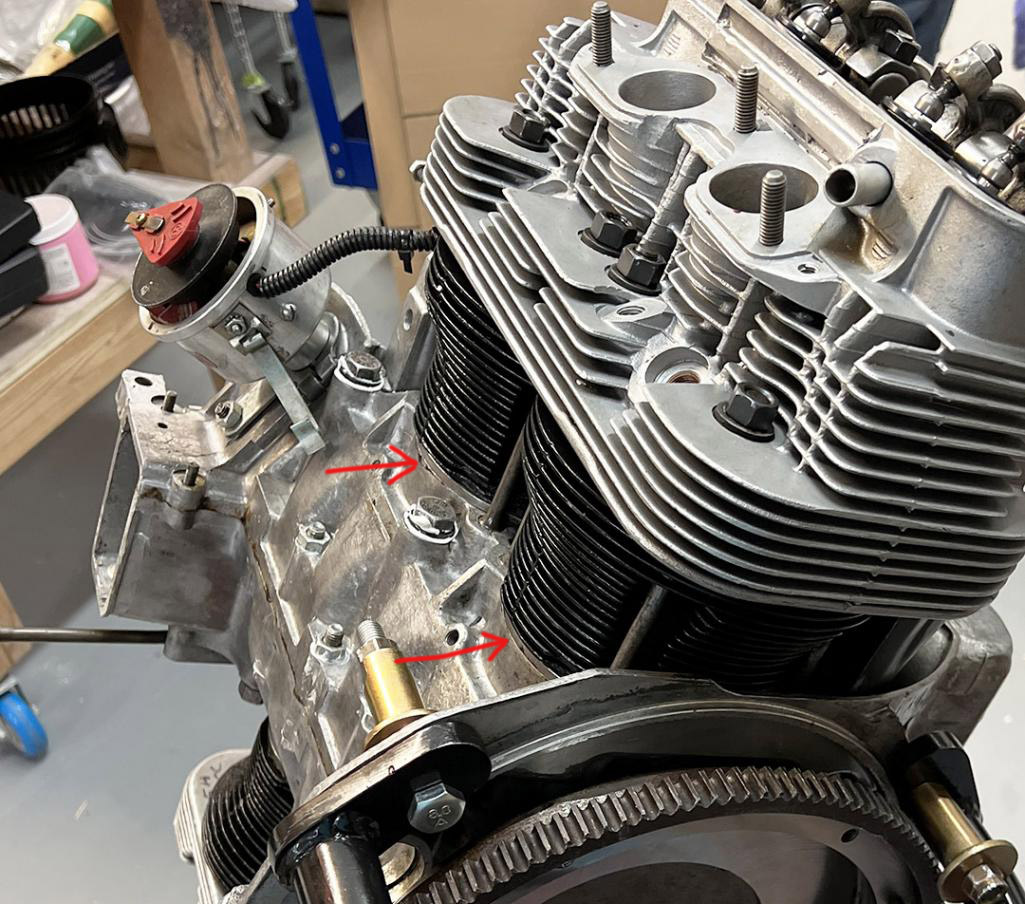 |
| technicalninja |
 Mar 19 2024, 01:04 PM Mar 19 2024, 01:04 PM
Post
#55
|
|
Advanced Member     Group: Members Posts: 2,531 Joined: 31-January 23 From: Granbury Texas Member No.: 27,135 Region Association: Southwest Region 
|
OOOHHHH!
Pretty pictures! Thanks Bob! What's up with the pic of the intake port? It looks like the gasket overhangs both the head below and the intake above (from the print in the gasket) |
| Jack Standz |
 Mar 19 2024, 01:25 PM Mar 19 2024, 01:25 PM
Post
#56
|
|
Senior Member    Group: Members Posts: 620 Joined: 15-November 19 From: Happy Place (& surrounding area) Member No.: 23,644 Region Association: None 
|
Yes, noticed that too. We run phenolic spacers which avoids that problem and insulates the carbs from the heads.
Another question that's somewhat/is related to this build thread. Is the windage tray modification good or bad for oil and windage issues?? |
| cgnj |
 Mar 19 2024, 02:38 PM Mar 19 2024, 02:38 PM
Post
#57
|
|
Senior Member    Group: Members Posts: 698 Joined: 6-March 03 From: Medford, NJ Member No.: 403 Region Association: None 
|
I cut my own gaskets. CSP linkage threaded rods too short to use the phenolic spacers. It appears from the video that he uses Sync-Link of CFR cable linkage. Maybe not enough thread engagement on the studs with his manifold.
Based on description in the video, it appears it was a crate motor. Who knows who touched it between delivery and scorching a bearing. Hopefully I don't torched for goring someone's sacred cow. |
| burton73 |
 Mar 19 2024, 03:15 PM Mar 19 2024, 03:15 PM
Post
#58
|
|
Senior member, and old dude     Group: Members Posts: 3,925 Joined: 2-January 07 From: Los Angeles Member No.: 7,414 Region Association: Southern California 
|
The picture of intake port is from the moment of tear down and my comment was (this should be blueprinted and there should be no extra material to cause any flow turbulence) . You can see the port work on the RAT HAM heads.
The Windage tray modification was a RAT deal innless this Eng. was rebuilt after Jake built it. No matter what you see the spun bearing. We opted for Tuna Can as it must have been oil starved at one point. It had a rear next to trans auxiliary oil cooler, and the decision was made to change that out to a front GT style cooler at PMB Performance This Engen was in Oscars blue car and the guy that bought the car just wanted the body and sold us the Engen and trans. He was going to a huge Mopar and custom trans. His car is a spare no expense resto mod. He also did some great hot rods so that body should end up as a nice car. Best Bob B |
| technicalninja |
 Mar 19 2024, 05:21 PM Mar 19 2024, 05:21 PM
Post
#59
|
|
Advanced Member     Group: Members Posts: 2,531 Joined: 31-January 23 From: Granbury Texas Member No.: 27,135 Region Association: Southwest Region 
|
When I'm "finished" with port matching you cannot feel the parting lines on anything including the gasket...
Phenolics are used if available. Often, if I have room, I'll put two little roll pins through the perfectly matched assembly to "fix" the position of everything. All of my previous intake manifold have been far larger than T4 stuff and the roll pins help, especially on straight 6s. I'll normally do 2 extra intake gaskets at the same time in the same "stack" as putting the little dowel holes in a replacement gasket down the road is a BITCH! An overhung gasket that like, by someone that was working for me would be, STRIKE 1! Still a very nice engine! |
| VaccaRabite |
 Mar 20 2024, 05:22 AM Mar 20 2024, 05:22 AM
Post
#60
|
|
En Garde!           Group: Admin Posts: 13,821 Joined: 15-December 03 From: Dallastown, PA Member No.: 1,435 Region Association: MidAtlantic Region 
|
The Windage tray modification was a RAT deal innless this Eng. was rebuilt after Jake built it. There was a time when Raby advised doing this to all windage trays to ensure oil got back into the sump fast enough. Around 2009 when I did my engine I did the same to my tray. I don't know what the current advice is. Zach |
  |
2 User(s) are reading this topic (2 Guests and 0 Anonymous Users)
0 Members:

|
Lo-Fi Version | Time is now: 13th December 2025 - 05:00 PM |
Invision Power Board
v9.1.4 © 2025 IPS, Inc.


