|
|
|
Porsche, and the Porsche crest are registered trademarks of Dr. Ing. h.c. F. Porsche AG.
This site is not affiliated with Porsche in any way. Its only purpose is to provide an online forum for car enthusiasts. All other trademarks are property of their respective owners. |
|
|

  |

| SKL1 |
 Jun 7 2024, 11:32 AM Jun 7 2024, 11:32 AM
Post
#1
|
|
Senior Member  Group: Members Posts: 1,716 Joined: 19-February 11 From: north Scottsdale Member No.: 12,732 Region Association: Upper MidWest |
This may be in a thread somewhere but I've never been good with the search function, if so, please supply a link. Otherwise, here goes...
Finally installing a pass side mirror and will be taking off the door card, etc. I assume I'll want to drill a small pilot hole from the inside through the nut so the holes are in the right place. Any other suggestions so as to not "hurt" a perfectly good door and paint job?? TIA. |
   |

 
|
| slowrodent |
Jun 7 2024, 11:54 AM
Post
#2
|
|
Member Group: Members Posts: 197 Joined: 29-February 20 From: Tucson/Oro Valley Member No.: 23,981 Region Association: Southwest Region |
Not claiming it's the best way, but I drilled mine from the outside (small bit at first) after carefully measuring the driver's door mirror location.... It was right where I expected it to be..
|
|
|
|
| Ishley |
Jun 7 2024, 12:08 PM
Post
#3
|
|
Member Group: Members Posts: 236 Joined: 4-October 21 From: Clarendon Hills Il Member No.: 25,957 Region Association: Upper MidWest |
I drilled mine from the inside using a vix bit... this will center a small hole right in the middle of the nuts. Then I threaded a bolt up thru the nut from the inside and used a small bit in a dremel to clean up the hole. The bolt will help to reduce damage to the thread. Mask the out side first. Go slow and get a perfect set of holes.... right where they need to be.
|
|
|
|
| burton73 |
Jun 7 2024, 12:10 PM
Post
#4
|
|
Senior member, and old dude Group: Members Posts: 3,858 Joined: 2-January 07 From: Los Angeles Member No.: 7,414 Region Association: Southern California |
@SKL1
If you go to Google it is easy to find. There search Eng. Is much better than what is on the world site and easer to use. It even has AI now Best Bob b  |
 |
|
| Shivers |
Jun 7 2024, 12:17 PM
Post
#5
|
|
Senior Member Group: Members Posts: 3,089 Joined: 19-October 20 From: La Quinta, CA Member No.: 24,781 Region Association: Southern California |
|
|
|
|
| SKL1 |
Jun 7 2024, 06:19 PM
Post
#6
|
|
Senior Member Group: Members Posts: 1,716 Joined: 19-February 11 From: north Scottsdale Member No.: 12,732 Region Association: Upper MidWest |
Thanks guys. Got the new mirror today from SMC and it didn't have the chrome screws!! Not exactly an every day item you'd find at Ace!!
|
|
|
|
| Front yard mechanic |
Jun 7 2024, 06:58 PM
Post
#7
|
|
Senior Member Group: Members Posts: 1,357 Joined: 23-July 15 From: New Mexico Member No.: 18,984 Region Association: None |
Just do from the outside no need to remove the door panel. A simple measurement from the drivers door with an 1/8” inch bit, then enlarge it to fit just remember don’t install the mirror upside down (IMG:style_emoticons/default/alfred.gif)
|
|
|
|
| iankarr |
Jun 7 2024, 08:34 PM
Post
#8
|
|
The wrencher formerly known as Cuddy_K Group: Members Posts: 2,566 Joined: 22-May 15 From: Heber City, UT Member No.: 18,749 Region Association: Intermountain Region |
QUOTE(SKL1 @ Jun 7 2024, 08:19 PM)  Thanks guys. Got the new mirror today from SMC and it didn't have the chrome screws!! Not exactly an every day item you'd find at Ace!! You’ll want stainless steel screws, which shouldn’t be too hard to find. It’s an M6x1.0 Philips oval head. Don’t forget the rubber base (IMG:style_emoticons/default/smile.gif) 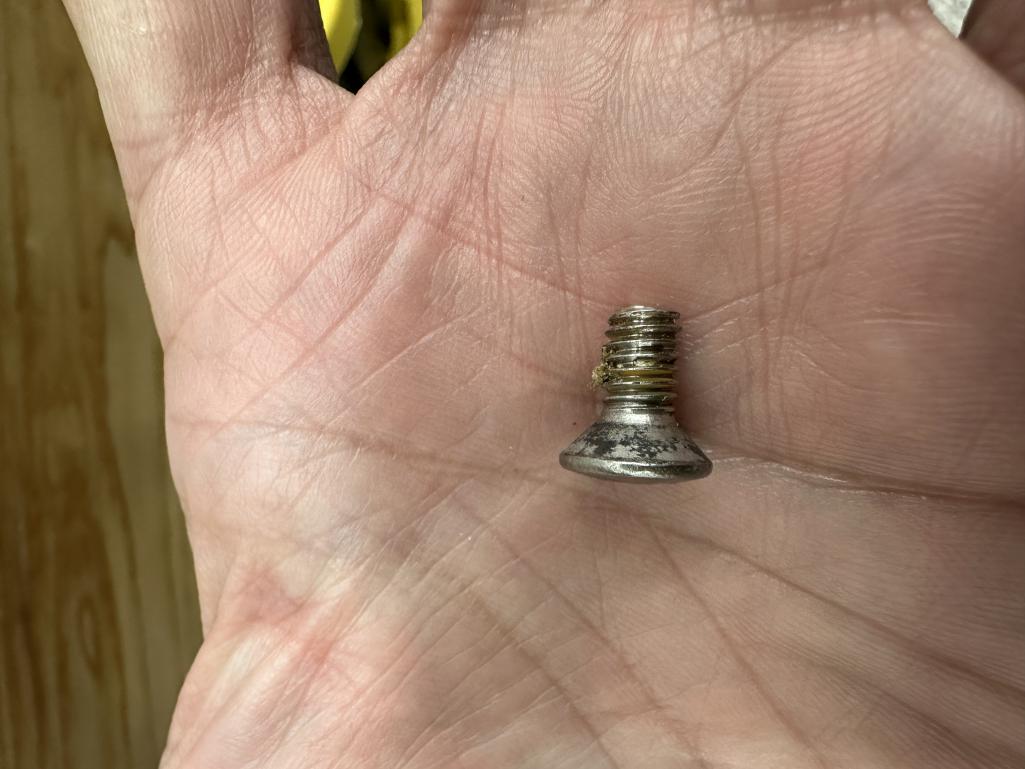 |
|
|
|
| Chris914n6 |
Jun 7 2024, 11:34 PM
Post
#9
|
|
Jackstands are my life. Group: Members Posts: 3,493 Joined: 14-March 03 From: Las Vegas, NV Member No.: 431 Region Association: Southwest Region |
Actually you can find these screws at Ace/Lowes/HD. They are not that special.
|
|
|
|
| BillC |
Jun 8 2024, 02:32 PM
Post
#10
|
|
Senior Member Group: Members Posts: 678 Joined: 24-April 15 From: Silver Spring, MD Member No.: 18,667 Region Association: MidAtlantic Region |
QUOTE(burton73 @ Jun 7 2024, 02:10 PM) @SKL1 If you go to Google it is easy to find. There search Eng. Is much better than what is on the world site and easer to use. It even has AI now Best Bob b You need to be very careful with trusting AI results -- a lot of them will "hallucinate" and make up stuff, like this one did. There are no "two nuts" on the inside, just a single nutplate with two holes. And, there's no room to use a punch and a hammer, at least not without removing the center post and fixed triangular window. QUOTE(Shivers @ Jun 7 2024, 02:17 PM) Good find! (IMG:style_emoticons/default/biggrin.gif) That's what I was going to post, but you saved me the hassle of looking it up. |
|
|
|
| ClayPerrine |
Jun 8 2024, 06:14 PM
Post
#11
|
|
Life's been good to me so far..... Group: Admin Posts: 16,462 Joined: 11-September 03 From: Hurst, TX. Member No.: 1,143 Region Association: NineFourteenerVille |
I have done this without removing the window or the window track.
I carefully taped over the spot on the door where the mirror would mount with blue painters tape. Then I used a 6mm automatic center punch. I put it inside the nut plate and pushed on it until it clicked. That dimples the metal outward on the outside of the door. I then carefully reversed the dimple with a punch, and used a drill with a 7mm drill bit to carefully drill out the mirror mounting holes. Then just touch up the paint so it doesn't rust, remove the blue painter's tape, and mount the mirror. |
|
|
|
| technicalninja |
Jun 8 2024, 07:50 PM
Post
#12
|
|
Advanced Member Group: Members Posts: 2,531 Joined: 31-January 23 From: Granbury Texas Member No.: 27,135 Region Association: Southwest Region |
QUOTE(ClayPerrine @ Jun 8 2024, 07:14 PM) I have done this without removing the window or the window track. I carefully taped over the spot on the door where the mirror would mount with blue painters tape. Then I used a 6mm automatic center punch. I put it inside the nut plate and pushed on it until it clicked. That dimples the metal outward on the outside of the door. I then carefully reversed the dimple with a punch, and used a drill with a 7mm drill bit to carefully drill out the mirror mounting holes. Then just touch up the paint so it doesn't rust, remove the blue painter's tape, and mount the mirror. @ClayPerrine You have a spring-loaded center punch that has a 6mm shank like a high end "transfer" punch? That's FREAKING cool! I want a set! 6/8/10/12 would work great! This is "The Way" for centering holes for this process. I was planning on making a "center-punch mandrel" out of a 6X1 bolt. machine the end of it to create a little protrusion in the center and then screw it into the nut-plate from the inside until you can apply pressure to the skin and lightly tap the outside with a dowel/hammer to make the centering mark. Having the perfectly sized auto punch would make that much easier! |
|
|
|
| 930cabman |
Jun 9 2024, 05:30 AM
Post
#13
|
|
Advanced Member Group: Members Posts: 4,177 Joined: 12-November 20 From: Buffalo Member No.: 24,877 Region Association: North East States |
I did mine last year in an original paint door, it took me a couple weeks to get the guts, but worked perfect
|
|
|
|
| ClayPerrine |
Jun 9 2024, 05:33 AM
Post
#14
|
|
Life's been good to me so far..... Group: Admin Posts: 16,462 Joined: 11-September 03 From: Hurst, TX. Member No.: 1,143 Region Association: NineFourteenerVille |
QUOTE(technicalninja @ Jun 8 2024, 08:50 PM) QUOTE(ClayPerrine @ Jun 8 2024, 07:14 PM) I have done this without removing the window or the window track. I carefully taped over the spot on the door where the mirror would mount with blue painters tape. Then I used a 6mm automatic center punch. I put it inside the nut plate and pushed on it until it clicked. That dimples the metal outward on the outside of the door. I then carefully reversed the dimple with a punch, and used a drill with a 7mm drill bit to carefully drill out the mirror mounting holes. Then just touch up the paint so it doesn't rust, remove the blue painter's tape, and mount the mirror. @ClayPerrine You have a spring-loaded center punch that has a 6mm shank like a high end "transfer" punch? That's FREAKING cool! I want a set! 6/8/10/12 would work great! This is "The Way" for centering holes for this process. I was planning on making a "center-punch mandrel" out of a 6X1 bolt. machine the end of it to create a little protrusion in the center and then screw it into the nut-plate from the inside until you can apply pressure to the skin and lightly tap the outside with a dowel/hammer to make the centering mark. Having the perfectly sized auto punch would make that much easier! I actually made it from a 6mm transfer punch and an automatic center punch. I just turned down the cheap Harbor Freight transfer punch to have the same threaded end as the point on the automatic center punch. (IMG:style_emoticons/default/biggrin.gif) |
|
|
|
| technicalninja |
Jun 9 2024, 09:48 AM
Post
#15
|
|
Advanced Member Group: Members Posts: 2,531 Joined: 31-January 23 From: Granbury Texas Member No.: 27,135 Region Association: Southwest Region |
QUOTE(ClayPerrine @ Jun 9 2024, 06:33 AM) I actually made it from a 6mm transfer punch and an automatic center punch. I just turned down the cheap Harbor Freight transfer punch to have the same threaded end as the point on the automatic center punch. (IMG:style_emoticons/default/biggrin.gif) That, gentlemen, is the difference between a journeyman and a Master in my book! When you just automatically build your own tools rather than borrowing/buying is the point you're better than 99% of the critters wrenching... (IMG:style_emoticons/default/first.gif) I'd never seen a "transfer punch/center punch" combo before and I've seen MOST of what is available. Yep, Clay just built it. Exactly like a Master would... |
|
|
|
| Shivers |
Jun 9 2024, 10:59 AM
Post
#16
|
|
Senior Member Group: Members Posts: 3,089 Joined: 19-October 20 From: La Quinta, CA Member No.: 24,781 Region Association: Southern California |
QUOTE(ClayPerrine @ Jun 9 2024, 04:33 AM) QUOTE(technicalninja @ Jun 8 2024, 08:50 PM) QUOTE(ClayPerrine @ Jun 8 2024, 07:14 PM) I have done this without removing the window or the window track. I carefully taped over the spot on the door where the mirror would mount with blue painters tape. Then I used a 6mm automatic center punch. I put it inside the nut plate and pushed on it until it clicked. That dimples the metal outward on the outside of the door. I then carefully reversed the dimple with a punch, and used a drill with a 7mm drill bit to carefully drill out the mirror mounting holes. Then just touch up the paint so it doesn't rust, remove the blue painter's tape, and mount the mirror. @ClayPerrine You have a spring-loaded center punch that has a 6mm shank like a high end "transfer" punch? That's FREAKING cool! I want a set! 6/8/10/12 would work great! This is "The Way" for centering holes for this process. I was planning on making a "center-punch mandrel" out of a 6X1 bolt. machine the end of it to create a little protrusion in the center and then screw it into the nut-plate from the inside until you can apply pressure to the skin and lightly tap the outside with a dowel/hammer to make the centering mark. Having the perfectly sized auto punch would make that much easier! I actually made it from a 6mm transfer punch and an automatic center punch. I just turned down the cheap Harbor Freight transfer punch to have the same threaded end as the point on the automatic center punch. (IMG:style_emoticons/default/biggrin.gif) Ha, good idea. I'm going to file that away |
|
|
|
| SKL1 |
Jun 9 2024, 08:35 PM
Post
#17
|
|
Senior Member Group: Members Posts: 1,716 Joined: 19-February 11 From: north Scottsdale Member No.: 12,732 Region Association: Upper MidWest |
QUOTE(930cabman @ Jun 9 2024, 04:30 AM) I did mine last year in an original paint door, it took me a couple weeks to get the guts, but worked perfect It's taken 53 years for me to get the guts to do it... (Clay- thanks- great suggestions...) |
|
|
|
| chmillman |
Aug 23 2024, 08:07 AM
Post
#18
|
|
Member Group: Members Posts: 97 Joined: 15-June 24 From: Switzerland Member No.: 28,183 Region Association: Europe |
Hi all,
Wanting to find/order another "original" style side mirror on the passenger side.. What I have now is this: 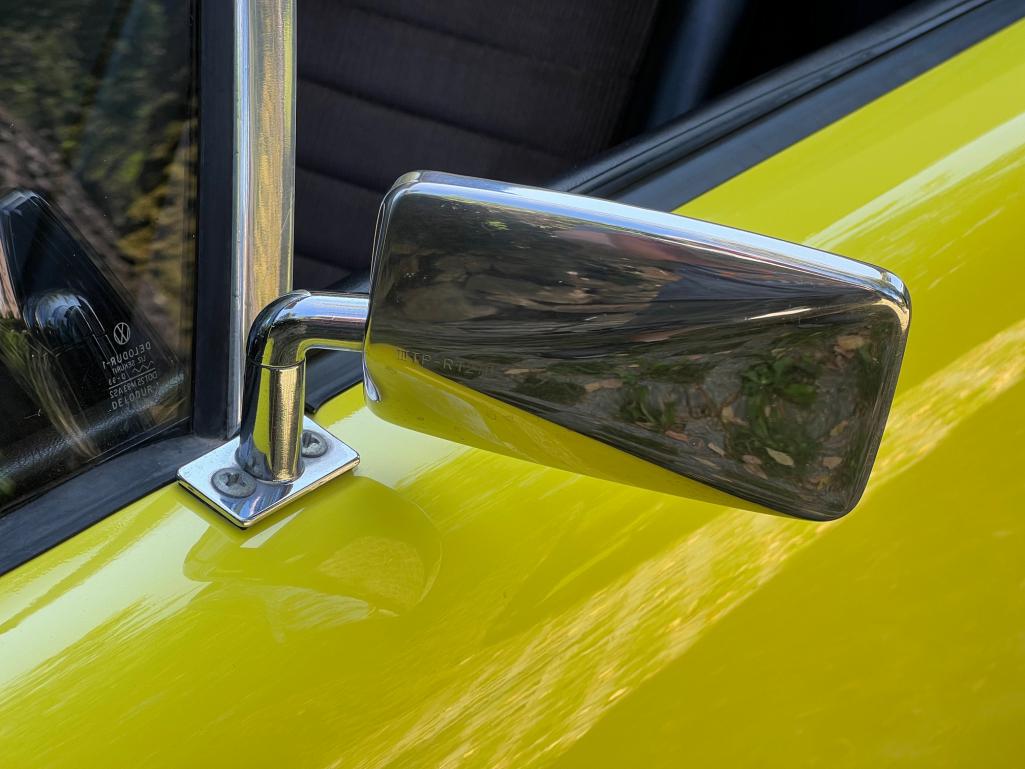 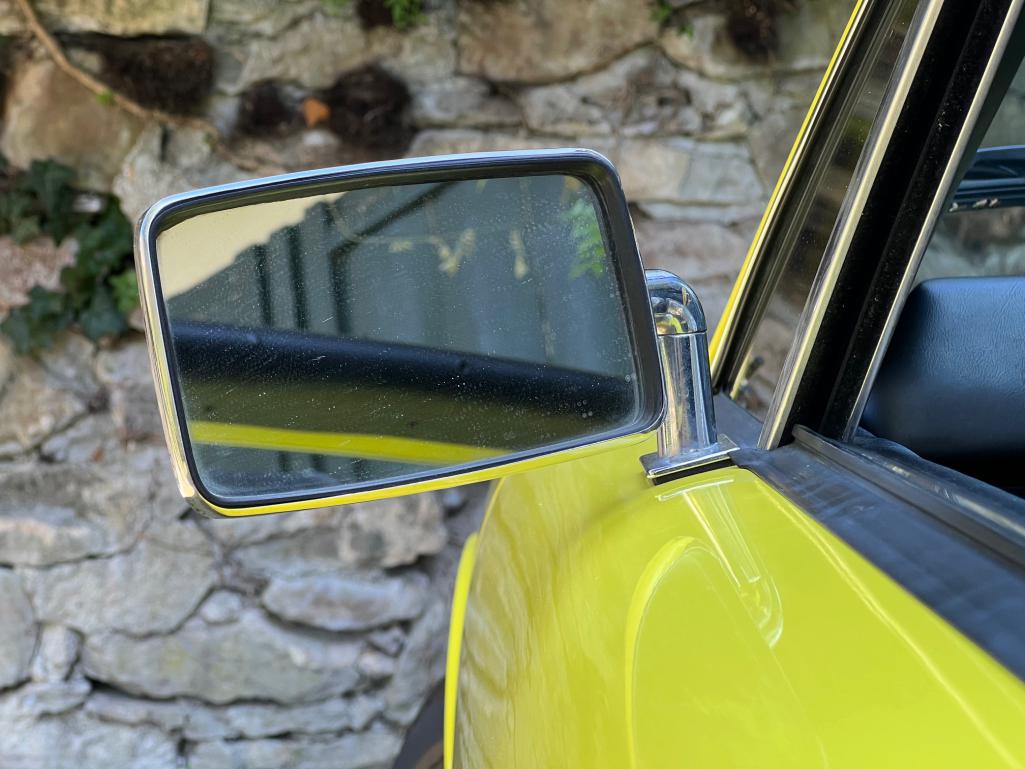 Is this an "Early" or "Late" style mirror? The other question/observation of the one I have - they did angle the mirror base a little, as one can see in the second image, but why not more so that the mirror would really be horizontal when mounted?? |
|
|
|
| dr914@autoatlanta.com |
Aug 23 2024, 09:17 AM
Post
#19
|
|
914 Guru Group: Members Posts: 8,188 Joined: 3-January 07 From: atlanta georgia Member No.: 7,418 Region Association: None |
QUOTE(SKL1 @ Jun 7 2024, 10:32 AM) This may be in a thread somewhere but I've never been good with the search function, if so, please supply a link. Otherwise, here goes... Finally installing a pass side mirror and will be taking off the door card, etc. I assume I'll want to drill a small pilot hole from the inside through the nut so the holes are in the right place. Any other suggestions so as to not "hurt" a perfectly good door and paint job?? TIA. yes and tape over the finish when cleaning up and taping the hole |
|
|
|
| jbyron |
Aug 23 2024, 10:07 AM
Post
#20
|
|
Jamie Group: Members Posts: 155 Joined: 17-July 07 From: Ballwin, MO Member No.: 7,916 Region Association: Upper MidWest |
QUOTE(SKL1 @ Jun 7 2024, 07:19 PM) Thanks guys. Got the new mirror today from SMC and it didn't have the chrome screws!! Not exactly an every day item you'd find at Ace!! 914Rubber has them. I'm receiving my set tomorrow. |
|
|
|
|
1 User(s) are reading this topic (1 Guests and 0 Anonymous Users)
0 Members:

|
Lo-Fi Version | Time is now: 18th July 2025 - 10:51 PM |
Invision Power Board
v9.1.4 © 2025 IPS, Inc.