|
|
|
Porsche, and the Porsche crest are registered trademarks of Dr. Ing. h.c. F. Porsche AG.
This site is not affiliated with Porsche in any way. Its only purpose is to provide an online forum for car enthusiasts. All other trademarks are property of their respective owners. |
|
|

  |

| rjames |
 May 24 2025, 09:16 AM May 24 2025, 09:16 AM
Post
#61
|
|
I'm made of metal  Group: Members Posts: 4,454 Joined: 24-July 05 From: Shoreline, WA Member No.: 4,467 Region Association: Pacific Northwest |
Put the ecu knob back in the middle and adjust only the inner screw counter clockwise until it idles ok. Then turn the screw slowly clockwise to lean it out a bit again until the idle starts hunting and then go back a 1/4 turn at most so it stops hunting. That should put you in the ballpark and allow you to drive the car, assuming everything else is good. Then use the wideband o2 readings to dial it in further.
|
   |

 
|
| Ron914 |
May 24 2025, 10:27 AM
Post
#62
|
|
Senior Member Group: Members Posts: 521 Joined: 19-April 22 From: Huntington Beach,Ca Member No.: 26,487 Region Association: Southern California |
QUOTE(rjames @ May 24 2025, 10:16 AM)  Put the ecu knob back in the middle and adjust only the inner screw counter clockwise until it idles ok. Then turn the screw slowly clockwise to lean it out a bit again until the idle starts hunting and then go back a 1/4 turn at most so it stops hunting. That should put you in the ballpark and allow you to drive the car, assuming everything else is good. Then use the wideband o2 readings to dial it in further. Thanks for the reply . I need to add that I must set my timing still , should I try this considering my timing is not spot on . It's kind of hard to set timing with the car running so rough right now . |
 |
|
| JeffBowlsby |
May 24 2025, 10:49 AM
Post
#63
|
|
914 Wiring Harnesses & Beekeeper Group: Members Posts: 9,259 Joined: 7-January 03 From: San Ramon CA Member No.: 104 Region Association: None |
Of those three pairs of wires, one is grounds for the ECU and TPS, and if this one was disconnected, car would not run at all. The other two pairs are for the 2 injector banks. You were probably only running on 2 cyl.
|
|
|
|
| Ron914 |
May 24 2025, 11:09 AM
Post
#64
|
|
Senior Member Group: Members Posts: 521 Joined: 19-April 22 From: Huntington Beach,Ca Member No.: 26,487 Region Association: Southern California |
QUOTE(JeffBowlsby @ May 24 2025, 11:49 AM) Of those three pairs of wires, 1 iz grounds did the ECU and TPS. Octet one was disconnected, car would not run at all. The other two pairs are for the 2 injector banks. You were probably only running on 2 cyl. Makes sense. |
|
|
|
| rjames |
May 27 2025, 06:30 PM
Post
#65
|
|
I'm made of metal Group: Members Posts: 4,454 Joined: 24-July 05 From: Shoreline, WA Member No.: 4,467 Region Association: Pacific Northwest |
QUOTE(Ron914 @ May 24 2025, 09:27 AM) QUOTE(rjames @ May 24 2025, 10:16 AM) Put the ecu knob back in the middle and adjust only the inner screw counter clockwise until it idles ok. Then turn the screw slowly clockwise to lean it out a bit again until the idle starts hunting and then go back a 1/4 turn at most so it stops hunting. That should put you in the ballpark and allow you to drive the car, assuming everything else is good. Then use the wideband o2 readings to dial it in further. Thanks for the reply . I need to add that I must set my timing still , should I try this considering my timing is not spot on . It's kind of hard to set timing with the car running so rough right now . Get all of your injectors working first. If after that the car is running rough after setting the timing, try the above. Note any changes you make so they can be reversed if need be. BTW, I know meters readings can vary, but your MPS curve looks a lot more lean than it should be, especially as you approach WOT. |
|
|
|
| Superhawk996 |
May 28 2025, 05:31 AM
Post
#66
|
|
914 Guru Group: Members Posts: 7,856 Joined: 25-August 18 From: Woods of N. Idaho Member No.: 22,428 Region Association: Galt's Gulch |
Those grounds are mighty crispy and corroded and are not going to do you any favors in the long run. (IMG:style_emoticons/default/poke.gif) what’s the rest of your FI look like - hopefully not as cracked.
Clean the grounds with small wire brush until shiny. Stay focused on getting running and/or verifying injectors as noted above. Plan for new FI wiring harness in the future. |
|
|
|
| Superhawk996 |
May 28 2025, 05:36 AM
Post
#67
|
|
914 Guru Group: Members Posts: 7,856 Joined: 25-August 18 From: Woods of N. Idaho Member No.: 22,428 Region Association: Galt's Gulch |
QUOTE(Ron914 @ May 24 2025, 12:27 PM) I need to add that I must set my timing still , should I try this considering my timing is not spot on . It's kind of hard to set timing with the car running so rough right now . (IMG:style_emoticons/default/bs.gif) Set static timing at 7-8 degrees using a multimeter or test lamp. That will always get you close enough to start and run decently without the need to get RPMs up to set & verify full advance. Of course this assumes your dizzy advance isn’t siezed up or non-functional. Lots of videos of how to set static timing on VW’s on the YouTubez. If you need help or don’t understand the process after watching a couple videos - we’re here to help (IMG:style_emoticons/default/grouphug.gif) |
|
|
|
| Ron914 |
May 29 2025, 06:25 PM
Post
#68
|
|
Senior Member Group: Members Posts: 521 Joined: 19-April 22 From: Huntington Beach,Ca Member No.: 26,487 Region Association: Southern California |
QUOTE(Superhawk996 @ May 28 2025, 06:36 AM) QUOTE(Ron914 @ May 24 2025, 12:27 PM) I need to add that I must set my timing still , should I try this considering my timing is not spot on . It's kind of hard to set timing with the car running so rough right now . (IMG:style_emoticons/default/bs.gif) Set static timing at 7-8 degrees using a multimeter or test lamp. That will always get you close enough to start and run decently without the need to get RPMs up to set & verify full advance. Of course this assumes your dizzy advance isn’t siezed up or non-functional. Lots of videos of how to set static timing on VW’s on the YouTubez. If you need help or don’t understand the process after watching a couple videos - we’re here to help (IMG:style_emoticons/default/grouphug.gif) Thanks for checking in on me @Superhawk996 , I have been taking a break as I let a lot things go working on my car and need to get caught up . I have more time this weekend and next week to give it one more shot at getting it running so I can drive it to the WCR in a few weeks . I made up a remote start switch to help me ,I have a good timing mark on my flywheel that I can see now for timing . I still have the Pertronix in the dizzy but am thinking of going back to the points/condenser again just to eliminate any possibility the Pertronix is a part of the problem .I saw the break in one of the ground wires and have purchased some new connectors and a brass wire brush to clean up my connections . I actually would like to see if anyone locally has a good MPS just to eliminate if my new problems are coming from it . At the WCR I believe Jeff B is giving away a couple of gift certificates for a raffle so maybe I'll get lucky and win one . I can use it to offset the cost of a new wiring harness if I don't find my problems . Based on the flywheel timing mark I added a white dot on my fan wheel to help . I believe my advance on the dizzy is ok ,I connected the mighty vac and can see the advance plate moving inside my dizzy . I will add an update after the weekend. 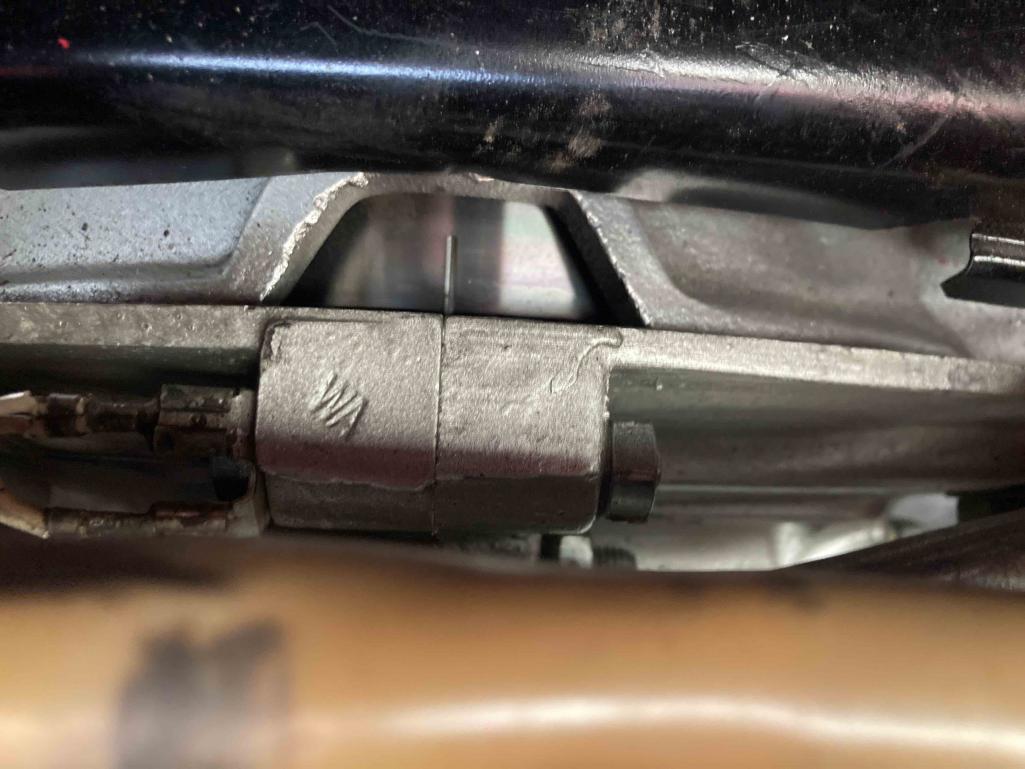 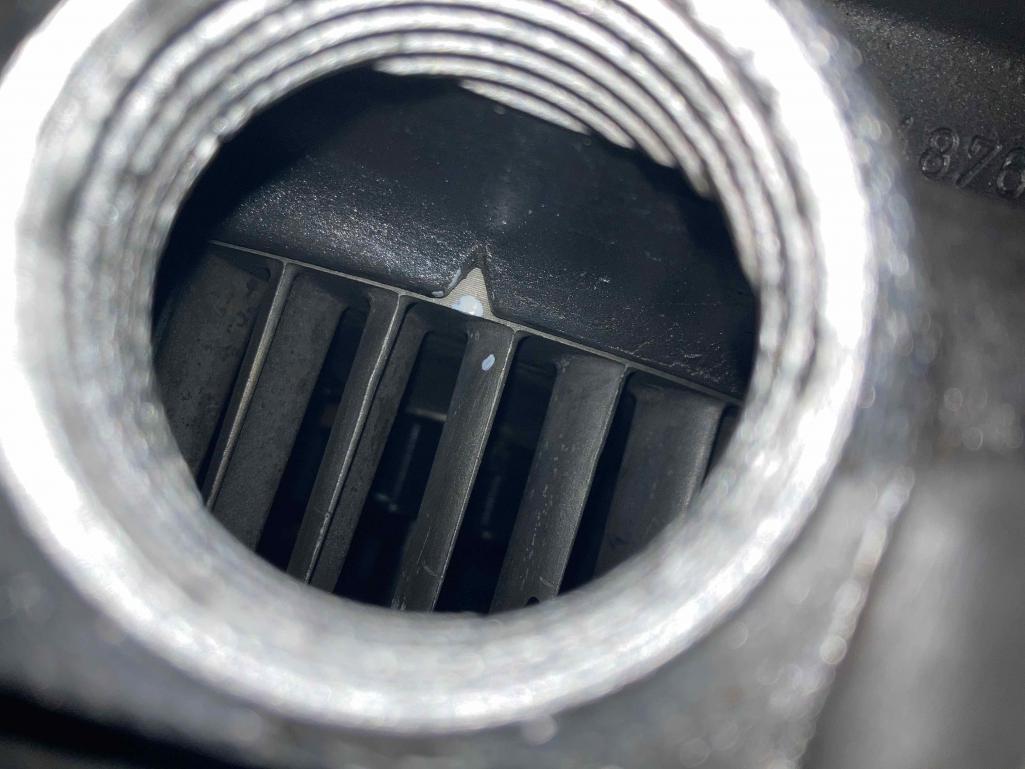 |
|
|
|
| Superhawk996 |
May 30 2025, 04:15 AM
Post
#69
|
|
914 Guru Group: Members Posts: 7,856 Joined: 25-August 18 From: Woods of N. Idaho Member No.: 22,428 Region Association: Galt's Gulch |
My bad Ron
I completely forgot you were running Pertronix. |
|
|
|
| Ron914 |
Aug 19 2025, 03:10 PM
Post
#70
|
|
Senior Member Group: Members Posts: 521 Joined: 19-April 22 From: Huntington Beach,Ca Member No.: 26,487 Region Association: Southern California |
Hello to all that have been helping me getting my 914 up and running so I can finally enjoy driving it and passing my CA smog test , @emerygt350 , @Superhawk996
Since some time as passed since I last posted on this so I will recap my situation. I bought my car 1976 2.0L D-Jet in March /2022 . The car had the motor removed and disassembled by the previous owner when I purchased it . It has been both a fun and frustrating experience getting to where I am now . This was my first 914 and I welcomed the challenge as Covid was still going on and I needed something to occupy my time and I always wanted one . I wasn't confident with assembling the lower end of the motor so I had Brothers in Ontario put it together for me and I worked on putting the rest together and installing it in the car . I have no previous owner information to add and have no history of the car . I purchased a new flywheel / Sachs clutch and AA big bore pistons from George @ European Motor in Hawthorne . The motor is now a 2056 . I have no information on which cam was used as it came with the box of parts that I got with the car ( I believe it to be stock) . I did have Brothers install chrome moly connecting rods and George did balance the new flywheel Renato at Brothers bench tested the motor and broke in with a carburetor set up since he did not do fuel injection . When I first installed the motor it started right up but always had a high idle due to a vacuum leak somewhere . I replaced all vacuum lines and installed all new gaskets before starting the motor . The high idle prevented me from passing a smog test so I have ben chasing that issue for over a year . I have since worked on the decel valve ( I believe it was adjusted wrong) , had Mark K rebuild my throttle body , and purchased a CF MPS rebuild from a member here on the site . Car was idling good and I drove it 10-15 miles before removing the MPS to rebuild it . I rebuilt my MPS because it leaked and would not hold vacuum for very long and was told I might as well replace the diaphragm with Chris's rebuild kit since I will need to properly tune my MPS because of the 2056 motor upgrade .This was in April and I was looking forward to attending my first WCR in June and drive my car but something went south from that point . After replacing the diaphragm I reinstalled it and when I started the car, it went from running good to running poorly and shaking as if it was missing a cylinder or two. I now have had time to get back to the car and have some questions and findings too report printed out PB Anders trouble shooting D-Jet pages from the tech notes on this site and pulled out my multi meter to make some checks . I have made some progress and I have the following values to report as the car will now start up (no shaking ) but it will just die after about 5-10 minutes of running . I checked TSI ambient air sensor between ECU plug terminals 1 & 13 = 295 ohms (seems ok) I checked the four FI's and had Cyl1- ter. 3 to ground = 3.1 ohms , Cyl. 2 ter. 4 to ground 3.2 ohms , Cyl. 3 ter. 5 to ground 3.2 ohms and Cyl 4 ter. 6 to ground 3.1 ohms MPS terminals 7 & 15 = 94.4 ohms ( no continuity to MPS case for all 4 terminals ) & 8-10=346.4 ohms (seems good) Terminal 11 to ground 0.6 ohms (?) Triger contacts 12 & 21 and 12& 22 switching ok when engine cranked over Terminals 16/24 to ground 12.34VDC ( voltage measured at the battery 12.84 VDC) TS2 CHT -@68F 5.3K ohms @79F 3.6K ohms once the CHT temp gauge (Dakota digital) reaches 100-104F the car just shuts off and does not want to restart , @ this time my readings between terminal 23 & ground reads 74.1 ohms., once car cools down it will start again. I have re-terminated several of the D-jet connections which did make a difference . I have a remanufactured ECU in my car with the following information on it ECU P 039 906 021AV 10/75 220 006 052 095 MPS 0280 100 043/ 039 906 051/VW Decel valve 280 160 001 / 311 133 030 527 Distributor 039 905 205 A VW CHT is old ,looks original , assuming a 00 280 130 012 . I also have a new one I purchased from 914 Rubber (not installed ) My motor number is GC004876 , Trans HA08105 My suspicion is the CHT is bad but I am not sure . When I first started looking in the box of parts that came with the car there was a funky looking homemade resistor that was unusable so I assumed I need to replace its and purchased one from AutoAtlanta but have since been told remove it as the as only used on a 70-73 1.7 so I took it out of the CHT circuit . Since I have read a few posts suggesting to install a potentiometer inline ,my question is should I do this to keep my CHT ohm reading higher when the car warms up . I installed a Vacuum gauge ,Dakota digital CHT and still need a bung installed in my muffler to complete the AFR meter I installed also . When I first start the car my Plenum vacuum is about 20inHG but once car motor is warm the vacuum falls off before the motor dies . When I first start the motor the AAR brings the idle up to about 1400 rpm ( normal) once it closes idle is still a bit above 1000 rpm but I can use the idle sure on TB to lower it . I have not yet tried to drive the car . Any suggestions ? I do have a local member that has offered to give me a hand with my problem (Bob D) 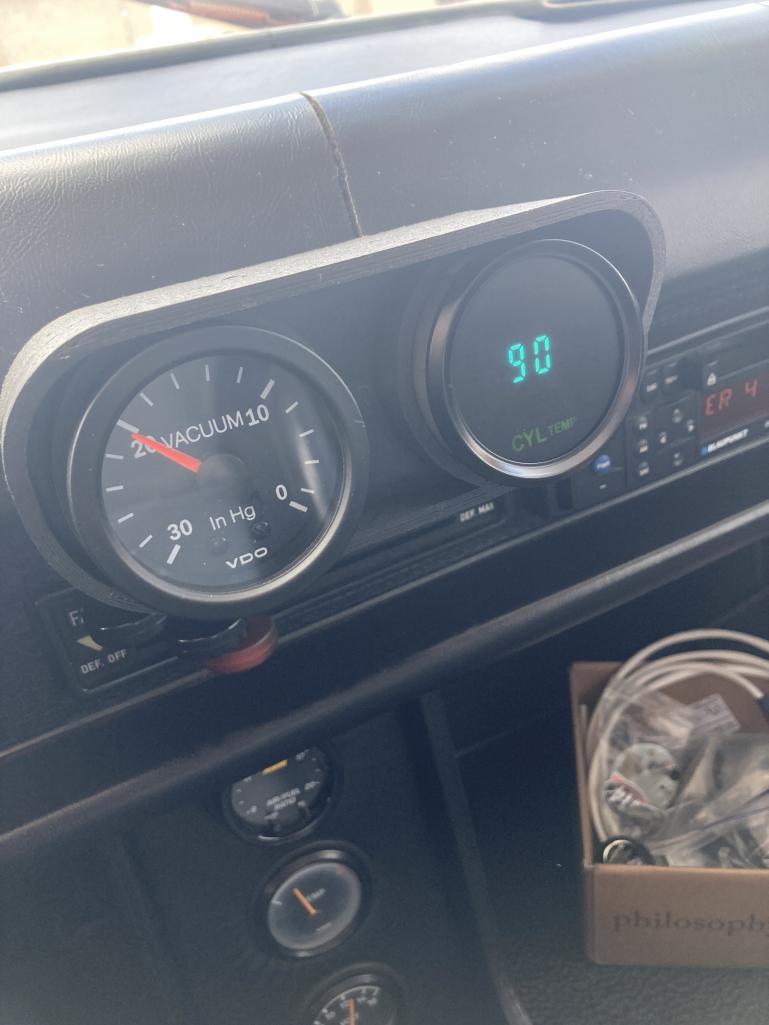 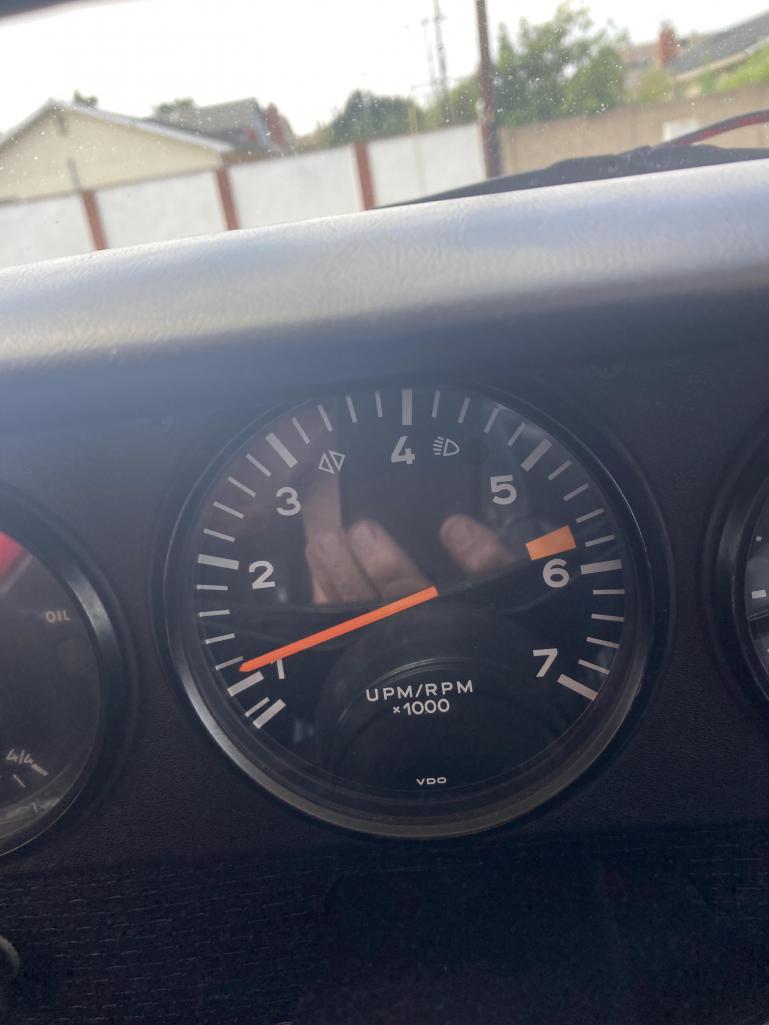 |
|
|
|
| Superhawk996 |
Aug 19 2025, 04:35 PM
Post
#71
|
|
914 Guru Group: Members Posts: 7,856 Joined: 25-August 18 From: Woods of N. Idaho Member No.: 22,428 Region Association: Galt's Gulch |
Hi Ron,
Glad you haven’t given up. Two things come to mind: “TS2 CHT -@68F 5.3K ohms @79F 3.6K ohms once the CHT temp gauge (Dakota digital) reaches 100-104F the car just shuts off and does not want to restart , @ this time my readings between terminal 23 & ground reads 74.1 ohms., once car cools down it will start again.” These are some whacky values cold through warm up. CHT resistance is a little too high at 68F ambient, about right at 79F, but that it seems to drops way too much by 100F to 74 ohms on the Dakota is weird. At 100F CHT the sensor should be more like 1200 ohms. If you are truly dropping to 74 ohms at 100F that is going to go lean and I wouldn’t be surprised it stalls. Here’s the chart of how CHT should respond for the 012 CHT 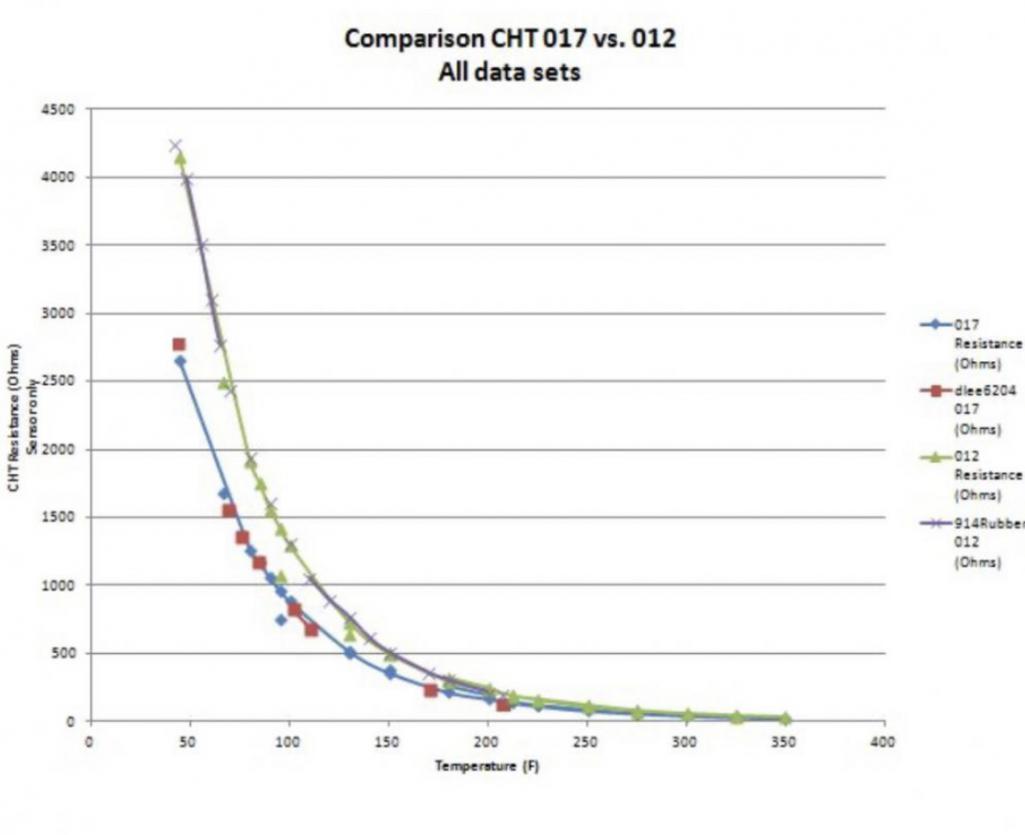 1) Are you sure that you are measuring OHMs properly? Use your meter to measure a known resistor (like the ballast reaistor) and make sure the meter agrees with a known resistance. 2) Are you sure the Dakota is reading CHT properly? Use a secondary Infra Red thermometer or other thermometer to measure head temp and ensure your Dakota gauge is reading correctly. The first thing I would do if all the above is true is swap the CHT for the new one. Before I install the new one, I’d check it on the bench to make sure it’s measuring properly. You can use a cup of boiling water to measure the new CHT resistance hot around 212F or so. |
|
|
|
| Superhawk996 |
Aug 19 2025, 04:46 PM
Post
#72
|
|
914 Guru Group: Members Posts: 7,856 Joined: 25-August 18 From: Woods of N. Idaho Member No.: 22,428 Region Association: Galt's Gulch |
Here’s a little experiment you can do before the CHT swap.
start the engine Let it warm until it stalls Unplug the CHT Does it start or at least sputter immediately? Unplugging the CHT will drive the mixture very rich. It’s possible it will drive the mixture way too rich and won’t start either but would be interesting to try to see if it provides any hint. To answer your question: “my question is should I do this to keep my CHT ohm reading higher when the car warms up . Ie. install a variable resistor inline with the CHT No. . . You should not have to be playing games to get the engine to run and warm up properly. |
|
|
|
| Ron914 |
Aug 19 2025, 05:03 PM
Post
#73
|
|
Senior Member Group: Members Posts: 521 Joined: 19-April 22 From: Huntington Beach,Ca Member No.: 26,487 Region Association: Southern California |
I will try your suggestions later today and post the results . You can see my factory oil temp gauge in the photo of the vacuum and Dakota CHT , its has only moved a little bit , don't know if the 90F corresponds with the reading shown . I have an IR thermometer so I will also take a photo of my readings with it and the Dakota and factory temperature gauge.
Thanks |
|
|
|
| emerygt350 |
Aug 19 2025, 05:20 PM
Post
#74
|
|
Advanced Member Group: Members Posts: 3,622 Joined: 20-July 21 From: Upstate, NY Member No.: 25,740 Region Association: North East States |
QUOTE(Ron914 @ Aug 19 2025, 05:03 PM) I will try your suggestions later today and post the results . You can see my factory oil temp gauge in the photo of the vacuum and Dakota CHT , its has only moved a little bit , don't know if the 90F corresponds with the reading shown . I have an IR thermometer so I will also take a photo of my readings with it and the Dakota and factory temperature gauge. Thanks Nice to see you are still poking at it. That oil will take forever to heat up, so nothing odd there. Superhawk's suggestion is where I would definitely go. Easier than a pot. Definitely check the extra cht you have in boiling water. I would pull yours asap and boil that one too. |
|
|
|
| Ron914 |
Aug 19 2025, 05:30 PM
Post
#75
|
|
Senior Member Group: Members Posts: 521 Joined: 19-April 22 From: Huntington Beach,Ca Member No.: 26,487 Region Association: Southern California |
QUOTE(emerygt350 @ Aug 19 2025, 06:20 PM) QUOTE(Ron914 @ Aug 19 2025, 05:03 PM) I will try your suggestions later today and post the results . You can see my factory oil temp gauge in the photo of the vacuum and Dakota CHT , its has only moved a little bit , don't know if the 90F corresponds with the reading shown . I have an IR thermometer so I will also take a photo of my readings with it and the Dakota and factory temperature gauge. Thanks Nice to see you are still poking at it. That oil will take forever to heat up, so nothing odd there. Superhawk's suggestion is where I would definitely go. Easier than a pot. Definitely check the extra cht you have in boiling water. I would pull yours asap and boil that one too. I will need to make the custom 3" extension tool for removing /installing the CHT sensors but I will follow the easy suggestions first then go get a 13mm deep socket and test both sensors . I really can't say why everything went south after rebuilding the MPS but after many redone connections on the FI harness the car is improving .I had a lot going on this summer and really just needed to take a break from the car for a while . I had a great time at the WCR2025 and met a lot of great fellow 914ers . My new goal is to get running so I can take my 914 on the next local run with many I met at the ramble on 9-13 |
|
|
|
| Superhawk996 |
Aug 19 2025, 07:50 PM
Post
#76
|
|
914 Guru Group: Members Posts: 7,856 Joined: 25-August 18 From: Woods of N. Idaho Member No.: 22,428 Region Association: Galt's Gulch |
QUOTE(Ron914 @ Aug 19 2025, 07:03 PM) I will try your suggestions later today and post the results . You can see my factory oil temp gauge in the photo of the vacuum and Dakota CHT , its has only moved a little bit , don't know if the 90F corresponds with the reading shown . I have an IR thermometer so I will also take a photo of my readings with it and the Dakota and factory temperature gauge. Thanks Yeah that doesn’t look right either Is your Dakota gauge reading Celsius rather than Fahrenheit? Oil temperature lags head temperature - by a significant time. Although your oil temp gauge isn’t hot by any stretch - I’m surprised it’s even off the peg if cylinder head is 90F. Just eye balling the red line would suggest your oil is running hotter than the heads if this is a single warm up cycle that wouldn’t be possible. Heads cool faster than oil once the oil and case are hot so without knowing exactly what the conditions were I’ll just say that’s odd for oil temp to be hotter than head temps. Attached thumbnail(s) 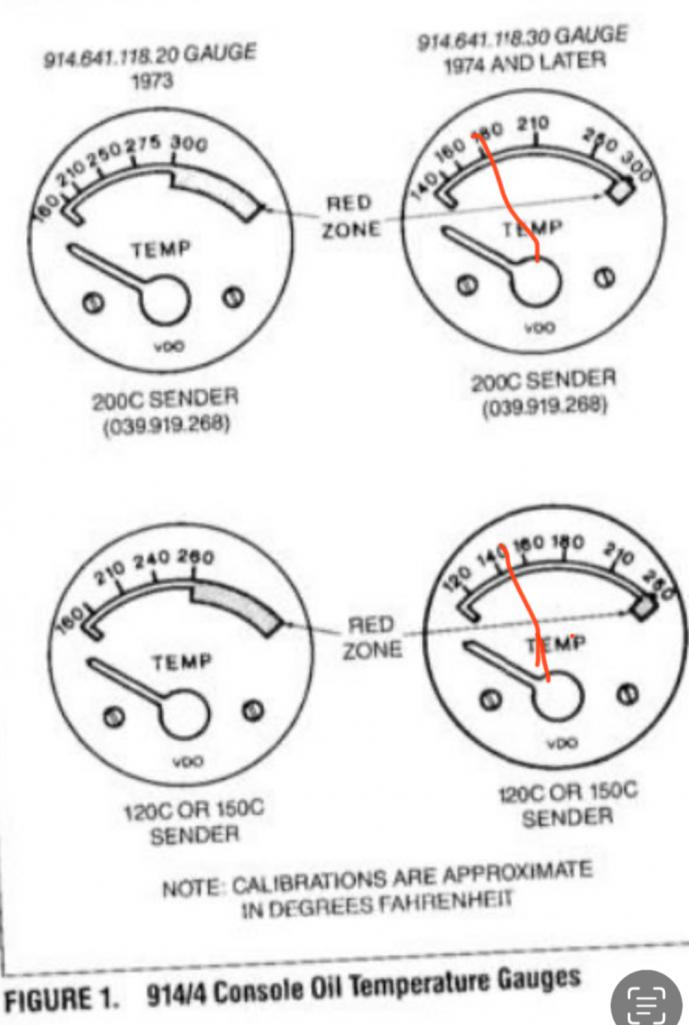
|
|
|
|
| Ron914 |
Aug 19 2025, 10:39 PM
Post
#77
|
|
Senior Member Group: Members Posts: 521 Joined: 19-April 22 From: Huntington Beach,Ca Member No.: 26,487 Region Association: Southern California |
@Superhawk996 I made the checks you requested and I have to say after reading your last comments I also questioned the accuracy of the Dakota CHT gauge . When I purchased my gauge I mistakenly ordered it with a 1/2" ring terminal (12.7mm) because I didn't want to order a 18' connecting wire from sensor to gauge ,what I didn't know was because I ordered the shorter connecting wire they swap the 14mm ring for a 1/2" ring with the shorter wire . You only get a 18' connecting wire with the 14mm sensor ring . I contacted Dakota Digital and asked if I opened the ring terminal up to 14mm or 0.551181" and was told as long as I don't cut the wire it should be ok .
Measured value of CHT sensor @ ECU plug :car cold ,garage temperature ~80F ,measured value 3.293k ohms I checked my meter against the 270 ohm resistor I bought from Auto Atlanta and it measured 266.2 ohms . Started my engine AAR was open / idle~1400 The car started running bad @ ~9:20 minutes idle was hunting up to 1200 , something seems not right . After ~15 minutes engine stops , unplugged the CHT and engine just cranked and would not start , car smells flooded , my Dakota gauge reads 97F, the CHT sensor measured 048.9 ohms @ the ECU plug, my IR reads 143F . My IR thermometer read 98F when checking it against the Dakota @ 93F . I took photos but am only adding the TS2/CHT value read @ the ECU plug between terminals 23 and ground and my gauges when engine stopped . I did get a chance to check the CHT sensor I purchased from 914 Rubber I dropped it into a cup of 212F water and the resistance read 0.497 k ohms on my meter. I checked the value of this sensor @ room temperature and it read 1.917 k ohms .  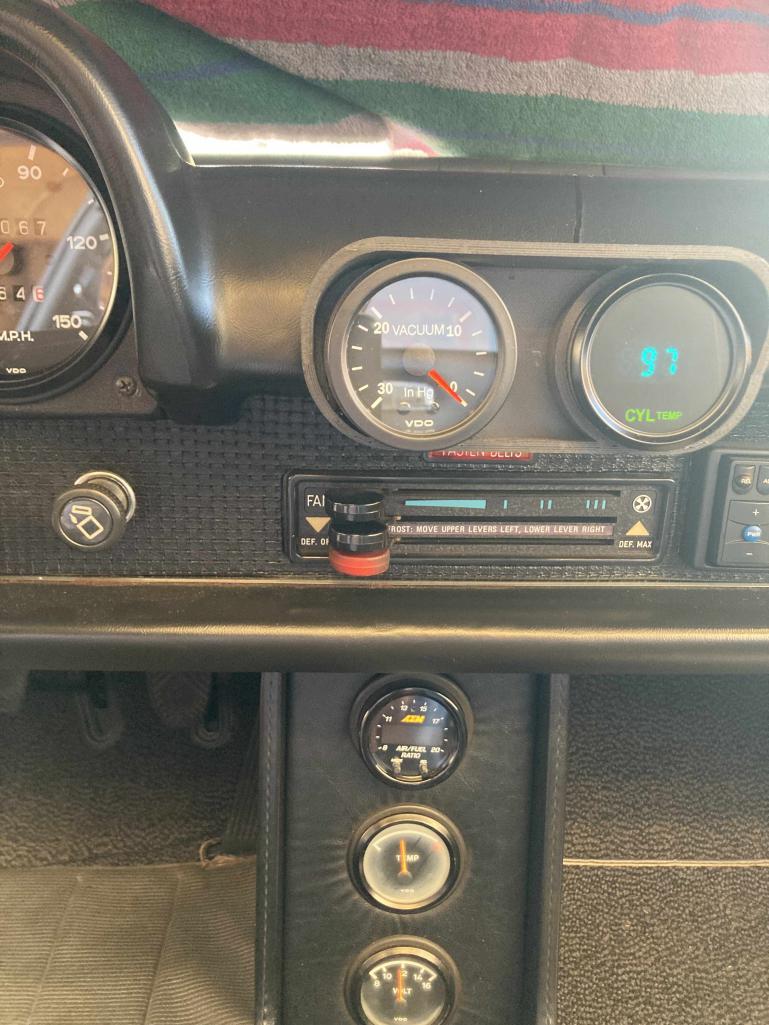 |
|
|
|
| Superhawk996 |
Aug 19 2025, 11:33 PM
Post
#78
|
|
914 Guru Group: Members Posts: 7,856 Joined: 25-August 18 From: Woods of N. Idaho Member No.: 22,428 Region Association: Galt's Gulch |
Good job and report out on the testing Ron. (IMG:style_emoticons/default/aktion035.gif)
I don’t like the disconnected correlations between Dakota, IR temp, and the oil temperature gauges. Something seems off to me. Especially if the engine was started cold at ambient and only run 15 minutes idling before pictures of gauges were taken. At the moment - let’s not get pulled down the rabbit hole of trying to figure out why these temperatures don’t seem well correlated. We very well may have to come back to this later. I especially don’t like that you are saying you’re reading less than 50 ohms of CHT temp resistance on the currently installed CHT when head is supposedly only 140ish and the engine stalls. Are you measuring the head (aluminum) that is exposed? Sorry to ask stupid question but need to ensure 140F isn’t the temp of the engine tin. As another plausibility check, a bare hand can lightly touch or quickly tap /touch 140F surface for a second or two without feeling like you’re going to get burned. Does this seem right? (Do not burn yourself - just trying to establish that we are talking about a touchable part of the head not being nearly as hot as boiling water). The bench testing of the new CHT seems plausible both ambient at 212ish. Swap the CHT sensor and see what happens. |
|
|
|
| Ron914 |
Aug 20 2025, 08:12 AM
Post
#79
|
|
Senior Member Group: Members Posts: 521 Joined: 19-April 22 From: Huntington Beach,Ca Member No.: 26,487 Region Association: Southern California |
QUOTE(Superhawk996 @ Aug 20 2025, 12:33 AM) Good job and report out on the testing Ron. (IMG:style_emoticons/default/aktion035.gif) I don’t like the disconnected correlations between Dakota, IR temp, and the oil temperature gauges. Something seems off to me. Especially if the engine was started cold at ambient and only run 15 minutes idling before pictures of gauges were taken. At the moment - let’s not get pulled down the rabbit hole of trying to figure out why these temperatures don’t seem well correlated. We very well may have to come back to this later. I especially don’t like that you are saying you’re reading less than 50 ohms of CHT temp resistance on the currently installed CHT when head is supposedly only 140ish and the engine stalls. Are you measuring the head (aluminum) that is exposed? Sorry to ask stupid question but need to ensure 140F isn’t the temp of the engine tin. As another plausibility check, a bare hand can lightly touch or quickly tap /touch 140F surface for a second or two without feeling like you’re going to get burned. Does this seem right? (Do not burn yourself - just trying to establish that we are talking about a touchable part of the head not being nearly as hot as boiling water). The bench testing of the new CHT seems plausible both ambient at 212ish. Swap the CHT sensor and see what happens. Good morning , I have a small job to help a friend today so it will be afternoon before I get back to this and I need to buy a 13 mm socket and make a relief in the 3" extension first . I shot my IR at the stud that the intake runner bolts to and also was under the car and shot the exposed head ,I think the runner bolt where it attaches to the head should be a good place . I will follow up later this late afternoon when I return . I agree and will replace the CHT sensor once I get the paper tool for removal and report findings |
|
|
|
| ctc911ctc |
Aug 20 2025, 09:52 AM
Post
#80
|
|
Senior Member Group: Members Posts: 1,331 Joined: 9-June 18 From: boston Member No.: 22,206 Region Association: North East States |
Audio engineers Fluke!
QUOTE(Ron914 @ Aug 19 2025, 10:39 PM) @Superhawk996 I made the checks you requested and I have to say after reading your last comments I also questioned the accuracy of the Dakota CHT gauge . When I purchased my gauge I mistakenly ordered it with a 1/2" ring terminal (12.7mm) because I didn't want to order a 18' connecting wire from sensor to gauge ,what I didn't know was because I ordered the shorter connecting wire they swap the 14mm ring for a 1/2" ring with the shorter wire . You only get a 18' connecting wire with the 14mm sensor ring . I contacted Dakota Digital and asked if I opened the ring terminal up to 14mm or 0.551181" and was told as long as I don't cut the wire it should be ok . Measured value of CHT sensor @ ECU plug :car cold ,garage temperature ~80F ,measured value 3.293k ohms I checked my meter against the 270 ohm resistor I bought from Auto Atlanta and it measured 266.2 ohms . Started my engine AAR was open / idle~1400 The car started running bad @ ~9:20 minutes idle was hunting up to 1200 , something seems not right . After ~15 minutes engine stops , unplugged the CHT and engine just cranked and would not start , car smells flooded , my Dakota gauge reads 97F, the CHT sensor measured 048.9 ohms @ the ECU plug, my IR reads 143F . My IR thermometer read 98F when checking it against the Dakota @ 93F . I took photos but am only adding the TS2/CHT value read @ the ECU plug between terminals 23 and ground and my gauges when engine stopped . I did get a chance to check the CHT sensor I purchased from 914 Rubber I dropped it into a cup of 212F water and the resistance read 0.497 k ohms on my meter. I checked the value of this sensor @ room temperature and it read 1.917 k ohms . |
|
|
|
|
3 User(s) are reading this topic (3 Guests and 0 Anonymous Users)
0 Members:

|
Lo-Fi Version | Time is now: 5th June 2026 - 09:52 PM |
Invision Power Board
v9.1.4 © 2026 IPS, Inc.