|
|
|
Porsche, and the Porsche crest are registered trademarks of Dr. Ing. h.c. F. Porsche AG.
This site is not affiliated with Porsche in any way. Its only purpose is to provide an online forum for car enthusiasts. All other trademarks are property of their respective owners. |
|
|

  |

| 914werke |
 Jun 5 2026, 11:11 AM Jun 5 2026, 11:11 AM
Post
#81
|
|
"I got blisters on me fingers"  Group: Members Posts: 11,680 Joined: 22-March 03 From: USofA Member No.: 453 Region Association: Pacific Northwest |
QUOTE(burton73 @ Jun 4 2026, 05:45 PM)  The picture is from when Mark and Sonners and I tore down the RAT built 2270. The flaps were locked down in the open position. so you can see what that looked like. This (IMG:style_emoticons/default/agree.gif) is quite common. IDK how many of these Ive encountered that were missing the T stat and had also locked down the cooling flap. (IMG:style_emoticons/default/dry.gif) The argument is always "its unnecessary" "I don't drive this car in the winter" or "it never gets cold enough here to warrant it" (IMG:style_emoticons/default/mad.gif) You are also missing the little tabs that hold the shaft into the plastic impeller bushings |
   |

 
|
| 930cabman |
Jun 5 2026, 11:53 AM
Post
#82
|
|
Advanced Member Group: Members Posts: 4,704 Joined: 12-November 20 From: Buffalo Member No.: 24,877 Region Association: North East States |
I am fully onboard of the fact the Germans wouldn't include anything not 100% necessary, but I only have my own experience. My recent (3 years ago) 2056 build rocks, heats up very quickly, runs down the road at 80mph at 210-230 F oil temp getting 30+mpg.
NO thermostat, flaps fully open 24-7-365 |
|
|
|
| 930cabman |
Jun 7 2026, 08:38 AM
Post
#83
|
|
Advanced Member Group: Members Posts: 4,704 Joined: 12-November 20 From: Buffalo Member No.: 24,877 Region Association: North East States |
QUOTE(930cabman @ Jun 5 2026, 11:53 AM) I am fully onboard of the fact the Germans wouldn't include anything not 100% necessary, but I only have my own experience. My recent (3 years ago) 2056 build rocks, heats up very quickly, runs down the road at 80mph at 210-230 F oil temp getting 30+mpg. NO thermostat, flaps fully open 24-7-365 I'm waiting (IMG:style_emoticons/default/stirthepot.gif) |
|
|
|
| Superhawk996 |
Jun 7 2026, 11:34 AM
Post
#84
|
|
914 Guru Group: Members Posts: 7,887 Joined: 25-August 18 From: Woods of N. Idaho Member No.: 22,428 Region Association: Galt's Gulch |
QUOTE(930cabman @ Jun 7 2026, 10:38 AM) QUOTE(930cabman @ Jun 5 2026, 11:53 AM) I am fully onboard of the fact the Germans wouldn't include anything not 100% necessary, but I only have my own experience. My recent (3 years ago) 2056 build rocks, heats up very quickly, runs down the road at 80mph at 210-230 F oil temp getting 30+mpg. NO thermostat, flaps fully open 24-7-365 I'm waiting (IMG:style_emoticons/default/stirthepot.gif) For what? Permission to wear out your engine prematurely? Granted. (IMG:style_emoticons/default/stirthepot.gif) Having been an automotive engineer by profession (30 years) we can start a new thread on it. We can go thru various SAE papers as well as the Mackerle book Air-Cooled Automotive Engines if you want. Just for clarity, I love debating this (IMG:style_emoticons/default/stromberg.gif) and have posted the the response above out of good natured friendship / ribbing (IMG:style_emoticons/default/poke.gif) and don’t mean for it to be mean or dismissive. Happy to have the debate with anyone but let’s not tie up Ron’s thread. (IMG:style_emoticons/default/drunk.gif) |
|
|
|
| 930cabman |
Jun 7 2026, 02:39 PM
Post
#85
|
|
Advanced Member Group: Members Posts: 4,704 Joined: 12-November 20 From: Buffalo Member No.: 24,877 Region Association: North East States |
Having results for the OP is the goal, in my opinion it is far better to have flaps wide open than flaps closed or possibly (partially)closed
again, in 45 - 50 degree ambient my 2056 is defrosting the windshield in a very short time, just my .02 hope Ron can get to the bottom of things |
|
|
|
| Superhawk996 |
Jun 7 2026, 04:41 PM
Post
#86
|
|
914 Guru Group: Members Posts: 7,887 Joined: 25-August 18 From: Woods of N. Idaho Member No.: 22,428 Region Association: Galt's Gulch |
QUOTE(930cabman @ Jun 7 2026, 04:39 PM) Having results for the OP is the goal, in my opinion it is far better to have flaps wide open than flaps closed or possibly (partially)closed again, in 45 - 50 degree ambient my 2056 is defrosting the windshield in a very short time, just my .02 hope Ron can get to the bottom of things Let’s take this thermostat and flaps debate over to a new thread here: www.914world.com/bbs2/index.php?showtopic=378325 |
|
|
|
| Ron914 |
Jun 12 2026, 02:27 PM
Post
#87
|
|
Senior Member Group: Members Posts: 527 Joined: 19-April 22 From: Huntington Beach,Ca Member No.: 26,487 Region Association: Southern California |
Update ,
I received my CFR oil pressure relief kit today . Picture of old valve and new part . 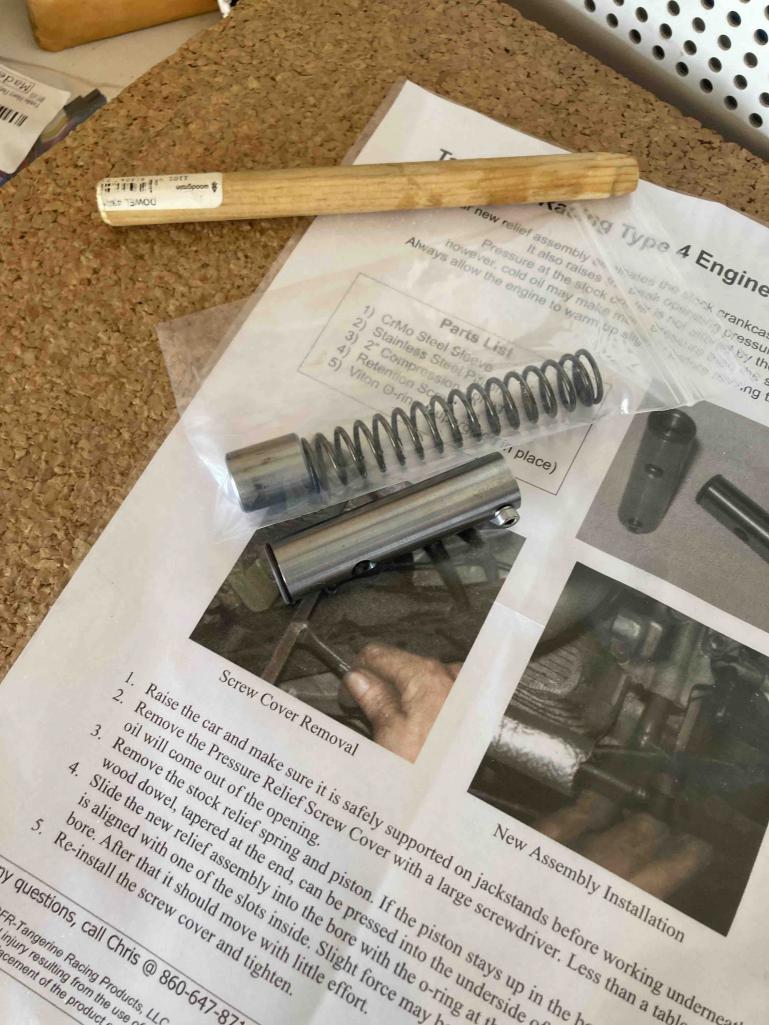 Pulled the #4 spark plug and used my bore scope to see how the flap moves over the oil cooler , also a photo of my # 4 plug to see how it is burning. 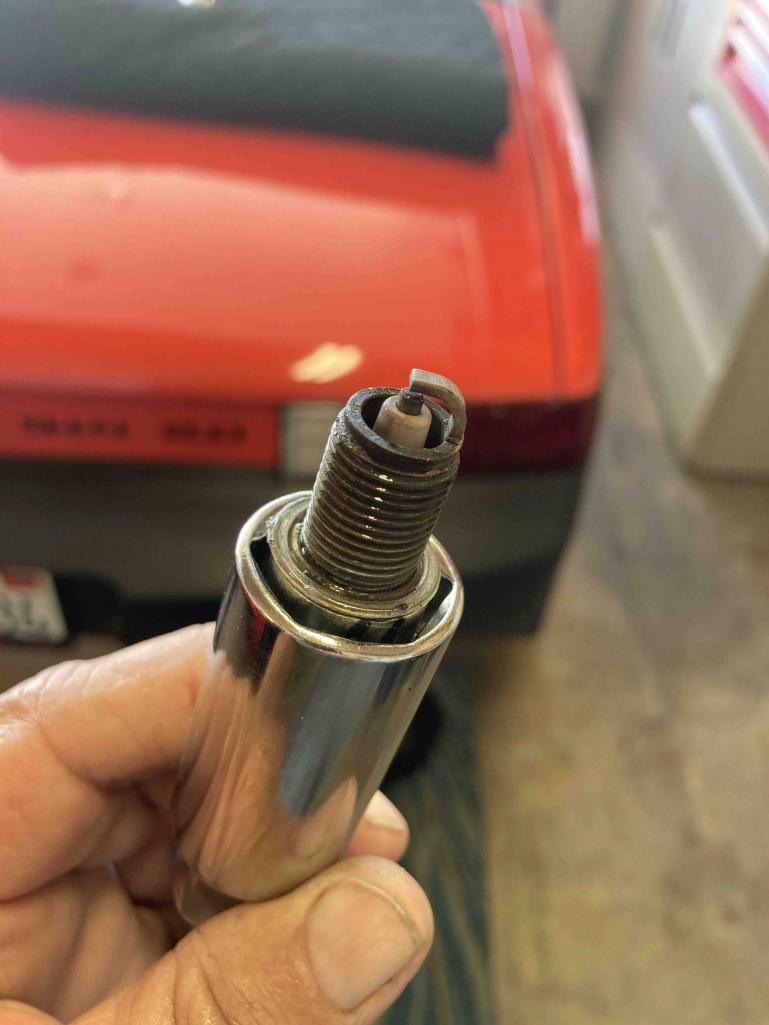 I haven't figured out how to extract photos from the bore scope so here is a photo of a photo but you can see it is down over the oil cooler but there seems to be some resistance as I near the end of the flaps travel. It doesn't look like it covers the oil cooler completely I also could send @Superhawk996 , @emerygt350 via text a short video . Hot  Cold 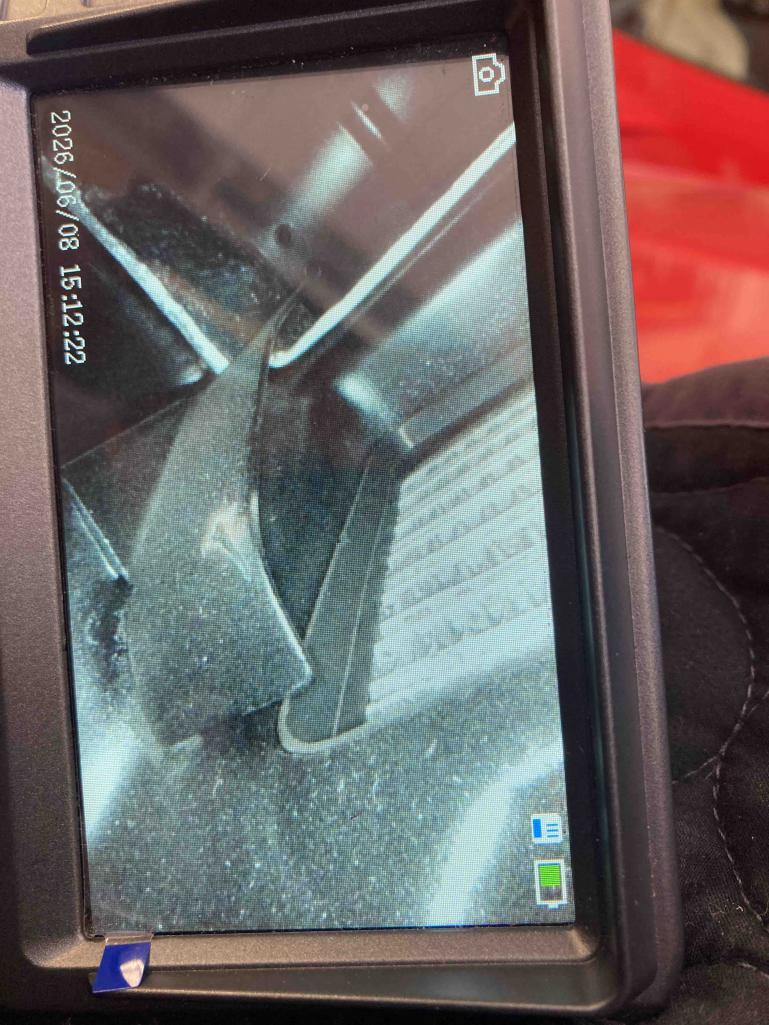 I have not started the car yet and do a longer test run . I will do this later after the sealant I used on the relief valve screw dries . |
|
|
|
| Superhawk996 |
Jun 12 2026, 02:45 PM
Post
#88
|
|
914 Guru Group: Members Posts: 7,887 Joined: 25-August 18 From: Woods of N. Idaho Member No.: 22,428 Region Association: Galt's Gulch |
@ron914
Yeah - that flap is not down over the cooler like it should be. In the full open position that flap would be down so far that you would not see the cooler. Go take a close look at the picture of the flap in post #64 full open position. As it sits a significant amount of air is bypassing the oil cooler when hot. You’re going to need to deep dive why it isn’t opening all the way. Hard to gauge depth perception in the photo but looks to me like the flap is hitting the side tin that surrounds the cooler and is and not allowing the oil cooler flap to seat all the way. |
|
|
|
| emerygt350 |
Jun 12 2026, 03:18 PM
Post
#89
|
|
Advanced Member Group: Members Posts: 3,639 Joined: 20-July 21 From: Upstate, NY Member No.: 25,740 Region Association: North East States |
Wow, it really looks like that flap on the left is blocking it. Shoot, that gap is way too large, no air is being diverted into the cooler. Anybody got any views of that area on a functioning system
Plug looks good though. And hey! You found your problem!!! This can be fixed! |
|
|
|
| porschetub |
Jun 12 2026, 06:17 PM
Post
#90
|
|
914 Guru Group: Members Posts: 5,122 Joined: 25-July 15 From: New Zealand Member No.: 18,995 Region Association: None |
QUOTE(emerygt350 @ Jun 13 2026, 09:18 AM) Wow, it really looks like that flap on the left is blocking it. Shoot, that gap is way too large, no air is being diverted into the cooler. Anybody got any views of that area on a functioning system Plug looks good though. And hey! You found your problem!!! This can be fixed! Looks like it ,for what it's worth my last build I test fitted the flap rod with both cylinder tins off and found the rod was bent ?,replaced with a used one and all good ,this could be the issue here . Cheers . |
|
|
|
| Jack Standz |
Jun 12 2026, 06:56 PM
Post
#91
|
|
Senior Member Group: Members Posts: 827 Joined: 15-November 19 From: Happy Place (& surrounding area) Member No.: 23,644 Region Association: None |
QUOTE(Superhawk996 @ Jun 13 2026, 03:45 AM) @ron914 Yeah - that flap is not down over the cooler like it should be. In the full open position that flap would be down so far that you would not see the cooler. Go take a close look at the picture of the flap in post #64 full open position. As it sits a significant amount of air is bypassing the oil cooler when hot. You’re going to need to deep dive why it isn’t opening all the way. Hard to gauge depth perception in the photo but looks to me like the flap is hitting the side tin that surrounds the cooler and is and not allowing the oil cooler flap to seat all the way. (IMG:style_emoticons/default/agree.gif) (IMG:style_emoticons/default/agree.gif) That right flap (and probably the left one too) isn't working right for some reason. Definitely at least part of the problem. Remember that "mystery tin" you found? That piece might be missing from the left side of the motor, so suggest you take the bore scope over there and do the same procedure on the left side tin. Or, alternatively you could take a photo from under the car to see if it's installed/installed properly. Now back to your very limited space and the fix. Yes, you can stand on your head in the engine compartment and yes the top tins can be removed without removing the motor. It's not an enviable task, but it is one option. If you can figure out why the flaps aren't working right, you may be able to remove tin fasteners and get a stick or thin prybar in there to "adjust" the flaps so they move properly. If was our motor, I know what we'd do. Best wishes for the fix! |
|
|
|
| frank_c |
Jun 13 2026, 10:57 PM
Post
#92
|
|
Member Group: Members Posts: 94 Joined: 29-December 24 From: Austin, TX Member No.: 28,542 Region Association: None |
QUOTE(emerygt350 @ Jun 12 2026, 04:18 PM) Anybody got any views of that area on a functioning system Here's a photo with the flap in the down position (air to cooler):  |
|
|
|
| JamesM |
Jun 14 2026, 03:54 PM
Post
#93
|
|
Advanced Member Group: Members Posts: 2,247 Joined: 6-April 06 From: Kearns, UT Member No.: 5,834 Region Association: Intermountain Region |
QUOTE(Ron914 @ Jun 12 2026, 12:27 PM) Hot I have not started the car yet and do a longer test run . I will do this later after the sealant I used on the relief valve screw dries . No need for a test run, this is a problem. Almost looks like there is an abnormal bend to your diverter flap. Perhaps it is a side effect of looking at it through a borescope but that flap should be mostly flat where it lays over the oil cooler. Your appears to have a pretty pronounced curve in it Hot closed it should look like this. 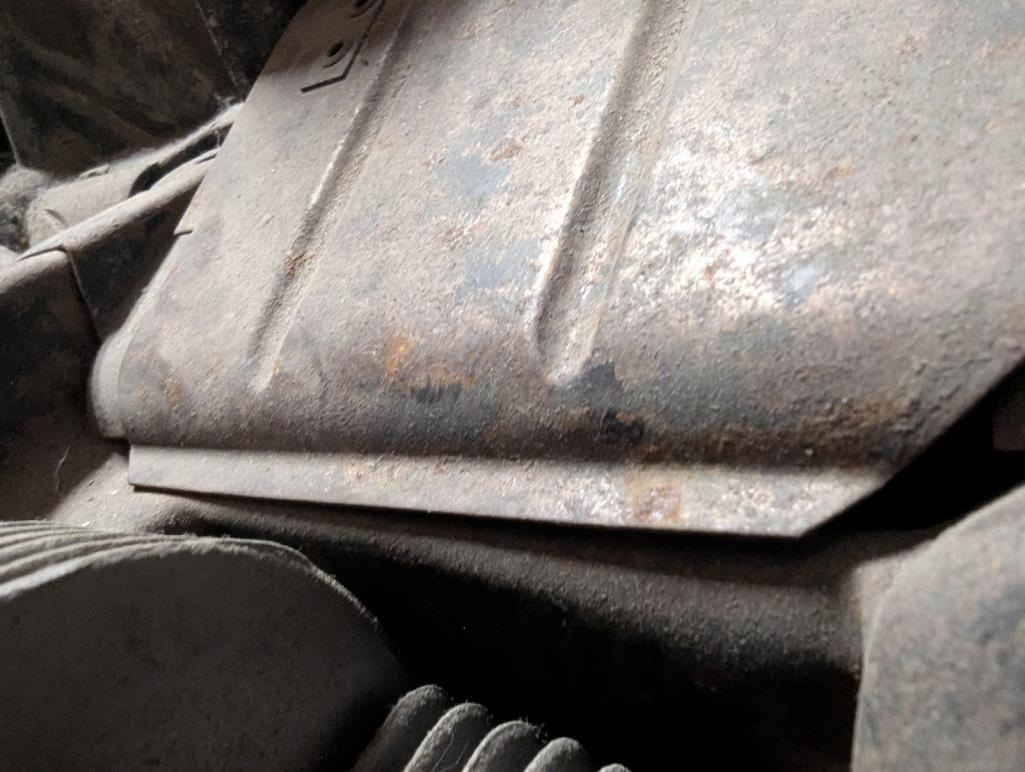 Open again for reference. 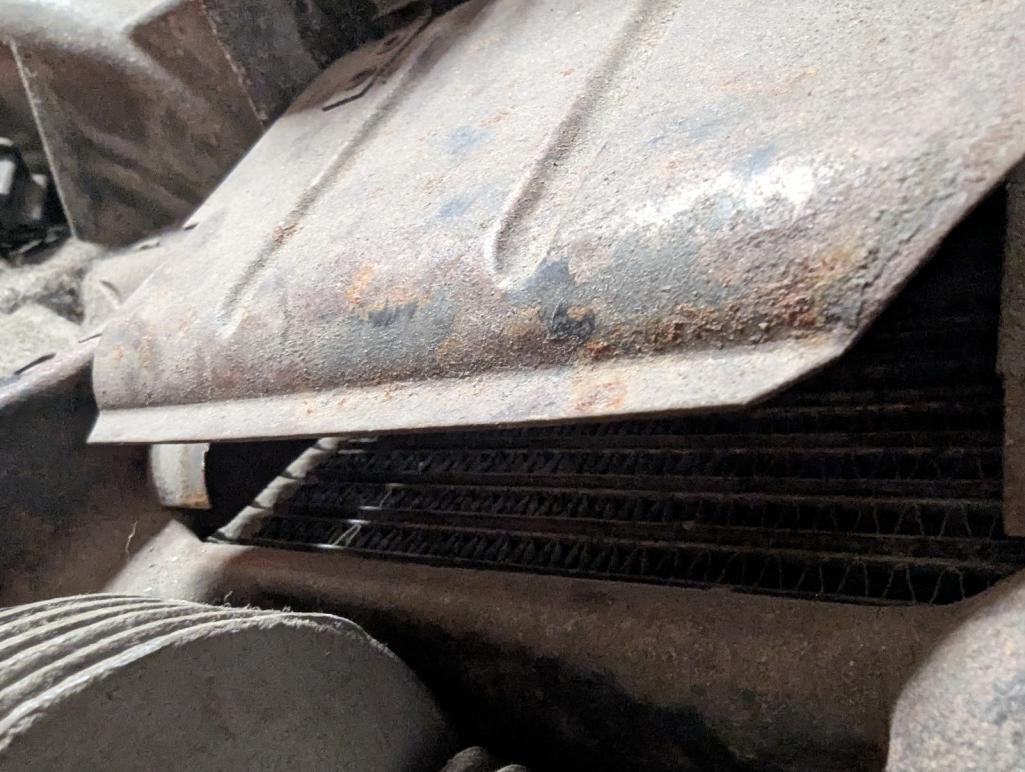 Wondering if you may be able to force it (deforming the flap) closed through the spark plug socket in the tin. Wouldnt be a proper long term fix but if you can close that gap it would at least get you driving for now. BEFORE that though, loosen (or remove) the three tin screws (seen in the photo below) that hold the oil cooler tin to the upper tin during this attempt as that may allow some room for it to shift as well. I have had it happen where testing the flap with the top tin off has been fine but tightening those three screws pulls the lower tin into a position that obstructs movement of the flap. Trying to find a way for you to avoid dropping the engine, but really the answer is pretty clear here as to what should happen. 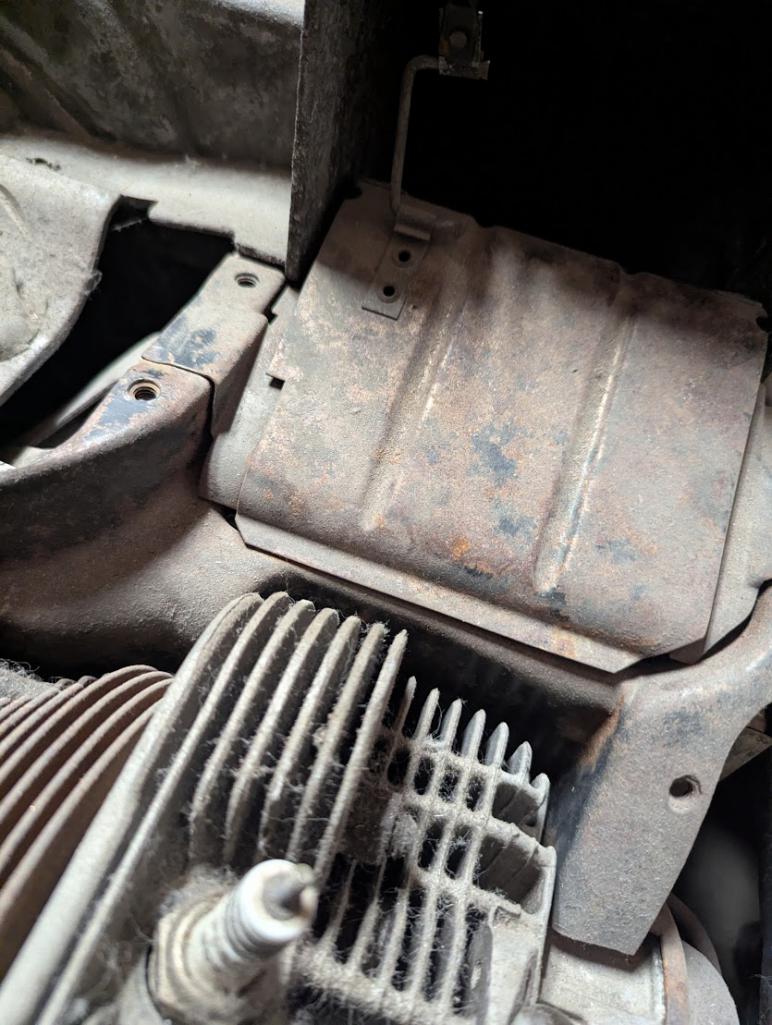 |
|
|
|
| JamesM |
Jun 14 2026, 04:04 PM
Post
#94
|
|
Advanced Member Group: Members Posts: 2,247 Joined: 6-April 06 From: Kearns, UT Member No.: 5,834 Region Association: Intermountain Region |
To me it looks like you have interference right here:
In addition though the entire edge looks funny. Was this an aftermarket replacement possibly? 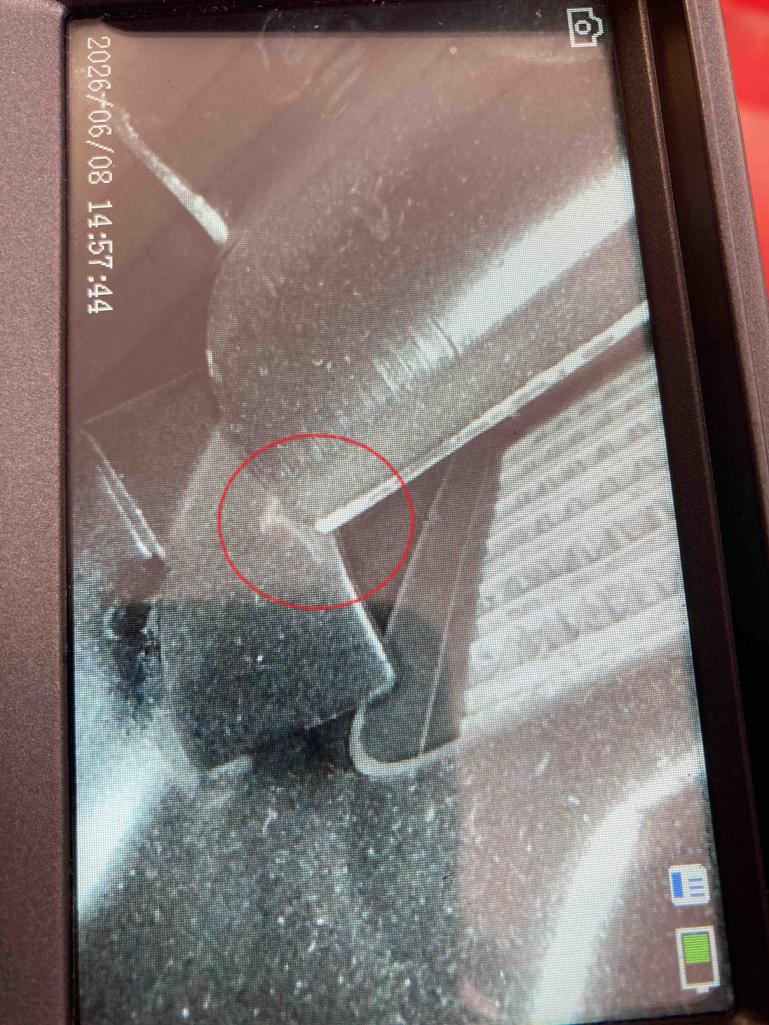 |
|
|
|
| Ron914 |
Jun 14 2026, 05:35 PM
Post
#95
|
|
Senior Member Group: Members Posts: 527 Joined: 19-April 22 From: Huntington Beach,Ca Member No.: 26,487 Region Association: Southern California |
QUOTE(JamesM @ Jun 14 2026, 05:04 PM) To me it looks like you have interference right here: In addition though the entire edge looks funny. Was this an aftermarket replacement possibly? I agree with you . I can see where it is hitting and removed the paint . I repainted all the tins before installing . Looks like my inexpeirence bit me on this one . I thought we had it together correctly . On the other hand did some testing with @Superhawk996 today and my gauge appears to start out way too high on start up so I will be posting an a WTB ad later for the OEM 60 mm 200C temperature gauge . |
|
|
|
| emerygt350 |
Jun 14 2026, 06:30 PM
Post
#96
|
|
Advanced Member Group: Members Posts: 3,639 Joined: 20-July 21 From: Upstate, NY Member No.: 25,740 Region Association: North East States |
it looks like it is installed backwards but I can't see how you could even do that...
|
|
|
|
| frank_c |
Jun 14 2026, 11:14 PM
Post
#97
|
|
Member Group: Members Posts: 94 Joined: 29-December 24 From: Austin, TX Member No.: 28,542 Region Association: None |
QUOTE(emerygt350 @ Jun 14 2026, 07:30 PM) it looks like it is installed backwards but I can't see how you could even do that... I was thinking the same thing given the curve at the end, but like you said, that doesn't seem possible due to the location of the pivot clips. Plus, the clips aren't visible in the scope photo. Could it be a vane/diverter from another engine? Something fabricated? 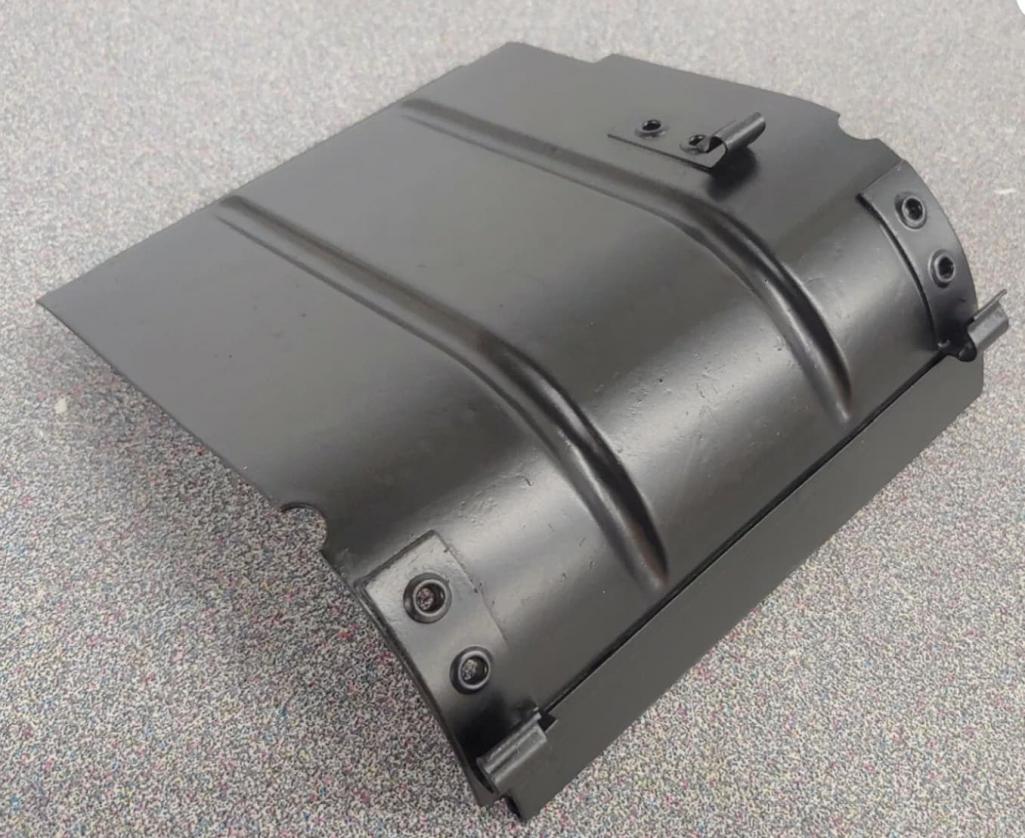 |
|
|
|
|
1 User(s) are reading this topic (1 Guests and 0 Anonymous Users)
0 Members:

|
Lo-Fi Version | Time is now: 15th June 2026 - 03:19 AM |
Invision Power Board
v9.1.4 © 2026 IPS, Inc.