|
|
|
Porsche, and the Porsche crest are registered trademarks of Dr. Ing. h.c. F. Porsche AG.
This site is not affiliated with Porsche in any way. Its only purpose is to provide an online forum for car enthusiasts. All other trademarks are property of their respective owners. |
|
|


| watsonrx13 |
 Sep 24 2005, 04:18 AM Sep 24 2005, 04:18 AM
Post
#1
|
|
Advanced Member  Group: Members Posts: 2,735 Joined: 18-February 03 From: Plant City, FL Member No.: 312 Region Association: South East States |
This is a step-by-step instruction to install new bearings in the front hubs and attach the hubs to the car. I am going to make the assumption that you have already purchased new hubs or removed all of the seals and bearing from the old hub and had it checked for correct thickness and trueness. My recommendation is to purchase new hubs/discs.
When you get the bearings, remove the race and place them in a freezer. This will slightly shrink the race, so that you can start the installation of the bearings into the hub. Attached image(s) 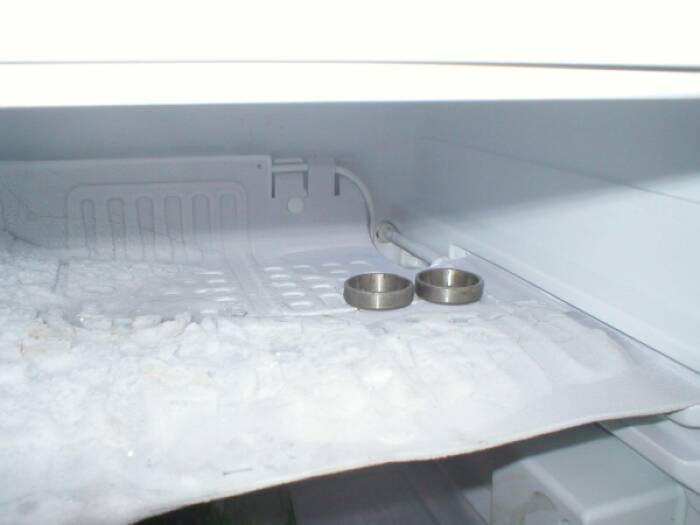
|
   |

 
|
Posts in this topic
 watsonrx13 Install front bearings and attach hubs Sep 24 2005, 04:18 AM
 watsonrx13 This is what the back side of the hub looks like b... Sep 24 2005, 04:18 AM watsonrx13 I used the hammer to carefully tap the race down t... Sep 24 2005, 04:18 AM watsonrx13 This shows how I used the driver to seat the race. Sep 24 2005, 04:19 AM watsonrx13 This shows the race fully seated. Sep 24 2005, 04:19 AM watsonrx13 Next, I flipped the hub over. Again, you'll no... Sep 24 2005, 04:19 AM watsonrx13 Again, I removed the frozen race and set it in the... Sep 24 2005, 04:20 AM watsonrx13 I then used a 1 1/8" deep socket to carefully pres... Sep 24 2005, 04:20 AM watsonrx13 This shows the outside race fully seated. Sep 24 2005, 04:20 AM watsonrx13 Here's where the front hub attaches to the ste... Sep 24 2005, 04:21 AM watsonrx13 I'm holding the large bearing. The next step i... Sep 24 2005, 04:21 AM watsonrx13 Once the bearing is filled with grease, place this... Sep 24 2005, 04:21 AM watsonrx13 This shows the seal that will be pressed in the hu... Sep 24 2005, 04:22 AM watsonrx13 This shows the seal in place. Sep 24 2005, 04:22 AM watsonrx13 Throughout the installation, I have worn gloves. T... Sep 24 2005, 04:22 AM watsonrx13 This shows the slotted washer and nut that will be... Sep 24 2005, 04:23 AM watsonrx13 Attach the slotted washer and the nut. Please take... Sep 24 2005, 04:23 AM watsonrx13 Finally, smear some grease on the nut and install ... Sep 24 2005, 04:23 AM Brando Yay! Nice how-to! http:... Sep 24 2005, 10:34 AM SpecialK Most excellent pictorial! http://www.914wor... Sep 25 2005, 09:48 AM
  |
1 User(s) are reading this topic (1 Guests and 0 Anonymous Users)
0 Members:

|
Lo-Fi Version | Time is now: 17th April 2026 - 04:28 AM |
Invision Power Board
v9.1.4 © 2026 IPS, Inc.