Home  |  Forums  |  914 Info  |  Blogs
 
914World.com - The fastest growing online 914 community!
 
Porsche, and the Porsche crest are registered trademarks of Dr. Ing. h.c. F. Porsche AG. This site is not affiliated with Porsche in any way.
Its only purpose is to provide an online forum for car enthusiasts. All other trademarks are property of their respective owners.
 

Welcome Guest ( Log In | Register )

3 Pages V  1 2 3 >  
Reply to this topicStart new topic
> I need help with rear trunk torsion bar, How do I get the bar behind the roller?
Doug Leggins
post Oct 4 2005, 08:55 PM
Post #1


Senior Member
***

Group: Benefactors
Posts: 1,358
Joined: 6-February 03
From: Nashville, Indiana
Member No.: 261
Region Association: None


The teener kicked my ass tonight! I simply wore myself out trying to get the rear trunk torsion bar behind the trunk roller.

I searched for as much info as I cold find before beginning this task. I modified my 12" adjustable wrench as mentioned on other threads on this topic. This tool proved to be a very good lever for pushing the torsion bar back. I could get the torsion bar pushed/twisted back well enough but I could not get it around the hinge roller/pin. I tried several times but could not find a way to get the roller behind the pin on the hinge.

I tried to remove the hinge then hold the torsion bar back as far as I could and then reinstall the hinge -This is the task the wore me out! No matter how or what I tried I could not find a way to get the bar behind the roller.

Anyone know the secret/technique to get the torsion bar in place?

Here is a pic of the wrench with a notch cut out on the end.


Attached image(s)
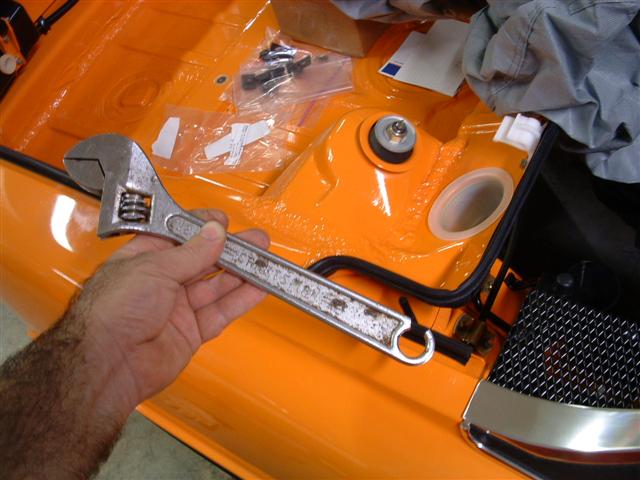
Attached Image
User is offlineProfile CardPM
Go to the top of the page
+Quote Post
Doug Leggins
post Oct 4 2005, 09:03 PM
Post #2


Senior Member
***

Group: Benefactors
Posts: 1,358
Joined: 6-February 03
From: Nashville, Indiana
Member No.: 261
Region Association: None


Trying to bet the black torsion bar behind the brass roller. -Help!!!


Attached image(s)
Attached Image
User is offlineProfile CardPM
Go to the top of the page
+Quote Post
Rand
post Oct 4 2005, 09:07 PM
Post #3


Cross Member
*****

Group: Members
Posts: 7,409
Joined: 8-February 05
From: OR
Member No.: 3,573
Region Association: None


Taking mine OUT was a careful process... putting one back IN? Ouch - I don't envy your job.

Personally, I like the shock kits better.

Are you intentionally wanting to keep the stock parts? If not, Craig can hook you up with a great alternative (www.camp914.com).

If so, I can understand after looking at your car pics. (IMG:http://www.914world.com/bbs2/html/emoticons/drooley.gif) Nice work! (IMG:http://www.914world.com/bbs2/html/emoticons/smilie_pokal.gif)
User is offlineProfile CardPM
Go to the top of the page
+Quote Post
JoeSharp
post Oct 4 2005, 10:06 PM
Post #4


In Irvine, Ca. May 15-18
****

Group: Members
Posts: 3,947
Joined: 9-July 03
From: DeLand, Florida
Member No.: 898
Region Association: South East States


Doug: I take my 1/4 screw driver extention and a deep 5/16 socket for leverage, it seems to work for me.
:PERMAGRIN: Joe
User is offlineProfile CardPM
Go to the top of the page
+Quote Post
Air_Cooled_Nut
post Oct 4 2005, 10:19 PM
Post #5


914 Ronin - 914 owner who lost his 914club.com
***

Group: Members
Posts: 1,748
Joined: 19-April 03
From: Beaverton, Oregon
Member No.: 584
Region Association: None


Though I can't help, this topic is perfect because I'm going to change out the plastic ones for the brass ones left over from my last 914. Oh, and I am quite envious with your car (IMG:http://www.914world.com/bbs2/html/emoticons/wub.gif) Orange cars rock (IMG:http://www.914world.com/bbs2/html/emoticons/aktion035.gif) (see my VW on my web site (IMG:http://www.914world.com/bbs2/html/emoticons/wink.gif) )
User is offlineProfile CardPM
Go to the top of the page
+Quote Post
olav
post Oct 4 2005, 10:51 PM
Post #6


Senior Member
***

Group: Retired Members
Posts: 1,107
Joined: 28-December 02
From: Los Gatos, CA. USA
Member No.: 34
Region Association: None


To get that puppy on you need to:

Preload torsion bar spring with a box wrench until the crescent wrench with the notch can be positioned behind the upper bend.

Once the crescent wrench is in position push it forward toward the roller.

Set the spring on the roller with a screw driver.

So, you essentially attack the problem from the trunk side.
User is offlineProfile CardPM
Go to the top of the page
+Quote Post
Doug Leggins
post Oct 4 2005, 10:53 PM
Post #7


Senior Member
***

Group: Benefactors
Posts: 1,358
Joined: 6-February 03
From: Nashville, Indiana
Member No.: 261
Region Association: None


I thought about the shock kits, even had it on the long list of things to buy. But, for some reason i have been compelled to use the stock set up on the rear trunk (IMG:http://www.914world.com/bbs2/html/emoticons/confused24.gif) . The engineering mind set just kinda wants to see how well this set up works when in good condition and properly maintained. This set up is kind of intriguing to me. Although much less so now that I have tried to install it (IMG:http://www.914world.com/bbs2/html/emoticons/laugh.gif) .

Joe - Do you use the extension and socket to maneuver the bar around the roller and pin?

Air_Cooled_Nut - The modified 12" adjustable wrench works very well to move the torsion bar forward and back. I think that it would work very well to relieve the tension enough to slide off the plastic roller and then slide on the brass roller.

Anyone else with a good idea on a way to get the torsion bar behind the roller?

Thanks
User is offlineProfile CardPM
Go to the top of the page
+Quote Post
olav
post Oct 4 2005, 10:59 PM
Post #8


Senior Member
***

Group: Retired Members
Posts: 1,107
Joined: 28-December 02
From: Los Gatos, CA. USA
Member No.: 34
Region Association: None


There's a "special" tool to do this with and the adjustable wrench mimicks the tool. (IMG:http://www.914world.com/bbs2/html/emoticons/wink.gif)
User is offlineProfile CardPM
Go to the top of the page
+Quote Post
Doug Leggins
post Oct 4 2005, 11:08 PM
Post #9


Senior Member
***

Group: Benefactors
Posts: 1,358
Joined: 6-February 03
From: Nashville, Indiana
Member No.: 261
Region Association: None


QUOTE
To get that puppy on you need to:

Preload torsion bar spring with a box wrench until the crescent wrench with the notch can be positioned behind the upper bend.

Once the crescent wrench is in position push it forward toward the roller.

Set the spring on the roller with a screw driver.

So, you essentially attack the problem from the trunk side.


These are the steps that i tried, except for setting the spring on the roller with a screw driver. I thought about trying this but didn't have the right helpers to attempt it. My wife and my son were trying their best but just not the skill level that I needed on this task to attempt prying the torsion bar around the pin and roller.

Toby - nice squareback!
User is offlineProfile CardPM
Go to the top of the page
+Quote Post
hmeeder
post Oct 4 2005, 11:14 PM
Post #10


Dante's Sportscar
**

Group: Members
Posts: 352
Joined: 21-November 04
From: San Diego, CA
Member No.: 3,154


I used this method once upon a time when my hinge pin cup separated from the sidewall. Respect those damn torsion bars, they have no respect for you. Werd

Trunk Torsion Bar Procedure

PS. Love the color fo your car too. OPAFer!
User is offlineProfile CardPM
Go to the top of the page
+Quote Post
plas76targa
post Oct 5 2005, 06:00 AM
Post #11


Senior Member
***

Group: Members
Posts: 885
Joined: 22-February 04
From: Frederick, MD
Member No.: 1,700
Region Association: MidAtlantic Region


Doug,

To replace a broken plastic roller with an aluminum roller, I used the spark plug wrench out of my 911's tool kit. I'd guess it performed the same function as the 5/16 deep socket described in Herb's procedure. My advantage was the torsion spring was already in place so I didn't have to move it far. That tool easily fits one's hand as well as over the bar. I did have a helper though.

I don't envy you trying to pry that thing 90 degrees - as you photo shows. If you can borrow the spark plug tool from anyone local, that might work. Anyone close by to help? Sure looks like you'd need six hands a some divine guidance too!
User is offlineProfile CardPM
Go to the top of the page
+Quote Post
ClayPerrine
post Oct 5 2005, 08:50 AM
Post #12


Life's been good to me so far.....
***************

Group: Admin
Posts: 15,410
Joined: 11-September 03
From: Hurst, TX.
Member No.: 1,143
Region Association: NineFourteenerVille


As was said previously, use a box end wrench to move the torsion bar until you can get the mocified cresent wrench hooked over the bar below the first bend.

Remove the roller from the pin, and use a big screwdriver as a wedge to allow the bar to slide past the pin and below it.

Once the bar is laying against the bottom of the pin, use the cresent wrench to pry it down, and slip the roller in place.


Hope that helps.
User is offlineProfile CardPM
Go to the top of the page
+Quote Post
aircooledboy
post Oct 5 2005, 10:58 AM
Post #13


Sweet Pea's 1st ride in daddy's "vroom -vroom"
***

Group: Members
Posts: 1,672
Joined: 4-February 04
From: Rockford, IL
Member No.: 1,629
Region Association: Upper MidWest


I have had to do this 3 times to repair my pivot hinge, and I used a deepwell socket kinda like joe described.

1) box end wrench to get the bar end pointing up to vertical
2) slip smallest that will it over the bar deepwell socket with 12" extension over the end of the bar
3) move bar into place with extension
4) As bar gets into position near roller, slide socket back off bar enough so it isn't going to interfere with the roller, let bar up into grove.
User is offlineProfile CardPM
Go to the top of the page
+Quote Post
flesburg
post Oct 5 2005, 02:52 PM
Post #14


Senior Member
***

Group: Members
Posts: 506
Joined: 22-November 04
From: Pontiac, IL
Member No.: 3,162


Guys !!!!!!!!! This question comes up every 6 months or so.

There is a special tool for this. I bought mine from either Tweeks (now mid-america motorsports) or Automotion (now Performance Products) maybe 20-25 years ago.

It slips over the end of the torsion bar, rotates, and holds onto the torsion bar. It has a socket fitting on it so you can use a ½ or ¾ inch breaker bar to apply tension to the torsion bar. It works like a charm. No danger of a broken bone. When you see how easy it is you will be pissed off at yourself for not thinking of it and making one for yourself.

If you will give me a little time ( I will not be where the tool is to take its picture until the 15th of October) I will take a picture and post it. Maybe one of you might want to make some….

Or, I will loan it to you. If you will pay for shipping both ways (and let me hold title to your first born, or you 914, or something) until you return it to me. I do not normally EVER loan tools, because it makes enemies out of friends when they break them or loose them or forget them or whatever. Seriously, I would loan it. I live near Kansas City, MO.

I do not want to sell it because I might need it someday and do not know where to get another one…

Dale Flesburg


Send me a PM
User is offlineProfile CardPM
Go to the top of the page
+Quote Post
ClayPerrine
post Oct 5 2005, 03:46 PM
Post #15


Life's been good to me so far.....
***************

Group: Admin
Posts: 15,410
Joined: 11-September 03
From: Hurst, TX.
Member No.: 1,143
Region Association: NineFourteenerVille


Dale,

The cresent wrench modification mentioned in this thread was invented by a Porsche mechanic (Wes Hildreth) who has worked on these cars since they were new. He has the special wrench you describe, and he considers it an expensive paperweight. (IMG:http://www.914world.com/bbs2/html/emoticons/biggrin.gif)

If it works for you, great.
User is offlineProfile CardPM
Go to the top of the page
+Quote Post
JoeSharp
post Oct 5 2005, 04:20 PM
Post #16


In Irvine, Ca. May 15-18
****

Group: Members
Posts: 3,947
Joined: 9-July 03
From: DeLand, Florida
Member No.: 898
Region Association: South East States


Doug: I takt the 5/16th deep well and slip it on a 1/4 screw driver extention and slip that over the bar. Work it around the grill parts and under the piviot pen. It takes some effort, but thats just the way I get it done.
:PERMAGRIN: Joe


Attached image(s)
Attached Image
User is offlineProfile CardPM
Go to the top of the page
+Quote Post
Allan
post Oct 5 2005, 05:10 PM
Post #17


Teenerless Weenie
*****

Group: Members
Posts: 8,373
Joined: 5-July 04
From: Western Mesopotamia
Member No.: 2,304
Region Association: Southern California


Excellent solution Joe.
User is offlineProfile CardPM
Go to the top of the page
+Quote Post
JoeSharp
post Oct 5 2005, 06:19 PM
Post #18


In Irvine, Ca. May 15-18
****

Group: Members
Posts: 3,947
Joined: 9-July 03
From: DeLand, Florida
Member No.: 898
Region Association: South East States


Thanks Allan. But its not mine, I read it on the board somewhere.
:PERMAGRIN: Joe
User is offlineProfile CardPM
Go to the top of the page
+Quote Post
jsteele22
post Oct 5 2005, 06:42 PM
Post #19


Senior Member
***

Group: Members
Posts: 727
Joined: 24-August 05
From: Colorado Springs, CO
Member No.: 4,653


Car looks sweet, BTW (I'm thinking of converting to signal orange if I ever get around to painting.)

I repaired a hinge on my car when I got it, and was gonna get the metal rollers (one of the plastic ones was cracked.) When I looked at how it worked and how hard it was to install, I decided it just wasn't a very good design compared to a shock (really shock + spring) kit. To keep the trunk lid up, the force required is inversely proportional to the distance from the pivot. If you want your force applied 10 times closer than it would be with a shock/spring system, you've gotta apply 10 times more force. Hmm. it would seem that a force that large could over time prove harmful to the hinges. Anyone ever heard of hinge problems on a 914 ? How about any car w/ the shock/spring setup ?

I understand the aesthetic of not having those shocks there, and also the desire to keep a car as stock looking as possible, but in my case neither of these apply. So I bought a shock kit, which I still have in its original packaging. When I need to keep the trunk lid open, I use my head. (IMG:http://www.914world.com/bbs2/html/emoticons/wink.gif)
User is offlineProfile CardPM
Go to the top of the page
+Quote Post
Doug Leggins
post Oct 5 2005, 08:30 PM
Post #20


Senior Member
***

Group: Benefactors
Posts: 1,358
Joined: 6-February 03
From: Nashville, Indiana
Member No.: 261
Region Association: None


SUCCESS!!!! (IMG:http://www.914world.com/bbs2/html/emoticons/biggrin.gif) (IMG:http://www.914world.com/bbs2/html/emoticons/biggrin.gif) (IMG:http://www.914world.com/bbs2/html/emoticons/biggrin.gif)

Both torsion bars are in place!

Thanks to all of you that helped! I also called Michael at Brad Mayeur's shop and got very similar advice. (IMG:http://www.914world.com/bbs2/html/emoticons/beerchug.gif)

My wife and I got the passenger side on fairly easy tonight using the 1/4" screwdriver extension and screwdriver as a prybar method.

It went well enough that I was confident that the driver's side would be relatively easy so I recruited my son to take some "action" shots.

Here are some pics of the driver's side install.

Using the 1/4" nutdriver extension in my left hand to pull the torsion rod as far forward as I could, stopping when it touched the small grill.


Attached image(s)
Attached Image
User is offlineProfile CardPM
Go to the top of the page
+Quote Post

3 Pages V  1 2 3 >
Reply to this topicStart new topic
1 User(s) are reading this topic (1 Guests and 0 Anonymous Users)
0 Members:


- Lo-Fi Version Time is now: 26th April 2024 - 01:39 AM