|
|
|
Porsche, and the Porsche crest are registered trademarks of Dr. Ing. h.c. F. Porsche AG.
This site is not affiliated with Porsche in any way. Its only purpose is to provide an online forum for car enthusiasts. All other trademarks are property of their respective owners. |
|
|

  |

| grasshopper |
 Feb 26 2006, 09:21 AM Feb 26 2006, 09:21 AM
Post
#81
|
|
Advanced Member  Group: Members Posts: 2,613 Joined: 10-December 04 From: Valdosta, GA Member No.: 3,258 Region Association: None |
i've been saving up for a while so i will have enough to even be semi important. I just finished stripping the passenger side, and re-welding some patches. After looking at them, i knew something wasn't right.... i took a ballpoint hammer, and i just had to hit it lightly to pop my patch out. I took about a week and practiced welding new metal and old metal together, and got it pretty good. I seem to have trouble running a bead on really thin metal even on the lowest heat setting. What i have been doing is putting spot welds, and grinding them down and putting more spots if i find pinholes. It has been working pretty well so far, and my welds are a LOT stronger... i'll post some pics later...got to go take them (IMG:http://www.914world.com/bbs2/html/emoticons/biggrin.gif)
|
   |

 
|
| Katmanken |
Feb 26 2006, 09:36 AM
Post
#82
|
|
You haven't seen me if anybody asks... Group: Members Posts: 4,738 Joined: 14-June 03 From: USA Member No.: 819 Region Association: Upper MidWest |
Barry,
Ya need a chill plate behind the thin metal. Something that can pull some of the heat away and act as a backing plate to prevent weld drips... Get a short piece (3-4 inches or so )of some copper tubing. Pound one end flat about half way down..... Push a stick or dowel into the stil round end and secure the copper to the stick. Bend the flat part slightly to an angle that fits behind the area you are working in... While holding the stick, push the flat part of the copper against the back side of the weld area and hold in place. Apply weld. Copper will prevent burnthrough by absorbing excess heat, and if it does burnthrough, the weld pools up on the copper and won't drip. Weld won't stick to the copper either... (IMG:http://www.914world.com/bbs2/html/emoticons/biggrin.gif) Hope that helps.... I bought a Miller 135 MIG with infinitely variable controls and I love it. I can dial it in for whatever the metal thickness.. Still use the chill plate sometimes though... Ken |
|
|
|
| grasshopper |
Feb 26 2006, 09:42 AM
Post
#83
|
|
Advanced Member Group: Members Posts: 2,613 Joined: 10-December 04 From: Valdosta, GA Member No.: 3,258 Region Association: None |
well, i would have done that and will do that, but on the spots i have been welding, you couldn't get a pinky in there.... i'll post some pics..
|
|
|
|
| grasshopper |
Feb 27 2006, 08:23 PM
Post
#84
|
|
Advanced Member Group: Members Posts: 2,613 Joined: 10-December 04 From: Valdosta, GA Member No.: 3,258 Region Association: None |
ok, a little late...sorry....the sail panel patch in place..
Attached image(s) 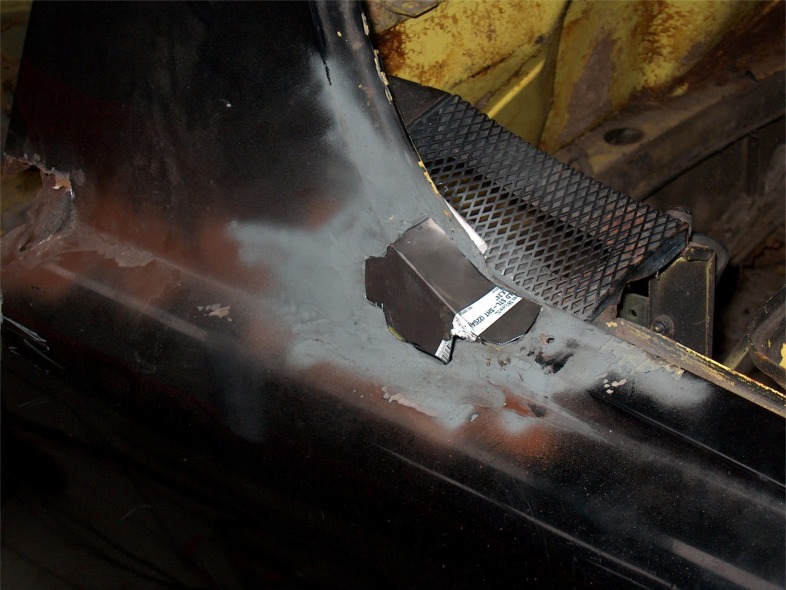
|
|
|
|
| grasshopper |
Feb 27 2006, 08:24 PM
Post
#85
|
|
Advanced Member Group: Members Posts: 2,613 Joined: 10-December 04 From: Valdosta, GA Member No.: 3,258 Region Association: None |
welded and ground down
Attached image(s) 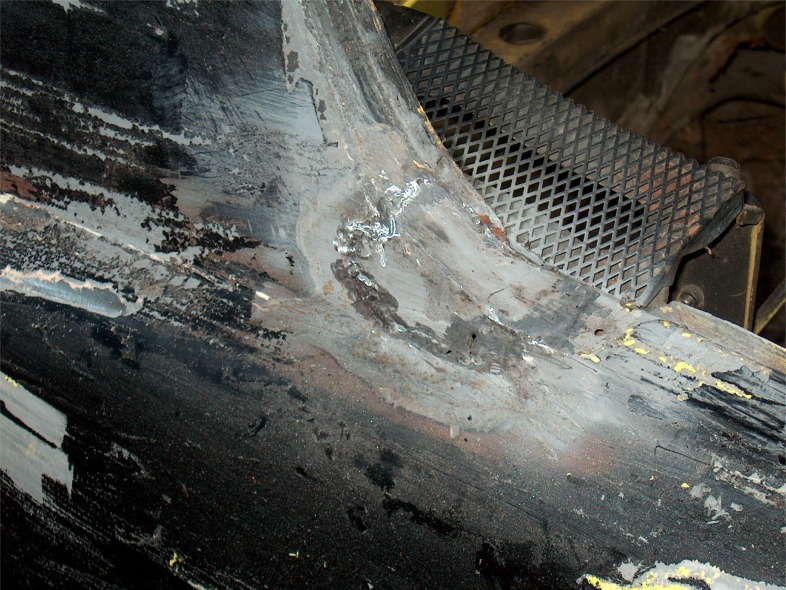
|
|
|
|
| grasshopper |
Feb 27 2006, 08:26 PM
Post
#86
|
|
Advanced Member Group: Members Posts: 2,613 Joined: 10-December 04 From: Valdosta, GA Member No.: 3,258 Region Association: None |
as you can see, the curve isn't perfect, so i am going to get a small torch, and shrink/strech the metal until i get the correct shape...
Attached image(s) 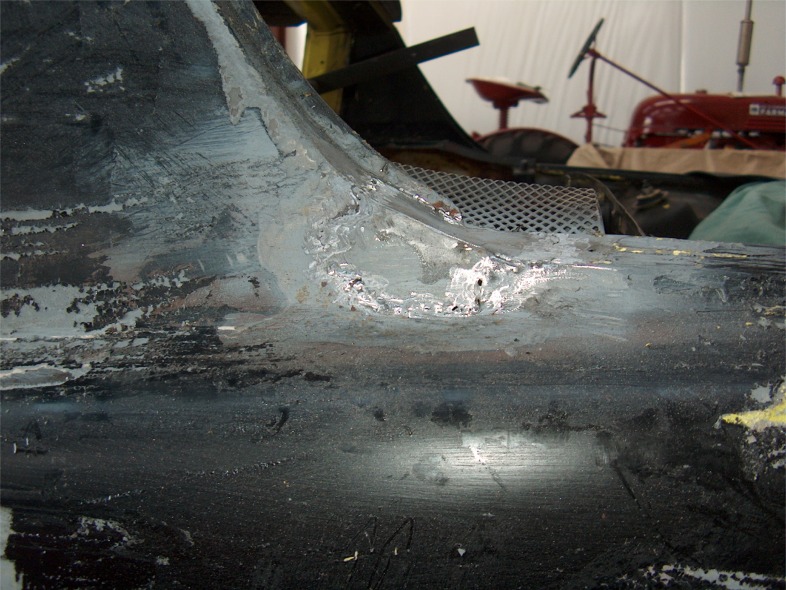
|
|
|
|
| grasshopper |
Feb 27 2006, 08:28 PM
Post
#87
|
|
Advanced Member Group: Members Posts: 2,613 Joined: 10-December 04 From: Valdosta, GA Member No.: 3,258 Region Association: None |
rear corner of the front fender... sorry no before pic, just after
Attached image(s) 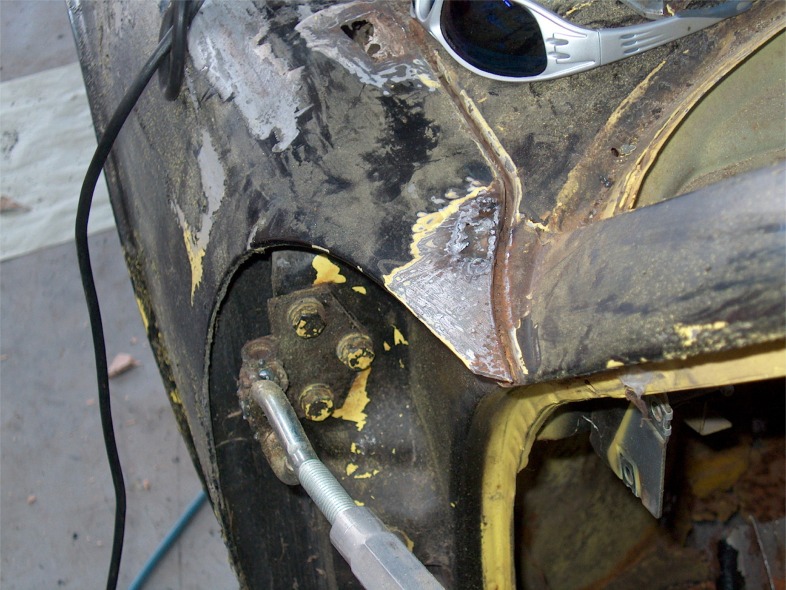
|
|
|
|
| grasshopper |
Feb 27 2006, 08:31 PM
Post
#88
|
|
Advanced Member Group: Members Posts: 2,613 Joined: 10-December 04 From: Valdosta, GA Member No.: 3,258 Region Association: None |
more rust in that area....
Attached image(s) 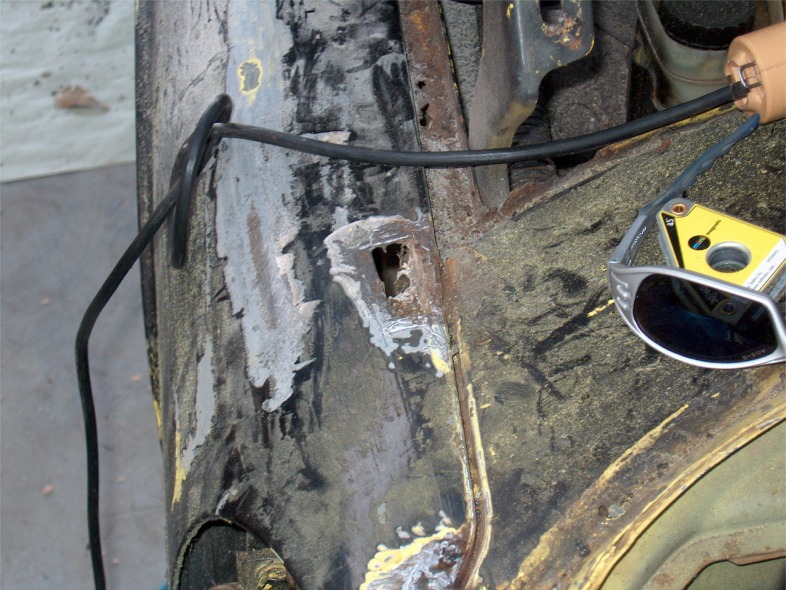
|
|
|
|
| grasshopper |
Feb 27 2006, 08:33 PM
Post
#89
|
|
Advanced Member Group: Members Posts: 2,613 Joined: 10-December 04 From: Valdosta, GA Member No.: 3,258 Region Association: None |
welded and ground down
Attached image(s) 
|
|
|
|
| grasshopper |
Feb 27 2006, 08:38 PM
Post
#90
|
|
Advanced Member Group: Members Posts: 2,613 Joined: 10-December 04 From: Valdosta, GA Member No.: 3,258 Region Association: None |
another shot of the sail panel.... the next task is to cut out the rear trunk, and weld in the new panel. I am going to get a sand blaster and see what the hell hole really looks like.... oh yeah, after i finished all the cleanup of my patches, i am going to fill them with lead filler.....That all for now (IMG:http://www.914world.com/bbs2/html/emoticons/locust.gif)
Attached image(s) 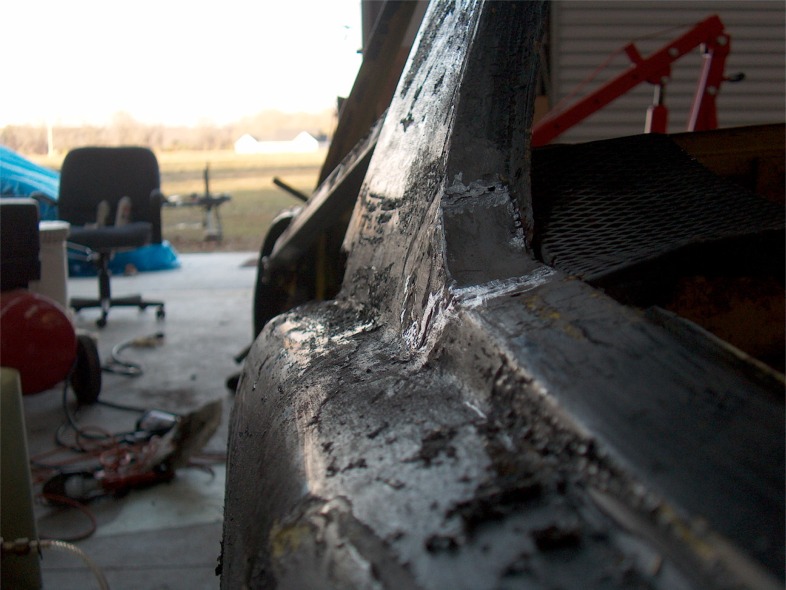
|
|
|
|
| jd74914 |
Feb 27 2006, 08:40 PM
Post
#91
|
|
Its alive Group: Members Posts: 4,780 Joined: 16-February 04 From: CT Member No.: 1,659 Region Association: North East States |
why lead? bondo has gotten much better.
|
|
|
|
| grasshopper |
Feb 27 2006, 08:48 PM
Post
#92
|
|
Advanced Member Group: Members Posts: 2,613 Joined: 10-December 04 From: Valdosta, GA Member No.: 3,258 Region Association: None |
bondo doesn't sound good (IMG:http://www.914world.com/bbs2/html/emoticons/biggrin.gif) but seriously, i would like as much metal as possible.... any tips on using lead?? would bondo be better??
|
|
|
|
| jd74914 |
Feb 27 2006, 08:57 PM
Post
#93
|
|
Its alive Group: Members Posts: 4,780 Joined: 16-February 04 From: CT Member No.: 1,659 Region Association: North East States |
Bondo would be easier and have less of those bad fumes. If you just skim with bondo there shouldn't be any problem with cracking unless you put it on parts that flex alot (like the edges of doors). Bondo is also cheaper and comes in so many varieties now for pretty much all purposes.
IMHO with technology improvements in bondo, filling low spots with leadis more for bragging rights on show cars and hotrods. I have never used lead and have minimal bondo experience, everything above is what I have been told by my Uncle who has done quite a bit of body work and painting. |
|
|
|
| drewvw |
Feb 27 2006, 09:08 PM
Post
#94
|
|
new england car guy Group: Members Posts: 1,631 Joined: 24-February 06 From: Boston, MA Member No.: 5,630 Region Association: North East States |
Love this thread Barry. Like you, I was doing nothing but working on cars when I was 14. I had my Karmann Ghia ripped apart at that point, and it was only in a little bit better shape. looking forward to the hell hole pics..... Drew |
|
|
|
| grasshopper |
Feb 27 2006, 09:12 PM
Post
#95
|
||
|
Advanced Member Group: Members Posts: 2,613 Joined: 10-December 04 From: Valdosta, GA Member No.: 3,258 Region Association: None |
yeah, it was covered in bondo/fiberglass..... i started poking and pulling.... im kinda scared to do anything to that area...i'll probably save that for last (IMG:http://www.914world.com/bbs2/html/emoticons/unsure.gif) |
||
|
|
|
||
| Carrera916 |
Feb 27 2006, 09:16 PM
Post
#96
|
|
Member Group: Members Posts: 292 Joined: 9-February 03 From: Pleasanton, CA Member No.: 273 |
Hey Barry!
I didn't realized it was you that had requested for pictures of rear fender panels that I have for sale. I hope you got the pictures today. Listen, about the welding part, i don't know how far you are with your work now but I thought maybe i can give an idea how to play with the MIG while welding.... When you're about to trigger the torch, watch the feedwire touching the bare metal, if the arc is popping and the feedwire is "crushing" onto the panel, two things to try out....increase the voltage (heat) and try again. If it's punching a hole, you probably got too much voltage, bring down a tad. If that doesn't seem to help a bit, then fiddle the speed of the feedwire down a bit at one heat setting of your choice until you get a very nice arc, no popping and you're able to move along the line, that's the setting you want for that perticular job you're welding on. Sometimes the same setting may not work on other area of your repair. You're gonna have to play a bit to get the feel of it. Now, re read above, if you see your feedwire melts before it ever "feed" onto the metal, and the arc is popping, your feedwire setting is way too slow. Try increase the speed till it gives you a nice arc and nice puddle of molted feedwire on your work, then you're all set. I always start with a tack (like spotweld) on the work area (new metal align to old metal) to check my setting before I weld down the line. When you tack weld, try do that on every one inch all the way around the perimeter of the new metal to give you a better secured piece onto the old metal before welding shut the whole thing. Then take your time to start weld from one tack to another and STOP! Let the metal cool down a bit and double check the alignment of the new metal to old metal, hammer it in place if needed to, then continue welding the next tack weld to tack weld at the opposite side of your piece from your first welding. That way the heat are spread out a bit better without warping your work out of shape and let it cool a bit. I tend to avoid water cooling as much as I can to avoid the "cold shock" onto hot weld beads. What I mean by let it cool a bit, I just the time right after I stopped welding, to check my weld bead, double check the alignment and then go on. Thats about a min of cooling which would be good. Grinding off the excessive bead that hasn't been watercooled turns out to be a bit be easier too. Hell, everyone has their own way of doing it, it's just that I wanted to share in what I do with my welding. Oh, one last thing, a shitty (aka rusty, dirty, greasy) metal, you will NEVER be able to have a decent weld bead or most important, molted pentration/fusion between these two metals cuz the arc has to be right and it's no way for the feedwire to react properly when it's grounded. When you try weld something on poorly grounded metal (or shitty metal), the weld beads will look exactly like what you had in your first few pictures of trying it out. Grind out everything to shining metal, no rust specks or pits allowed before you weld, other wise you'll be cursing out loud inside your helmet! Hope this helps and PM me if you got questions, i'll be gladly to help. Good luck! (IMG:http://www.914world.com/bbs2/html/emoticons/welder.gif) jerry |
|
|
|
| grasshopper |
Feb 27 2006, 09:26 PM
Post
#97
|
|
Advanced Member Group: Members Posts: 2,613 Joined: 10-December 04 From: Valdosta, GA Member No.: 3,258 Region Association: None |
hey!!! thanks for the info jerry!!at the beginning, i didn't have my settings right, and didn't know how it was supposed to sound. I can run a nice bead on the nice new metal, but i am kind of afraid to try and run a bead on the body panels....the first time i tried i burned right through...but that was before i got my settings right... i also cant figure out how fast i need to move the welder to prevent blow through.... sometimes i move to slow, and sometimes i move to fast, and cant control it....mabey ill give it another shot tomorrow at running a bead.... there sure are enough places to try on..... (IMG:http://www.914world.com/bbs2/html/emoticons/wacko.gif)
|
|
|
|
| degreeoff |
Feb 27 2006, 10:19 PM
Post
#98
|
|
I like big butts and I can not lie! Group: Members Posts: 1,622 Joined: 9-February 03 From: Booowieeee MD (near DC) Member No.: 275 Region Association: MidAtlantic Region |
I like to "spot weld" the entire peice....as mentioned above work in 1" increments to "secure" the peice but that sheet metal gets SO HOT so fast that I find it easier to just do little"spot welds all the way and the metal does'nt have a chance to heat up enough for burn through....
Just my novice opinion.... |
|
|
|
|
1 User(s) are reading this topic (1 Guests and 0 Anonymous Users)
0 Members:

|
Lo-Fi Version | Time is now: 3rd May 2024 - 02:25 AM |
Invision Power Board
v9.1.4 © 2024 IPS, Inc.