|
|
|
Porsche, and the Porsche crest are registered trademarks of Dr. Ing. h.c. F. Porsche AG.
This site is not affiliated with Porsche in any way. Its only purpose is to provide an online forum for car enthusiasts. All other trademarks are property of their respective owners. |
|
|


| spare time toys |
 Oct 15 2005, 11:13 AM Oct 15 2005, 11:13 AM
Post
#1
|
|
hooked on grilling food.  Group: Members Posts: 4,059 Joined: 3-April 04 From: West Plano Tx Member No.: 1,884 Region Association: Southwest Region |
I got the MOMO wheel from Dougc and am going to recover it. I have got the leather coming. Is there anyplace to learn a baseball stich?
|
   |

 
|
  |
Replies(1 - 19)
| jd74914 |
Oct 15 2005, 11:52 AM
Post
#2
|
|
Its alive Group: Members Posts: 4,780 Joined: 16-February 04 From: CT Member No.: 1,659 Region Association: North East States |
Its an easy stick to learn, but I don't know how to explain how to do it. I recovered the wheel in my dad's 911 (first time i had ever sewn leather) and it turned out great.
Did you get a leather recovering kit, or just a piece of leather? |
|
|
|
| spare time toys |
Oct 15 2005, 03:26 PM
Post
#3
|
|
hooked on grilling food. Group: Members Posts: 4,059 Joined: 3-April 04 From: West Plano Tx Member No.: 1,884 Region Association: Southwest Region |
I got a hide that is about 4' X2' I figure I can mess up a couple of times that way.
|
|
|
|
| markb |
Oct 15 2005, 04:49 PM
Post
#4
|
|
914less :( Group: Members Posts: 5,449 Joined: 22-January 03 From: Nipomo, CA Member No.: 180 Region Association: Central California |
All I know is it's really hard on the hands! I think you'll need to use 2 needles & threads, and overlap(?). That's the only way my feeble little mind can see how to do it. I'd get a decent pair of gloves, and cut the tips of the fingers off, to protect your hands. I sliced mine pretty good doing my first one.
|
|
|
|
| SpecialK |
Oct 15 2005, 08:00 PM
Post
#5
|
|
aircraft surgeon Group: Benefactors Posts: 3,211 Joined: 15-March 04 From: Pacific, MO Member No.: 1,797 |
You are in luck today Larry.......go buy a lotto ticket!
I just took a break from installing a new AGLA cover on a leather wheel I'm doing for a door prize at the FFC. And since I'm in the process of actually doing the stitch you mentioned, I'll post a series of pics ('cause I'm too 'puter stupid to do it in one post (IMG:http://www.914world.com/bbs2/html/emoticons/wacko.gif) ), so... First let me say that you will go completely insane if you do this with raw, unpunched leather, it's bad enough with a kit......but if "crazy" is just a short walk from where you're at, and you have nothing but time...I applaud you! (IMG:http://www.914world.com/bbs2/html/emoticons/pray.gif) Now the "stitch". I'm not sure how many spokes your MOMO has, but you'll want to do it in sections. Pull off 4 times as much thread as you think you'll need for each section....example of the amount of thread you'll use doing this stitch - I cut 30" of thread to do the small area between the spokes on a standard leather 914 steering wheel, and only had 6" to spare when I finished the section, so extra is better, it would suck to have to make a splice in the middle of the stitch. Here we go... A pic of where I stopped a few minutes ago...I use one needle, tried two, big PITA with two. Then I move the needle from one thread to the other (not a problem, big eye in the needle). The first pic shows the thread to your right, threaded approx. 3" through the needle, looped around to the opposite side to the next open hole below the thread on your left-hand side, then across to the open hole below the thread being pulled....hope that makes sense. Attached image(s) 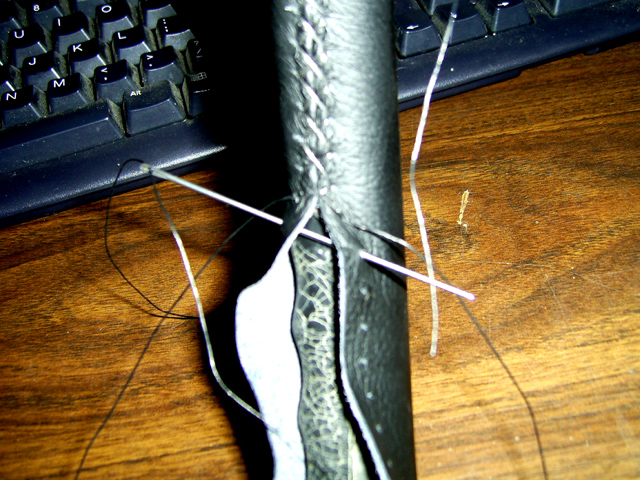
|
|
|
|
| SpecialK |
Oct 15 2005, 08:03 PM
Post
#6
|
|
aircraft surgeon Group: Benefactors Posts: 3,211 Joined: 15-March 04 From: Pacific, MO Member No.: 1,797 |
Thread pulled through to the right...
Attached image(s) 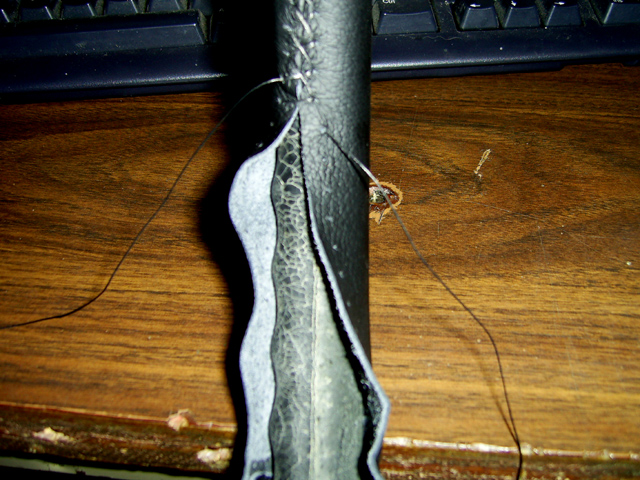
|
|
|
|
| SpecialK |
Oct 15 2005, 08:06 PM
Post
#7
|
|
aircraft surgeon Group: Benefactors Posts: 3,211 Joined: 15-March 04 From: Pacific, MO Member No.: 1,797 |
Left-hand thread entering the same hole that you just pulled the right-hand thread through, and out through the open hole below the origin of the thread...
Attached image(s) 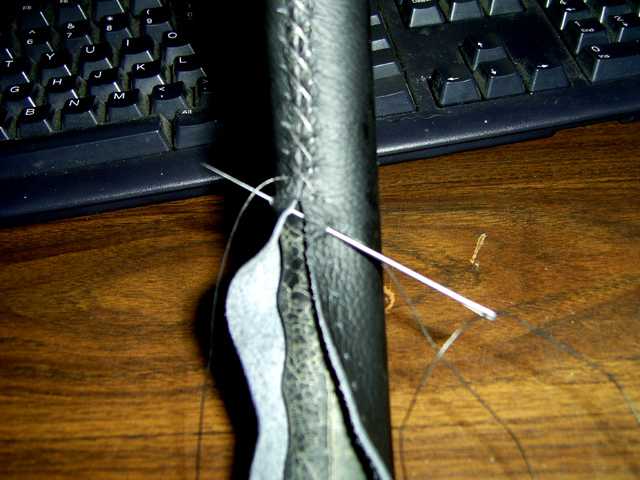
|
|
|
|
| SpecialK |
Oct 15 2005, 08:08 PM
Post
#8
|
|
aircraft surgeon Group: Benefactors Posts: 3,211 Joined: 15-March 04 From: Pacific, MO Member No.: 1,797 |
Another pic showing the routing of the left-hand thread...(note that the left-hand thread enters the same hole as the right-hand thread exited...and then out through the open hole below the origin.)
Attached image(s) 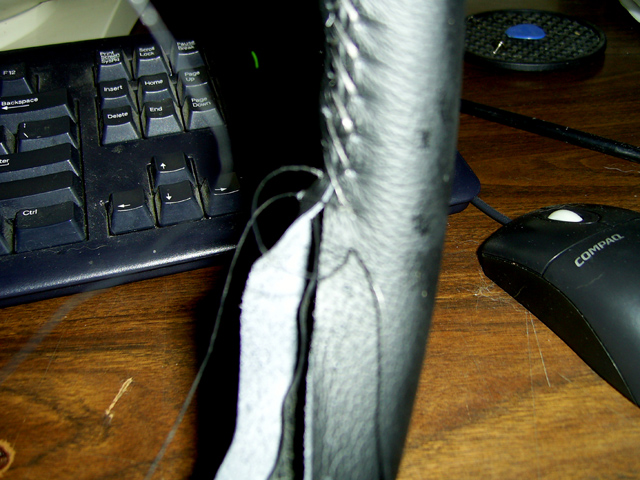
|
|
|
|
| SpecialK |
Oct 15 2005, 08:11 PM
Post
#9
|
|
aircraft surgeon Group: Benefactors Posts: 3,211 Joined: 15-March 04 From: Pacific, MO Member No.: 1,797 |
pull them both tight...
Attached image(s) 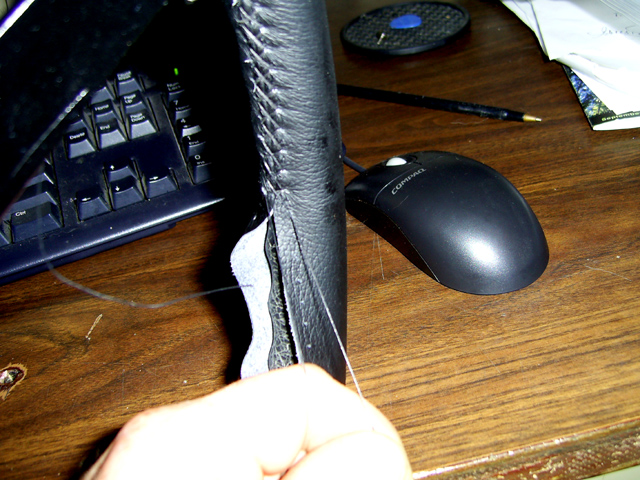
|
|
|
|
| SpecialK |
Oct 15 2005, 08:12 PM
Post
#10
|
|
aircraft surgeon Group: Benefactors Posts: 3,211 Joined: 15-March 04 From: Pacific, MO Member No.: 1,797 |
Repeat the process..... (IMG:http://www.914world.com/bbs2/html/emoticons/headbang.gif)
Attached image(s) 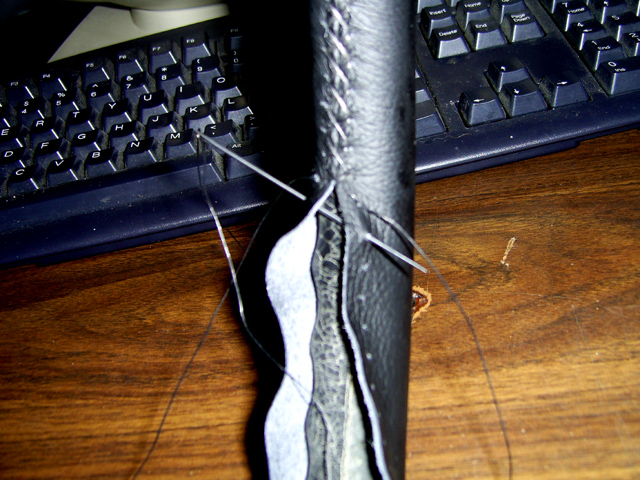
|
|
|
|
| SpecialK |
Oct 15 2005, 08:15 PM
Post
#11
|
|
aircraft surgeon Group: Benefactors Posts: 3,211 Joined: 15-March 04 From: Pacific, MO Member No.: 1,797 |
After about five or six successful stitches, I use the eye end of the needle to pull the stitches tighter in the direction of the stitch, and tuck any puckers in the leather inward.
Attached image(s) 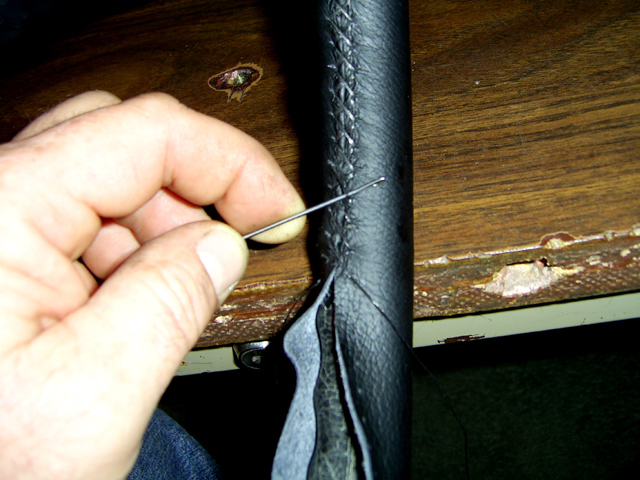
|
|
|
|
| SpecialK |
Oct 15 2005, 08:21 PM
Post
#12
|
|
aircraft surgeon Group: Benefactors Posts: 3,211 Joined: 15-March 04 From: Pacific, MO Member No.: 1,797 |
Patients and good lighting are essential. If you need me to clarify any of the steps, let me know....good luck!
Oh, I almost forgot! When you're ending a section, back track 3 complete stitches, and then forward again to lock the thread in place. Tie the ends off with a double granny, and tuck in the loose ends (I'd show you a pic, but I haven't got that far on this particular wheel yet (IMG:http://www.914world.com/bbs2/html/emoticons/wink.gif) ) |
|
|
|
| markb |
Oct 15 2005, 09:28 PM
Post
#13
|
|
914less :( Group: Members Posts: 5,449 Joined: 22-January 03 From: Nipomo, CA Member No.: 180 Region Association: Central California |
I think I understand all but the last part about backing up 3 stitches. When you get to that point, I'd appreciate a pic.
Thanks for the explanation! (IMG:http://www.914world.com/bbs2/html/emoticons/smilie_pokal.gif) I hereby nominate this for the Classics section. |
|
|
|
| 913B |
Oct 7 2008, 11:40 PM
Post
#14
|
|
Senior Member Group: Members Posts: 847 Joined: 25-April 05 From: South Bay/SoCal Member No.: 3,983 Region Association: None |
Hello, sorry for bringing back a old thread. Does anyone have more tips on the subject. I got an AGLA kit and seems like the thread was kinda thin, almost like a fish wire ? Is this right ? Second does anyone have more pics on the sewing process. I got lost over the pics previously posted.
Thanks in Advance. |
|
|
|
| Eric_Shea |
Oct 7 2008, 11:44 PM
Post
#15
|
|
PMB Performance Group: Admin Posts: 19,275 Joined: 3-September 03 From: Salt Lake City, UT Member No.: 1,110 Region Association: Rocky Mountains |
QUOTE Tips on recovering a steering wheel Yeah... Google "Dallas Custom Steering Wheel" (IMG:style_emoticons/default/biggrin.gif) |
|
|
|
| sww914 |
Oct 7 2008, 11:53 PM
Post
#16
|
|
Advanced Member Group: Members Posts: 2,439 Joined: 4-June 06 Member No.: 6,146 Region Association: None |
I did one years ago. I'd say get a hammer and hit yourself on both knees. If you like that, you should go for it. If you didn't like the pain then send it out. (IMG:style_emoticons/default/smile.gif)
|
|
|
|
| bradtho |
Aug 23 2010, 02:04 PM
Post
#17
|
|
Member Group: Members Posts: 266 Joined: 22-December 09 From: Seattle, WA Member No.: 11,165 Region Association: None |
I restitched the original leather on my steering wheel this weekend. I thought I'd share a few details that I couldn't find beforehand.
I couldn't find waxed nylon thread but did find waxed cotton. it was a little thicker than the original (or what was left of the original). It feels great now. Since I still had the old leather on I didn't bother with the stitching guide, I was able to just follow the impressions in the leather and figure it out. I believe it was a cross stitch. The big sections took about 84 inches of thread and the small sections about 30. This was an original bow-tie steering wheel. Of course that's the amount of thread used, you need more for making the final pulls and tying the knot. I bought 9 yards. You absolutely do not want to run out of thread, so buy extra just to be sure. I used 2 curved needles. not sure why SpecialK felt that 1 needle was easier. I'm embarrassed to say how many hours this took, at least 10. I'm glad I did it, but I will never do it again. The comment about hammering your knees makes a lot more sense now. |
|
|
|
| carr914 |
Aug 23 2010, 05:17 PM
Post
#18
|
|
Racer from Birth Group: Members Posts: 118,670 Joined: 2-February 04 From: Tampa,FL Member No.: 1,623 Region Association: South East States |
QUOTE(Eric_Shea @ Oct 8 2008, 01:44 AM)  QUOTE Tips on recovering a steering wheel Yeah... Google "Dallas Custom Steering Wheel" (IMG:style_emoticons/default/biggrin.gif) (IMG:style_emoticons/default/agree.gif) 110% |
|
|
|
| patssle |
Aug 23 2010, 06:17 PM
Post
#19
|
|
Senior Member Group: Members Posts: 981 Joined: 28-August 09 From: Houston, TX Member No.: 10,741 Region Association: None |
QUOTE(Eric_Shea @ Oct 7 2008, 09:44 PM) QUOTE Tips on recovering a steering wheel Yeah... Google "Dallas Custom Steering Wheel" (IMG:style_emoticons/default/biggrin.gif) Nice info! I need to get my Mazda 3 steering wheel recovered. POS is already faded at 40k miles. |
|
|
|
| charliew |
Aug 26 2010, 04:13 PM
Post
#20
|
|
Advanced Member Group: Members Posts: 2,363 Joined: 31-July 07 From: Crawford, TX. Member No.: 7,958 |
I would buy the pre punched and cut kit even if you get better thread. I have always used two needles. I had a little trouble wearing the thread where the needles are pulling on it. I usually just watch tv while I'm working on it. I would rather do a steering wheel than scrape undercoating or sound deadening or remove rust, at least it's under ac.
|
|
|
|
|
1 User(s) are reading this topic (1 Guests and 0 Anonymous Users)
0 Members:

|
Lo-Fi Version | Time is now: 17th May 2024 - 10:11 PM |
Invision Power Board
v9.1.4 © 2024 IPS, Inc.