|
|
|
Porsche, and the Porsche crest are registered trademarks of Dr. Ing. h.c. F. Porsche AG.
This site is not affiliated with Porsche in any way. Its only purpose is to provide an online forum for car enthusiasts. All other trademarks are property of their respective owners. |
|
|

  |

| joeav8tor |
 Mar 6 2006, 03:46 PM Mar 6 2006, 03:46 PM
Post
#1
|
|
Member  Group: Members Posts: 408 Joined: 23-January 05 From: mattituck, Long Island NY Member No.: 3,493 |
Hi,
I am going to be removing my upper dashpad, I have a replacement pad that I can use as a guide to locate the nuts that need to be removed (13mm?) my main question is what needs to be removed to get at the nuts...ie gauge cluster, lower dash pad...etc...thanks (IMG:http://www.914world.com/bbs2/html/emoticons/confused24.gif) Joe |
   |

 
|
| tdgray |
Mar 6 2006, 03:49 PM
Post
#2
|
|
Thank God Nemo is not here to see this Group: Members Posts: 9,705 Joined: 5-August 03 From: Akron, OH Member No.: 984 Region Association: None |
I'm getting ready to do this also.
Do a search for threads in the garage.. I found several good one. Short and sweet it sounds like you have to remove the gauge cluster, the glovebox and maybe the heater controls. Of course if your and idiot like me you'll try and try to get to the nuts without completely removing all this crap and in the end remove it anyway (IMG:http://www.914world.com/bbs2/html/emoticons/screwy.gif) Good luck... let us know. |
|
|
|
| McMark |
Mar 6 2006, 03:49 PM
Post
#3
|
|
914 Freak! Group: Retired Admin Posts: 20,179 Joined: 13-March 03 From: Grand Rapids, MI Member No.: 419 Region Association: None |
The guage cluster just needs the mount screws removed so you can reach behind it. The vents on either end of the dash make nice access ports (if it's a later model car). The radio is in the way. That's all I can think of.
|
|
|
|
| lapuwali |
Mar 6 2006, 03:52 PM
Post
#4
|
|
Not another one! Group: Benefactors Posts: 4,526 Joined: 1-March 04 From: San Mateo, CA Member No.: 1,743 |
There's a recent thread in the Classic Threads section on this very topic. Much easier than searching...
|
|
|
|
| joeav8tor |
Mar 6 2006, 04:13 PM
Post
#5
|
|
Member Group: Members Posts: 408 Joined: 23-January 05 From: mattituck, Long Island NY Member No.: 3,493 |
nice heads up on the classic thread advice, burned out my color cartridge on it though, better than getting grease on the laptop in the garage.
thanks Joe |
|
|
|
| szuccaro |
Mar 6 2006, 05:08 PM
Post
#6
|
|
ZUKE Group: Members Posts: 200 Joined: 27-June 03 From: Cameron Park, CA Member No.: 862 Region Association: Northern California |
Joe... I just went thru this myself. Replaced the upper dash material (close to the windshield), the dash pad, and while I was at it the gauges too. I removed the gauges, lower dash pad, stereo and glove box. I didnt have to remove the heate controls. Besides making yourself into a pretzel, I used a small socket wrench and a elongated, angled socket wrench for the difficult nuts.
I was able to find and replace all the nuts, except the one right in front of me from the left (left gauge access hole). For the life of me I couldnt get that nut back on. Be sure to label the wiring so you can easily connect up the gauges when done. Although i didnt need it, I had a wiring diagram ready. Steve Attached thumbnail(s) 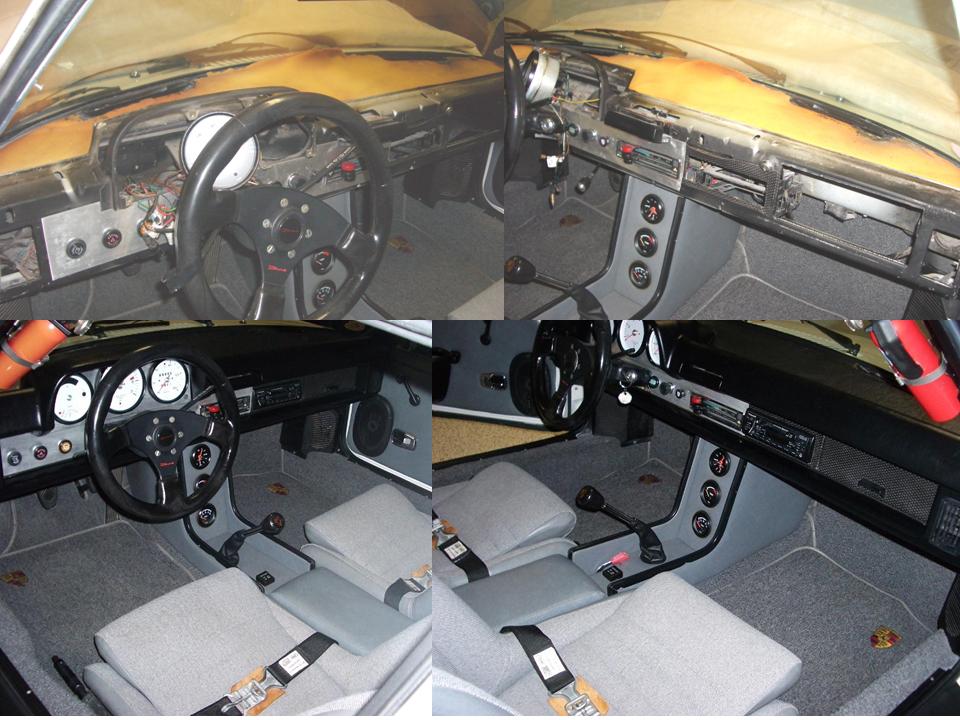
|
|
|
|
| szuccaro |
Mar 6 2006, 05:09 PM
Post
#7
|
|
ZUKE Group: Members Posts: 200 Joined: 27-June 03 From: Cameron Park, CA Member No.: 862 Region Association: Northern California |
The wiring diagram
Attached image(s) 
|
|
|
|
| szuccaro |
Mar 6 2006, 05:09 PM
Post
#8
|
|
ZUKE Group: Members Posts: 200 Joined: 27-June 03 From: Cameron Park, CA Member No.: 862 Region Association: Northern California |
I guess that didnt work well.
|
|
|
|
| szuccaro |
Mar 6 2006, 05:13 PM
Post
#9
|
|
ZUKE Group: Members Posts: 200 Joined: 27-June 03 From: Cameron Park, CA Member No.: 862 Region Association: Northern California |
Here it is.
Attached image(s) 
|
|
|
|
| Rand |
Mar 6 2006, 07:08 PM
Post
#10
|
|
Cross Member Group: Members Posts: 7,409 Joined: 8-February 05 From: OR Member No.: 3,573 Region Association: None |
|
|
|
|
|
1 User(s) are reading this topic (1 Guests and 0 Anonymous Users)
0 Members:

|
Lo-Fi Version | Time is now: 17th May 2024 - 02:55 PM |
Invision Power Board
v9.1.4 © 2024 IPS, Inc.