|
|
|
Porsche, and the Porsche crest are registered trademarks of Dr. Ing. h.c. F. Porsche AG.
This site is not affiliated with Porsche in any way. Its only purpose is to provide an online forum for car enthusiasts. All other trademarks are property of their respective owners. |
|
|

  |

| byndbad914 |
 Apr 17 2006, 05:07 PM Apr 17 2006, 05:07 PM
Post
#1
|
|
shoehorn and some butter - it fits  Group: Members Posts: 1,547 Joined: 23-January 06 From: Broomfield, CO Member No.: 5,463 Region Association: None |
So, I was updating my website and came up with a name for my car... though it is really more sarcastic than I would have wished for.
Project MBT-8 914 stands for (in military voice) Main Battle Tank 8 nine one four - or resembling the fact it is a V8 914 that is quickly becoming an M1 Abrams. It will be interesting to see what this puppy weighs when I am all said and done - I expect that the 2305lbs it went in at has been on a steady diet of burritos. I put a lot of cage in it for safety, so I am okay with that, but now that I am adding weight with a dry sump tank (not the tank, but the extra oil weight and hoses), a wing that feels pretty heavy, and door panels, etc (every little thing adds up of course) I am going to have to go to fiberglass decklids and lexan windshields to get back near that weight. Let's see, how can I lie to myself... oh yeah, hey it will be more stable. Yeah, that's the ticket. But, if you are going to war, bring a tank right? Lame metaphor for racing of course, but... well... whatever. AJ made a bunch of progress again, from the rear iso it is starting to look like a 914 again 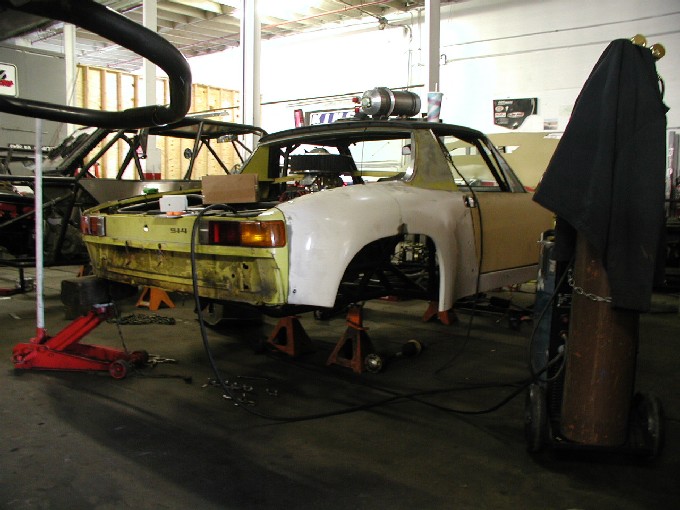 YEAH, we can preview pics finally!! And do multiples in one post!! Nice job to the admins!! here you can see the upper pad set in place - notice the cut to get it in. Once it is screwed down, the seam will be noticeable but not bad. 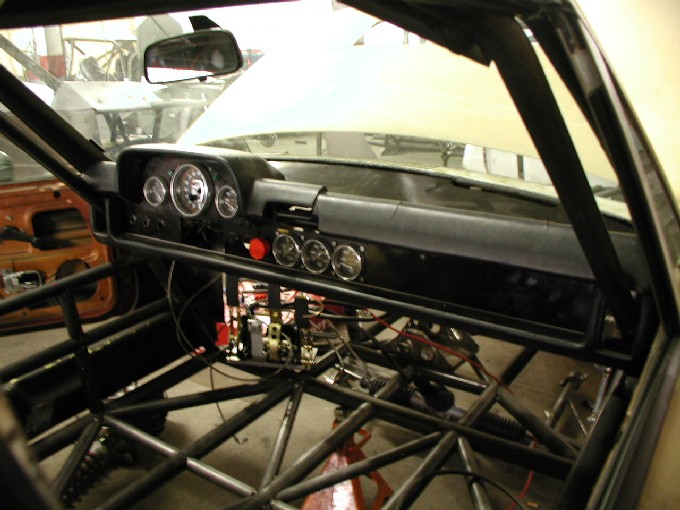 the front will need rework to fit, but tacked into place for now until the front fiberglass is put on this week. 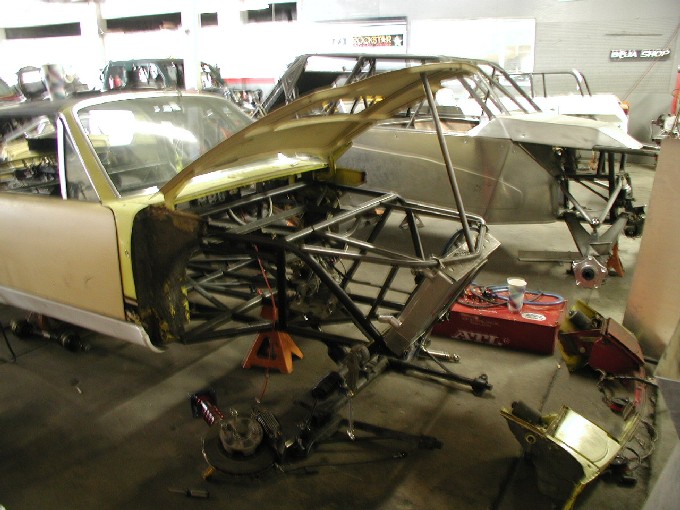 Also added in some midpoint mounts to the adapter plate for additional support - that 930 transaxle mounting setup is scary to me so this should take some of the load off of that area. 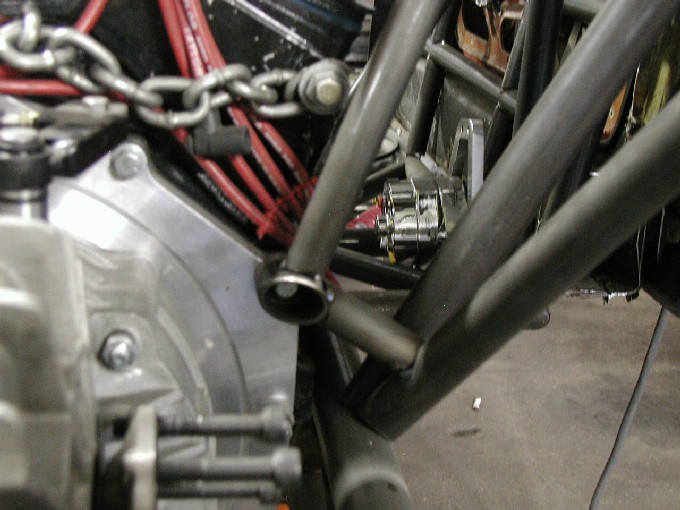 BTW, if you saw this link for the first time, here is the original link from the start http://www.914world.com/bbs2/index.php?sho...p;hl=byndbad914 got messed up a little by the "great virus of 06" fiasco, so I started another here. |
   |

 
|
| 914_1.8t |
Apr 18 2006, 03:19 PM
Post
#2
|
|
Member Group: Members Posts: 302 Joined: 3-June 04 From: East Bay Member No.: 2,149 |
Looking great (IMG:style_emoticons/default/clap56.gif)
Please do keep updating with newer pics...I'm in the process of doing something similar and your pics are very helpful. |
|
|
|
| Aaron Cox |
Apr 18 2006, 04:24 PM
Post
#3
|
|
Professional Tinkerer Group: Retired Admin Posts: 24,548 Joined: 1-February 03 From: Corona, CA Member No.: 219 Region Association: Southern California |
nuts!
|
|
|
|
| byndbad914 |
Apr 18 2006, 05:33 PM
Post
#4
|
|
shoehorn and some butter - it fits Group: Members Posts: 1,547 Joined: 23-January 06 From: Broomfield, CO Member No.: 5,463 Region Association: None |
not just nuts, deeez nutz!
sorry, couldn't help myself. 1.8t - are you building a tube car as well? If so, you can mimic my "floor" if you are worried about side impact stability, but if you worry about weight, the average sane car builder will use way less tubing and you will probably be fine. I am "ascared" of getting hurt, so that is why the cockpit area is so gnarly. I have what is known as the Anderson Luck Factor... Of course, hopefully I don't "call it" here, but watch me go off the track and have something come in the window and hit me in the throat anyway. The car will be in perfect shape without a scratch. That would be what is known amongst my friends as the "Anderson Luck Factor" - the low probably of the craziest/worst thing happening is multiplied by 10 if I am involved. (IMG:style_emoticons/default/blink.gif) Yeah, they think that is funny... (IMG:style_emoticons/default/happy11.gif) |
|
|
|
| pokey1168 |
Apr 18 2006, 06:14 PM
Post
#5
|
|
Member Group: Members Posts: 158 Joined: 3-July 05 From: Pampa,Tx Member No.: 4,369 |
WOW!!!!!!!! (IMG:style_emoticons/default/pray.gif) (IMG:style_emoticons/default/pray.gif)
I think I am having tube envy!!!! GREAT work |
|
|
|
| 914_1.8t |
Apr 18 2006, 06:29 PM
Post
#6
|
|
Member Group: Members Posts: 302 Joined: 3-June 04 From: East Bay Member No.: 2,149 |
QUOTE(byndbad914 @ Apr 18 2006, 04:33 PM)  not just nuts, deeez nutz! sorry, couldn't help myself. 1.8t - are you building a tube car as well? If so, you can mimic my "floor" if you are worried about side impact stability, but if you worry about weight, the average sane car builder will use way less tubing and you will probably be fine. I am "ascared" of getting hurt, so that is why the cockpit area is so gnarly. I have what is known as the Anderson Luck Factor... Of course, hopefully I don't "call it" here, but watch me go off the track and have something come in the window and hit me in the throat anyway. The car will be in perfect shape without a scratch. That would be what is known amongst my friends as the "Anderson Luck Factor" - the low probably of the craziest/worst thing happening is multiplied by 10 if I am involved. (IMG:style_emoticons/default/blink.gif) Yeah, they think that is funny... (IMG:style_emoticons/default/happy11.gif) Yup, I had a rought idea of what I wanted to do but looking at yours gave me a clear plan on how to do things. Thanks again for posting the pics. Not really worried about weight...I just want to it be less than 2400lbs and i'm good...but even then I dont think i'm going to use as much tubing as yours. I may pick up some 1"x.120 tubing to reinforce selected areas. |
|
|
|
| byndbad914 |
Apr 18 2006, 07:06 PM
Post
#7
|
|
shoehorn and some butter - it fits Group: Members Posts: 1,547 Joined: 23-January 06 From: Broomfield, CO Member No.: 5,463 Region Association: None |
pokey - I think I am having avatar envy!
1.8t - a couple suggestions to help minimize the tubing but stay rigid... I have the outer perimeter (the "square" that frames out the interior area) at 2" diameter - 1-3/4" would be fine for most folks. The lower forward tubes, the rear tubes that mount the engine, and the tubes that tie the front to rear are 1-3/4" - I would stick with that. The reinforcement in the interior is a mix of 1-1/2" and 1-1/4" - you could make the "diamond" under the seats and other "tie-in" tubing out of 1-1/2" and leave out a lot of the cross tubing (the stuff running parallel to the windshields that I added for side impact stability). that said, if you use chromoly like I did (DOM will be 30% heavier), my whole tube frame section is probably only 300-400lbs. I haven't done a weight analysis in a while, but the lower "frame area" front to rear with no hoop or NASCAR bars was about 175lbs, so if that doubled it would only be 350lbs, and I don't think I added twice as much tubing yet. DOM would only add roughly 115lbs to the whole car in that case. If you stay with a 4cyl and 901 trans, you will be lighter than me by a couple hundred pounds as well. So I am guessing I will be around 2400lbs, maybe higher as I add more stuff to it (trans coolers, trans pump, oil coolers, wing, fire suppression system, so forth), so you should stay within 2400lbs. Roger Sheridan has a really light 914 tube car - I have a ton of pix of that car. a thread from the bird board http://forums.pelicanparts.com/showthread....threadid=253609 He had mostly 1-3/4" and 1-1/2" bar, with 1" stuff in less structural areas, firewalls weren't welded in place (mine will be = more rigidity but more weight). He has a 3" diameter tube that runs across the rear of the car at the lower firewall area and built off of that - his designer found it necessary to have that huge tube at that point to help react the rear loads IIRC. His whole car with a -6 and 901 trans was just over 1800lbs. He recently went to a 915 so guesses it is about 1850lbs now. Carbon fiber seat, etc. helps of course. (IMG:style_emoticons/default/drooley.gif) |
|
|
|
| 914_1.8t |
Apr 18 2006, 09:09 PM
Post
#8
|
|
Member Group: Members Posts: 302 Joined: 3-June 04 From: East Bay Member No.: 2,149 |
Thanks for the suggestions, I will be picking up some 2x2"'s for the floor area like you suggested. I'm using DOM tubing so I guess mine will be a little heavier. Currently I've got 100ft of 1.5" DOM, I'll also pick up some 1" .120 to use for reinforcements.
My plan is to leave the exterior of the car alone and gut everything else, including front rear firewall as you did....only keeping the longs. I don't plan to take the fenders/quarters apart...just leave the body whole with reinforments and build around (on inside) of that. After being inspired by your thread (really (IMG:style_emoticons/default/clap56.gif) ) I went into the garage and did some chopping and bending. I managed to make the main hoop/roll bar. I'm planning on making the cage off of the longs first and then chopping and doing the floor and building up as on yours. Anyways, I don't mean to hijak your thread...I'll start another one for my project in case someone would like to see it...thanks again for your suggestions. |
|
|
|
| byndbad914 |
Apr 19 2006, 06:20 PM
Post
#9
|
|
shoehorn and some butter - it fits Group: Members Posts: 1,547 Joined: 23-January 06 From: Broomfield, CO Member No.: 5,463 Region Association: None |
QUOTE(914_1.8t @ Apr 18 2006, 08:09 PM) Thanks for the suggestions, I will be picking up some 2x2"'s for the floor area like you suggested. I'm using DOM tubing so I guess mine will be a little heavier. Currently I've got 100ft of 1.5" DOM, I'll also pick up some 1" .120 to use for reinforcements. My plan is to leave the exterior of the car alone and gut everything else, including front rear firewall as you did....only keeping the longs. I don't plan to take the fenders/quarters apart...just leave the body whole with reinforments and build around (on inside) of that. After being inspired by your thread (really (IMG:style_emoticons/default/clap56.gif) ) I went into the garage and did some chopping and bending. I managed to make the main hoop/roll bar. I'm planning on making the cage off of the longs first and then chopping and doing the floor and building up as on yours. Anyways, I don't mean to hijak your thread...I'll start another one for my project in case someone would like to see it...thanks again for your suggestions. Just to clarify the first sentence - I have 2" diameter round bar, not 2x2 square bar. If you want to go with a "boxed" section car, use 2x3, with the 3" as the vertical dimension. Oh boy, see now you went and got me all excited... I started out to build a rectangular "frame" car but couldn't get 2x3 in chromoly... And then reread what I just wrote - build a frame car. THAT would be cool, not weigh a ton, and the longs would be in place simply to hold the body structure, not carry loads. With my car, I kept the longs below the doors to have some rigidity regarding the fact I am using stock, heavy doors. The rear section that is still left (the sail panel and the small bit of fender to Dzus the fiberglass) is VERY weak right now. I can grab the little piece of fender and move the sail around a bit. Won't matter as the reinforcements added in my first pics in this post will hold all that in place. For you, you could run 2x3 box front to rear firewall as a parallel frame (with the correct width to match the mounting locations for the front suspension), then box out the car to the longs, and back and forth at the front nad rear where you want the new firewalls. Then weld the 2x3 along the longs on the inside - making the new frame structure integral to the longs. Now the body is "along for the ride". Add in a roll cage just like mine (tie into the frame, NOT the longs!!), a couple tubes to the front for strut perch mounting and such (similar to mine). Then the rear you could lay out with a mix of round bar and box sections to mount your engine and such. You will be fairly different from mine if you run trailing arms. Watch my link over the next couple weeks - AJ should be starting the five-link rear setup shortly which will be waaaayy easier and slicker to work with than trailing arms and easy to build (you'll already have the 1" diam tubing). Front end will be tubular as well with struts that would also be good to copy if you plan to use struts and not SLA ("double A"). The lower arms, fully adjustable strut perches and spherical "ball joint adapter" pieces were all bought from Kanna Motorsports and I expect them to work fine... we'll see soon enough. Make sure to add some small strutural tubing like I have to tie into the fenders, rear panel and such to support the body, THEN cut out all of the inner body stuff and rearward longitinals (cut rear part of longs down to the firewall like I did AFTER you lock the body in place - will take a lot less measuring than AJ is doing right now to get the body back into place). If you are going to stick with the flat Pcar engines, you would need to work at keeping everything removeable from the bottom since they are so wide. Otherwise, the narrow V8 makes the upward removal doable, and the caging of the car much easier. If you could come from the top, you could frame front to rear. fingers are wearing out... The reason I support building a "frame" car so much is that any overhead structure is not as necessary for rigidity - though of course helps with torsional loads for sure - notice I say not as necessary. You could have less internal cage structure and such for a very rigid car making it more streetable. Think American g-machine cars and you will get what I mean. Solid frames, solid suspensions, minimal overhead structure, very streetable and comfortable with loads of power and cornering on hand. THAT is what I originally intended to build, then went 141mph, car was scary acting, etc etc, full tube crazy car. My future 70 Mustang fastback project will be diff'ernt - build more for the street with a 500HP engine, but from a 430-ish cube engine, so "milder" running and such. Then I won't want all the cage structure at all. That will be 2x4 DOM framed out with a NASCAR front clip and 3-link rear if that means anything to you. Our 914s are lighter so 2x3 DOM would be fine for you. Here is a good Nova g-machine project that illustrates the rectangular tubing as a frame with minimal cage structure. http://www.iimuchfabrication.com/ |
|
|
|
| 914_1.8t |
Apr 20 2006, 03:18 AM
Post
#10
|
|
Member Group: Members Posts: 302 Joined: 3-June 04 From: East Bay Member No.: 2,149 |
I'm planning on doing something very similar to what you recommended. However, I'm building the cage into the longs and also tying it into the floor and rest of the chassis. Basically, the longs and body will be going for a ride with the chassis and won't really be responsible for any kind of load, it'll be just hanging on as you said.
As for my project: Using a Audi S4 (2.7tt, but single larger turbo) engine + 6spd trans. HP goals is about 550ish. Uneven lenght A-arms with QA1 or Koni coilovers with Willwood 4 piston calipers/brakes front and rear, riding on custom spindles using porsche hubs and bearings. I'll be modding some trailing arms to make the spindles (at least thats the plan for now). And as far as G-machines...I love em. Check out Lateral-g.net if you havn't already...I got my motivated to build the 914 this style from checking out that stuff. My next car will be a 69' camaro (which will be my daily driver)...after I finish the 914. -Sonu |
|
|
|
| byndbad914 |
Apr 20 2006, 01:37 PM
Post
#11
|
|
shoehorn and some butter - it fits Group: Members Posts: 1,547 Joined: 23-January 06 From: Broomfield, CO Member No.: 5,463 Region Association: None |
QUOTE(914_1.8t @ Apr 20 2006, 02:18 AM) As for my project: Using a Audi S4 (2.7tt, but single larger turbo) engine + 6spd trans. HP goals is about 550ish. So the 250cube V8 dual overhead cam engine... definitely build a frame car to the rear suspension points, and pick the engine up from below. Then make the motor/trans remove from above. You'll see how easy it is on my car in the next couple of weeks. Besides, those heads make the engine so wide (now I know why you want to remove the rear firewall!!) you will have to come in from the top. With a framed rear, you will need very little tubing above it for support (just enough to tie in some shock mounts basically), which will make R&R that much easier as well. BTW, since you follow the 'merican car stuff, why not something cheap and simple like a dual overhead cam 4.6L Ford? I am also considering building a daily driver 914 with one of these and a re-geared 901 (instead of the Mustang). Kennedy may even have an adapter plate for Ford to Audi transaxles by now if you wnat that 6spd. Could put a couple of junkyard Garretts on there and make 550 no problem on boost, and there are TONS of aftermarket parts for it. I was measuring the 5.4L supercharged engine in my Lightning too (IMG:style_emoticons/default/smile.gif) Uneven lenght A-arms with QA1 or Koni coilovers with Willwood 4 piston calipers/brakes front and rear, riding on custom spindles using porsche hubs and bearings. I'll be modding some trailing arms to make the spindles (at least thats the plan for now). Are you hell-bent to have stock Porsche bolt pattern or something? I would highly, highly suggest just getting NASCAR front suspension pieces with the Wilwood calipers and rotors as a package. Would be 5 on 5 pattern which means a ton more wheel selection, especially if you want to use racing wheels. Buy adjustable coil-overs for NASCAR as well - cheap and easy to work with. 86 all that Porsche crap, it just becomes a PITA sooner or later. For the rear, you could cut down the trailing arm to just the hub, build uprights from there, and redrill stock hubs to 5 on 5, and adapter the Wilwoods to the rear. OR, there is a ton of already fabbed up rear hub stuff out there for purchase. Not cheap, but easier in the end and easy to fab to. All that QA1 stuff and such I really am not sure how it has gotten so popular, other than they make bolt-on kits for Camaros and such. Building from scratch, use the NASCAR stuff like Carrera 67-series shocks and such. Here is a link to give you an idea of pricing and such - click on the SW Tour Front Suspension link - you would just get uppers and lowers, hubs and such - maybe those calipers if you like (remember, those are enough to stop a SW Tour car!), use the stock rack for correct width and such, set the hubs to the right track width and weld away. Easy to adapt turbo tie rods to work with these hubs. http://www.strcars.com/products.htm If I had it to do over again... before I spent all that money on struts and shit trying to build a tub car instead of a tube car... And as far as G-machines...I love em. Check out Lateral-g.net if you havn't already...I got my motivated to build the 914 this style from checking out that stuff. My next car will be a 69' camaro (which will be my daily driver)...after I finish the 914. Nice, Lateral-g is in my "favorites". Check out this Mustang - this is what I was going to do to the one I had years ago, then got the idea for the 914... http://www.lateral-g.net/members/libbymustang/ Holy crap - it is done!! I have been watching that link for over a year and it hasn't changed until sometime in the last week, he went from fab to "finished" pics. (IMG:style_emoticons/default/drooley.gif) (IMG:style_emoticons/default/drooley.gif) (IMG:style_emoticons/default/drooley.gif) |
|
|
|
| 914_1.8t |
Apr 20 2006, 03:05 PM
Post
#12
|
|
Member Group: Members Posts: 302 Joined: 3-June 04 From: East Bay Member No.: 2,149 |
QUOTE So the 250cube V8 dual overhead cam engine... definitely build a frame car to the rear suspension points, and pick the engine up from below. Then make the motor/trans remove from above. You'll see how easy it is on my car in the next couple of weeks. Besides, those heads make the engine so wide (now I know why you want to remove the rear firewall!!) you will have to come in from the top. With a framed rear, you will need very little tubing above it for support (just enough to tie in some shock mounts basically), which will make R&R that much easier as well. BTW, since you follow the 'merican car stuff, why not something cheap and simple like a dual overhead cam 4.6L Ford? I am also considering building a daily driver 914 with one of these and a re-geared 901 (instead of the Mustang). Kennedy may even have an adapter plate for Ford to Audi transaxles by now if you wnat that 6spd. Could put a couple of junkyard Garretts on there and make 550 no problem on boost, and there are TONS of aftermarket parts for it. I was measuring the 5.4L supercharged engine in my Lightning too (IMG:style_emoticons/default/smile.gif) I was looking into the LS1's and Lightning stuff also...but decided to go Audi. Plus I got a killer deal on the engine/trans and am very familiar with Audi motors. A single GT35r should get me there with the S4 motor and it's stong enough stock to hold that kind of power. QUOTE Are you hell-bent to have stock Porsche bolt pattern or something? I would highly, highly suggest just getting NASCAR front suspension pieces with the Wilwood calipers and rotors as a package. Would be 5 on 5 pattern which means a ton more wheel selection, especially if you want to use racing wheels. Buy adjustable coil-overs for NASCAR as well - cheap and easy to work with. 86 all that Porsche crap, it just becomes a PITA sooner or later. For the rear, you could cut down the trailing arm to just the hub, build uprights from there, and redrill stock hubs to 5 on 5, and adapter the Wilwoods to the rear. OR, there is a ton of already fabbed up rear hub stuff out there for purchase. Not cheap, but easier in the end and easy to fab to. Actually, not really looking to keep porsche bolt patter necessarily...just thought I could use the stuff I already have (like extra trailing arms) to make the spindles. The wheels I want to really use are 5x112 bolt pattern. I'm looking into a few other choices also (cheaper ones) and will decide by tomorrow which way to go. QUOTE Nice, Lateral-g is in my "favorites". Check out this Mustang - this is what I was going to do to the one I had years ago, then got the idea for the 914... http://www.lateral-g.net/members/libbymustang/ Holy crap - it is done!! I have been watching that link for over a year and it hasn't changed until sometime in the last week, he went from fab to "finished" pics. (IMG:style_emoticons/default/drooley.gif) (IMG:style_emoticons/default/drooley.gif) (IMG:style_emoticons/default/drooley.gif) Yeah...I've been following that mustang for quite some time now. Basically what I want to do with the teener...but still not sure if I will really need to do a boxed 2x3 or round tubing for the bottom since the teener is so much lighter. If I get a camaro I'll be doing like that. I'll post some pics next week of progress...and my final decision on how to do the frame/suspension. I'm having a cousin come by and to compare ideas and then we will build whatever we decide on. Any updates on your car? |
|
|
|
| byndbad914 |
Apr 20 2006, 03:59 PM
Post
#13
|
|
shoehorn and some butter - it fits Group: Members Posts: 1,547 Joined: 23-January 06 From: Broomfield, CO Member No.: 5,463 Region Association: None |
QUOTE(914_1.8t @ Apr 20 2006, 02:05 PM) Plus I got a killer deal on the engine/trans and am very familiar with Audi motors. A single GT35r should get me there with the S4 motor and it's stong enough stock to hold that kind of power. Makes sense - kinda what I figured. Those Audi motors are nice, just parts can be expensive when needed. My good friend (is building a turbo'd Volvo) has an Audi A4 and was telling me an O2 sensor was almost $200!! He is really resourceful and determined a VW one would be an exact replacement (had to change the wiring connector) for $48. Actually, not really looking to keep porsche bolt patter necessarily...just thought I could use the stuff I already have (like extra trailing arms) to make the spindles. The wheels I want to really use are 5x112 bolt pattern. I'm looking into a few other choices also (cheaper ones) and will decide by tomorrow which way to go. So are those wheels "dished" at all or have a bunch of backspace? I ask because you could set the track width to run a nice race wheel (which tend to have less backspace, or more "dish") and then make adapters that bolt to the 5 on 5 and match whatever flavor of wheel you want. The additional backspace can make up for the 1" adapter. Just a thought, and exactly what I am doing with mine. Yeah...I've been following that mustang for quite some time now. Basically what I want to do with the teener...but still not sure if I will really need to do a boxed 2x3 or round tubing for the bottom since the teener is so much lighter. If I get a camaro I'll be doing like that. Camaro would be 2x4. 2x3 would be about right for a light 914. IMHO, a simple 2x3 structure would be the easiest way to go and build SLA front and rear suspension from. You could have a sweet street/track car with minimum tubing that way. In fact, with a 2x3 frame you really wouldn't need any additional tubing at all. So a 4pt cage would be nice for safety, but not as necessary for stiffness. Down tubes at the front suspension from the roll bar would simply be there to have somewhere to mount the shocks. Rear suspension would be the same story - there just to tie in shock mounts. It could be supported by a couple tubes running down through the firewall to the rear of the frame. Really slick and easy. Just my opinion of course... Any updates on your car? With gas at $3.19/gal (just filled up at lunch (IMG:style_emoticons/default/wacko.gif) ) I am only going to see AJ once a week on Saturdays. This Sat I may start trying to get some wiring started - I have a Painless (more like PITA) 12 circuit race car fuse block I am going to convert the car over to. Will be slick in the end though a tough job to do. I have spent the last 3 days studying how they wired that fuse block and laying out how I am going to integrate it into the 914. 914s tend to have an unfused positive feed, though not always, and then fuse the output (like the headlights for instance, the switch is unfused hot, and the wires that go to the headlights run thru the fuse). The flashers have a fused hot on 914. This panel is set up to fuse the positive input on everything - not a difficult change but I have to dig through the wiring diagrams to determine the best way to wire into the stock 914 components. |
|
|
|
| byndbad914 |
Apr 24 2006, 12:57 PM
Post
#14
|
|
shoehorn and some butter - it fits Group: Members Posts: 1,547 Joined: 23-January 06 From: Broomfield, CO Member No.: 5,463 Region Association: None |
AJ continues to cruise along on the car... here are some pix from Saturday. More will be on my website when I update it -probably tomorrow.
Starting to look like its old self again 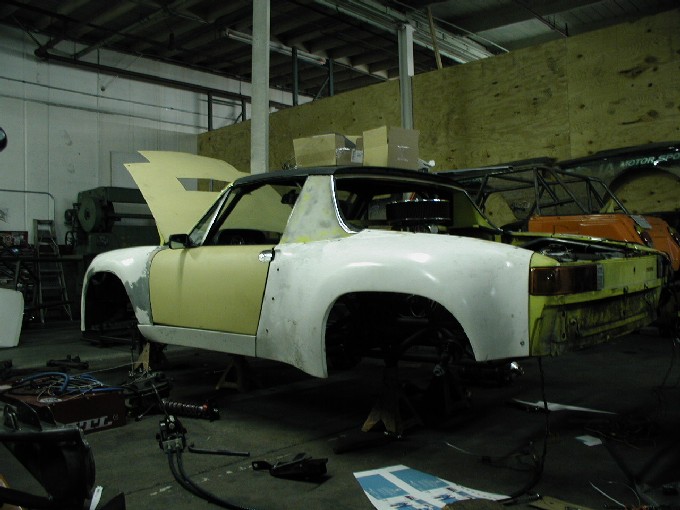 Here is the front trunk area - radiator is tucked in nice and tight to the fiberglass, but a little too tight. AJ needs to drop the nose another 3/8" roughly to get the fiberglass back to original position - notice the broken lip area - he is brutal with my fiberglass! 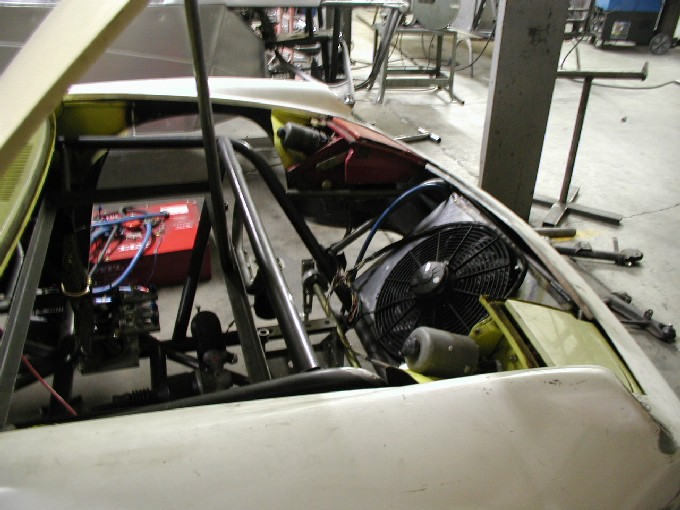 Here is a tray I made for the rear to hold the ignition and trans pump. There will be a couple bars ran from the mid-mounts to rear mounts for this tray to ride on. Then when I want to remove the engine and trans, that can come right along with it (notice the flanges have been added so engine/trans can R&R from above) 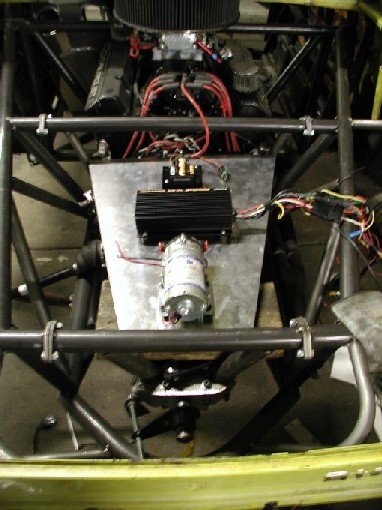 This shows the rough placement of the seat - even though the firewall will be much further forward than before, you can see that the seat is roughly where I would have had it anyway. By rough placement I mean there are no brackets welded in place yet... I will be using the stock rails and mounting scheme to have adjustability to get it just perfect. My right rotator in my shoulder was blown out a few years back so it gets "twitchy" after a bit of use, so I have to move the seat around every once in awhile to change my position to the wheel. 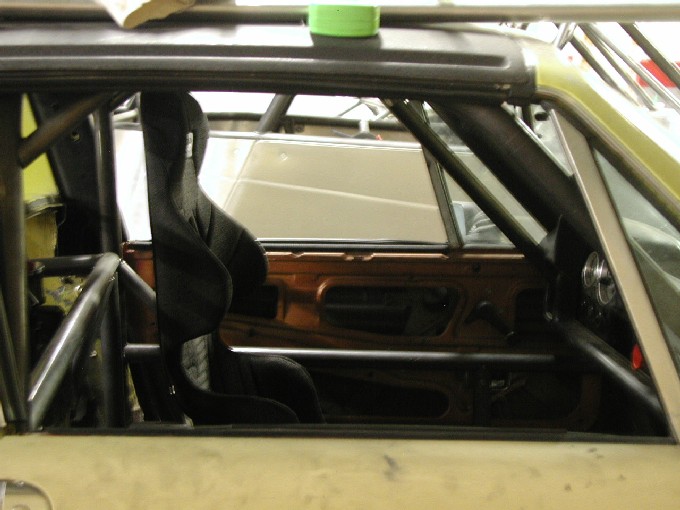 |
|
|
|
| turbo914v8 |
Apr 24 2006, 04:08 PM
Post
#15
|
|
Member Group: Members Posts: 373 Joined: 26-July 03 From: Canada Member No.: 952 |
QUOTE(byndbad914 @ Apr 24 2006, 11:57 AM) AJ continues to cruise along on the car... here are some pix from Saturday. More will be on my website when I update it -probably tomorrow. Starting to look like its old self again Here is the front trunk area - radiator is tucked in nice and tight to the fiberglass, but a little too tight. AJ needs to drop the nose another 3/8" roughly to get the fiberglass back to original position - notice the broken lip area - he is brutal with my fiberglass! Here is a tray I made for the rear to hold the ignition and trans pump. There will be a couple bars ran from the mid-mounts to rear mounts for this tray to ride on. Then when I want to remove the engine and trans, that can come right along with it (notice the flanges have been added so engine/trans can R&R from above) This shows the rough placement of the seat - even though the firewall will be much further forward than before, you can see that the seat is roughly where I would have had it anyway. By rough placement I mean there are no brackets welded in place yet... I will be using the stock rails and mounting scheme to have adjustability to get it just perfect. My right rotator in my shoulder was blown out a few years back so it gets "twitchy" after a bit of use, so I have to move the seat around every once in awhile to change my position to the wheel. AHHHHH finally got my fix, great pictures. Still looking for the pictures of the wing? |
|
|
|
| byndbad914 |
Apr 24 2006, 04:16 PM
Post
#16
|
|
shoehorn and some butter - it fits Group: Members Posts: 1,547 Joined: 23-January 06 From: Broomfield, CO Member No.: 5,463 Region Association: None |
Hey Paul - I know what you mean. I too am jonesing to see what the wing is going to look like on the car, and I pestered AJ again Saturday asking when we could work on it (IMG:style_emoticons/default/smile.gif) He needs to finish up some more stuff in the rear before we start welding in mounting plates for the wing, so maybe a week or two more (IMG:style_emoticons/default/confused24.gif)
|
|
|
|
| byndbad914 |
May 30 2006, 04:05 PM
Post
#17
|
|
shoehorn and some butter - it fits Group: Members Posts: 1,547 Joined: 23-January 06 From: Broomfield, CO Member No.: 5,463 Region Association: None |
Alright, after a 5-week fuch up dealing with machinists, I finally have the car moving along again. Long story short, I had designed some custom wheel adapters for the new racing wheels, which should take one day to make. THREE WEEKS into the ordeal, I finally told the first shop to pound sand after not starting them (they told me 2 days btw when I gave them the dimensions). Then the next shop took a week to do them WRONG (even with a fully dimensioned ProE drawing!!!!), then after I taught them how to read a print, made them close but not quite right again the next week. Close enough to work though, so the car sat 5 weeks waiting for a 1-day project. I shoulda just bought a rotary table and done them myself at this point...
So, anyway, AJ is finally able to get back on it and start doing the suspension. After the suspension is all in place, we can install the firewalls, mount seats, wire, plumb and all that good stuff. Hopefully that is all "downhill" and rolls along, but the car won't be done to bring up to the WCC, which I REALLY wanted to be able to do. I was on schedule 5 weeks ago (IMG:style_emoticons/default/mad.gif) Front suspension - forward link is really a 935 link from Kanna Motorsports - AJ is making a lower A-arm for strength v. one forward link and one lateral link. 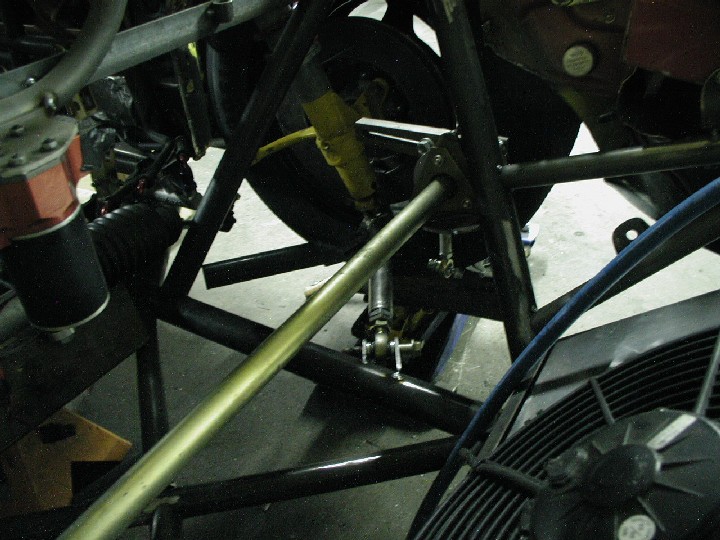 Iso shot with the wing and new spill plates (the other ones I fabbed looked lame once the wing was installed) 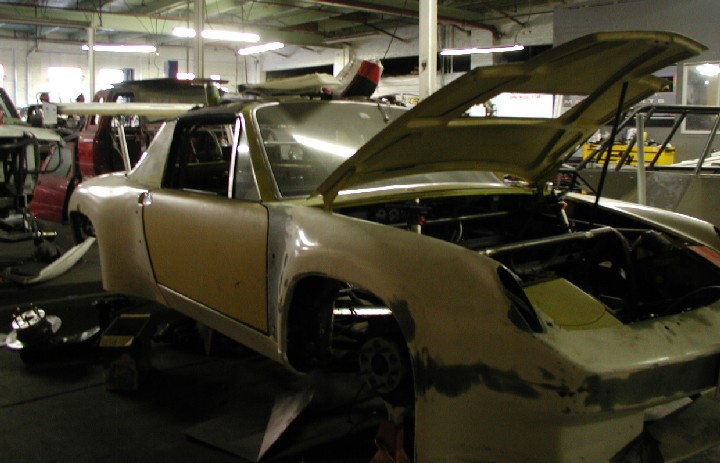 From the rear 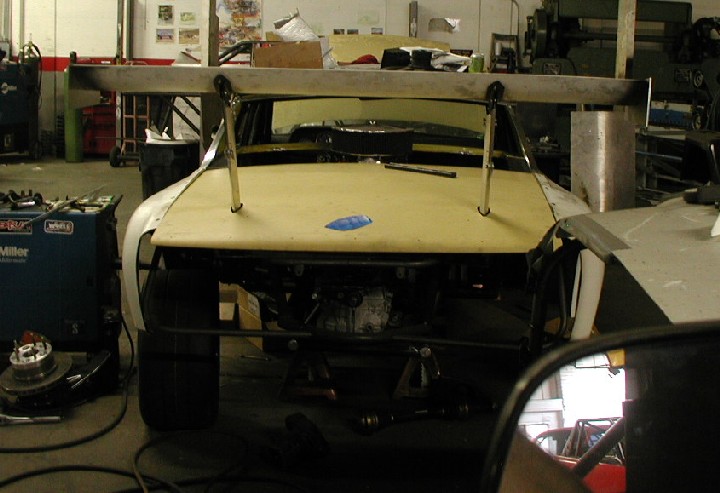 |
|
|
|
| byndbad914 |
May 30 2006, 04:17 PM
Post
#18
|
|
shoehorn and some butter - it fits Group: Members Posts: 1,547 Joined: 23-January 06 From: Broomfield, CO Member No.: 5,463 Region Association: None |
Details of the wing mounting for those that have wondered how I was going to do it - I more or less copied the idea from Roger Sheridan, except how he designed his lower mounting to the car. The aluminum uprights had flat sections inside that matched .75x1.5" tubing perfectly (I think Roger used the chromoly steel which doesn't have that feature and was why I chose aluminum instead).
The adjusting hardware on the uprights is all purchased from McMaster Carr and is simply a 6" adjuster with rod ends. The tabs will be welded into place later. 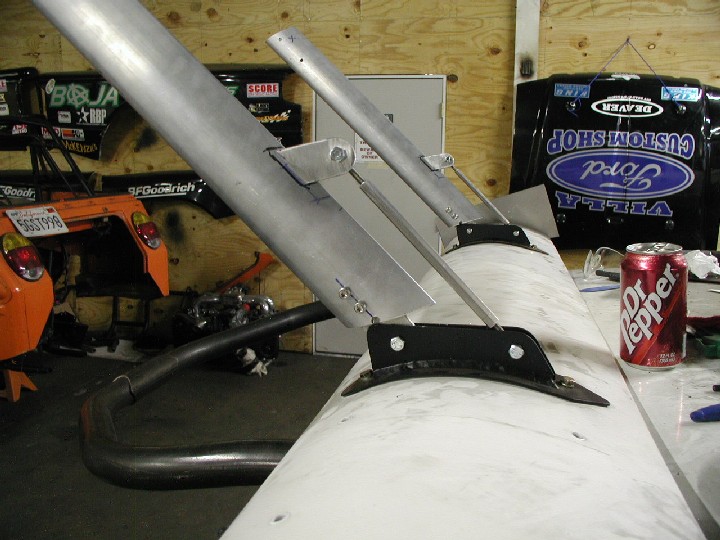 Lower mount has two sets of holes - lower pair puts the wing about roof high, then I have an inch higher set in case I need cleaner air. Starts looking a bit lame if the wing gets really high though... the angle is 25 degrees - I would like more "visually" but I was afraid of the moment loads at the weld with more and more angle.  At the top, I have aluminum plate cut to fit the upper wing mount welded to thicker plate cut to match the .75"x1.5" inside dim of the tubing. 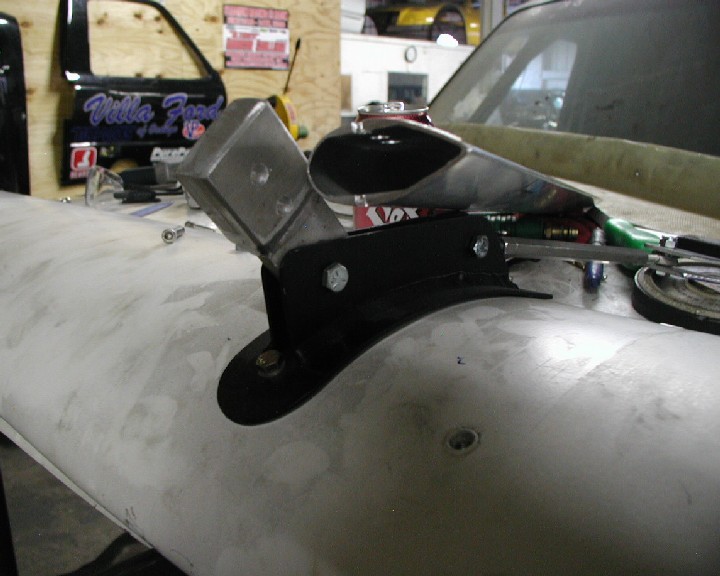 There are more shots on my website, but beware, geocities sucks and wants to shut it down apparently if a bunch of people access it (IMG:style_emoticons/default/confused24.gif) but feel more than welcome to click away... |
|
|
|
| turbo914v8 |
May 30 2006, 09:30 PM
Post
#19
|
|
Member Group: Members Posts: 373 Joined: 26-July 03 From: Canada Member No.: 952 |
Ahhh, you know that this is just what I have been waiting for. (IMG:style_emoticons/default/biggrin.gif)
Why did you not put the wing uprights closer together like RS car? Can you post the part number of the uprights again? Great progress. |
|
|
|
| byndbad914 |
May 31 2006, 02:07 PM
Post
#20
|
|
shoehorn and some butter - it fits Group: Members Posts: 1,547 Joined: 23-January 06 From: Broomfield, CO Member No.: 5,463 Region Association: None |
QUOTE(turbo914v8 @ May 30 2006, 08:30 PM) Why did you not put the wing uprights closer together like RS car? I was going to put them closer together, but Roger said he has some "rocking" in his wing with the mounts close together. Having them further apart will help combat that. However, the narrower spacing would look much cooler... just make sure you custom order the wing to have the internal support where you plan to mount it. I had to custom order the 33" width - standard is something like a 42" and 52" width. Roger Sheridan has his at 18" width btw Can you post the part number of the uprights again? Here is a link to Aircraft Spruce - the tubing is one size only in aluminum and comes in 6ft lengths (one piece is more than long enough for 2 uprights and WAYYY cheaper than the chromoly. Cost of one exact length upright in chromoly would be as much if not more than the whole 6ft piece of aluminum). http://www.aircraftspruce.com/catalog/mepages/struttube.php Great progress. Thanks |
|
|
|
|
1 User(s) are reading this topic (1 Guests and 0 Anonymous Users)
0 Members:

|
Lo-Fi Version | Time is now: 27th July 2026 - 03:37 PM |
Invision Power Board
v9.1.4 © 2026 IPS, Inc.