|
|
|
Porsche, and the Porsche crest are registered trademarks of Dr. Ing. h.c. F. Porsche AG.
This site is not affiliated with Porsche in any way. Its only purpose is to provide an online forum for car enthusiasts. All other trademarks are property of their respective owners. |
|
|

  |

| ottox914 |
 Jun 18 2006, 10:25 PM Jun 18 2006, 10:25 PM
Post
#21
|
|
The glory that once was.  Group: Members Posts: 1,302 Joined: 15-December 03 From: Mahtomedi, MN Member No.: 1,438 Region Association: Upper MidWest |
Dork brother in law messing around with motor mounts.
Attached thumbnail(s) 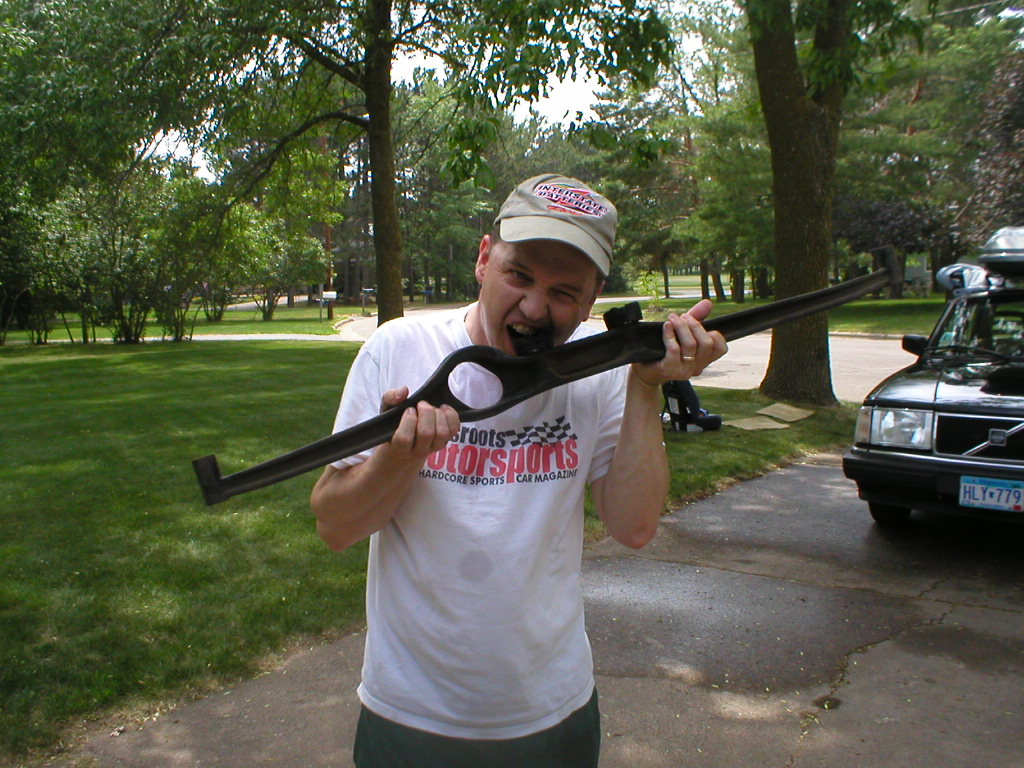
|
   |

 
|
| ottox914 |
Jun 18 2006, 10:26 PM
Post
#22
|
|
The glory that once was. Group: Members Posts: 1,302 Joined: 15-December 03 From: Mahtomedi, MN Member No.: 1,438 Region Association: Upper MidWest |
new engine rubber is in.
Attached thumbnail(s) 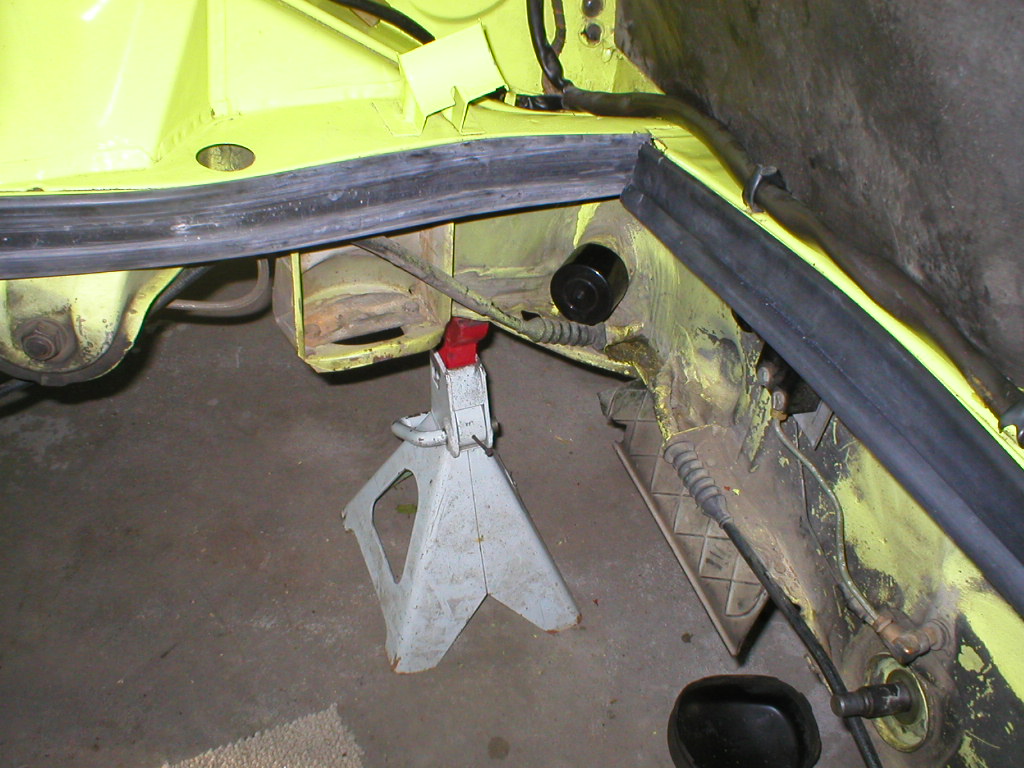
|
|
|
|
| ottox914 |
Jun 18 2006, 10:29 PM
Post
#23
|
|
The glory that once was. Group: Members Posts: 1,302 Joined: 15-December 03 From: Mahtomedi, MN Member No.: 1,438 Region Association: Upper MidWest |
got some parts... these are pulley's from a/c cars, there are 2 different designs, one a bit larger, lighter, but the "edge" of the pulley where magnets would have to mount is angled, the other pulley is a bit smaller, a heavier cast piece, but has a nice flat edge for drilling/mounting the magnets. There is also a "shorty" distrubuter plug that Dave-O made and sent. Thanks!
Attached thumbnail(s) 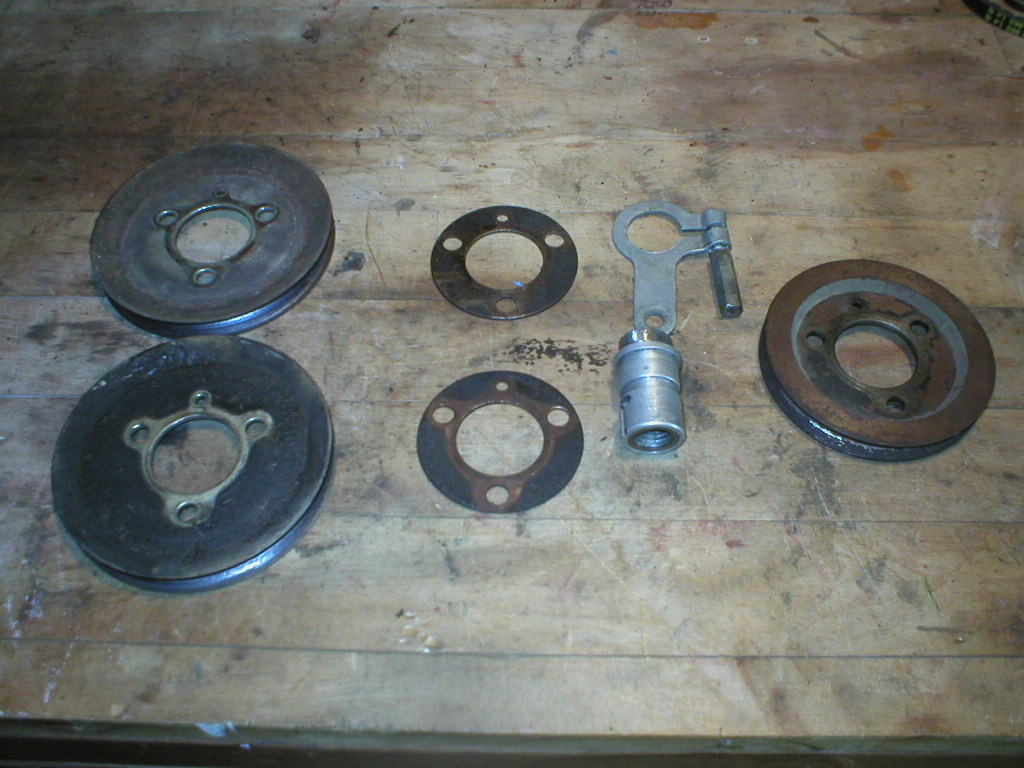
|
|
|
|
| ottox914 |
Jun 18 2006, 10:32 PM
Post
#24
|
|
The glory that once was. Group: Members Posts: 1,302 Joined: 15-December 03 From: Mahtomedi, MN Member No.: 1,438 Region Association: Upper MidWest |
close up of the pulleys and their differences. I'm going to start looking things over with an eye to useing the pulley with the flat magnet mounting surfaces, for obvious reasons. If I need a larger diameter pulley to get the magnets closer to where the hall sensor will end up, I may just use the larger ones as templates, and have an aluminum disc made up. I'll post more when I know more.
Attached thumbnail(s) 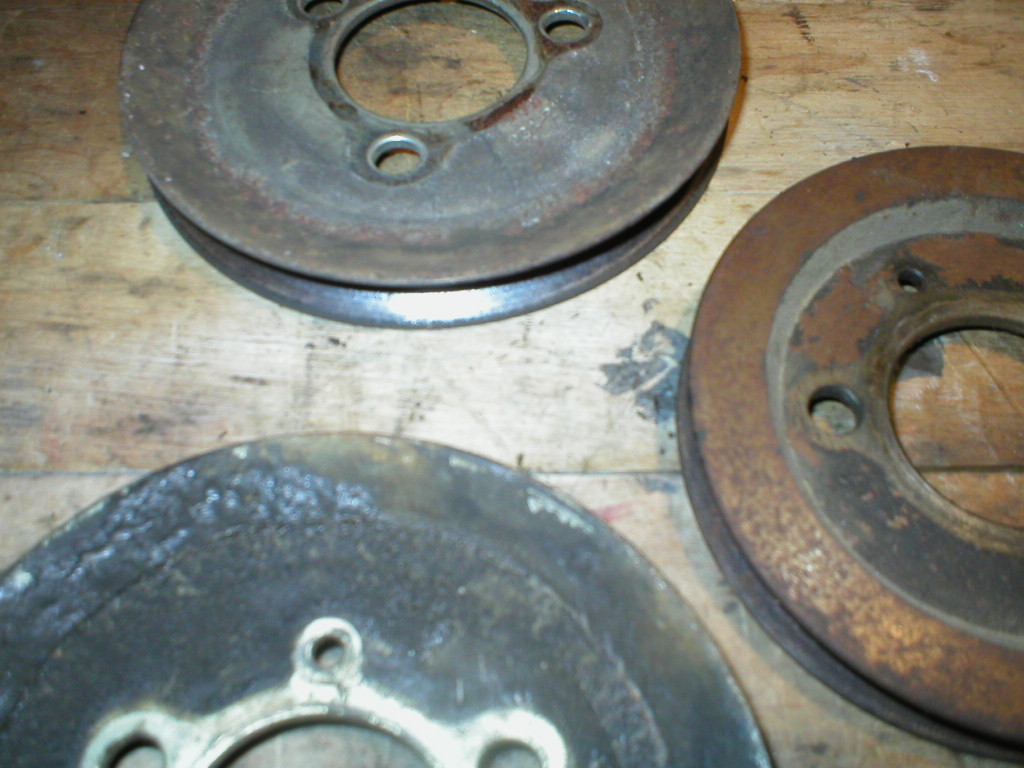
|
|
|
|
| Mark Henry |
Jun 23 2006, 12:21 PM
Post
#25
|
|
that's what I do! Group: Members Posts: 20,065 Joined: 27-December 02 From: Port Hope, Ontario Member No.: 26 Region Association: Canada |
System shipped yesterday, it should be in my hands on Monday.
FYI I ordered the system last friday and they are busy as hell right now, pretty good turn around (for a custom wire system) I'd say. BTW if you mount the trigger wheel about the same as mine those pulley's should work just fine. Size doesn't matter (to a point) but you have to install the magnets spot-on. (IMG:style_emoticons/default/beerchug.gif) |
|
|
|
| ottox914 |
Jul 13 2006, 09:16 PM
Post
#26
|
|
The glory that once was. Group: Members Posts: 1,302 Joined: 15-December 03 From: Mahtomedi, MN Member No.: 1,438 Region Association: Upper MidWest |
Goodies have arrived!!! Bad news is that I'll be away from home and projects for the next 3 weeks with work, weddings, auto cross events in borrowed cars, family reunions..... this is gonna drive me nuts!
Here are the bits and pieces- Attached thumbnail(s) 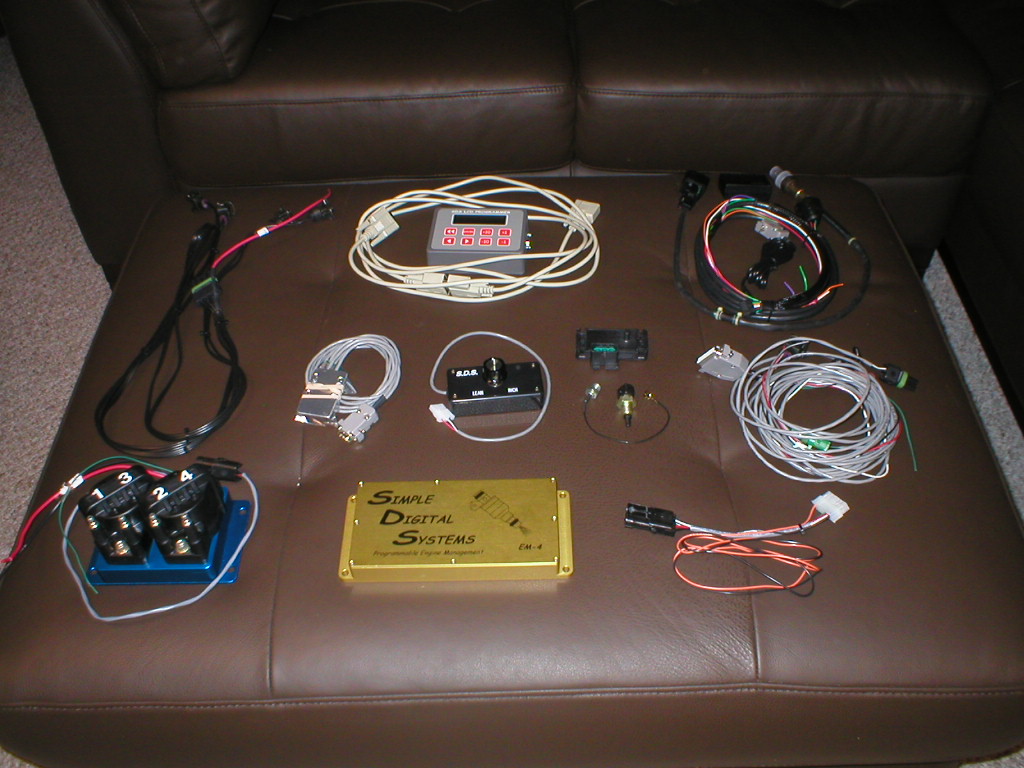
|
|
|
|
| Mark Henry |
Jul 14 2006, 07:17 AM
Post
#27
|
|
that's what I do! Group: Members Posts: 20,065 Joined: 27-December 02 From: Port Hope, Ontario Member No.: 26 Region Association: Canada |
|
|
|
|
| ottox914 |
Jul 28 2006, 10:06 PM
Post
#28
|
|
The glory that once was. Group: Members Posts: 1,302 Joined: 15-December 03 From: Mahtomedi, MN Member No.: 1,438 Region Association: Upper MidWest |
Took the last 2 days off work, yesterday was slow, as I was bushed from 3 weeks on the road, but today significant progress was made...
The main SDS ecu has been mounted, all wires run. Coil pac mounted and connected. Attached image(s) 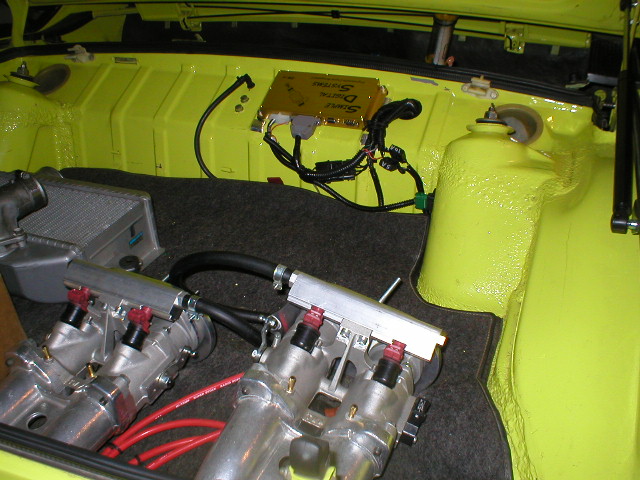 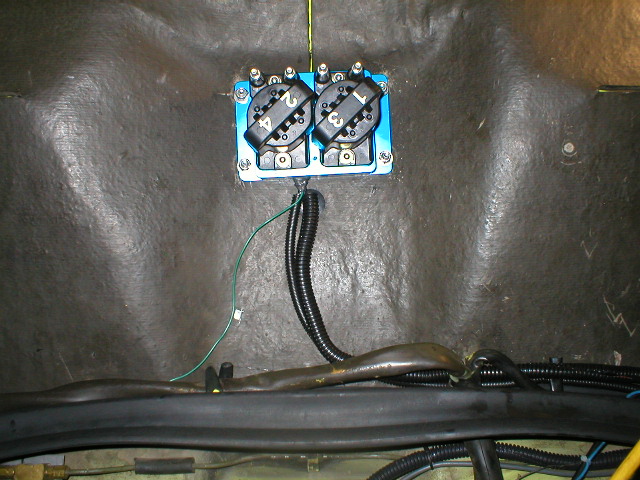
|
|
|
|
| ottox914 |
Jul 28 2006, 10:08 PM
Post
#29
|
|
The glory that once was. Group: Members Posts: 1,302 Joined: 15-December 03 From: Mahtomedi, MN Member No.: 1,438 Region Association: Upper MidWest |
A couple more views of the ECU install.
Attached image(s) 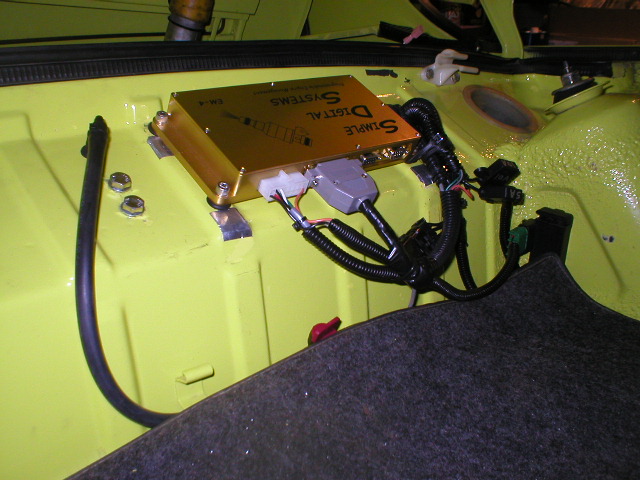 
|
|
|
|
| ottox914 |
Jul 28 2006, 10:11 PM
Post
#30
|
|
The glory that once was. Group: Members Posts: 1,302 Joined: 15-December 03 From: Mahtomedi, MN Member No.: 1,438 Region Association: Upper MidWest |
Here is a bunch of wireing, relays, distribution block... the relays and fuses have long enough leads to be pulled up over the battery to make them easier to work with if a fuse or relay goes bad and needs replacement when the engine is NOT out, and axcess is not this easy.
Attached image(s) 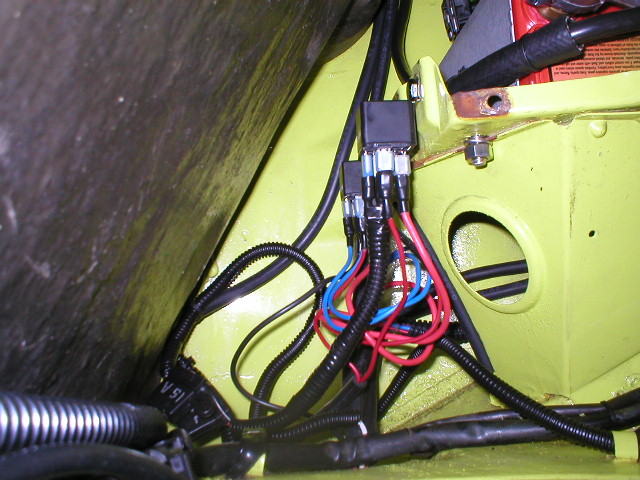 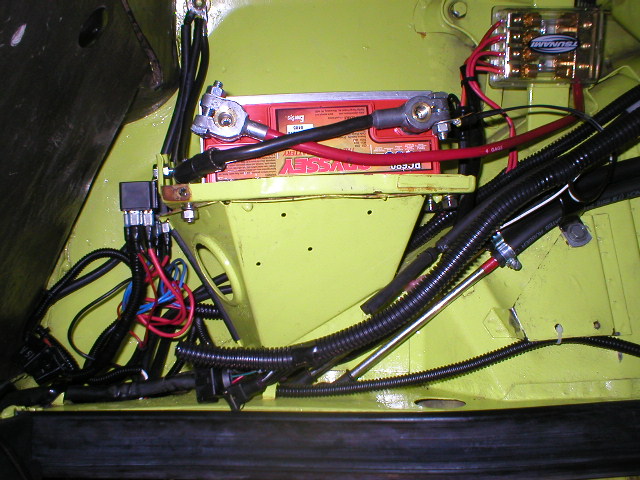
|
|
|
|
| ottox914 |
Jul 28 2006, 10:22 PM
Post
#31
|
|
The glory that once was. Group: Members Posts: 1,302 Joined: 15-December 03 From: Mahtomedi, MN Member No.: 1,438 Region Association: Upper MidWest |
Just a few more for tonight. After this was all done, I turned the key. Not much happened, as there is no motor, but the SDS fired up, the display worked, the sending units sent, and the ecu responded. Engine temp, air temp, TPS all registered and were reactive, as was the control knob. The hall sensor was not installed on the engine, but I did plug it in and run the magnets across it, and it showed "magnet seen" on the screen, another good sign.
Still lots to do- tomorrow's goals will be to get the wires run for the WMS wideband, running from the dash display to the wideband O2 sensor, and connecting into the SDS system along the way. Also drilling a hole in the dash and finishing up the wireing for the VDO cyl. head temp gauge. If energy continues, I've got the rest of Chris Foley's fuel lines to install and a new, bigger fuel pump. If I can get all that off the list, that'll be a good day. Still remaining: pushrod tube seals, of course check and set the valves after taking the rockers off, and tear off the fan to mount the pulley from the prior photos, and mount the hall sensor. I'll check the clutch while the tranny is off, new shift bushings and motor mounts, install that lightweight starter I bought last december... and so it goes. Attached image(s) 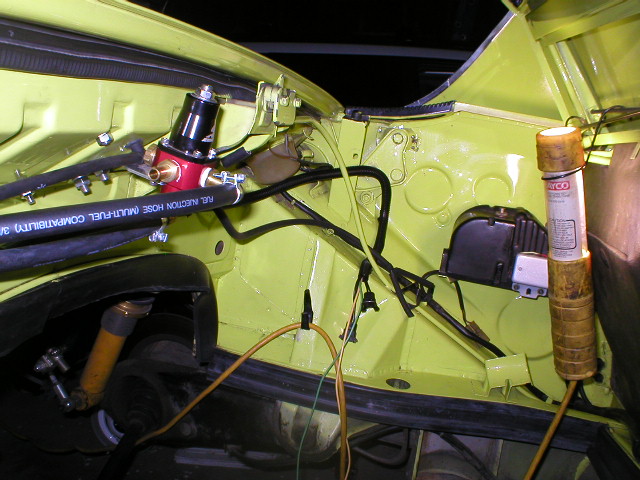 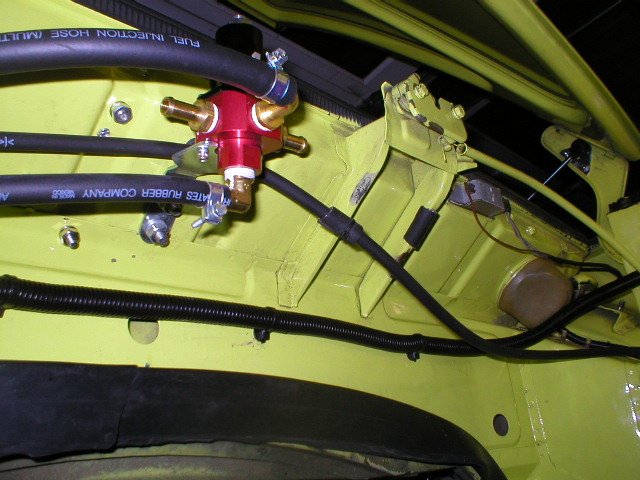
|
|
|
|
| ottox914 |
Jul 29 2006, 07:42 PM
Post
#32
|
|
The glory that once was. Group: Members Posts: 1,302 Joined: 15-December 03 From: Mahtomedi, MN Member No.: 1,438 Region Association: Upper MidWest |
TheWMS wideband is in and tested. I only need to hook up the actual wideband sensor once engine/trans/exhaust system is back in. Put some battery to the dash mount display, and all the right lights and test codes ran.
Installed it where the cig lighter goes. The first photo shows the display pressure fit into the cig lighter, just to see how it looks. Second photo, I have pulled out the lighter and used a Dremel tool with a metal cutting bit to square off the bottom of the cig lighter hole, so I can better center the display on the dash. Makes some nice shiney metal bits that go everywhere. Attached image(s) 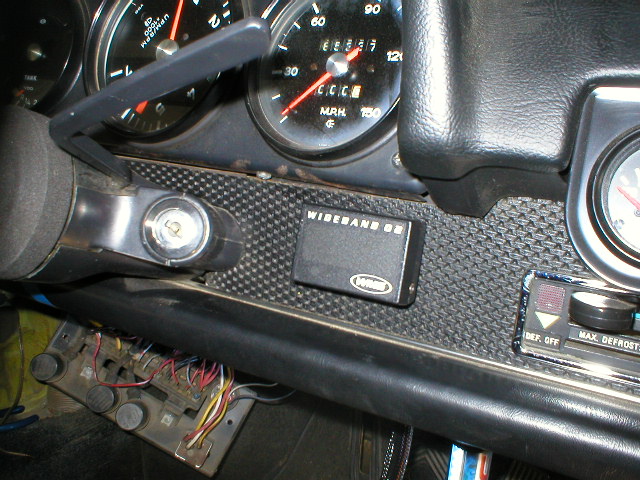 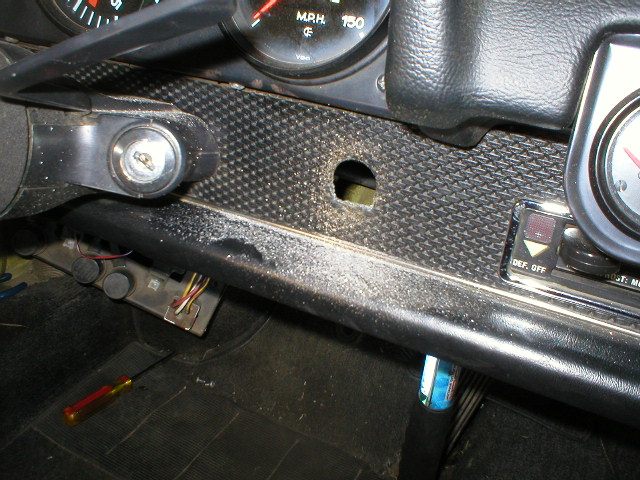
|
|
|
|
| ottox914 |
Jul 29 2006, 07:46 PM
Post
#33
|
|
The glory that once was. Group: Members Posts: 1,302 Joined: 15-December 03 From: Mahtomedi, MN Member No.: 1,438 Region Association: Upper MidWest |
Ran the wires back to the engine by way of the driver side heat duct. The WMS bundle looked to be well protected, but there were 2 wires from the SDS ecu that needed to be attached to the wideband, so I ran those thru some 3/8 plastic tubing, then stuck the whole mess up the heater tunnel. At the ends are my 2.99 fernco plumbing caps, rubber, with a hole drilled thru them. Once the motor is in, and all final lengths set up, I'll add some black rtv at the back to prevent any water getting in at the hole. I'll also squirt some in the end of the plastic tube to seal it as well. I plan to leave an inch or 2 of plastic tube coming out into the engine area, and if I need to send any other wires up front, I can cut off the bit with the rtv in it to open the tube up again.
Attached image(s) 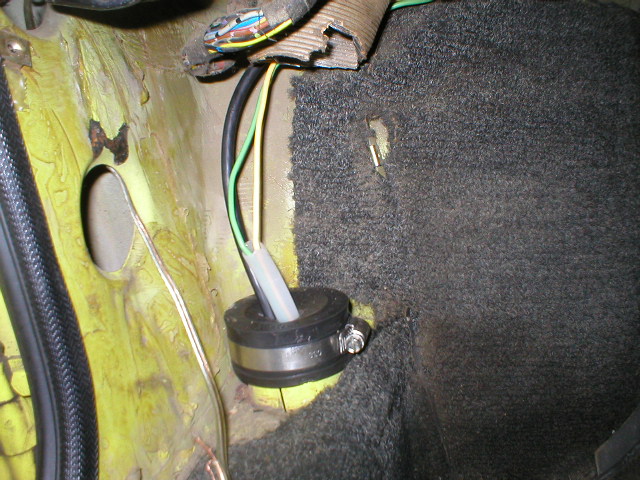 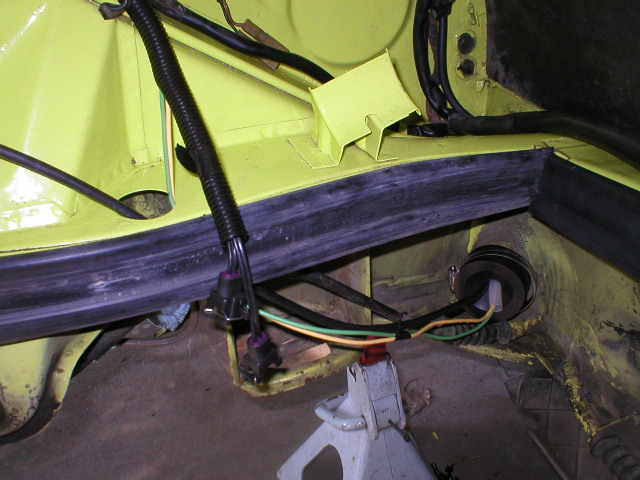
|
|
|
|
| ottox914 |
Jul 29 2006, 07:51 PM
Post
#34
|
|
The glory that once was. Group: Members Posts: 1,302 Joined: 15-December 03 From: Mahtomedi, MN Member No.: 1,438 Region Association: Upper MidWest |
Finished install. Looks good to me. Was really a snap in some ways, as the cig lighter provided switched power and ground right in the area I needed for the WMS wideband. 3M double sided foam tape secured the display to the dash. Just needed a couple make spade connectors. Also got the wires for the cyl head temp gauge strung from the engine area up the tunnel, using another grommet from some addl wires that came up front for oil sending/pressure gauges installed a couple yrs ago. Tomorrow will be the cutting of a big hole in the dash on the other side of the steering wheel for the cyl head temp gauge. And there is still those fuel lines if I get done quickly on the gauge install.
Attached image(s) 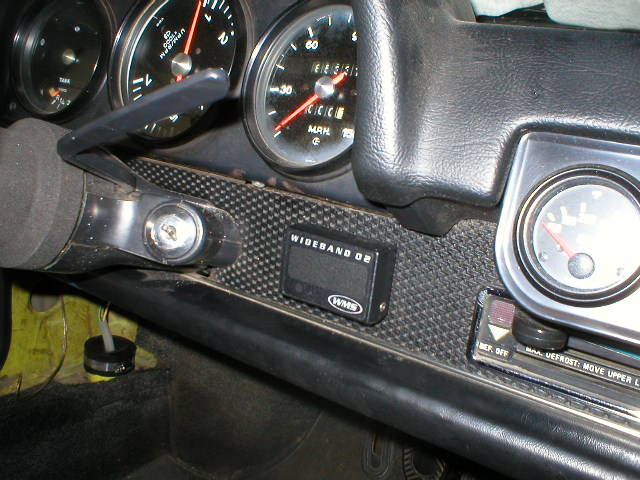
|
|
|
|
| Dave-O |
Jul 29 2006, 08:06 PM
Post
#35
|
|
Is winter done yet? Group: Members Posts: 511 Joined: 26-August 03 From: Minneapols, MN Member No.: 1,082 |
Looks good Dave! I'm a bit jealous of all your fancy new gadgets. I'm going to take my 914 with an AFI system (archaic fuel injection) and beat up on some punk kids in Appleton tomorrow.
Have you dug into the fan housing yet? |
|
|
|
| ottox914 |
Jul 29 2006, 09:15 PM
Post
#36
|
|
The glory that once was. Group: Members Posts: 1,302 Joined: 15-December 03 From: Mahtomedi, MN Member No.: 1,438 Region Association: Upper MidWest |
Dave-O, have not gotten in there yet. I wanted to get all with wiring done first, and save some of the fab work for... you? I know you like that kind of stuff- whatcha doing next weekend? Actually, I wanted to get all the wiring done with the engine out, and the fuel lines, as once the pushrod tube seals and sensor mount are done, I'm gonna REALLY want to get it all back togather, and having to put time in on that other stuff would drive me mad with the engine done, but now, all that other stuff is still kinda fun and part of the process.
I did power up the SDS ecu last night- everything looks good. The controller scrolled thru all the screens in the correct order, I hooked up the ET (engine temp) and AT (air temp) as well as the TPS, and all registered correct values. The TPS value changed as the throttle body was open/shut. I was pretty stoked after that little test run. I wanted to stay up all night and just play with the controller, just to get the hang of it. You ran great last weekend- that 41 with me in your STS2 car was fun. That chick in the Mazdaspeed Miata was a cutie- to bad she: 1) drives a miata, 2) has a boyfriend with an Elise, and 3) I happen to be very married. Would mine, with the SDS and Keizer/710's been in the 40's? 39's? Who knows. It really made me want mine back on the road/track again. Go and pick on some ricers, and give me a call with the results. FTD? Top 5? Top 10? Don't be to jealous, yours runs. And runs well. You've got many runs that I owe you in mine for the help you've been. |
|
|
|
| ottox914 |
Aug 1 2006, 09:05 PM
Post
#37
|
|
The glory that once was. Group: Members Posts: 1,302 Joined: 15-December 03 From: Mahtomedi, MN Member No.: 1,438 Region Association: Upper MidWest |
More progress, slow but, well, sure? Got the cylinder head temp gauge mounted in the dash. Still need to get the wires hooked up, but the lines from the engine to the dash are run, just need to connect to the gauge, and need to run a ground and dimmer switched power to the light. Here's some pics- first one is the location, second is the big hole saw for the big hole. I first located center for the hole, and traced onto the vinyl the hole saw size opening. I then used a sharp knife to cut the vinyl out of the hole. Center punched the metal, drilled a starter hole, and had at it with the hole saw. I drilled the hole out with the saw in reverse. Didn't want to risk the sharp edge of the teeth snagging some vinyl, and also wanted some control of the hole and how quickly it broke thru- didn't want to twist the wires behind the hole into a rats nest of problems.
Attached image(s) 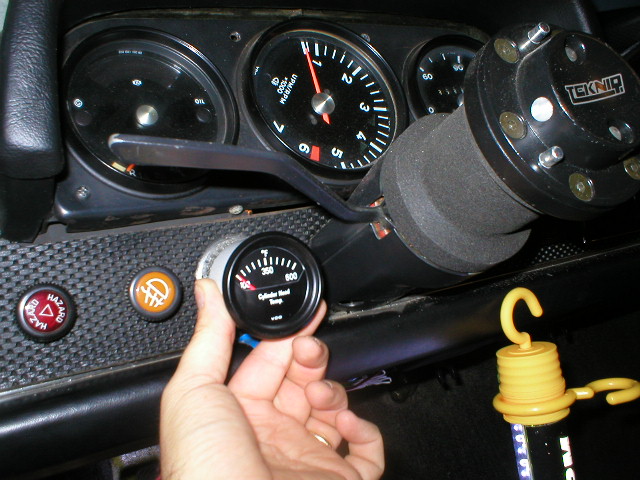 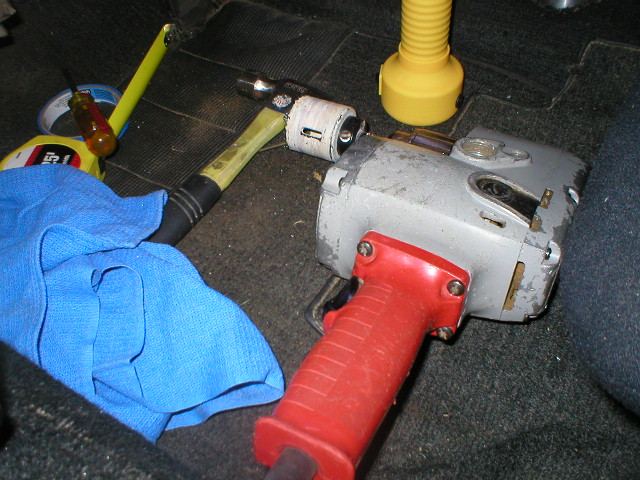
|
|
|
|
| ottox914 |
Aug 1 2006, 09:09 PM
Post
#38
|
|
The glory that once was. Group: Members Posts: 1,302 Joined: 15-December 03 From: Mahtomedi, MN Member No.: 1,438 Region Association: Upper MidWest |
Once the basic hole was done, I used the dremel and metal cutting bit to smooth out the rough edges, and open the hole a little, as the hole saw was 2", the gauge 2 1/16. Grind a little off, test fit, grind a little more for the perfect fricton fit. First pic is the finished hole, next one is the view of the gauge with the wheel on, from my eye level perspective. Off to the right is the WMS wideband display.
Attached image(s) 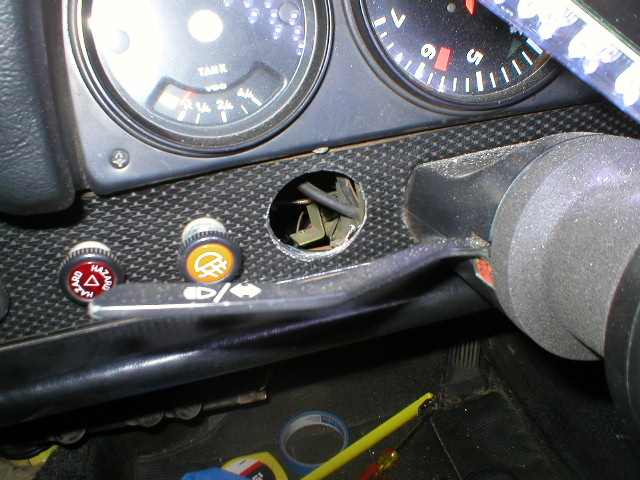 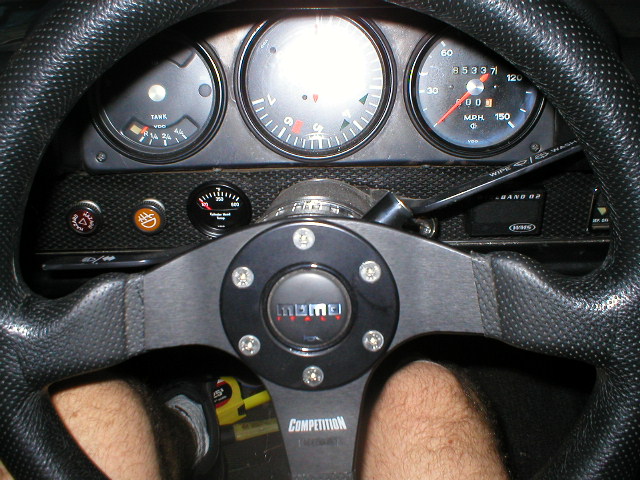
|
|
|
|
| ottox914 |
Aug 1 2006, 09:14 PM
Post
#39
|
|
The glory that once was. Group: Members Posts: 1,302 Joined: 15-December 03 From: Mahtomedi, MN Member No.: 1,438 Region Association: Upper MidWest |
I also took a lunch break and put the wire wheel on the drill, and shined up the a/c pulley that will hold the magnets for the crank fire ignition. Just a bit nicer to work with clean parts. Below are before and after photos.
Dave-O, coming off a 4th place pax finish in his STS2 car, is possibly coming over this weekend to get the last of the fabrication work done, and hopefully turn the key... I think between the 2 of us its do-able in 2 days. We'll find out. Attached image(s) 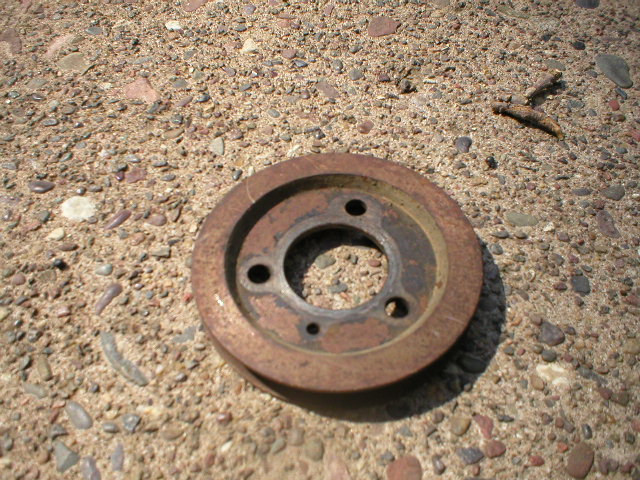 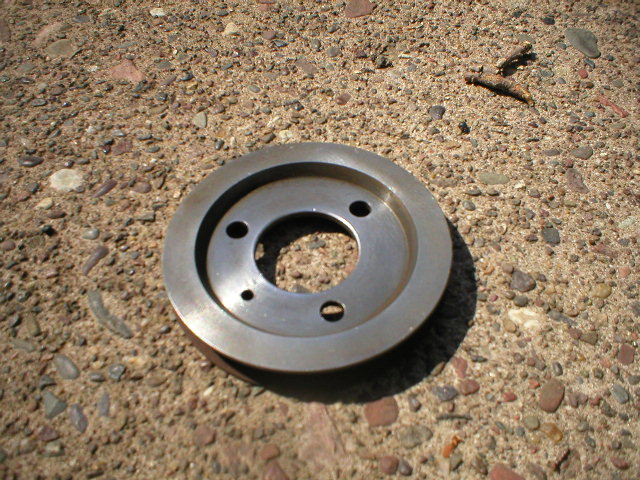
|
|
|
|
| ottox914 |
Aug 1 2006, 09:17 PM
Post
#40
|
|
The glory that once was. Group: Members Posts: 1,302 Joined: 15-December 03 From: Mahtomedi, MN Member No.: 1,438 Region Association: Upper MidWest |
Sorry, couldn't resist, a close up of the gauge.
Attached image(s) 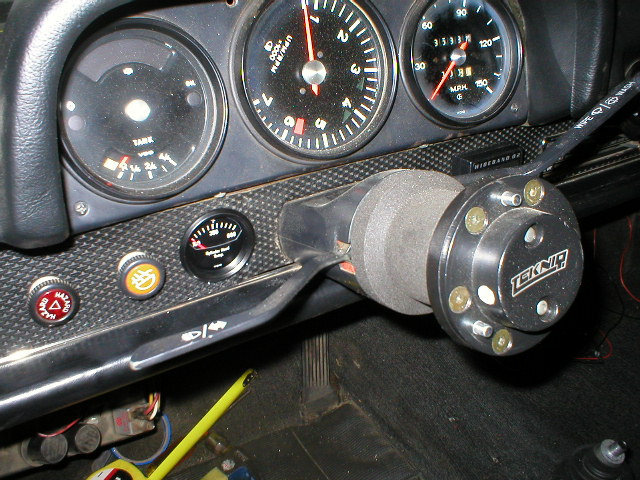
|
|
|
|
|
2 User(s) are reading this topic (2 Guests and 0 Anonymous Users)
0 Members:

|
Lo-Fi Version | Time is now: 21st June 2026 - 04:42 AM |
Invision Power Board
v9.1.4 © 2026 IPS, Inc.