|
|
|
Porsche, and the Porsche crest are registered trademarks of Dr. Ing. h.c. F. Porsche AG.
This site is not affiliated with Porsche in any way. Its only purpose is to provide an online forum for car enthusiasts. All other trademarks are property of their respective owners. |
|
|

  |

| 914forme |
 Sep 7 2006, 06:41 PM Sep 7 2006, 06:41 PM
Post
#1
|
|
Times a wastin', get wrenchin'!  Group: Members Posts: 3,896 Joined: 24-July 04 From: Dayton, Ohio Member No.: 2,388 Region Association: None |
Well I have bit the bullet sold the fron Weltmeister 22mm bar, and picked up a Nascar Hand me down.
As of today all the parts are in except the bearings, I will have them tomorrow, TSC (Tractor Supply Company) has the parts I need. I liked smart racings graphs so much I had to make my own. (IMG:style_emoticons/default/biggrin.gif) Foot Pound numbers are the upper column, size is across the bottom. With the arms I am running these are the rates I can achieve. Mr. H. Ross Perot, would be proud of me. Attached image(s) 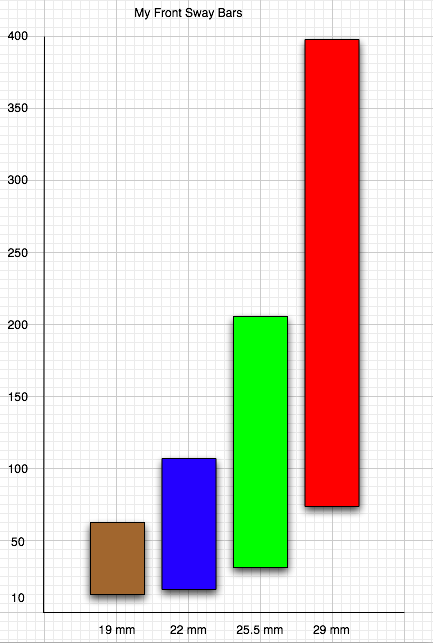 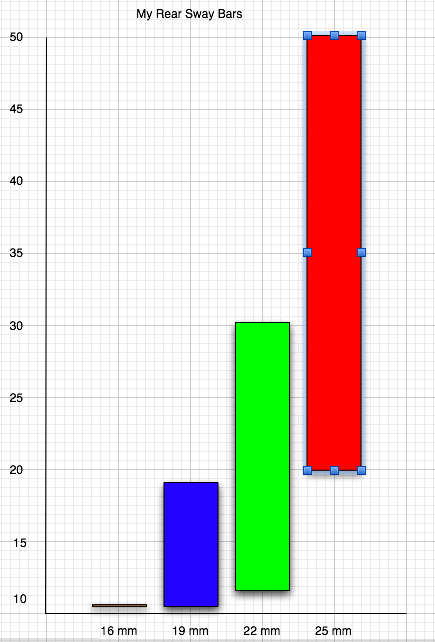
|
   |

 
|
| jhadler |
Sep 8 2006, 12:30 PM
Post
#2
|
|
Long term tinkerer... Group: Members Posts: 1,879 Joined: 7-April 03 From: Lyons, CO Member No.: 529 |
I'm still trying to figure out why you want such incredibly stiff sway bars.
You're defeatnig the purpose of an independent suspension with mongo bars like that... Still, I can't wait to see pictures of those monster bars in a 914... (IMG:style_emoticons/default/biggrin.gif) -Josh2 |
|
|
|
| Joe Ricard |
Sep 9 2006, 05:08 PM
Post
#3
|
|
CUMONIWANNARACEU Group: Members Posts: 6,811 Joined: 5-January 03 From: Gautier, MS Member No.: 92 |
The theory of big bars and soft springs. has some interesting benefits.
Car will stay flat but should followbumpy surfacesbetter with a Koni sport set 1/2 range or so. |
|
|
|
| J P Stein |
Sep 9 2006, 06:43 PM
Post
#4
|
|
Irrelevant old fart Group: Members Posts: 8,797 Joined: 30-December 02 From: Vancouver, WA Member No.: 45 Region Association: None |
QUOTE(Joe Ricard @ Sep 9 2006, 04:08 PM)  The theory of big bars and soft springs. has some interesting benefits. Car will stay flat but should followbumpy surfacesbetter with a Koni sport set 1/2 range or so. Yes it does have some points, but also there are downsides. I can't even consider it on our bumpy venues for fear of bottoming both the chassis & suspension. The "as low as you can go" is out the window with soft springs for the same reasons, even on "normal" venues....just suspension bottoming problems. Squat & dive also can become an issue. We'll expect reports as to how it is working out. |
|
|
|
| jhadler |
Sep 11 2006, 10:27 AM
Post
#5
|
|
Long term tinkerer... Group: Members Posts: 1,879 Joined: 7-April 03 From: Lyons, CO Member No.: 529 |
QUOTE(Joe Ricard @ Sep 9 2006, 03:08 PM) The theory of big bars and soft springs. has some interesting benefits. Car will stay flat but should followbumpy surfacesbetter with a Koni sport set 1/2 range or so. But that's not going to happen. What's a sway bar? It's a big spring that couples the left and right side suspensions. When the outbaord side suspension moves, the inboard suspension will be forced to move in that same direction. So not only does the outboard suspension have to move against it's own spring rate, it has to move against the inbaord suspension spring rate as well (adjusted for the coupling rate between the two). The only time a massive sway bar won't be a problem on bumpy sufaces is when you're traveling straight, where the two sides are equally loaded, and the bump effects both wheels equally. Once you're in a turn, the mongo sway bar can actually make compliance issues -worse-, not better. BTDT. I'm not saying that all spring and no sway is the solution either. But if you're trying to optimize for performance (and not freeway ride comfort), then mongo sway bars and soft torsion bars I don't think are a good combination. Yes, it's true, you can make the spring rates too stiff, such that you skate over bumpy terrain. If you were always going to drive on glassy smooth racetrack asphalt, then all spring and minimal sway bar might be great. But that's rarely the case. So, failing that, you need to tune to a good compromise. But small torsion bars and a Peterbuilt sway bar are extreemes in the wrong directions, IMHO. -Josh2 |
|
|
|
| DanT |
Sep 11 2006, 11:47 AM
Post
#6
|
|
Going back to the Dark Side! Group: Members Posts: 4,300 Joined: 4-October 04 From: Auburn, CA Member No.: 2,880 Region Association: None |
All I can report is what I have observed watching and riding in a 914 set up with stock front torsion bars and a 31mm Tarret front sway bar. I believe he has either 180 or 200# rear springs, but I could be wrong on the rear.
I believe he is running adjustable Konis front and rear The car turns in very nicely and holds it's set well. No tendency to plow or rear to be tail happy. I have ridden in it at Sears at speed and also at Marina AX site. But then I compare it to my car with 21mm front torsion bars, stock sway bar and 180# rear springs and don't feel much difference. Maybe if I drove the car I could feel the difference. I just don't like relying on a huge sway bar to be my entire performance suspension. A lot of stress being put on that area of the wheel well, that it wasn't designed for. I would have to do some pretty major reinforcement of that area to use such a large sway bar. I would think that after a lot of abuse that area would begin to "oil can" and then work harden and crack... (IMG:style_emoticons/default/confused24.gif) To each his own. If you can make it work...good for you. Just not the way I have done it in the past on my 4 914s. In this person's application that I described, it works very well. He has been at the top of the AX results with this set up and is on a very good learning curve on the big track with the same setup. |
|
|
|
| Trekkor |
Sep 11 2006, 12:07 PM
Post
#7
|
|
I do things... Group: Members Posts: 7,809 Joined: 2-December 03 From: Napa, Ca Member No.: 1,413 Region Association: Northern California |
This "person" sounds very familiar (IMG:style_emoticons/default/Jumpy.gif) (IMG:style_emoticons/default/wavey.gif)
31mm Smart Racing Products front sway bar 200# rear springs on adustable perches stock rear sway bar- always connected (IMG:style_emoticons/default/wink.gif) Koni adjustables all around This winter will include some chassis strengthening exercises in the front as well as the rear suspension ears. KT |
|
|
|
| 914forme |
Sep 12 2006, 06:35 PM
Post
#8
|
|
Times a wastin', get wrenchin'! Group: Members Posts: 3,896 Joined: 24-July 04 From: Dayton, Ohio Member No.: 2,388 Region Association: None |
You guys make me (IMG:style_emoticons/default/chairfall.gif)
BTW, I can make this bar softer than a 22mm if I wanted to, I have a settings that make it run softer and harder than my former 22, there are lots of ways to play with a big bar here. So back to the work: I did some (IMG:style_emoticons/default/welder.gif) (IMG:style_emoticons/default/smash.gif) (IMG:style_emoticons/default/sawzall-smiley.gif) Here is what I got. First off the arms in stock form they are 5 lbs a piece, them Nascar guys like road hugin weight!!! After drilling cutting, and I have them out being milled right now. My hope is a less portly arm. Attached image(s) 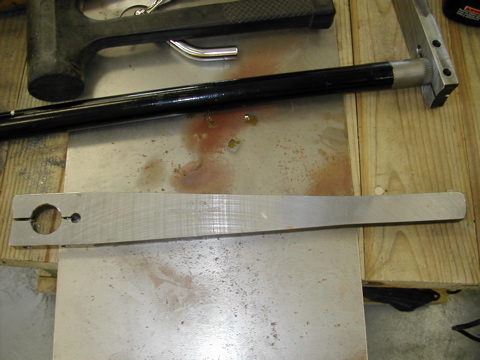
|
|
|
|
| 914forme |
Sep 12 2006, 06:36 PM
Post
#9
|
|
Times a wastin', get wrenchin'! Group: Members Posts: 3,896 Joined: 24-July 04 From: Dayton, Ohio Member No.: 2,388 Region Association: None |
This pile of shavings is from one arm.
Attached image(s) 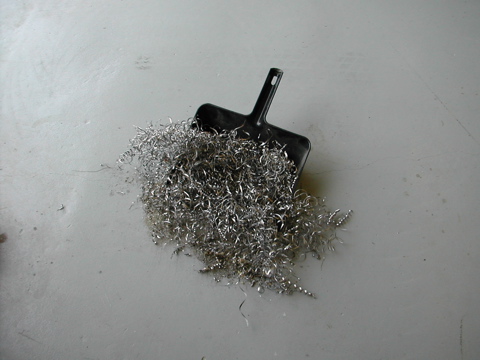
|
|
|
|
| 914forme |
Sep 12 2006, 06:38 PM
Post
#10
|
|
Times a wastin', get wrenchin'! Group: Members Posts: 3,896 Joined: 24-July 04 From: Dayton, Ohio Member No.: 2,388 Region Association: None |
I am still working on these making them lighter. I have drilled a few more holes. And still need to cut the ends off.
Attached image(s) 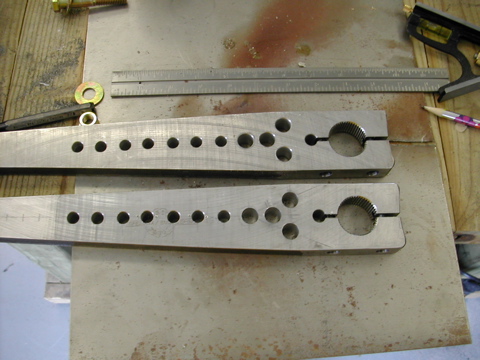
|
|
|
|
| 914forme |
Sep 12 2006, 06:39 PM
Post
#11
|
|
Times a wastin', get wrenchin'! Group: Members Posts: 3,896 Joined: 24-July 04 From: Dayton, Ohio Member No.: 2,388 Region Association: None |
Ah Roller bearings. And they fit like they should.
Attached image(s) 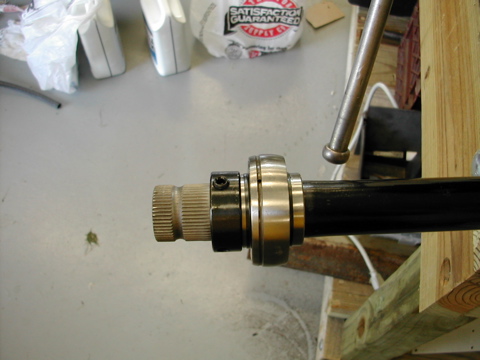
|
|
|
|
| 914forme |
Sep 12 2006, 06:47 PM
Post
#12
|
|
Times a wastin', get wrenchin'! Group: Members Posts: 3,896 Joined: 24-July 04 From: Dayton, Ohio Member No.: 2,388 Region Association: None |
Next comes the mounts for these bearings. Pattren being made, I have to drill a big hole in the side of the car. I will make a template for hte hole saw out of hard wood. So I can bolt it in and drill them out. First the cardboard template.
Attached image(s) 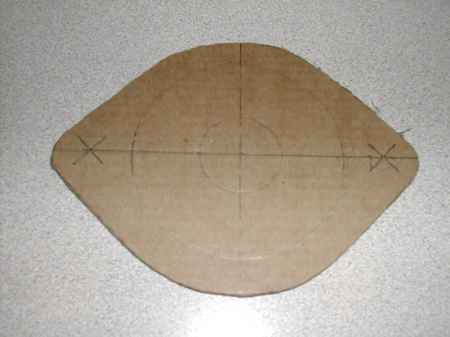
|
|
|
|
| 914forme |
Sep 12 2006, 06:49 PM
Post
#13
|
|
Times a wastin', get wrenchin'! Group: Members Posts: 3,896 Joined: 24-July 04 From: Dayton, Ohio Member No.: 2,388 Region Association: None |
The bearing cups with the bearing installed and locking collar.
Attached image(s) 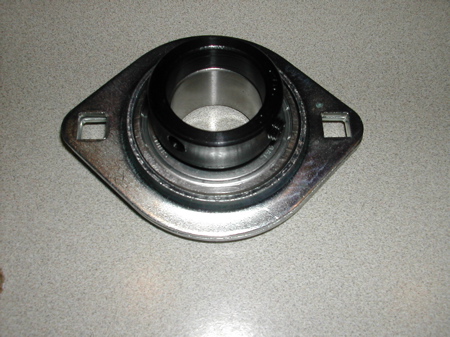
|
|
|
|
| 914forme |
Sep 14 2006, 06:33 PM
Post
#14
|
|
Times a wastin', get wrenchin'! Group: Members Posts: 3,896 Joined: 24-July 04 From: Dayton, Ohio Member No.: 2,388 Region Association: None |
Working hard at it tonight, Fab work is so slow........
My old reinforcements welded in nut plates, made out of 16 ga. Attached image(s) 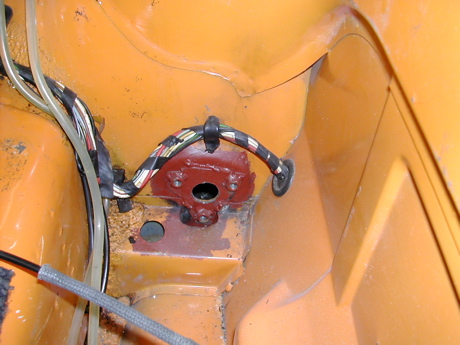
|
|
|
|
| 914forme |
Sep 14 2006, 06:38 PM
Post
#15
|
|
Times a wastin', get wrenchin'! Group: Members Posts: 3,896 Joined: 24-July 04 From: Dayton, Ohio Member No.: 2,388 Region Association: None |
Next I made a fixture to cut the arms off square.
Attached image(s) 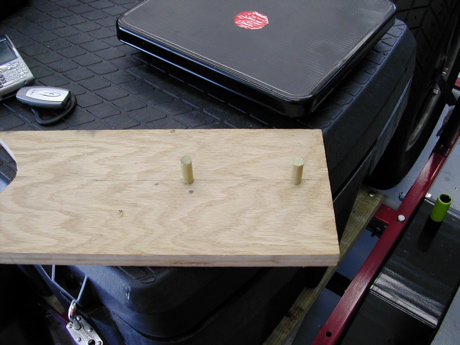 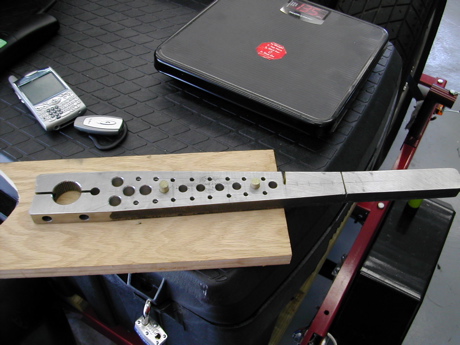 
|
|
|
|
| 914forme |
Sep 14 2006, 06:40 PM
Post
#16
|
|
Times a wastin', get wrenchin'! Group: Members Posts: 3,896 Joined: 24-July 04 From: Dayton, Ohio Member No.: 2,388 Region Association: None |
Built a new set of backing plates ground off the old ones, it is very tight in there, so had to grind a little off the one side.
Attached image(s) 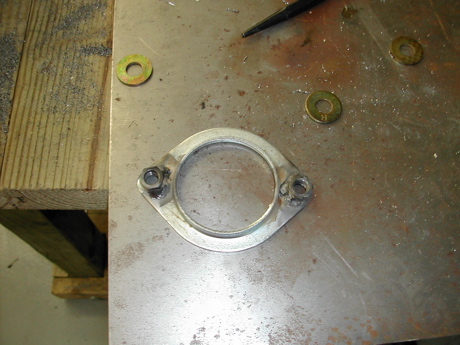 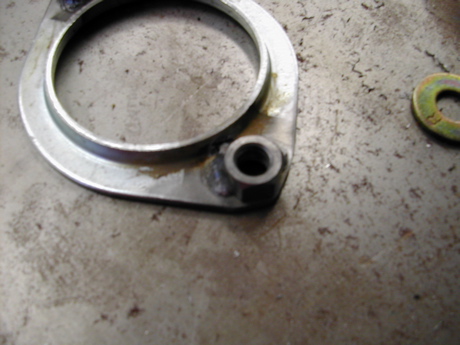
|
|
|
|
| 914forme |
Sep 14 2006, 06:45 PM
Post
#17
|
|
Times a wastin', get wrenchin'! Group: Members Posts: 3,896 Joined: 24-July 04 From: Dayton, Ohio Member No.: 2,388 Region Association: None |
Nut Plate test fitted. things left todo:
Drill out the hole for the bearing to sit into. Test fit bearing cage! Weld in the engman reinforcements - hoping they get to the shop in time. Weld up everything else. Rinse and repeat on the other side. Install the bar, fit the arms, drop links and the tabs. then bolt the rest of the suspension back in. I have the strut out right now, easier to work in there. Attached image(s) 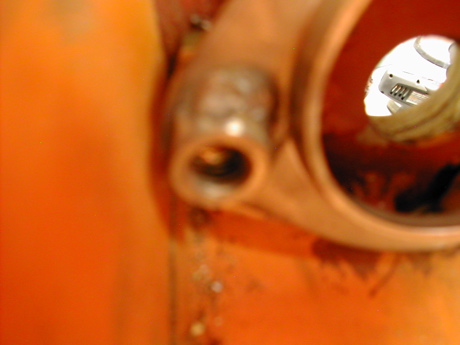 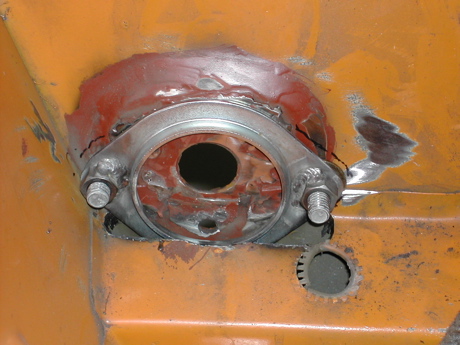
|
|
|
|
| 914forme |
Sep 14 2006, 06:47 PM
Post
#18
|
|
Times a wastin', get wrenchin'! Group: Members Posts: 3,896 Joined: 24-July 04 From: Dayton, Ohio Member No.: 2,388 Region Association: None |
Yes I gradeated from the Sir Andy School of Photcrappy (IMG:style_emoticons/default/poke.gif) did not look that bad on that tiny 2.5 inch LCD. Honestly
|
|
|
|
| Chris Pincetich |
Sep 14 2006, 08:08 PM
Post
#19
|
|
B-) Group: Members Posts: 2,082 Joined: 3-October 05 From: Point Reyes Station, CA Member No.: 4,907 Region Association: Northern California |
(IMG:style_emoticons/default/aktion035.gif)
Looks like NASCAR doesn't need it adustable...but now with all those centered holes it will be (?). Nice work! A bearing will really reduce the stress, so will those enormous mounting plates. I'll be interested in seeing the rear come together and dealing with the small amount of room that most lowered 914s have (like mine). (IMG:style_emoticons/default/beerchug.gif) |
|
|
|
| Brad Roberts |
Sep 14 2006, 08:28 PM
Post
#20
|
|
914 Freak! Group: Members Posts: 19,148 Joined: 23-December 02 Member No.: 8 Region Association: None |
Everyone watching:
The KEY is.. range of adjustment. MUCH easier to adjust F+R bars than it is to change spring rates in the front or rear of a 914. Do you know the first thing that gets done to a GT3Cup car when it comes out of the crate here in the USA? YANK out the SUPER stiff springs. They work great for Formula1 tracks but they SUCK here in the states. JP has a VERY good point about squat and such. I typically dial this in and out with the shocks. B |
|
|
|
|
1 User(s) are reading this topic (1 Guests and 0 Anonymous Users)
0 Members:

|
Lo-Fi Version | Time is now: 5th May 2024 - 02:44 PM |
Invision Power Board
v9.1.4 © 2024 IPS, Inc.