|
|
|
Porsche, and the Porsche crest are registered trademarks of Dr. Ing. h.c. F. Porsche AG.
This site is not affiliated with Porsche in any way. Its only purpose is to provide an online forum for car enthusiasts. All other trademarks are property of their respective owners. |
|
|

  |

| dakotaewing |
 Sep 14 2006, 08:55 PM Sep 14 2006, 08:55 PM
Post
#21
|
|
Senior Member  Group: Members Posts: 1,160 Joined: 8-July 03 From: DeSoto, Tx Member No.: 897 Region Association: Southwest Region |
Stephen -
If you don't mind, will you post the details in regard to the sources and part #s for this install??? - I am planning on something similar, very soon, and those details would be big help - Thanks - Thom |
   |

 
|
| 914forme |
Sep 15 2006, 09:35 AM
Post
#22
|
|
Times a wastin', get wrenchin'! Group: Members Posts: 3,896 Joined: 24-July 04 From: Dayton, Ohio Member No.: 2,388 Region Association: None |
Sources
Here is the list so far: 1 3/16" Swaybar - Schroeder - Ebay score - it was $45.00 plus 12.50 shipping. Arms - Coleman Racing 49 spline solid arm 43.90 each. Speedway engineering product, nice but 5lbs a piece. Bearings and end links Big Bearing Store I used a prelubed bearing, I would liked to use a relube, but it would be a paint to build the grease groves into this setup. You can do it, but I will pull the bearings and replace or repack if I have to. 1/2 rod ends where ~7 each Bearing plates Tractor Supply Company 2 bolt flange - I am using 6 of them, I used a set to make the nut plates with. Also got the bearings here, so I made sure they fit the plates. Bolts Tractor Supply Company Sells Grade 8 buy the pound, so about $7 worth of stuff, probably less, but I grabbed a ton of bolts nuts washer to get fit up done. Tube and Jam nuts for the Rod ends. Pegusas Auto Racing. The tubes where 9.95 x2 each, the jam nuts where .95 each x4 Them Funky washer to keep a failed rod end in from parting company with the chassis. They also work really well as a spacer fro the ends that still allow a range of movement. I have 8 of these ~20 bucks. Grand Total - Oh I hate doing this....... $237.55 I also have these in mistakes 3 bolt flange - just no room, you could do it, but it is just harder. $3.45 Two flanges with bearings cast. @ 10.95 each Mistake totals - $25.35 Will recoup some to this by applying the mistakes to another project, not sure what thou..... Sold the old Welt 22, thanks again (IMG:style_emoticons/default/clap56.gif) So I have a total outlay in the project of $87.90 including the mistakes. I have not started the rears yet, but I am looking @ $250 for the rear. I am hoping I can keep close that number. (IMG:style_emoticons/default/av-943.gif) |
|
|
|
| Trekkor |
Sep 15 2006, 10:07 AM
Post
#23
|
|
I do things... Group: Members Posts: 7,809 Joined: 2-December 03 From: Napa, Ca Member No.: 1,413 Region Association: Northern California |
Good work!!
Thanks for the resources. KT |
|
|
|
| Aaron Cox |
Sep 15 2006, 10:25 AM
Post
#24
|
|
Professional Lawn Dart Group: Retired Admin Posts: 24,541 Joined: 1-February 03 From: OC Member No.: 219 Region Association: Southern California |
ok.. why not mill the arms with a SLOT so you have infinite adjustment vs 12 predrilled holes.....
slot them like a tarett bar, and you can get more precise adjustment... very cool tho |
|
|
|
| dakotaewing |
Sep 15 2006, 11:42 AM
Post
#25
|
|
Senior Member Group: Members Posts: 1,160 Joined: 8-July 03 From: DeSoto, Tx Member No.: 897 Region Association: Southwest Region |
Stephen -
Thanks for doing this - it is a huge help !!!! (IMG:style_emoticons/default/smilie_pokal.gif) |
|
|
|
| Brad Roberts |
Sep 15 2006, 01:15 PM
Post
#26
|
|
914 Freak! Group: Members Posts: 19,148 Joined: 23-December 02 Member No.: 8 Region Association: None |
Aaron,
Porsche has never offered a sliding adjustment sway bar on their race cars. Always have been "multi-hole" I have wondered this same thing. They typically only ship the cars with one adjustable drop link per sway bar. No need for two. B |
|
|
|
| jhadler |
Sep 15 2006, 01:38 PM
Post
#27
|
|
Long term tinkerer... Group: Members Posts: 1,879 Joined: 7-April 03 From: Lyons, CO Member No.: 529 |
I find it interesting too...
Why not blade style in-cockpit adjusters? Then again, individual holes make for VERY repeatable settings. Whereas a free sliding clamp on an arm (like the welt, or others) means there is more room for slop in trying to make a repeated adjustment. Say, from dry to rain and back... And really, how much resolution is actually needed in adjusting a sway bar? Is there really a need to adjust a sway bar in 1 lb increments? Just a thought... -Josh2 |
|
|
|
| Brad Roberts |
Sep 15 2006, 03:49 PM
Post
#28
|
|
914 Freak! Group: Members Posts: 19,148 Joined: 23-December 02 Member No.: 8 Region Association: None |
QUOTE Why not blade style in-cockpit adjusters? ALMS says you cant have cockpit adjustable bars... so we put the adjusters in the front trunk for the front bar and the rear bar adjuster in the engine compartment. Depending on what class you run your 914 in.. most run groups dont allow cockpit adjustable bars. One of the big time supports of this site is working on cockpit adjustable/blade bars for multiple cars. The New GT3997 Cups come with everything but the cables and the adjusters. Roger Sheridan has been running a rear cockpit adjustable bar on his 914 for years and years. He changes it as the race wears on and the front tires start to go away. B |
|
|
|
| 914forme |
Sep 16 2006, 06:22 PM
Post
#29
|
|
Times a wastin', get wrenchin'! Group: Members Posts: 3,896 Joined: 24-July 04 From: Dayton, Ohio Member No.: 2,388 Region Association: None |
Well first up, the Mail Lady came today, and brought a package from Mark (IMG:style_emoticons/default/boldblue.gif)
Here is what was inside: Supes Sway Bar Mounts U tabs inner log re-inforcments. Attached image(s) 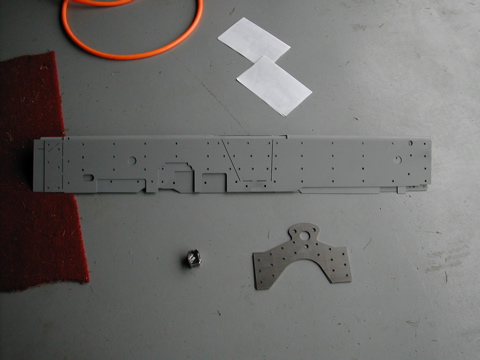
|
|
|
|
| 914forme |
Sep 16 2006, 06:25 PM
Post
#30
|
|
Times a wastin', get wrenchin'! Group: Members Posts: 3,896 Joined: 24-July 04 From: Dayton, Ohio Member No.: 2,388 Region Association: None |
Found out my 2 bolt mout exceeded the dimensions of Marks super mounts, dang nab it!!!!
Time to fab a few of my own. (IMG:style_emoticons/default/headbang.gif) Attached image(s) 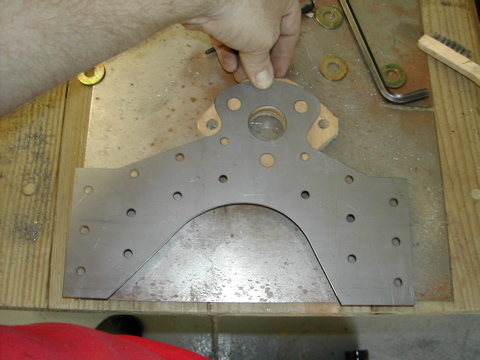 
|
|
|
|
| 914forme |
Sep 16 2006, 06:27 PM
Post
#31
|
|
Times a wastin', get wrenchin'! Group: Members Posts: 3,896 Joined: 24-July 04 From: Dayton, Ohio Member No.: 2,388 Region Association: None |
Next up drilling a major hole in the chassis. The bearings slip into this area, so the force is in a horazontal plane to the bearing. Should make it stronger yet!
Attached image(s) 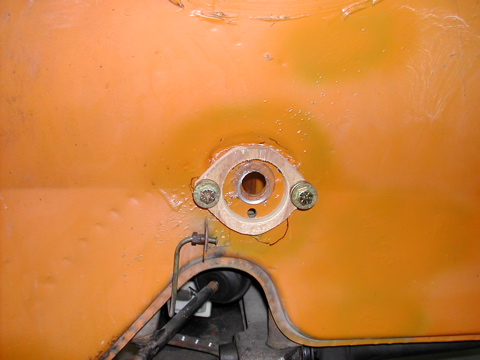
|
|
|
|
| 914forme |
Sep 16 2006, 06:32 PM
Post
#32
|
|
Times a wastin', get wrenchin'! Group: Members Posts: 3,896 Joined: 24-July 04 From: Dayton, Ohio Member No.: 2,388 Region Association: None |
Well there is a picture in which hours of work went on.
Stripped the paint, test fitted, stripped some more paint, paint the inner fender with a zinc epoxy, and the back side of my re-infrocement plate. The welds will splatter a little more, but hopefully the zinc will make rust creep a thing of the past. Only time will tell. Here it is ready for wellding. I grab the welder, open the tank, lay down a few beads on a sub srtap plate I was makeing, and sfffff _______ what, yep no gas. And dang it, its past noon. So I went on and preped a bunch more stuff. I well now get it all test fit and ready to weld then have a welding marathon. Attached image(s) 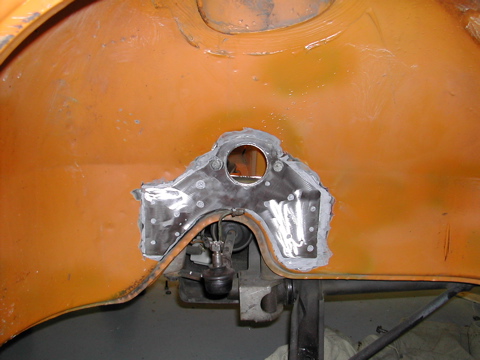
|
|
|
|
| 914forme |
Sep 16 2006, 06:36 PM
Post
#33
|
|
Times a wastin', get wrenchin'! Group: Members Posts: 3,896 Joined: 24-July 04 From: Dayton, Ohio Member No.: 2,388 Region Association: None |
Engman U tab kit is very nice worth the $$, I could not fab one this good.
I did have to bore it out for my larger bolts, But with the washers from Pegasus they look like I plalned it this way. No really I did! Well not really it just happened that way, love it when a plan comes togther. (IMG:style_emoticons/default/piratenanner.gif) Attached image(s) 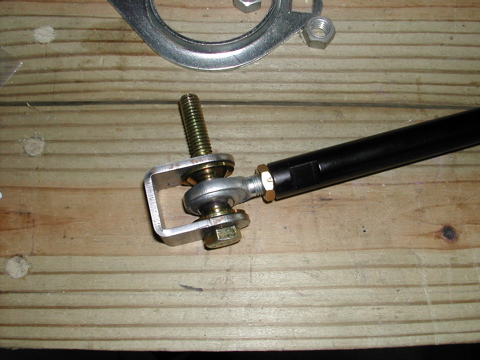
|
|
|
|
| 914forme |
Sep 16 2006, 06:46 PM
Post
#34
|
|
Times a wastin', get wrenchin'! Group: Members Posts: 3,896 Joined: 24-July 04 From: Dayton, Ohio Member No.: 2,388 Region Association: None |
And I finally cut the arms off, they are now down to 2 lbs. a piece (IMG:style_emoticons/default/biggrin.gif)
Aaron, I don't think I will slot the arm, I would like to get them lighter yet, and the slot would weaken the part. I intended after this season is over to take the arms to work, and relieve the arm of a little more of its girth. Here is how my bar jig worked out for choping the end of. I use a Small Miter saw as my metal chop saw. It is cheaper, lighter, and more acurate than a 14" chop saw. I use a blade made by MK Morse This thing is as nice as they say. $42.00 well spent, the saw was only $10 bucks more. Attached image(s) 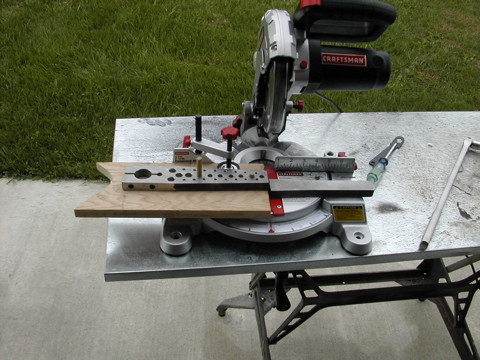
|
|
|
|
| Aaron Cox |
Sep 16 2006, 06:50 PM
Post
#35
|
|
Professional Lawn Dart Group: Retired Admin Posts: 24,541 Joined: 1-February 03 From: OC Member No.: 219 Region Association: Southern California |
the ends arent hurting for strength..... why not slot it fot infinitely more adjustability like a tarett/samrt/welt style (latter 2 are tubular... but slide)
just a thought..... cool project |
|
|
|
| 914forme |
Sep 16 2006, 06:57 PM
Post
#36
|
|
Times a wastin', get wrenchin'! Group: Members Posts: 3,896 Joined: 24-July 04 From: Dayton, Ohio Member No.: 2,388 Region Association: None |
My welt drove me nuts, had to use a tape everytime I made an adjustment. This way I know it is in the same place. But then the slide could work. I could recess the bolt head into the arm and that would free up one hand for a tape. I guess I could mark the bar also and build in my own tape.
Okay that is round two, once this season is over. I have 3 more events. - well 2 now that my welder lost its gas, I could not make tomorrow if I wanted too. Hopefully I can hold my points lead, looking at the pre-event registration I shuld be okay, but you neverr know who will show up (IMG:style_emoticons/default/dry.gif) Thank you for the kind words! |
|
|
|
| 914forme |
Sep 24 2006, 09:02 AM
Post
#37
|
|
Times a wastin', get wrenchin'! Group: Members Posts: 3,896 Joined: 24-July 04 From: Dayton, Ohio Member No.: 2,388 Region Association: None |
Week came and went, finally got the tank replaced, Did a bunch of fitting on the drivers side, and finally got to welding this afternoon. I lent my welder out, to a bud whose welder had died, he brings it back. I have the regulator, but now hose for the tank. (IMG:style_emoticons/default/headbang.gif) So I can him back, hey you got a hose over there for this thing.
Nope, ahh crap, he shows up about half hour latter, and we fab a new hose. Not as nice as the factory, but he made good on the deal, and will replace the original hose. But at least I got to weld the passenger side in. They are not pretty in some spots, but I know I got good penetration. Attached image(s) 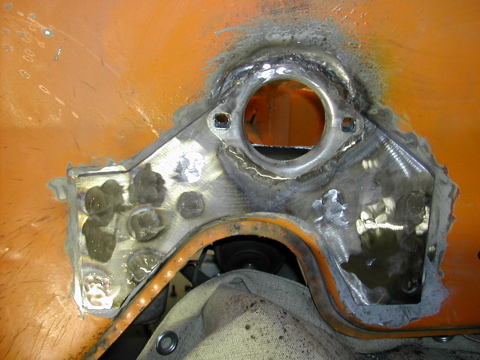 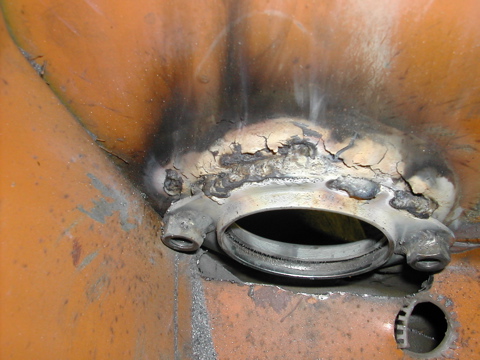 
|
|
|
|
| 914forme |
Sep 24 2006, 09:06 AM
Post
#38
|
|
Times a wastin', get wrenchin'! Group: Members Posts: 3,896 Joined: 24-July 04 From: Dayton, Ohio Member No.: 2,388 Region Association: None |
Got to love buring paint, I will clean it all up, prime it, seam seal it, then color coat. Once welding is done, inner fenders get a shot of anti, chip clear. I am tired of all the little chips the DOT-Rs cause.
I was also filling the side markers while I was there. Cut out a piece to fill the big hole flush, and welded the little holes shut. I took photshop lessons from Trekkor!!! My sharpy measurements in the one picture are for ride height settings to get the arms back in place, well close at least. And no I am not buildin a baja 914, it is up on jackstands!!! Attached image(s) 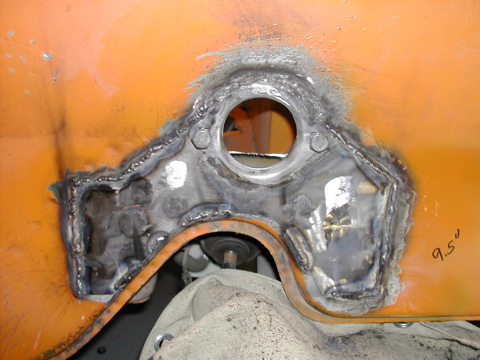 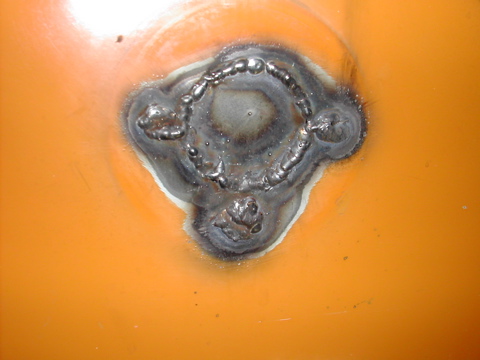
|
|
|
|
| 914forme |
Sep 24 2006, 09:12 AM
Post
#39
|
|
Times a wastin', get wrenchin'! Group: Members Posts: 3,896 Joined: 24-July 04 From: Dayton, Ohio Member No.: 2,388 Region Association: None |
If I get all the events done today, I hope to get some more welding done on the drivers side, and passengers side seam sealed and in primer. That clip in the picture of the front trunk is my fuel filter mount. It took the lines out of the tunnel to make sure I did not make a bigger mess of things.
Anybody got a recommendation on a good coating to spray into that tunnel area, so I can seal it up? BTW, if I rip that swaybar out of this car, I might as well just junk the chassis. I still contend that most of the tore chassis I have seen are caused by bushing bind causing the mount to place stress on the bolts and them then tearing the chassis out. Hopefully have an update tonight. |
|
|
|
| Trekkor |
Sep 24 2006, 11:53 AM
Post
#40
|
|
I do things... Group: Members Posts: 7,809 Joined: 2-December 03 From: Napa, Ca Member No.: 1,413 Region Association: Northern California |
That should hold (IMG:style_emoticons/default/welder.gif)
My welder friend after tigging up my broken PMS mount said: "If that breaks, I don't want to be there". Some welds become the strongest part of the car. Good work. KT |
|
|
|
|
1 User(s) are reading this topic (1 Guests and 0 Anonymous Users)
0 Members:

|
Lo-Fi Version | Time is now: 6th May 2024 - 04:38 AM |
Invision Power Board
v9.1.4 © 2024 IPS, Inc.