|
|
|
Porsche, and the Porsche crest are registered trademarks of Dr. Ing. h.c. F. Porsche AG.
This site is not affiliated with Porsche in any way. Its only purpose is to provide an online forum for car enthusiasts. All other trademarks are property of their respective owners. |
|
|

  |

| 914forme |
 Sep 24 2006, 05:56 PM Sep 24 2006, 05:56 PM
Post
#41
|
|
Times a wastin', get wrenchin'!  Group: Members Posts: 3,896 Joined: 24-July 04 From: Dayton, Ohio Member No.: 2,388 Region Association: None |
Thanks Trekkor.
Well got a little time this afternoon, after everything else wound down. Ground down and filled Pass side running light. Seam sealed the back side of my welds, and seam sealed the re-inforcement plates. The re-inforcements for the drivers side where primed in zinc. As was the inner fender well on the driver side. I made filler plates for the drivers side running lights, and the antenna hole. Pictures to follow. Attached image(s) 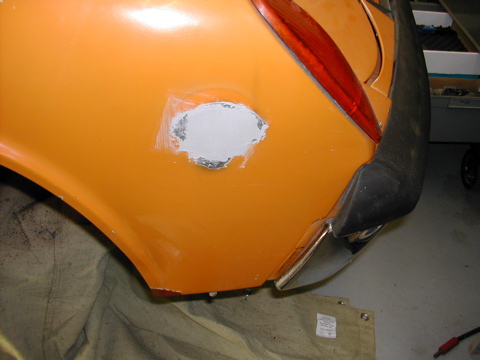 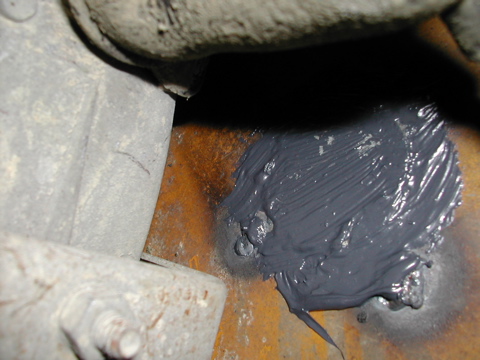 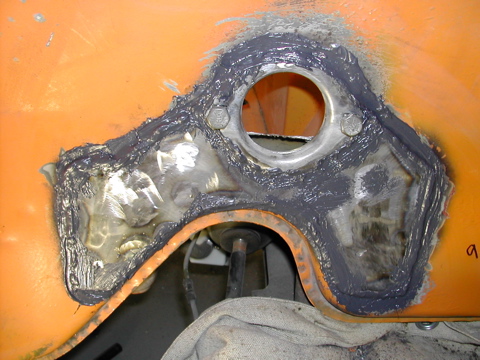
|
   |

 
|
| 914forme |
Sep 24 2006, 05:57 PM
Post
#42
|
|
Times a wastin', get wrenchin'! Group: Members Posts: 3,896 Joined: 24-July 04 From: Dayton, Ohio Member No.: 2,388 Region Association: None |
Opps missed a spot or two on the back side of the side marker, glad I took pictures of everything.
|
|
|
|
| 914forme |
Sep 25 2006, 03:59 PM
Post
#43
|
|
Times a wastin', get wrenchin'! Group: Members Posts: 3,896 Joined: 24-July 04 From: Dayton, Ohio Member No.: 2,388 Region Association: None |
Today was not my day to weld, so I have walked away for a while. Probally go back out latter tonight and clean the shop. My mind and arm where not playing well with each other, just pisses me off. So I will put it down and take a breather and see what comes latter.
Oh well I should have finished welding up the drivers side. But alas it is not ment to be right now. I hate it when I have welders block!!!!!! (IMG:style_emoticons/default/mad.gif) |
|
|
|
| 914forme |
Sep 25 2006, 06:14 PM
Post
#44
|
|
Times a wastin', get wrenchin'! Group: Members Posts: 3,896 Joined: 24-July 04 From: Dayton, Ohio Member No.: 2,388 Region Association: None |
Went back out after helping my son figure out his spelling home work. (IMG:style_emoticons/default/av-943.gif) As I have proven here more than once I can't F'in spell.
Well it was not as bad as I thought originally, I did warp the fender a little more, it had a big dent by the light anyway, so that needs to be taken car of. I burnt through one spot, and I welded my bolt to my reinforcement plate. (IMG:style_emoticons/default/aktion035.gif) That was brilliant. (IMG:style_emoticons/default/headbang.gif) A little grinding, and some seam sealer will fix part of it. I will fix the burn through with a grind and fill, and the fender, well, I guess I need to shrink it, and see if I can get the dent down to a manageable size, it is about 1/4" down right now, want it to be about 1/16ths. I hates bondo!!! A little can be just fine, a lot and I might as well add an anchor to this car. I tend to use JB Weld anyway, don't laugh, it is used for smoothing airframe skins, actually works really well. I had a old body shop guy show me that one. Hopefully get back on it Tuesday night. |
|
|
|
| 914forme |
Sep 28 2006, 06:54 PM
Post
#45
|
|
Times a wastin', get wrenchin'! Group: Members Posts: 3,896 Joined: 24-July 04 From: Dayton, Ohio Member No.: 2,388 Region Association: None |
Primed the inner passenger side fender tonight.
And got the rear sway bar finally from my ebay score. And some more pieces for chassis stiffening. I am seriously think I am being haunted by the racers version DWD - I am off to look for my Priest, I need a Dirk Wright exorcism! |
|
|
|
| 914forme |
Oct 2 2006, 07:38 PM
Post
#46
|
|
Times a wastin', get wrenchin'! Group: Members Posts: 3,896 Joined: 24-July 04 From: Dayton, Ohio Member No.: 2,388 Region Association: None |
Worked on the teener last night and tonight.
Yesterday first, the test fit of the bar. Both sides are primed and sealed up. So I could do a test fit and check for binding etc.... I need a shorter arm for my outer most adjustments. Will add the strut just to make sure I don't have any problems with it also, but I don't think I will. Passenger inner Fender. Second is under tank bar clearance and what a big bar looks like in an area you won't see. Third is front trunk wall clearance. BTW, the bar on the roller bearings just spins. (IMG:style_emoticons/default/biggrin.gif) The design being self centering means no binding what so ever, just smooth operation. Attached image(s) 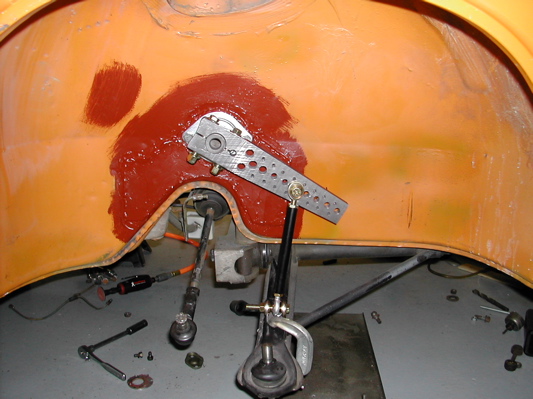 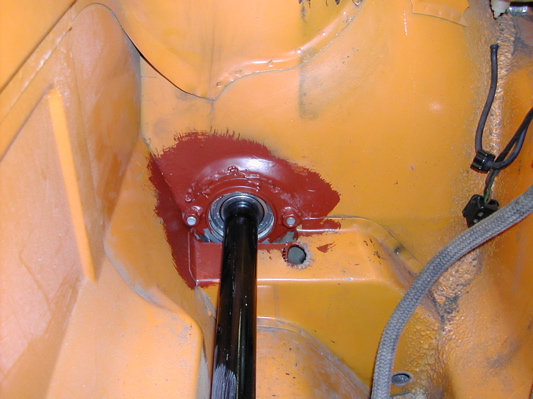 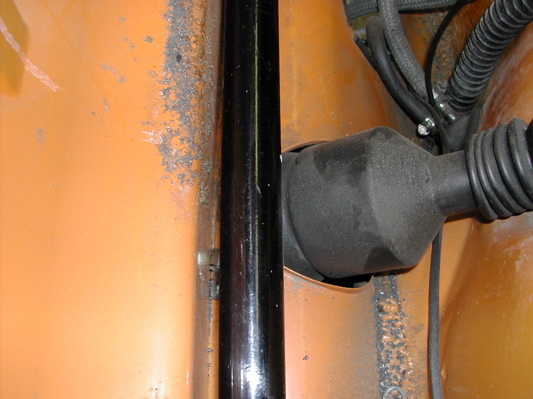
|
|
|
|
| 914forme |
Oct 2 2006, 07:49 PM
Post
#47
|
|
Times a wastin', get wrenchin'! Group: Members Posts: 3,896 Joined: 24-July 04 From: Dayton, Ohio Member No.: 2,388 Region Association: None |
DWD set in and tonight, I removed 20 pounds tar from the floor, for some reason I had spots with 2-3 layers of tar board (IMG:style_emoticons/default/confused24.gif) Trekkor thanks for the tip on the air chisel, set to 30 psi and stuff flew off. (IMG:style_emoticons/default/aktion035.gif) I started the Engmann inner log reinforcement kit, I seam filled the fender gap on the drivers side. And I built a set of rear toe adjusters. I got tired of using a clamp to hold my toe until I got the bolts tighten. This way is much easier, thank you Brant for the idea. (IMG:style_emoticons/default/clap56.gif) Inner arm ear reinforcement will be done this winter after engine and tranny drop. I have two more events, checked them over really well knock on wood have not started to tear yet. Next event I will probably rip it right out. (IMG:style_emoticons/default/sad.gif)
Luckily for me all chassis stiffing takes one point, I already took that point a long time ago. Only thing that can be dinged now would be if I caged the car with suspension points tied into the cage. I was busting butt, forgot to take pictures of all this stuff, except this. Attached image(s) 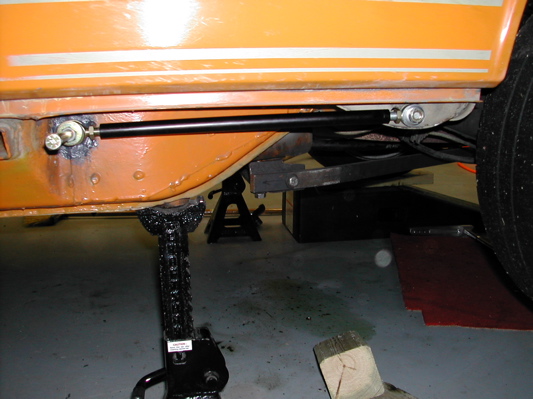
|
|
|
|
| 914forme |
Oct 8 2006, 03:50 PM
Post
#48
|
|
Times a wastin', get wrenchin'! Group: Members Posts: 3,896 Joined: 24-July 04 From: Dayton, Ohio Member No.: 2,388 Region Association: None |
I can't see straight right now. I was running the suspension through full motion today, making sure my sway bar design does not bind etc.... Everything is going well, until I hook the bar up to both sides. I have enough bushing bind on both sides to make suspension hold and allow me to lift the car. I had to run a strap down to the chain and off the car to make it move correctly.
So DWD kicks in, Again!!!!! Anybody want some crapmeister front poly bushings???? They will be cheap!!!!! Creak Creak Creak, pop pop pop goes my chassis, another good time to change something else. |
|
|
|
| Aaron Cox |
Oct 8 2006, 08:57 PM
Post
#49
|
|
Professional Lawn Dart Group: Retired Admin Posts: 24,541 Joined: 1-February 03 From: OC Member No.: 219 Region Association: Southern California |
did you ream em to fit?
mine have like zero bind (minimal) reamed and slotted i installed a pair for someone without reaming and yes.. they are extreme bind... even with slots and lots of gorilla jizz weltsheister lube |
|
|
|
| Trekkor |
Oct 9 2006, 09:22 AM
Post
#50
|
|
I do things... Group: Members Posts: 7,809 Joined: 2-December 03 From: Napa, Ca Member No.: 1,413 Region Association: Northern California |
|
|
|
|
| 914forme |
Oct 9 2006, 10:58 AM
Post
#51
|
|
Times a wastin', get wrenchin'! Group: Members Posts: 3,896 Joined: 24-July 04 From: Dayton, Ohio Member No.: 2,388 Region Association: None |
I reamed them a while back, did not add groves so I pulled the Crapmeisters have poly bronzes showing up from Eric Shea, hopefully later this week. Was going to do rollers, but time = money, and aggravation = me getting pissed off and finding the quickest solution I can. I have to have the car back onto the auto-x course for that last run of the season. It will be a long winter if I don't run again. And I lose my placing on the TTE class if I don't, that would suck, to fight from last place to first to blow it with a DNS ( Did not show )
|
|
|
|
| 914forme |
Mar 21 2007, 03:59 PM
Post
#52
|
|
Times a wastin', get wrenchin'! Group: Members Posts: 3,896 Joined: 24-July 04 From: Dayton, Ohio Member No.: 2,388 Region Association: None |
(IMG:style_emoticons/default/ricola.gif) requested pictures of the final version. One for each side.
Attached image(s) 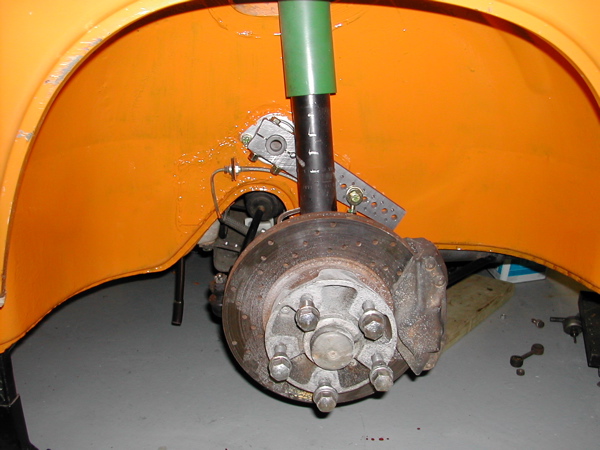 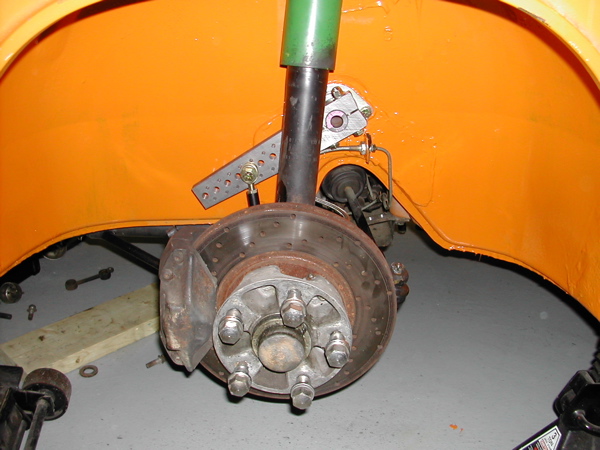
|
|
|
|
| rick 918-S |
Mar 21 2007, 04:39 PM
Post
#53
|
|
Hey nice rack! -Celette Group: Members Posts: 20,443 Joined: 30-December 02 From: Now in Superior WI Member No.: 43 Region Association: Northstar Region |
Cool, Nice work! (IMG:style_emoticons/default/driving.gif)
|
|
|
|
| Aaron Cox |
Mar 21 2007, 06:35 PM
Post
#54
|
|
Professional Lawn Dart Group: Retired Admin Posts: 24,541 Joined: 1-February 03 From: OC Member No.: 219 Region Association: Southern California |
slot em for infinite adjustability (IMG:style_emoticons/default/smile.gif)
|
|
|
|
|
1 User(s) are reading this topic (1 Guests and 0 Anonymous Users)
0 Members:

|
Lo-Fi Version | Time is now: 5th May 2024 - 08:34 PM |
Invision Power Board
v9.1.4 © 2024 IPS, Inc.