|
|

|
Porsche, and the Porsche crest are registered trademarks of Dr. Ing. h.c. F. Porsche AG.
This site is not affiliated with Porsche in any way. Its only purpose is to provide an online forum for car enthusiasts. All other trademarks are property of their respective owners. |
|
|
  |
| PORobinSCHE |
 Sep 10 2006, 10:58 AM Sep 10 2006, 10:58 AM
Post
#1
|
|
Member   Group: Members Posts: 421 Joined: 22-July 06 From: Orlando,Fl Member No.: 6,484 |
Bon Jour! who has the center gauge console in their vehicle? i am looking for demensions so i can build one. the design is fairly simple ,so i don't see any problems making a wood unit and covering it with vinyl and carpet.
thanks Monsiuer Robi'n |
| So.Cal.914 |
 Sep 10 2006, 11:19 AM Sep 10 2006, 11:19 AM
Post
#2
|
|
"...And it has a front trunk too."      Group: Members Posts: 6,588 Joined: 15-February 04 From: Low Desert, CA./ Hills of N.J. Member No.: 1,658 Region Association: None |
There is a little more to it than that, the stock "gauge" Console to give you
demensions I would have to draw you blue lines it's not just a square. The right, left elevations and top and bottem views are very different. Maybe someone here has a set already drawn. |
| URY914 |
 Sep 10 2006, 12:07 PM Sep 10 2006, 12:07 PM
Post
#3
|
|
I built the lightest 914 in the history of mankind.                                                                                                     Group: Members Posts: 120,562 Joined: 3-February 03 From: Jacksonville, FL Member No.: 222 Region Association: None |
Robin,
I have one out of the car you can see. Paul |
| BarberDave |
 Sep 10 2006, 06:04 PM Sep 10 2006, 06:04 PM
Post
#4
|
|
Barberdave    Group: Members Posts: 1,605 Joined: 12-January 03 From: Wauseon Ohio Member No.: 135 Region Association: Upper MidWest |
(IMG:style_emoticons/default/smilie_pokal.gif) I have a set of stock right and left sides, vinal is shot ,but there the correct dimensions. $10.00 + shipping . Let me know. Dave
|
| Tobra |
 Sep 10 2006, 06:08 PM Sep 10 2006, 06:08 PM
Post
#5
|
|
Senior Member    Group: Members Posts: 1,453 Joined: 22-August 05 From: Sacramento, CA Member No.: 4,634 |
Try look in the vendor area, there is a cat (up in Oregon as I recall) who makes them and speaker grill deals too.
|
| PORobinSCHE |
 Sep 10 2006, 06:30 PM Sep 10 2006, 06:30 PM
Post
#6
|
|
Member   Group: Members Posts: 421 Joined: 22-July 06 From: Orlando,Fl Member No.: 6,484 |
(IMG:style_emoticons/default/smilie_pokal.gif) I have a set of stock right and left sides, vinal is shot ,but there the correct dimensions. $10.00 + shipping . Let me know. Dave is the avatar lady included in the deal? (IMG:style_emoticons/default/shocked[1].gif) |
| PORobinSCHE |
 Sep 10 2006, 06:35 PM Sep 10 2006, 06:35 PM
Post
#7
|
|
Member   Group: Members Posts: 421 Joined: 22-July 06 From: Orlando,Fl Member No.: 6,484 |
There is a little more to it than that, the stock "gauge" Console to give you demensions I would have to draw you blue lines it's not just a square. The right, left elevations and top and bottem views are very different. Maybe someone here has a set already drawn. i merely need the basic H x W x L measurements. the contour for the floor and under-dash can be easily adjusted. Robin |
| John |
 Sep 10 2006, 11:39 PM Sep 10 2006, 11:39 PM
Post
#8
|
|
member? what's a member?     Group: Members Posts: 3,393 Joined: 30-January 04 From: Evansville, IN (SIRPCA) Member No.: 1,615 Region Association: None |
I think what they are trying to tell you is that the right and left sides are 3-dimensional. I know that mine (currently installed) is 3-dimensional as in the right side makes a curve toward the middle of the car as it gets closer to the front of the car.
I would suggest just buying the one offered for $10 as that is fairly cheap for a pattern. If you aren't going for stock anyway, you could just mock one up from cardboard and have a full scale model of what you want to build. just a couple thoughts. |
| HarveyH |
 Sep 11 2006, 06:12 AM Sep 11 2006, 06:12 AM
Post
#9
|
|
Member   Group: Members Posts: 450 Joined: 19-June 03 From: Downingtown, PA Member No.: 843 |
There used to be a French 914 site that had dimensioned drawings for the gauge console. I think I still have the link at home if someone doesn't post it before i get there. Obviously the site will be in French, but I used one of the online translation services and got a sort of coherent translation.
Harvey |
| 736conver |
 Sep 11 2006, 06:24 AM Sep 11 2006, 06:24 AM
Post
#10
|
|
Advanced Member     Group: Members Posts: 2,117 Joined: 25-May 03 From: SE Wisconsin Member No.: 736 Region Association: None |
There used to be a French 914 site that had dimensioned drawings for the gauge console. I think I still have the link at home if someone doesn't post it before i get there. Obviously the site will be in French, but I used one of the online translation services and got a sort of coherent translation. Harvey The site is still there but the console dimensions and pictures are gone now. I tried loading it when I first saw this post. It was a very good drawing with measurements. Look really precise. Here's the URL http://914france.ifrance.com/914france/ Click on the technique link on the left you can see where it was. |
| Matt Meyer |
 Sep 11 2006, 09:44 AM Sep 11 2006, 09:44 AM
Post
#11
|
|
Überlurker   Group: Members Posts: 216 Joined: 2-December 03 From: Eastern Washington Member No.: 1,411 Region Association: Pacific Northwest |
I have an AutoCAD drawing made from the French site (.dwg).
It is to scale but it is not dimensioned. E-mail me if that would help. |
| Matt Meyer |
 Sep 11 2006, 12:00 PM Sep 11 2006, 12:00 PM
Post
#12
|
|
Überlurker   Group: Members Posts: 216 Joined: 2-December 03 From: Eastern Washington Member No.: 1,411 Region Association: Pacific Northwest |
Blame Babblefish for the translation and see attached pictures.
You get following materials: 2 plywood plates of 400 X 800 5 mm thickness mm. Some 1,5 mm thickness sheet. 2 foam plates of 400 X 800 mm, thick of 5 mm 1 foam plate of 400 X 800 mm, thick of 2 mm 1 roller of imitation leather of 1 m X 1,5 m. You will also need, in addition to the current tools, of a jigsaw, a drilling machine, a stapler and woodworking glue. If you use a thicker wood, take care to correct the dimensions of the frontage and the consequently bottom, if not the sides of the console will exceed central tunnel! The console is composed of the following elements: On the right-hand side. On the left-hand side. Frontage. Melts. Back wall. Spacers (front, higher, lower and back). Higher fixing. ON THE RIGHT-hand SIDE (fig. 1) On one of the plates of plywood and according to the diagram: Trace AB = 280 mm. Trace the perpendicular with AB: AC = 95 mm. Trace the parallel with AB: CD = 305 mm. Trace = 200 mm by aligning B, D and E. Using a compass (or of a string and a pencil), determine the points of intersection F, G, H, I, J and K (dimensions in mm) while referring in the table. Trace the B-f-g-h-i-j-k-e line. Trace the round-off of ray 20 mm in D. Cut out according to contour obtained. Round the angles C and E with the ray 10 mm. Bore to 100 mm of ED and 25 mm of EK a hole with a diameter 5.5 mm. Have on the external side and along the A-c-d-e edge a band of wood of approximately 5 mm thickness on 10 mm broad and round the fields. ON THE LEFT-hand SIDE (fig. 2) On the other plate of plywood and according to the diagram: Trace AB = 280 mm. Trace the perpendicular with AB: AC = 95 mm. Trace the parallel with AB: CD = 305 mm. Trace = 200 mm by aligning B, D and E. Using a compass (or of a string and a pencil), determine the points of intersection F, M, L, G, H, I, J and K (dimensions in mm) while referring in the table. Trace the B-f-m-g-h-i-j-k-l-e line. Trace the L-m line. Trace the round-off of ray 20 mm in D. Cut out according to contour obtained. Cut out according to L-m Round the angles C and E with the ray 10 mm. Bore to 100 mm of ED and 25 mm of EL a hole with a diameter 5.5 mm. Have on the external side and along the A-c-d-e edge a band of wood of approximately 5 mm thickness on 10 mm broad and round the fields. FRONTAGE In one of the plywood falls, cut out a plate of 145 X 310 mm, then bore the holes corresponding to the various instruments. With the origin, the frontage comprised a clock, a voltmeter and a thermometer of oil, laid out vertically. MELTS (fig. 3) Cut out according to dimensions' of the diagram in one of the falls. Cutting for the passage of the lever of heating comprises in the beginning a plastic trimming on its circumference and the dimensions are given to install this one. In its absence, decrease the width of approximately 5 mm. BACK WALL Cut out in one of the falls, a plate of 50 X 160 mm and round the higher edge. BRACE BEFORE (fig. 4) Cut out according to the diagram by sticking several thicknesses. TOP TRANSOM (fig. 5) Cut out according to the diagram in sheet of 1,5 Misters Pliez in AB and CD on the same side. BOTTOM TRANSOM (fig. 6) After cutting according to the diagram, cross in EC and DF. Compared to the face ABC: Fold out of AC and data base towards the back with 90°. Fold in CG and DH towards the back with 90°. Fold in Ci and JD forwards with 105°. Fold in IJ towards the back with 210°. Compared to the I-j-k-l face: Fold in KL towards the back with 105°. BACK SPACER (fig. 7) Cut out according to the diagram, fold in AB and CD on the same side. Fold in EF and GH on the same side as previously. To paint black color. HIGHER FIXING (fig. 8) Cut out according to the diagram, fold in AB and CD on the same side. LEVER OF HEATING (fig. 9) The lever of heating being too on the left, it proves to be necessary to modify it to be able to install the console. Of curve, the lever will become right and shifted towards the line of 25 mm. Start by dismounting it completely, then: Saw the chrome lever to 65 mm of the axis then, pin towards you, fold it towards the line, according to the diagram. Weld a of the same sheet thickness, cut out according to the diagram. Weld a threaded rod with a diameter 5 mm. Sandpaper and make chromium plate. ASSEMBLY (fig. 10) To take the two parts composing the left side and assemble them by a line of fasten internal side, fold approximately 30° and fasten the other side. Cover each side with imitation leather after having interposed a layer of 5 mm thickness foam on the external faces (except on the edges). Screw the bottom transom on the faces left and right-hand side of the console, the mounting foot on the case backwards, plan CDGH with horizontal and 25 mm of the lower edge, parallel face ABCD and 30 mm in withdrawal on each side ED. Screw the top transom on the faces left and right-hand side of the console, 15 mm below on the sides EK, parallel face ABCD and 30 mm in withdrawal on each side ED. Screw the back spacer with the short-nap cloth of the lower edge on the back face, the rectangular hole upwards. Then screw with the short-nap cloth of the edge on the sides of the console. Screw the front spacer. Position the bottom then the frontage fix a clip on the bottom, two on the frontage in correspondence of the rectangular holes designed to receive them. Cover with imitation leather, after having interposed a layer of 2 mm foam on the visible faces. Screw higher fixing on the body, install the console, screw it on the case, then position the bottom and the frontage. Here, it is not finished, you do not have any more but to admire your work... Not too a long time! It remains you to install the manos! 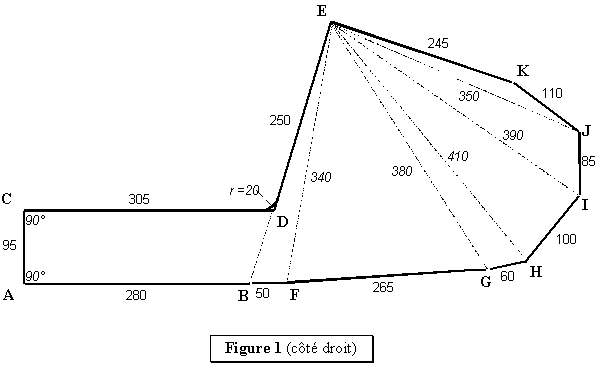 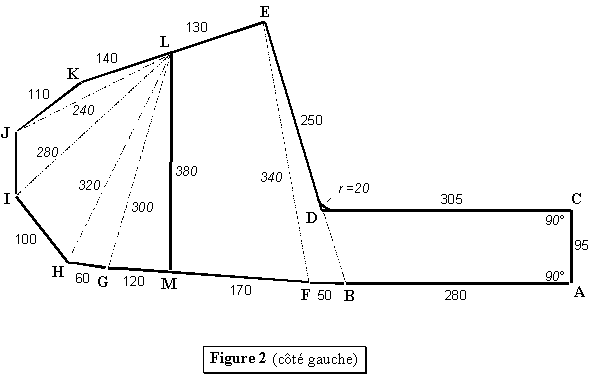 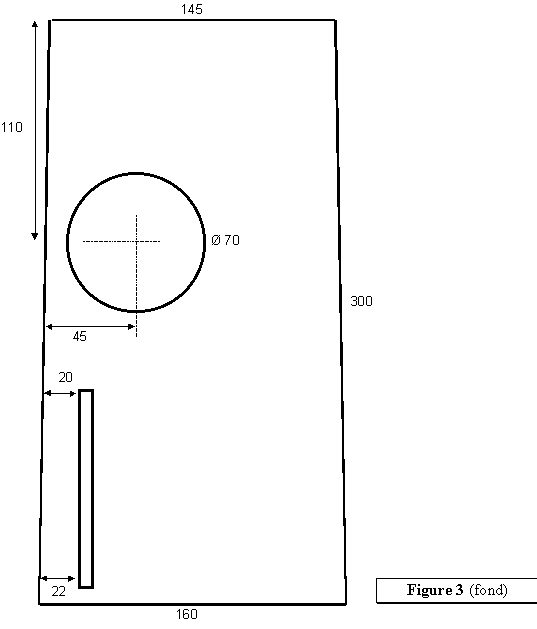   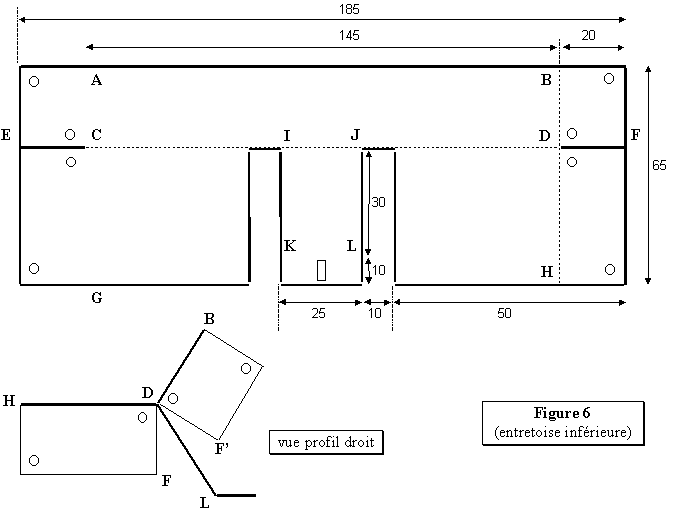 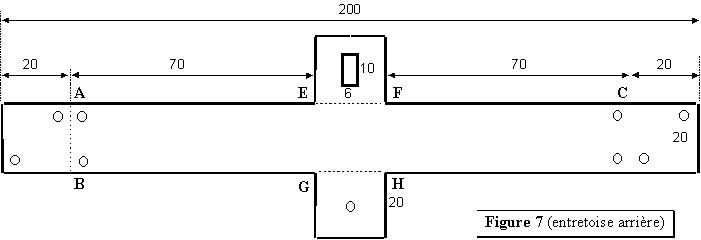  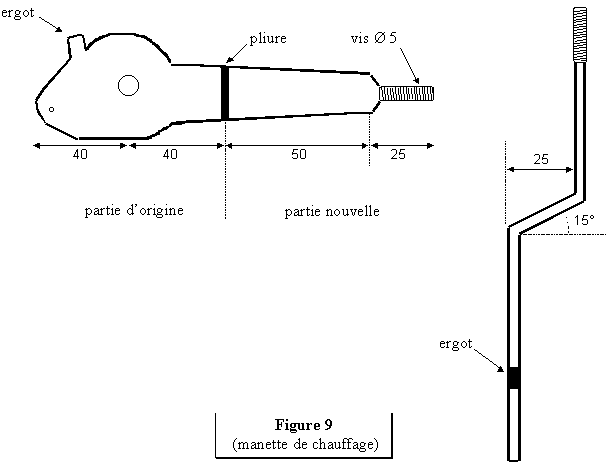 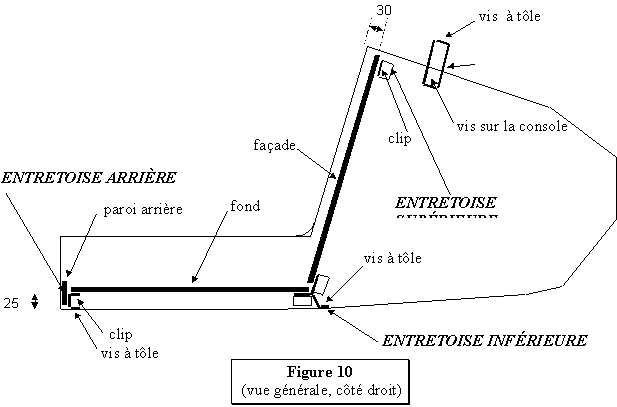 |
| Matt Meyer |
 Sep 11 2006, 12:04 PM Sep 11 2006, 12:04 PM
Post
#13
|
|
Überlurker   Group: Members Posts: 216 Joined: 2-December 03 From: Eastern Washington Member No.: 1,411 Region Association: Pacific Northwest |
73 6 conver convinced me to post the info. I archived the site before they took it down.
|
| So.Cal.914 |
 Sep 11 2006, 12:11 PM Sep 11 2006, 12:11 PM
Post
#14
|
|
"...And it has a front trunk too."      Group: Members Posts: 6,588 Joined: 15-February 04 From: Low Desert, CA./ Hills of N.J. Member No.: 1,658 Region Association: None |
There is a little more to it than that, the stock "gauge" Console to give you demensions I would have to draw you blue lines it's not just a square. The right, left elevations and top and bottem views are very different. Maybe someone here has a set already drawn. |
  |
1 User(s) are reading this topic (1 Guests and 0 Anonymous Users)
0 Members:

|
Lo-Fi Version | Time is now: 13th May 2024 - 09:58 PM |
Invision Power Board
v9.1.4 © 2024 IPS, Inc.


