|
|
|
Porsche, and the Porsche crest are registered trademarks of Dr. Ing. h.c. F. Porsche AG.
This site is not affiliated with Porsche in any way. Its only purpose is to provide an online forum for car enthusiasts. All other trademarks are property of their respective owners. |
|
|

  |

| type11969 |
 Jan 17 2007, 09:52 PM Jan 17 2007, 09:52 PM
Post
#21
|
|
Senior Member  Group: Members Posts: 1,231 Joined: 2-December 03 From: Collingswood, NJ Member No.: 1,410 Region Association: North East States |
Things weren't going my way today. Welds kind of sucked, 3 molten chunks of metal found their way through my clothes (part of the reason why the welds sucked), and I didn't get a whole lot done. Anyway, enough bitchin, here are the "gussets" welded in:
(IMG:http://i19.photobucket.com/albums/b188/type11969/914/pic003-1.jpg) Had to do more grinding than I would have liked, but I think I can declare this area just about done. |
   |

 
|
| McMark |
Jan 17 2007, 10:10 PM
Post
#22
|
|
914 Freak! Group: Retired Admin Posts: 20,180 Joined: 13-March 03 From: Grand Rapids, MI Member No.: 419 Region Association: None |
That's lookin' really nice.
|
|
|
|
| r_towle |
Jan 17 2007, 10:14 PM
Post
#23
|
|
Custom Member Group: Members Posts: 24,705 Joined: 9-January 03 From: Taxachusetts Member No.: 124 Region Association: North East States |
I love what you have done there, looks nice and solid...
My advice... BEFORE you pick up the grinder..ask yourself two questions. 1 Will it get in the way if I dont grind it? 2 Will anyone else besides me ever see this? It greatly reduces the amount of grinding that is needed... Have fun Rich |
|
|
|
| Hammy |
Jan 17 2007, 10:26 PM
Post
#24
|
|
mr. Wonderful Group: Members Posts: 1,828 Joined: 20-October 04 From: Columbia, CA./ Tuolumne Member No.: 2,978 Region Association: Northern California |
Lookin good..... keep it up
|
|
|
|
| type11969 |
Jan 18 2007, 07:11 AM
Post
#25
|
|
Senior Member Group: Members Posts: 1,231 Joined: 2-December 03 From: Collingswood, NJ Member No.: 1,410 Region Association: North East States |
Thanks for the kudos, hopefully it is as strong as it looks. Only did some grinding just to make sure the crappy looking welds were strong. Now I have to make another internal doubler under what will be the cutout for the heater tube and an external piece to complete the shell and this inner long will be done!
With the replacement metal sold online I've noticed that it is only one layer thick . . . do any of you know if that one layer is as thick as the double or triple layers Porsche used from the factory? Seems like if it isn't you could end up with a pretty flexible car if you use them. -Chris |
|
|
|
| type11969 |
Jan 22 2007, 08:05 AM
Post
#26
|
|
Senior Member Group: Members Posts: 1,231 Joined: 2-December 03 From: Collingswood, NJ Member No.: 1,410 Region Association: North East States |
Got a little done this weekend. Ground some welds down for another layer to tie some of the patches together:
(IMG:http://i19.photobucket.com/albums/b188/type11969/914/pic0051.jpg) Piece made and primed: (IMG:http://i19.photobucket.com/albums/b188/type11969/914/pic0041.jpg) Welded in: (IMG:http://i19.photobucket.com/albums/b188/type11969/914/pic0061.jpg) I found that 3/16" holes work much better than the smaller holes I was using previously for the plug welds. Definitely did not need a full seam on this piece. -Chris |
|
|
|
| rick 918-S |
Jan 22 2007, 08:34 AM
Post
#27
|
|
Hey nice rack! -Celette Group: Members Posts: 21,302 Joined: 30-December 02 From: Now in Superior WI Member No.: 43 Region Association: Northstar Region |
|
|
|
|
| autohausdolby |
Jan 24 2007, 08:29 AM
Post
#28
|
|
Member Group: Members Posts: 232 Joined: 12-September 06 From: Sheffield, England Member No.: 6,821 |
Some serious work there!
|
|
|
|
| type11969 |
Jan 24 2007, 09:40 PM
Post
#29
|
|
Senior Member Group: Members Posts: 1,231 Joined: 2-December 03 From: Collingswood, NJ Member No.: 1,410 Region Association: North East States |
Some more progress, piece fabbed:
(IMG:http://i19.photobucket.com/albums/b188/type11969/914/pic001-2.jpg) Areas cleaned up where the new piece is being added: (IMG:http://i19.photobucket.com/albums/b188/type11969/914/pic003-2.jpg) (IMG:http://i19.photobucket.com/albums/b188/type11969/914/pic005-1.jpg) Started using a high content zinc weld through primer. Allegedly more durable in the long run than the aluminized primer I have been using, but definitely does not hold up as well to the aluminized stuff when exposed to clamps, etc. Seems to scratch right off. Anyway . . . Pieces welded in and ground down: (IMG:http://i19.photobucket.com/albums/b188/type11969/914/pic007-1.jpg) (IMG:http://i19.photobucket.com/albums/b188/type11969/914/pic012.jpg) Its time to drill for and weld in the seatbelt mount, then its looking like it is time to finally re-install the heater tube!! -Chris |
|
|
|
| dkos |
Jan 27 2007, 11:30 AM
Post
#30
|
|
say, "RUST"! Group: Members Posts: 295 Joined: 1-December 04 From: Philadelphia, PA Member No.: 3,204 Region Association: None |
QUOTE(type11969 @ Jan 18 2007, 08:11 AM)  Thanks for the kudos, hopefully it is as strong as it looks. Only did some grinding just to make sure the crappy looking welds were strong. Now I have to make another internal doubler under what will be the cutout for the heater tube and an external piece to complete the shell and this inner long will be done! With the replacement metal sold online I've noticed that it is only one layer thick . . . do any of you know if that one layer is as thick as the double or triple layers Porsche used from the factory? Seems like if it isn't you could end up with a pretty flexible car if you use them. -Chris Hi Chirs, We've been talking about two parts cars I found in the Philly area. I just found your resto thread. My story is similar to yours. Bought a car that looked ok. Started digging and found a big mess hidden under bondo, fiberglass and riveted in scrap metal (I think one piece was an old license plate!). My car's probably not worth repairing, but I'm learning a lot and having fun. I've been rebuilding my longs in a similar way and was concerned about rigidity too. I bought an aftermarket reinforcement piece made by Brad Mayuers (sp?). It's heavy (at least 1/8" thick), but it's stiff. |
|
|
|
| dkos |
Jan 27 2007, 11:33 AM
Post
#31
|
|
say, "RUST"! Group: Members Posts: 295 Joined: 1-December 04 From: Philadelphia, PA Member No.: 3,204 Region Association: None |
Here are some pics of the Brad Mayuers piece. Top pic shows reinforcement piece on the ground and bottom shows it installed:
Attached image(s) 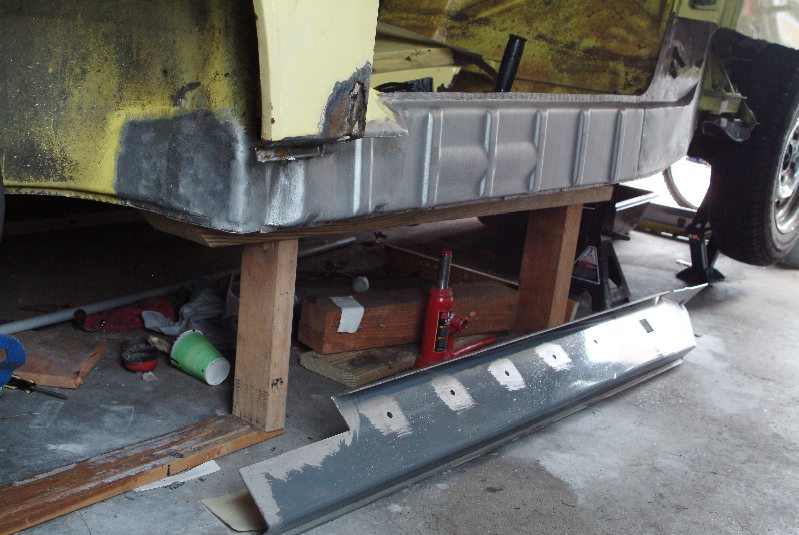 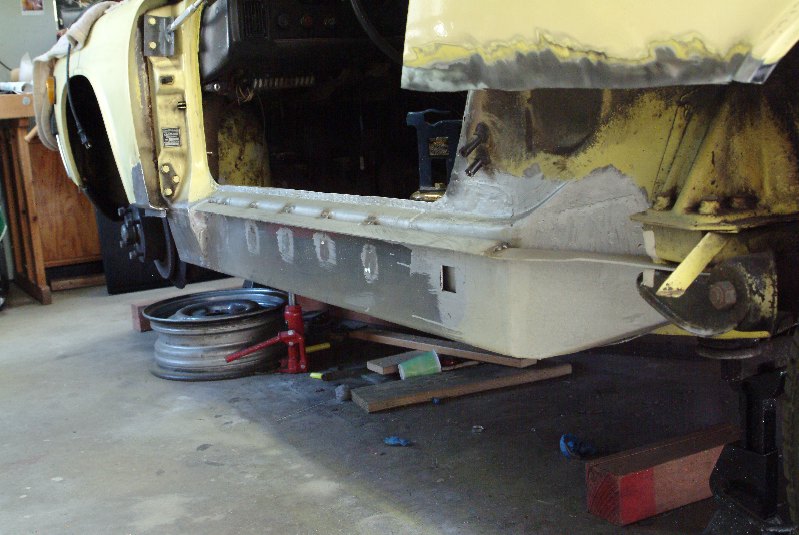
|
|
|
|
| dkos |
Jan 27 2007, 11:59 AM
Post
#32
|
|
say, "RUST"! Group: Members Posts: 295 Joined: 1-December 04 From: Philadelphia, PA Member No.: 3,204 Region Association: None |
how it attaches
Attached image(s) 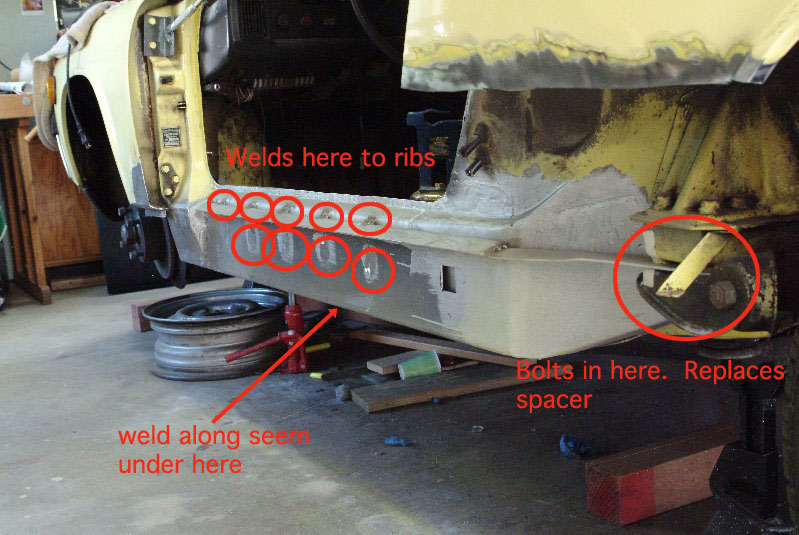
|
|
|
|
| SGB |
Jan 27 2007, 02:14 PM
Post
#33
|
|
just visiting Group: Members Posts: 4,086 Joined: 8-March 03 From: Huntsville, AL Member No.: 404 Region Association: South East States |
GO! GO!
wow. build-it-yerself car. Neato. incredible job. feel good about it. |
|
|
|
| type11969 |
Jan 29 2007, 09:37 PM
Post
#34
|
|
Senior Member Group: Members Posts: 1,231 Joined: 2-December 03 From: Collingswood, NJ Member No.: 1,410 Region Association: North East States |
Thanks Scott!
Dave, your long looked pretty good, why did you think you needed the extra reinforcement? Definitely plenty strong now, although that doesn't seem like that many spotwelds to attach 1/8" plate to much thinner sheet. I would worry about the spots pulling out, but I think I tend to do things a little overkill. Anyway, I'm sure the guy who made it knows better than I do. I am planning on installing an inner long kit once I have the car back together and a better idea about the gaps. It overlays the exposed long in the passenger compartment and ties them into another plate that overlays the rear firewall. Can't remember off hand who made it, but rest assured, when I get to it, it will be a part of this post. More recent progress, safety first (seat belt mounting plate install): (IMG:http://i19.photobucket.com/albums/b188/type11969/914/pic001-3.jpg) (IMG:http://i19.photobucket.com/albums/b188/type11969/914/pic003-3.jpg) Roughed out the cutout for the heater tube: (IMG:http://i19.photobucket.com/albums/b188/type11969/914/pic005-2.jpg) (IMG:http://i19.photobucket.com/albums/b188/type11969/914/pic006-2.jpg) -Chris |
|
|
|
| dkos |
Jan 30 2007, 08:27 AM
Post
#35
|
|
say, "RUST"! Group: Members Posts: 295 Joined: 1-December 04 From: Philadelphia, PA Member No.: 3,204 Region Association: None |
Chris,
The reinforcement piece welds in along the whole length of the piece to the botom edge of the inner rocker panel. Attached image(s) 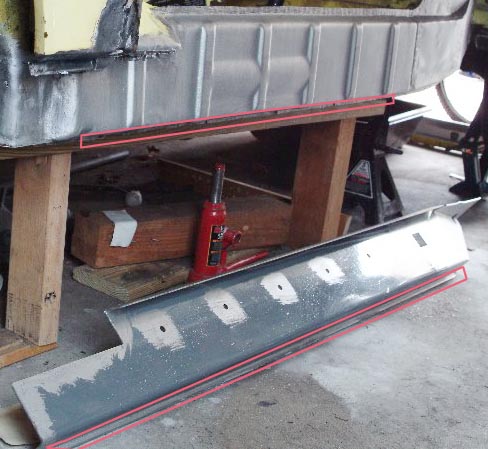
|
|
|
|
| dkos |
Jan 30 2007, 08:29 AM
Post
#36
|
|
say, "RUST"! Group: Members Posts: 295 Joined: 1-December 04 From: Philadelphia, PA Member No.: 3,204 Region Association: None |
My car was in similar condition to yours.
Attached image(s) 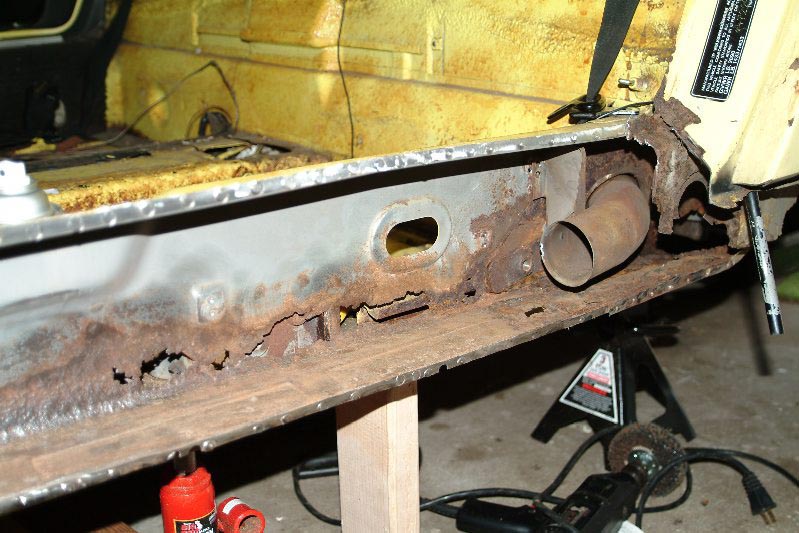
|
|
|
|
| dkos |
Jan 30 2007, 08:51 AM
Post
#37
|
|
say, "RUST"! Group: Members Posts: 295 Joined: 1-December 04 From: Philadelphia, PA Member No.: 3,204 Region Association: None |
I ended up cutting away all that rust and recreating the inside and bottom of the long. The piece I made wraps around the top inside of the long. Unfortunately I don't have a pick from the inside of the car.
Attached image(s) 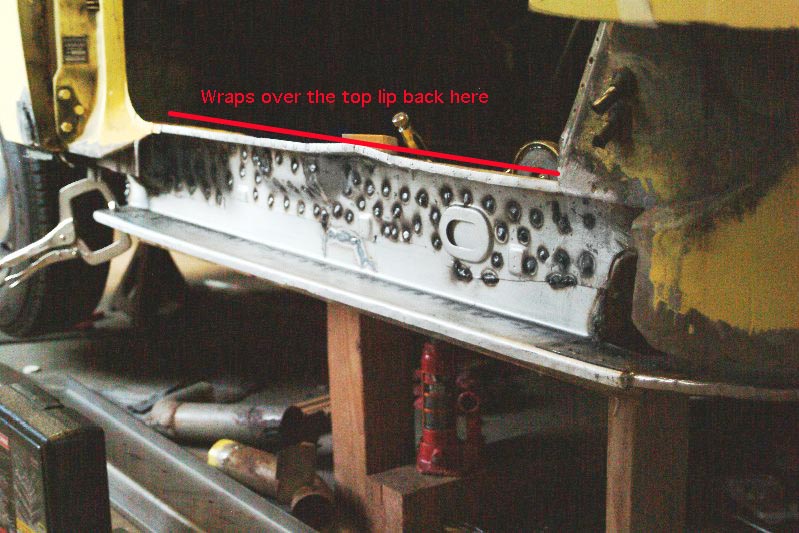
|
|
|
|
| dr914@autoatlanta.com |
Jan 30 2007, 09:01 AM
Post
#38
|
|
914 Guru Group: Members Posts: 8,241 Joined: 3-January 07 From: atlanta georgia Member No.: 7,418 Region Association: None |
my only two comments here are:
1 What a hero to save this 914! 2 Why hours and hours and hours and hours and hours of patching when aftermarket panels are readily available, cheap would have saved hours and hours of hard labor, kept the car more factory original, made it stronger, more valuable, and made it last much much longer? |
|
|
|
| SGB |
Jan 30 2007, 09:13 AM
Post
#39
|
|
just visiting Group: Members Posts: 4,086 Joined: 8-March 03 From: Huntsville, AL Member No.: 404 Region Association: South East States |
well, y'know, sometimes we got time, sometimes we got money...
(sometimes we got neither!) |
|
|
|
| dkos |
Jan 30 2007, 09:19 AM
Post
#40
|
|
say, "RUST"! Group: Members Posts: 295 Joined: 1-December 04 From: Philadelphia, PA Member No.: 3,204 Region Association: None |
My intitial plan was to also fabricate the inner rocker panel myself and then reinforce the whole thing with that 1/8" Brad Mayeur piece, but it was too hard to fabricate an inner rocker panel that BM's part would attach to...so I ended up buying the reproduction part from Restoration Design. It hurt covering that nice new inner rocker panel, but I was already commited to BM's reinforcemnt kit.
If I had it to do over again I would probably go the route you are. get the repro inner rocker and reinforce the long with the Engman inner long kit. |
|
|
|
|
1 User(s) are reading this topic (1 Guests and 0 Anonymous Users)
0 Members:

|
Lo-Fi Version | Time is now: 12th July 2026 - 04:12 PM |
Invision Power Board
v9.1.4 © 2026 IPS, Inc.