|
|
|
Porsche, and the Porsche crest are registered trademarks of Dr. Ing. h.c. F. Porsche AG.
This site is not affiliated with Porsche in any way. Its only purpose is to provide an online forum for car enthusiasts. All other trademarks are property of their respective owners. |
|
|

  |

| Dr Evil |
 Jul 16 2007, 10:49 PM Jul 16 2007, 10:49 PM
Post
#1
|
|
Send me your transmission!  Group: Members Posts: 23,041 Joined: 21-November 03 From: Loveland, OH 45140 Member No.: 1,372 Region Association: MidAtlantic Region |
Many people, including my self on my first 914, have suffered the annoying leaking from the tranny speedo drive seal. This is actually not that big of a deal to fix and I figured while I had a tail cone on my bench for a customer that I would document this for everyone.
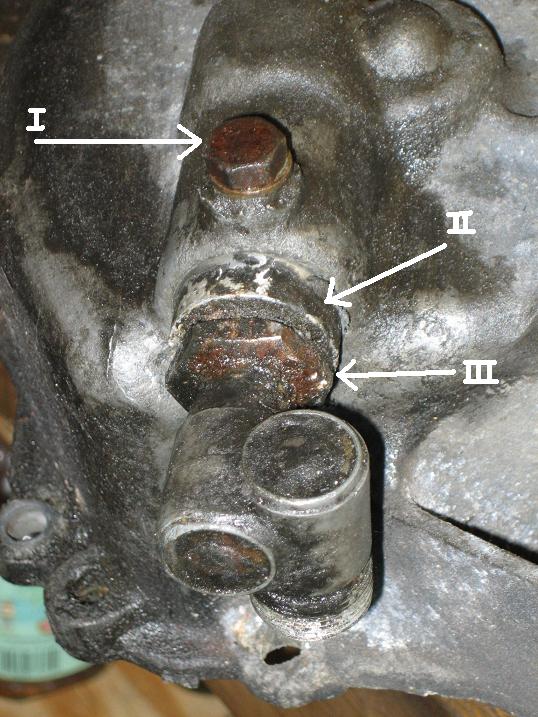 Steps: - Drain the tranny: Remove the filler hole first! This way you know if you can refill the tranny after you have drained it. - Remove bolt labeled "I". This is a common point of failure in that many over torque this when installing or the threads erode out. It may be helicoiled, but it is no big deal if the repair is done well. - Once bolt "I" is removed you should be able to grab the speedo drive and rotate it back and forth while pulling it out. If this fails then grab "III" with a crescent wrench and rotate the assembly in the CLOCKWISE direction while pulling. Be careful not to stress the angle part of the drive as it can become loose. Be patient and use some common mechanical sense (ya, ya, I know, not always so common). - Do not grip "II" with a pipe wrench or other implement of mechanical blasphemy! Follow the above step and it will come loose, if not, then a pipe wrench will not help you and you will need to get more creative with the PB Blaster and such.  With all of the parts apart you can see why you do not need to torque bolt "I" down too hard, the tip only needs to sit in the pit "V". "IV" shows the threads that tend to strip (mentioned above). "VI" is part of the problem. It is a cheap part to replace and is 1/2 of the problem. 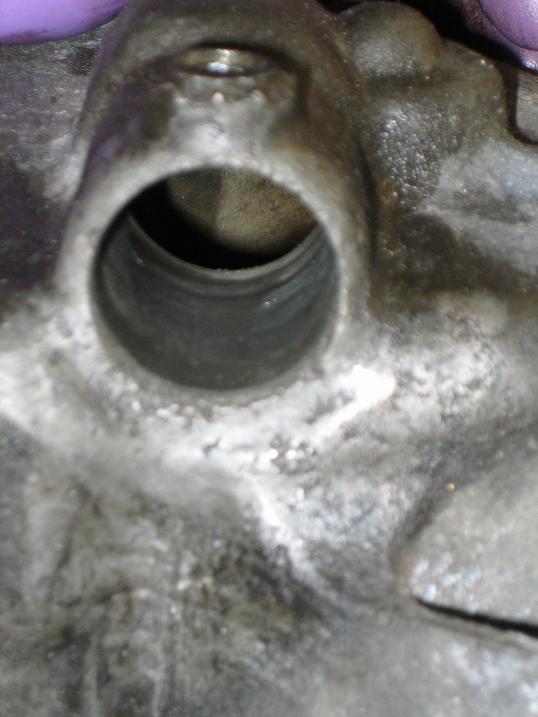 The other 1/2 of the problem is the bore which becomes corroded over time or contaminated with crud. Once you clean this bore with some solvent, take some fine grit sand paper (600 or finer) and make sure the bore is smooth. If there are irregularities then smooth them out. If there are gouges, clean them up with solvent and smear JB weld (very little) into them. Once dry, sand down until it is all smoothed out. Put on new O-ring, lube it lightly with oil and put it all together. The retaining bolt "I" is torqued to ONLY 12-13 ft.lbs. (NO MORE or you'll be sorry! (IMG:style_emoticons/default/sad.gif) ) That should be all it takes (IMG:style_emoticons/default/biggrin.gif) (IMG:style_emoticons/default/beer.gif) |
   |

 
|
| kconway |
Jul 17 2007, 12:02 AM
Post
#2
|
|
Senior Member Group: Members Posts: 1,347 Joined: 6-December 04 From: Monrovia, CA Member No.: 3,231 Region Association: Southern California |
Dr. Nice and timely. I have a new angle drive to install, item # III in the first photo. How does that part separate from item # II in same photo? I thought there was another seal involved in this mechanism. Big wrench?
Kev |
|
|
|
| Dr Evil |
Jul 17 2007, 12:15 AM
Post
#3
|
|
Send me your transmission! Group: Members Posts: 23,041 Joined: 21-November 03 From: Loveland, OH 45140 Member No.: 1,372 Region Association: MidAtlantic Region |
Yup, you can use a big crescent and twist counter clockwise (Lefty loosey)
There is no seal that I know of "in" the angle drive. None that I have ever had to replace, but I have not had much cause to dissect the drive itself. |
|
|
|
| Mrs. K |
Jul 17 2007, 12:20 AM
Post
#4
|
|
Grieve we must, but celebrate a great life! Group: Birthday Fairy Posts: 7,513 Joined: 6-June 04 From: Long Beach, CA Member No.: 2,166 |
Dr. Evil:
QUOTE How to fix a leaky tranny rear, Yes, I see the obvious joke in the title (IMG:style_emoticons/default/biggrin.gif) ............ummmmm.... you use that *special* rear end adjustment tool? (IMG:style_emoticons/default/confused24.gif) (IMG:style_emoticons/default/wink.gif) Lisa (IMG:style_emoticons/default/mrs.K.gif) |
|
|
|
| kconway |
Jul 17 2007, 12:23 AM
Post
#5
|
|
Senior Member Group: Members Posts: 1,347 Joined: 6-December 04 From: Monrovia, CA Member No.: 3,231 Region Association: Southern California |
QUOTE(Dr Evil @ Jul 16 2007, 11:15 PM)  Yup, you can use a big crescent and twist counter clockwise (Lefty loosey) There is no seal that I know of "in" the angle drive. None that I have ever had to replace, but I have not had much cause to dissect the drive itself. I was looking at this thread: http://www.914world.com/bbs2/index.php?sho...hl=angle++drive and it listed these two parts: Seal: 999 113 036 50 $8.22 O ring: 999 701 084 50 $ .91 Wondering where the seal goes? Looks like SirAndy answered that at the end of the thread I attached. Goes on the inner shaft? I pulled mine and it didn't have that seal. |
|
|
|
| Dr Evil |
Jul 17 2007, 01:31 AM
Post
#6
|
|
Send me your transmission! Group: Members Posts: 23,041 Joined: 21-November 03 From: Loveland, OH 45140 Member No.: 1,372 Region Association: MidAtlantic Region |
Well, I learn something new every day (IMG:style_emoticons/default/biggrin.gif) It is not covered at all in the shop manual (IMG:style_emoticons/default/sad.gif) Thanks for linking those here so others can reference them (IMG:style_emoticons/default/thumb3d.gif)
I will see about updating the write up to include this part (that only makes sense). |
|
|
|
| watsonrx13 |
Jul 17 2007, 05:33 AM
Post
#7
|
|
Advanced Member Group: Members Posts: 2,735 Joined: 18-February 03 From: Plant City, FL Member No.: 312 Region Association: South East States |
OK, I've checked both threads, but I don't understand where the seal goes. (IMG:style_emoticons/default/blink.gif)
Can someone post a pic of the seal installed? -- Rob |
|
|
|
| xperu |
Jul 17 2007, 07:47 AM
Post
#8
|
|
TEXAS Group: Members Posts: 597 Joined: 13-June 06 From: League City Texas Member No.: 6,213 Region Association: None |
Thanks Dr Evil, the timing for me is perfect, I'll be into it this weekend. Thanks again. Mike
|
|
|
|
| kconway |
Jul 17 2007, 09:07 AM
Post
#9
|
|
Senior Member Group: Members Posts: 1,347 Joined: 6-December 04 From: Monrovia, CA Member No.: 3,231 Region Association: Southern California |
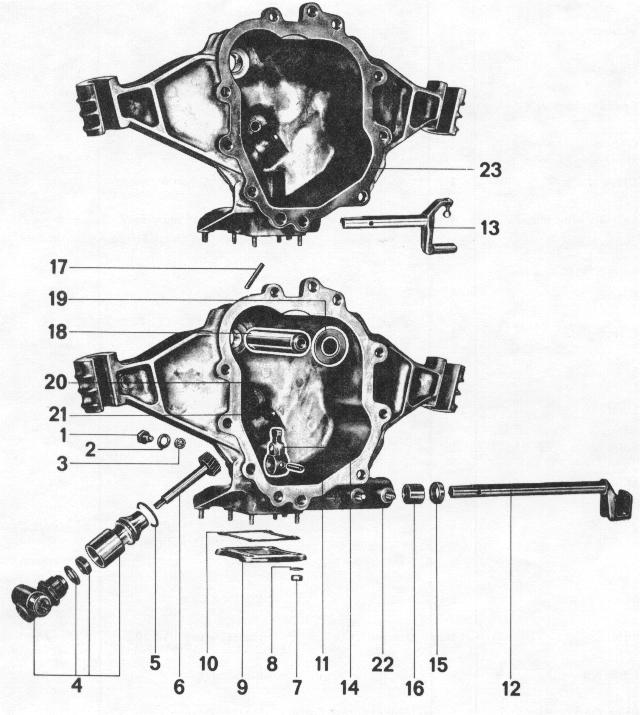
Found this exploded view, looks like its in the #4 stackup.
 Pulled my angle drive off and think I found a blue seal in the housing part. 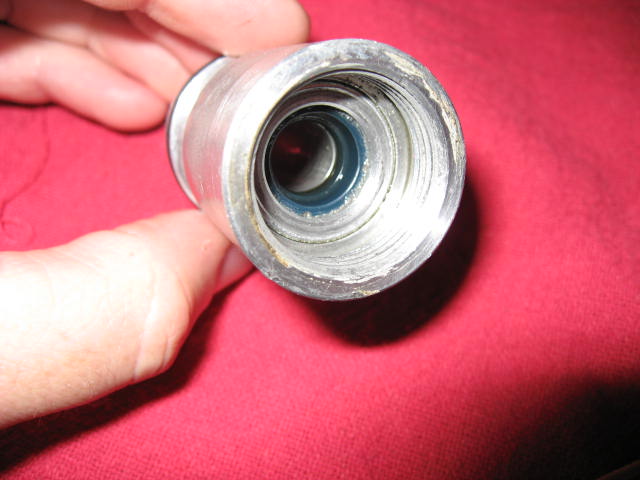 |
|
|
|
| Gint |
Jul 17 2007, 05:12 PM
Post
#10
|
|
Mike Ginter Group: Admin Posts: 16,098 Joined: 26-December 02 From: Denver CO. Member No.: 20 Region Association: Rocky Mountains |
I had to look at this thread... (IMG:style_emoticons/default/smile.gif)
|
|
|
|
| swl |
Aug 20 2007, 08:29 PM
Post
#11
|
|
Senior Member Group: Members Posts: 1,409 Joined: 7-August 05 From: Kingston,On,Canada Member No.: 4,550 Region Association: Canada |
picture below shows a variation on the angle drive. Note that there are two nuts on this one. The smaller one locks the angle drive onto the shaft- don't touch it.
This drive is from a car with a 08 72 build date. My new car has a 03 73 build date and has an angle drive like the one Mike is showing here. 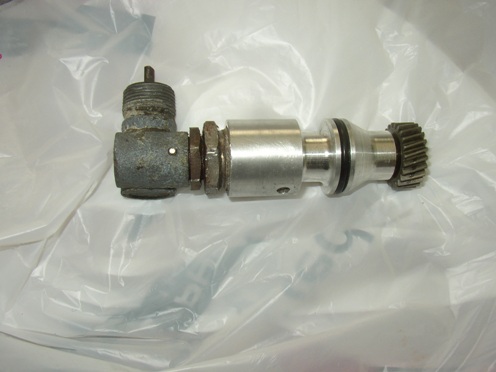 |
|
|
|
| Cap'n Krusty |
Aug 20 2007, 08:51 PM
Post
#12
|
|
Cap'n Krusty Group: Members Posts: 10,794 Joined: 24-June 04 From: Santa Maria, CA Member No.: 2,246 Region Association: Central California |
Nice writeup. That said, you didn't address the VERY common issue with the bore getting ovaled or hogged out from the drive pinion housing wobbling about. Sanding, smoothing, and cleaning doesn't fix big worn grooved in the soft metal bore. As far as I can determine, you have to either sleeve it or toss the cover. Sleeving would have to be done in a mill, something most of us don't have in the garage. The Cap'n
|
|
|
|
| kconway |
Aug 20 2007, 09:33 PM
Post
#13
|
|
Senior Member Group: Members Posts: 1,347 Joined: 6-December 04 From: Monrovia, CA Member No.: 3,231 Region Association: Southern California |
Not trying to step on Mike's how-to here but I discovered another part in this equation for this fix. Turns out there is an aluminum washer that comes out and has to be replaced if your replacing the oil seal.
take a look here -> http://www.914world.com/bbs2/index.php?showtopic=75154 |
|
|
|
| Dr Evil |
Aug 20 2007, 10:29 PM
Post
#14
|
|
Send me your transmission! Group: Members Posts: 23,041 Joined: 21-November 03 From: Loveland, OH 45140 Member No.: 1,372 Region Association: MidAtlantic Region |
Not stepping on anything, your making it better (IMG:style_emoticons/default/biggrin.gif) My original intention was to do a quick (due to time constraints) write up on what has been in my experience a most common cause of this. All of you put in your $.02 and made it better than I had intended and that is a good thing (IMG:style_emoticons/default/thumb3d.gif)
And now, back to the scholastic salt mine (IMG:style_emoticons/default/sad2.gif) |
|
|
|
|
1 User(s) are reading this topic (1 Guests and 0 Anonymous Users)
0 Members:

|
Lo-Fi Version | Time is now: 13th July 2025 - 10:27 AM |
Invision Power Board
v9.1.4 © 2025 IPS, Inc.