|
|
|
Porsche, and the Porsche crest are registered trademarks of Dr. Ing. h.c. F. Porsche AG.
This site is not affiliated with Porsche in any way. Its only purpose is to provide an online forum for car enthusiasts. All other trademarks are property of their respective owners. |
|
|

  |

| Jeff Hail |
 Mar 8 2008, 07:38 PM Mar 8 2008, 07:38 PM
Post
#201
|
|
Senior Member  Group: Members Posts: 1,141 Joined: 3-May 07 From: LA/ CA Member No.: 7,712 |
Finished welds at the inner long to rear long joint. Clean!
Attached image(s) 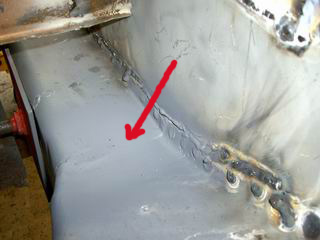
|
   |

 
|
| Wes V |
Mar 8 2008, 08:33 PM
Post
#202
|
|
Member Group: Members Posts: 482 Joined: 11-October 07 From: Los angeles Member No.: 8,211 |
Jeff;
This might be jumping ahead, but I've got a question for you. In the following photo, you show the frame rail section purchased from AA. (IMG:http://www.914world.com/bbs2/uploads/post-7712-1196043859.jpg) Is there another "layer" that goes over this and hides the corrugations, creating a double skin panel? It would be put in place prior to re-installing the engine tray, engine mount, rear suspension bracket, and battery tray? My car seems to have a double skin panel in this location. (the outter skin rotted due to battery acid, the corrugated section looks reasonable) I called AA and was told by them that the suspension console (and such) gets welded directly to the part shown in your photo. I'm pretty sure they are wrong. I've removed the engine mount on the drivers side, and the exposed section of the frame rail is smooth. Wes V |
|
|
|
| Jeff Hail |
Mar 8 2008, 09:15 PM
Post
#203
|
|
Senior Member Group: Members Posts: 1,141 Joined: 3-May 07 From: LA/ CA Member No.: 7,712 |
QUOTE(Wes V @ Mar 8 2008, 06:33 PM)  Jeff; This might be jumping ahead, but I've got a question for you. In the following photo, you show the frame rail section purchased from AA. (IMG:http://www.914world.com/bbs2/uploads/post-7712-1196043859.jpg) Is there another "layer" that goes over this and hides the corrugations, creating a double skin panel? It would be put in place prior to re-installing the engine tray, engine mount, rear suspension bracket, and battery tray? My car seems to have a double skin panel in this location. (the outter skin rotted due to battery acid, the corrugated section looks reasonable) I called AA and was told by them that the suspension console (and such) gets welded directly to the part shown in your photo. I'm pretty sure they are wrong. I've removed the engine mount on the drivers side, and the exposed section of the frame rail is smooth. Wes V The factory piece has the corrugations as a reinforcement on the inside of the rail. The outer overlay is what you see in a factory car. The corrugated piece does not connect to the outer wheelhouse as it only on one side and then bends over the sides of the box about an inch and half. My take is it keep's the rail side from collapsing under suspension loads ( compression, rebound and side loads). The corrugated reinforcement extends all the way down to the seatbelt anchor plate but is basicly flat once it meets the straight inner long. The AA part is thicker than the original inner 3 sided box but not equal to both pieces of metal combined. I question this myself and will be reinforcing this area in mine. Here is a picture of my old part cut out. You will see how it is made up. Attached image(s) 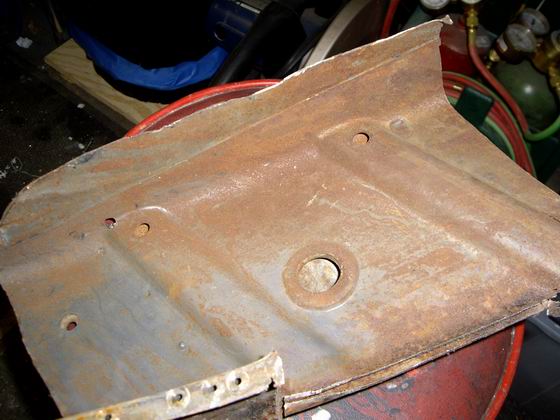
|
|
|
|
| Jeff Hail |
Mar 8 2008, 09:25 PM
Post
#204
|
|
Senior Member Group: Members Posts: 1,141 Joined: 3-May 07 From: LA/ CA Member No.: 7,712 |
Here's a couple pics that better show the rear rail/ inner corrugated reinforcements.
This area was a little different on very early cars. It was not as robust. The later cars had little pieces here and there to reinforce parts of the car better. ( striker brackets behind the lock pillar's and the front inner longs below and inside the hinge pillar) Attached image(s) 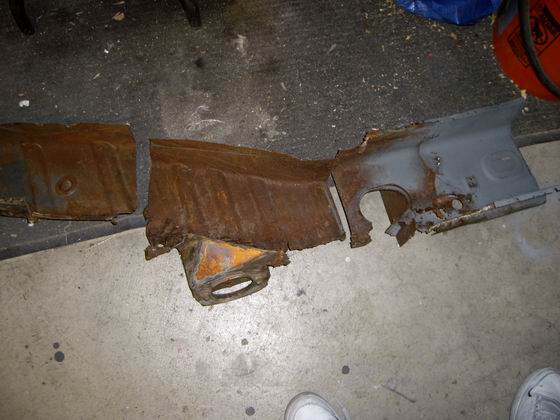 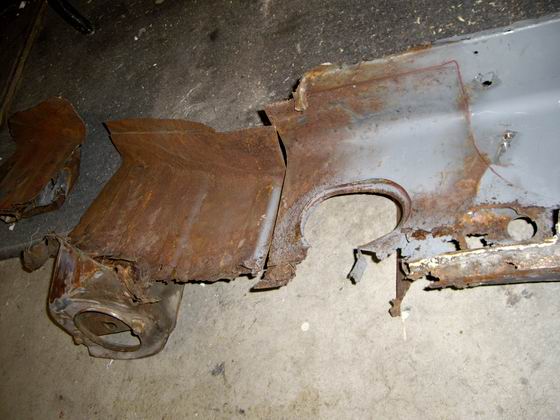
|
|
|
|
| Wes V |
Mar 8 2008, 10:54 PM
Post
#205
|
|
Member Group: Members Posts: 482 Joined: 11-October 07 From: Los angeles Member No.: 8,211 |
Thanks!
That's pretty much what I thought. So, in the factory installation; the corrugated section stiffens the side wall, but isn't welded to the other side of the box. The outer (smooth) section is what welds to the other side of the box. What AA is selling isn't technically correct, in that it replaces the two piece "composite" that the factory used. |
|
|
|
| Jeff Hail |
Mar 8 2008, 11:26 PM
Post
#206
|
|
Senior Member Group: Members Posts: 1,141 Joined: 3-May 07 From: LA/ CA Member No.: 7,712 |
QUOTE(Wes V @ Mar 8 2008, 08:54 PM) Thanks! That's pretty much what I thought. So, in the factory installation; the corrugated section stiffens the side wall, but isn't welded to the other side of the box. The outer (smooth) section is what welds to the other side of the box. What AA is selling isn't technically correct, in that it replaces the two piece "composite" that the factory used. Yes, Yes, Yes ....because it it easier to manufacturer in one piece. For the most the AA part will be sufficient. Most moden cars have frame rails that are made exactly the same way. (ala "crush zones") |
|
|
|
| Jeff Hail |
Mar 9 2008, 07:58 PM
Post
#207
|
|
Senior Member Group: Members Posts: 1,141 Joined: 3-May 07 From: LA/ CA Member No.: 7,712 |
Finished grinding the welds on the inside of the wheelhouse and some more epoxy primer.
Is it perfect? No there is a thin weld bead where it was sectioned and I did not want to grind it too thin. Just above where the battery tray mounts is the most noticable. I can live with that as everything else is all good steel now. Also fitted the lock pillar to the door and welded it up. These were brazed by the factory where they meet the sill and it took some time removing the old brass. A few rust pits where the pillar goes horizontal wiped clean with some media blasting. Attached image(s)  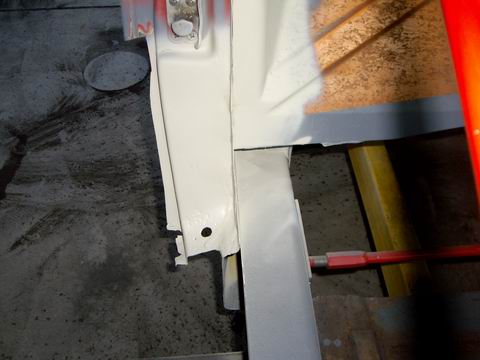
|
|
|
|
| Jeff Hail |
Mar 16 2008, 09:41 PM
Post
#208
|
|
Senior Member Group: Members Posts: 1,141 Joined: 3-May 07 From: LA/ CA Member No.: 7,712 |
Sean,
This is what you are looking for.............. These measurements were taken from an undamaged car and cross referenced to mine. The measurements on the inner ear will vary car to car due to rust, collison, console fatigue etc. Expect a 1/4 variance when you go to take measurements. Those inner ears take a beating over a lifetime. By triangulating from the hole in the firewall to both right and left ears you will not have a problem when you are ready to set the camber and toe. Using the measurements in the diagram: Taking this to another level. You can get the inner console tacked in. Then mount your control arm. Use an "All-thread" with a spherical rod end or piece of tubing where your shock mounts to the control arm, the top of the All-thread goes to the shock tower with some washers. Base the length of the All-thread on your normal ride height (sitting on the ground). Then using a camber gauge check it to see where you are before you weld everything solid. Install a wheel and tire and you can also check toe while static. Attached thumbnail(s) 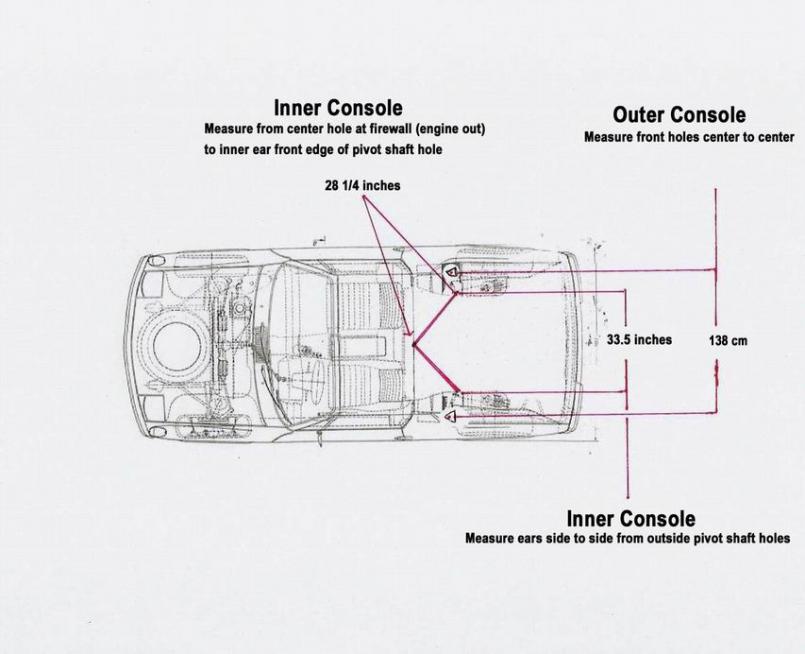 Attached image(s) 
|
|
|
|
| Gint |
Mar 17 2008, 05:55 AM
Post
#209
|
|
Mike Ginter Group: Admin Posts: 16,108 Joined: 26-December 02 From: Denver CO. Member No.: 20 Region Association: Rocky Mountains |
QUOTE(Jeff Hail @ Mar 9 2008, 07:58 PM) Is it perfect? No there is a thin weld bead where it was sectioned and I did not want to grind it too thin. Just above where the battery tray mounts is the most noticable. I can live with that as everything else is all good steel now. Beats rust... nice work. |
|
|
|
| sean_v8_914 |
Mar 17 2008, 02:38 PM
Post
#210
|
|
Chingon 601 Group: Members Posts: 4,011 Joined: 1-February 05 From: San Diego Member No.: 3,541 |
thanks Jeff. I made some door gap bars with turn buckles also. I'll go make some "shock simulators and check alignment spec with a wheel back on. Im about to weld in teh ear and Im wondering if the heat induced wil move the car. Brer and I did teh cross check body measurements per teh factory manual last night. amazingly everything is within 1/8th to 1/16th. I will be very mindfull of warping,. next is teh inner long stiffener made by ENGMAN.
I used teh #s from your yellow pad schetch posted earlier to tac in teh ear. this new dwg is super sexy. |
|
|
|
| sean_v8_914 |
Mar 17 2008, 02:40 PM
Post
#211
|
|
Chingon 601 Group: Members Posts: 4,011 Joined: 1-February 05 From: San Diego Member No.: 3,541 |
HOLY COW!!! it measured correctly 1st shot. Im going to buy a lotto ticket (after alignment check)
|
|
|
|
| brer |
Mar 17 2008, 03:03 PM
Post
#212
|
|
Advanced Member Group: Members Posts: 2,555 Joined: 10-March 05 From: san diego Member No.: 3,736 Region Association: None |
I've learned alot from this thread.
Unfortuneately it means I now have to redo my entire car. (IMG:style_emoticons/default/laugh.gif) |
|
|
|
| Jeff Hail |
Mar 17 2008, 06:17 PM
Post
#213
|
|
Senior Member Group: Members Posts: 1,141 Joined: 3-May 07 From: LA/ CA Member No.: 7,712 |
QUOTE(sean_v8_914 @ Mar 17 2008, 01:40 PM) HOLY COW!!! it measured correctly 1st shot. Im going to buy a lotto ticket (after alignment check) Regarding the suspension console: Nah it won't warp. Not enough constant heat in that area welding thin to thick metal. Just move around with the gun a bit and get your buddy holding the beer to grab an airhose and blow to cool in between welds. Regarding the Engman kit: Go slow......really slow.....tack first .........then alternate the plug welds as you go on the 3 pieces. DONT weld one piece in one shot. Move around...get that buddy to blow compressed air around the weld zones. If you think its getting too hot stop and wait then go back. |
|
|
|
| sean_v8_914 |
Mar 17 2008, 11:48 PM
Post
#214
|
|
Chingon 601 Group: Members Posts: 4,011 Joined: 1-February 05 From: San Diego Member No.: 3,541 |
thanks for the warning. I'll go left, right, front, back.
|
|
|
|
| Jeff Hail |
Mar 20 2008, 09:08 PM
Post
#215
|
|
Senior Member Group: Members Posts: 1,141 Joined: 3-May 07 From: LA/ CA Member No.: 7,712 |
Little things take time!
Actually about 15 minutes Fabricated new brackets for the airtubes. Not concerned if they look pretty. Once they are in they will never see daylight again. Removed the original, smacked it flat with a finishing hammer. Traced onto a sheet of 20 gauge steel and cut it out with hand nibbler. I destroyed one removing the tube from the car and the other one was a non-existant little patch of iron oxide that was swept away. Last of the original Rough cut and bends Final fit to the tubes Will drop the tubes off at the media blaster tomorrow. Attached image(s) 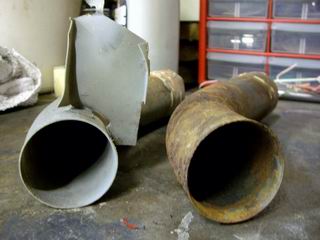 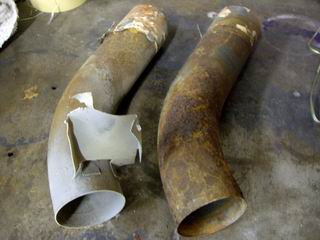 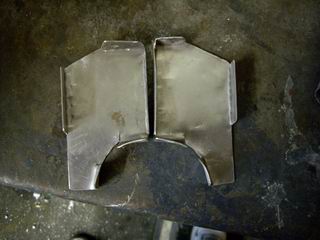 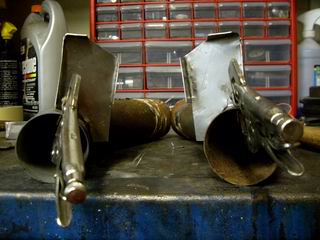 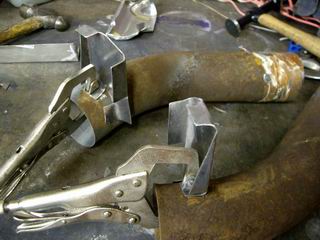
|
|
|
|
| Jeff Hail |
Mar 22 2008, 07:36 PM
Post
#216
|
|
Senior Member Group: Members Posts: 1,141 Joined: 3-May 07 From: LA/ CA Member No.: 7,712 |
Media blasted the air tubes. Welded the brackets I fabricated and epoxy primed, wet on wet with a final coat of Alu-Zinc. They will never ever rust again!
Attached image(s) 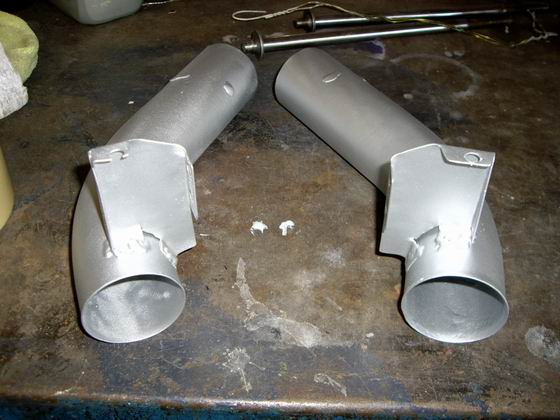
|
|
|
|
| Jeff Hail |
Mar 22 2008, 07:41 PM
Post
#217
|
|
Senior Member Group: Members Posts: 1,141 Joined: 3-May 07 From: LA/ CA Member No.: 7,712 |
Repaired the rust in the passenger side lock pillar.
Cut out the rusted area highlighted in yellow. Cut some backing pieces and tacked them in. Being the metal is so thin in this area it is a must. Even on the lowest heat setting on my Miller 180 it can still blow holes. Little fast trigger pulls. Attached image(s) 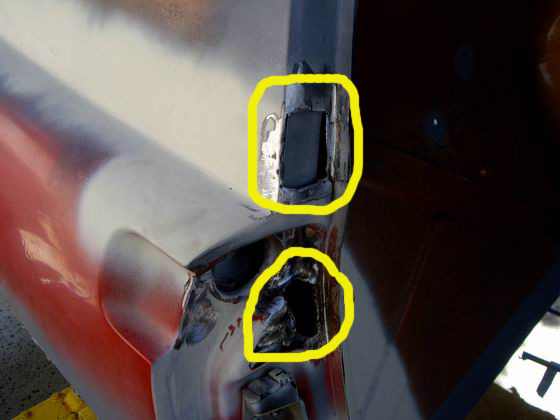 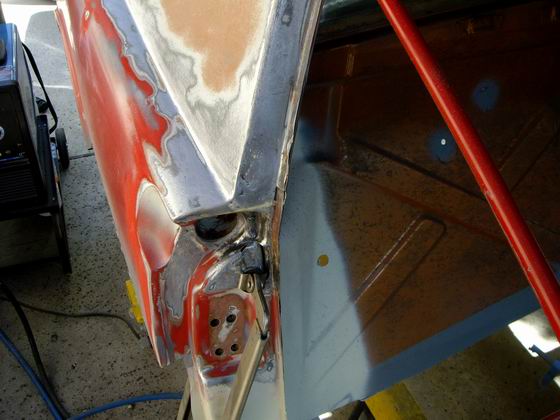 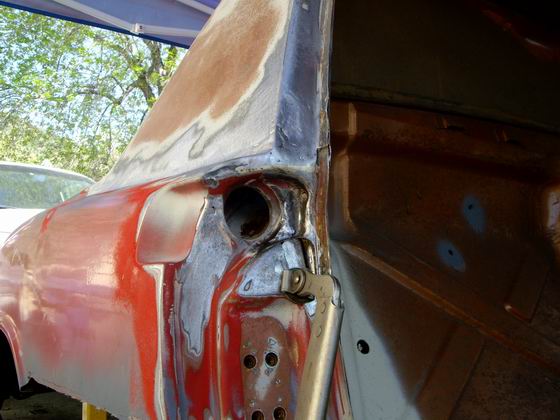
|
|
|
|
| Jeff Hail |
Mar 22 2008, 07:47 PM
Post
#218
|
|
Senior Member Group: Members Posts: 1,141 Joined: 3-May 07 From: LA/ CA Member No.: 7,712 |
After welding and then slowly grinding the two areas.
The area where the air vent is is tough to get a grinder into. This rea has to be right or the door weatherstrip will not seal correctly. Attached image(s) 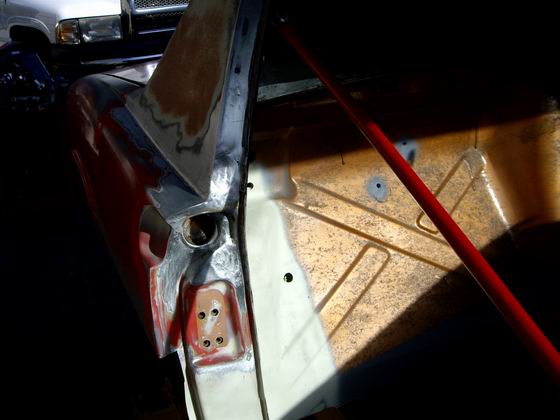 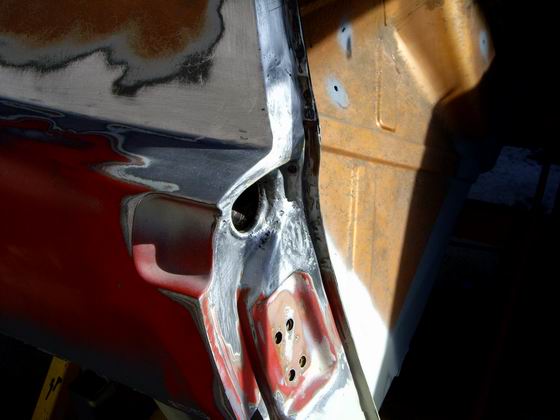 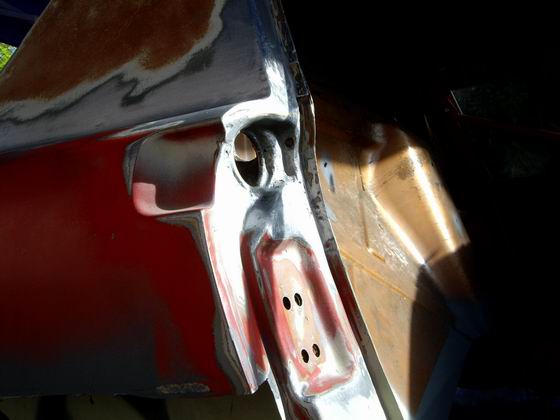
|
|
|
|
| Jeff Hail |
Mar 22 2008, 07:49 PM
Post
#219
|
|
Senior Member Group: Members Posts: 1,141 Joined: 3-May 07 From: LA/ CA Member No.: 7,712 |
Some epoxy primer after shaping.
Oops closed the door on wet primer! Thats how I know the weatherstrip seals good. No sail panel molding fastener holes either. Welded those up too. The backing plates I welded in on the backside of the pillar. Attached image(s) 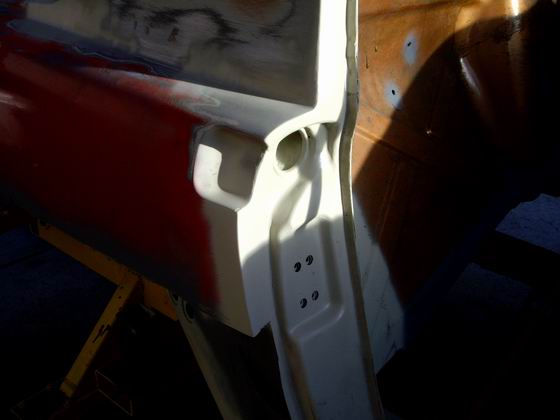  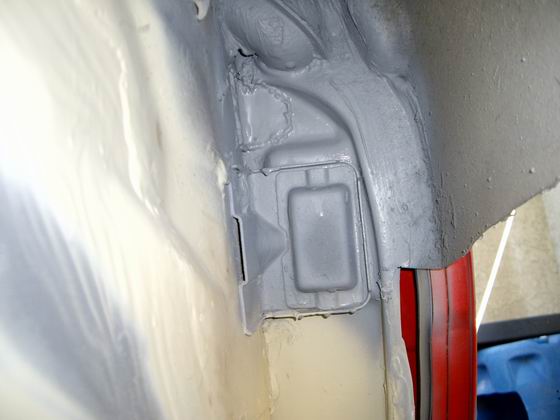
|
|
|
|
| sean_v8_914 |
Mar 23 2008, 10:25 AM
Post
#220
|
|
Chingon 601 Group: Members Posts: 4,011 Joined: 1-February 05 From: San Diego Member No.: 3,541 |
Jeff, what do you recommend to clean this up. that white paint, layers of old glue, crusty has got to go. sand, grind, paint stripper...?
Attached image(s) 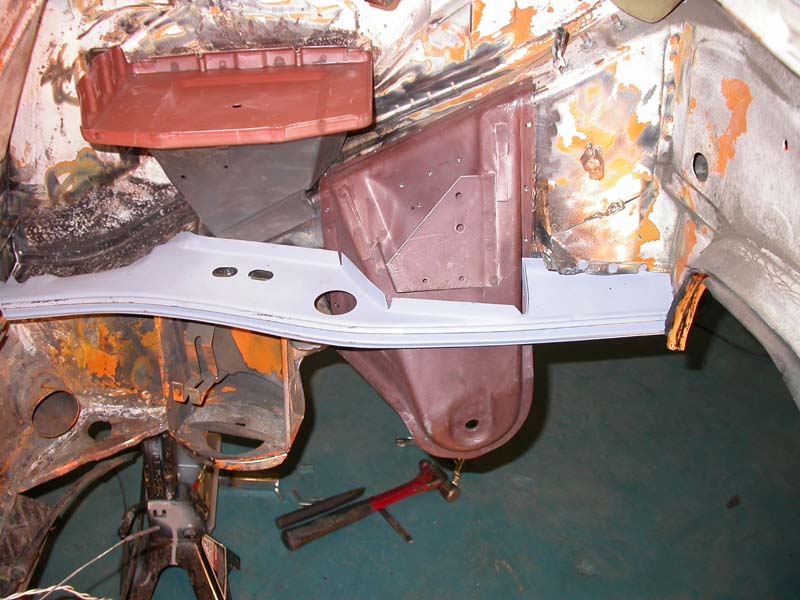
|
|
|
|
|
1 User(s) are reading this topic (1 Guests and 0 Anonymous Users)
0 Members:

|
Lo-Fi Version | Time is now: 4th July 2026 - 07:11 AM |
Invision Power Board
v9.1.4 © 2026 IPS, Inc.