|
|
|
Porsche, and the Porsche crest are registered trademarks of Dr. Ing. h.c. F. Porsche AG.
This site is not affiliated with Porsche in any way. Its only purpose is to provide an online forum for car enthusiasts. All other trademarks are property of their respective owners. |
|
|

  |

| stateofidleness |
 Oct 7 2007, 01:11 AM Oct 7 2007, 01:11 AM
Post
#26
|
|
Senior Member  Group: Members Posts: 810 Joined: 1-September 07 From: Canyon Lake, Texas! Member No.: 8,065 Region Association: None |
even if you're just cutting out small patches from the pans? (say 3" by 3" tops) and no work being done on the longs
*subscribes* really interested to see the progress on the firewall repair! i have those exact holes and curious to see the fix. question. did you remove the wiring harness? it is a pain... i sleeved mine for the time being but didnt know if it needed to be removed if i was going to be welding around it and im also assuming you dropped the engine? for the battery tray area? |
   |

 
|
| Jeff Hail |
Oct 7 2007, 01:41 AM
Post
#27
|
|
Senior Member Group: Members Posts: 1,141 Joined: 3-May 07 From: LA/ CA Member No.: 7,712 |
QUOTE(stateofidleness @ Oct 7 2007, 12:11 AM)  even if you're just cutting out small patches from the pans? (say 3" by 3" tops) and no work being done on the longs *subscribes* really interested to see the progress on the firewall repair! i have those exact holes and curious to see the fix. question. did you remove the wiring harness? it is a pain... i sleeved mine for the time being but didnt know if it needed to be removed if i was going to be welding around it and im also assuming you dropped the engine? for the battery tray area? If you are quilting patches in or just repairing the floors I would not go to such an extreme as I have with a fixture and door supports. I have stripped my tub to just a shell. I have left only the glass in so little critter's do not find a place to camp out for the winter. I hate when four legged things jump out of nowhere at me. Yes I have removed the wiring harness. If you are doing spot repairs leave the harness in or only partially remove/ pullback for any welding in the firewall/ tunnel area repairs.. I have to repair some areas of the loom anyway and I find it it my way if left in the car. Engine is out and being replaced with a six. The four cylinder mounts will disappear on the inner longs. |
|
|
|
| watsonrx13 |
Oct 7 2007, 07:30 AM
Post
#28
|
|
Advanced Member Group: Members Posts: 2,735 Joined: 18-February 03 From: Plant City, FL Member No.: 312 Region Association: South East States |
Very nice photo-documentary on the restoration of this vechile...
Can you show a better photo of where the bars are attached and describe how the bar is constructed? -- Rob |
|
|
|
| KELTY360 |
Oct 7 2007, 10:07 AM
Post
#29
|
|
914 Neferati Group: Members Posts: 5,167 Joined: 31-December 05 From: Pt. Townsend, WA Member No.: 5,344 Region Association: Pacific Northwest |
That lower firewall is serious sheetmetal porn. (IMG:style_emoticons/default/wub.gif)
You da man Jeff! (IMG:style_emoticons/default/welder.gif) (IMG:style_emoticons/default/pray.gif) (IMG:style_emoticons/default/pray.gif) (IMG:style_emoticons/default/pray.gif) |
|
|
|
| Jeff Hail |
Oct 7 2007, 02:52 PM
Post
#30
|
|
Senior Member Group: Members Posts: 1,141 Joined: 3-May 07 From: LA/ CA Member No.: 7,712 |
QUOTE(watsonrx13 @ Oct 7 2007, 06:30 AM) Very nice photo-documentary on the restoration of this vechile... Can you show a better photo of where the bars are attached and describe how the bar is constructed? -- Rob The bars were constructed of 1x1 square tube 1/8 wall. I welded some turnbuckles in and attached some scrap plate on each end. The anchoring points are the upper seatbelt bolt and in front just inboard of the upper hinge on the inner hinge post below the cowl. If the car was not fully supported from below then the upper hinge would be the best location with the doors off. When I took measurements with the car fully assembled the passenger side was in spec which surprised me. The driver side was wide by another 1/8 inch. On another note the front floors are in good shape forward of the seat crossmember.. Typical flash rust at the tunnel flanges only. Will clean up easily. I am replacing the floor behind the crossmember because its gone at the firewall. Attached image(s) 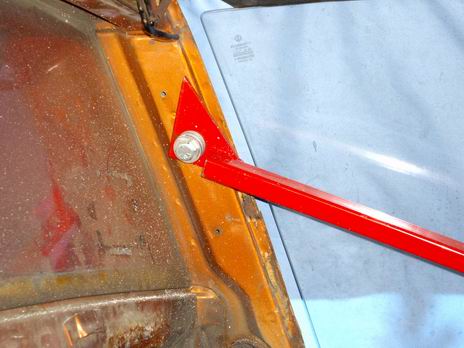 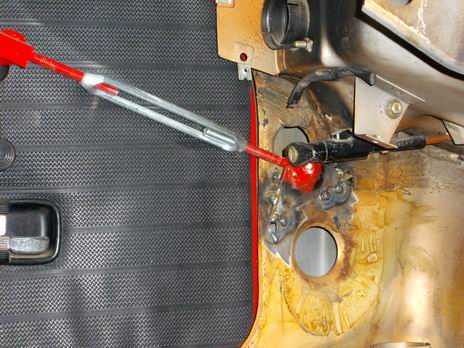 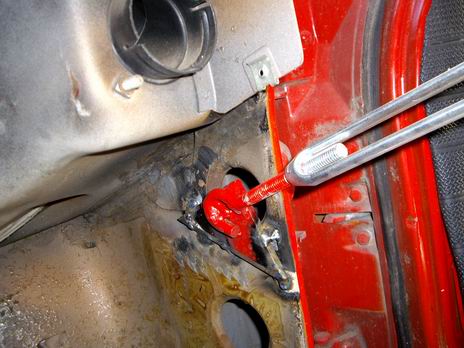 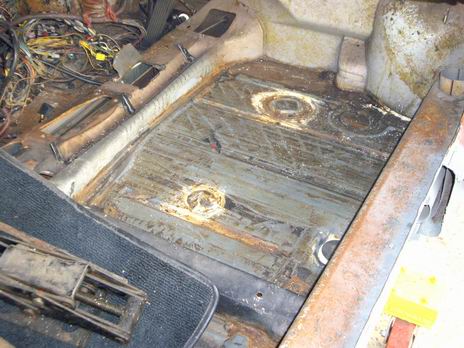
|
|
|
|
| Jeff Hail |
Oct 7 2007, 07:49 PM
Post
#31
|
|
Senior Member Group: Members Posts: 1,141 Joined: 3-May 07 From: LA/ CA Member No.: 7,712 |
The lower outer firewall is out. I didn't even damage the airtubes removing the old panel. Had to cut the control tubes which will be rebuilt and modified anyway.
The lower inner firewall will need a section lapped and flanged to fit the floor. It's all flat metal- piece of cake. Tools of the trade. Ok....the hard work is done (hehe) Its fabrication time. Some observations. About 1 out of every 10 resistance weld's from the factory had poor or no penetration. Also the flange that connects the lower outer firewall to the longs (between the air tube and inner long) had no welds. It was filled up with seam sealer. I'd swear this tub was assembled at the factory on a Thursday. Some flash rust here and there but nothing too bad. A Roloc disc will remove most. Maybe Racer Chris could donate one of his "Raised Pickup Point Kits" for this build....? Attached image(s)  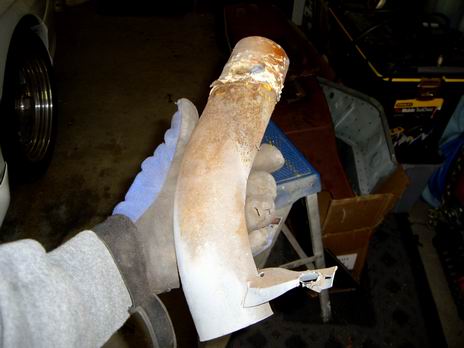 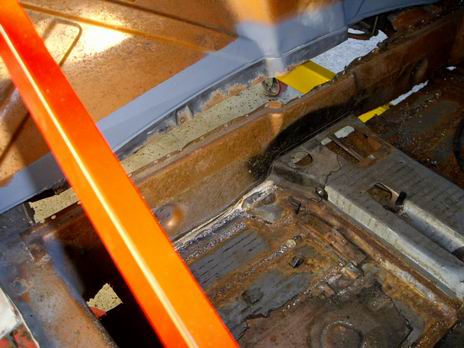 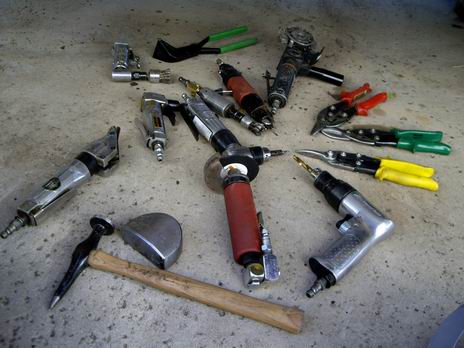
|
|
|
|
| Jeff Hail |
Oct 14 2007, 09:08 PM
Post
#32
|
|
Senior Member Group: Members Posts: 1,141 Joined: 3-May 07 From: LA/ CA Member No.: 7,712 |
Didn't get much done with the car this week. Busy at work during the week and ended up in bed with the flu Friday night and Saturday. Feel much better except except cannot invert my head to weld due to my sinus's are loaded up. Since I am glutton for punishment and hate being stuck indoors I did some cutting and trimming today. Just felt good to get out and do something.
I added some fixtures for the outer suspension control points. Since I am getting into the rails I need to support this area. Cut out the old right suspension console and rail (inner long) I truly have a rust free 914 now. Interesting enought these were welded from the factory with stainless wire if not TIG'd. Ate up the cut off disc's really fast. You guys must be thinking I am nuts? No just on a mission. Attached image(s) 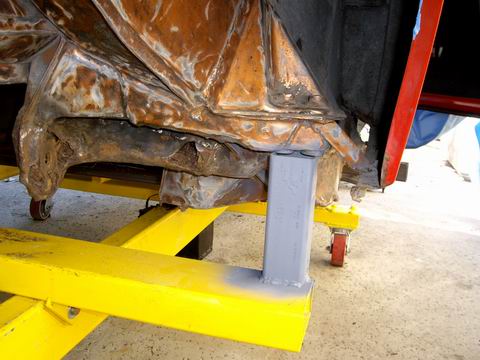 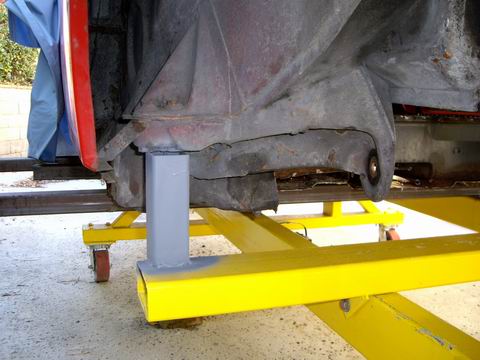 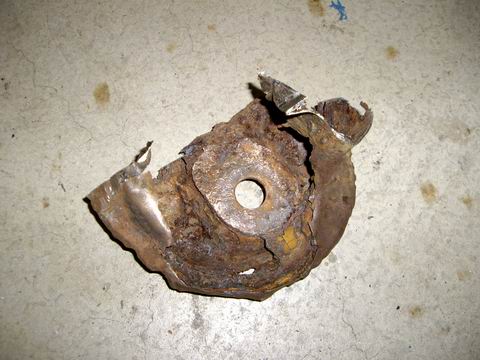 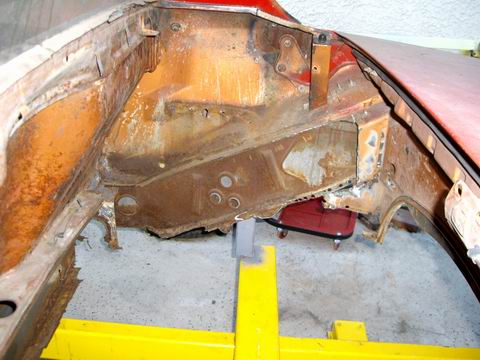
|
|
|
|
| Jeff Hail |
Oct 14 2007, 09:18 PM
Post
#33
|
|
Senior Member Group: Members Posts: 1,141 Joined: 3-May 07 From: LA/ CA Member No.: 7,712 |
I could have repaired and sectioned the right inner rail. Would have been a lot of work considering how rusted the lower and inner were so I decided to order the rail from AA. The corrugations would have been challenging to reproduce and would have required a lot of cuts and scab metal. Since the 4 cyl mounts are going by-by and the rail will be exposed I said what the "F"? You only live once. The AA part is going to require some fitting. It is rough but the quality is good. I will still reproduce the double wall as the factory did.
The body did not move at all when the rail was cut out. The 914 chassis is still pretty stiff in design when it is just a shell. Attached image(s) 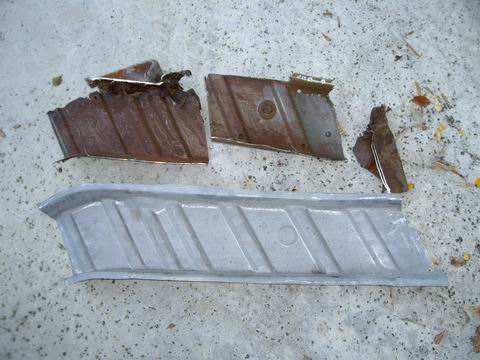 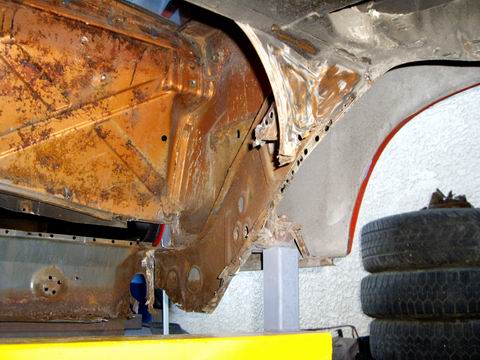
|
|
|
|
| Jeff Hail |
Oct 14 2007, 09:35 PM
Post
#34
|
|
Senior Member Group: Members Posts: 1,141 Joined: 3-May 07 From: LA/ CA Member No.: 7,712 |
The outer wheelhouse metal is sound. I was surpised that no rust was found at the lower rail area other than flash rust inside the box area. Still solid.
One observation was apparent. The rust issue on 914's is not just from battery acid. The area's below the hellhole are prone to rust because they are also high flex area's. The area's like the hell hole and just behind the seats at the firewall go from very stiffly reinforced structure to single layer metal. This is a flexible area and the paint/ coatings tend to not flex over the cars life and lift exposing the metal to acid, water etc. I have seen many 914's that are sealed better than others. I to this day cannot figure out why they didn't angle the hellhole shelf to drain better than make it flat like a holding pond? Attached image(s) 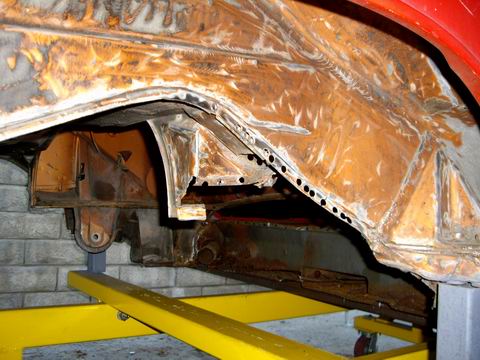
|
|
|
|
| type11969 |
Oct 14 2007, 09:50 PM
Post
#35
|
|
Senior Member Group: Members Posts: 1,231 Joined: 2-December 03 From: Collingswood, NJ Member No.: 1,410 Region Association: North East States |
Jeff- nice work, just figured out that you were the same jeff that posted in my thread! Those underbody jigs are nice . . . wish I had them. I may have to pick your brain at some point to figure out a way to line up the front suspension points on my 914. It was in an accident and the drivers quarter (and then some) was replaced right up to the suspension mounting point. It has to have been knocked out of alignment, if not by the accident, then certainly by the (poor) welding.
Keep up the good work! -Chris |
|
|
|
| Jeff Hail |
Oct 14 2007, 11:11 PM
Post
#36
|
|
Senior Member Group: Members Posts: 1,141 Joined: 3-May 07 From: LA/ CA Member No.: 7,712 |
QUOTE(type11969 @ Oct 14 2007, 08:50 PM) Jeff- nice work, just figured out that you were the same jeff that posted in my thread! Those underbody jigs are nice . . . wish I had them. I may have to pick your brain at some point to figure out a way to line up the front suspension points on my 914. It was in an accident and the drivers quarter (and then some) was replaced right up to the suspension mounting point. It has to have been knocked out of alignment, if not by the accident, then certainly by the (poor) welding. Keep up the good work! -Chris Chris, My 914 has had the right rear suspension console repaired in it's life. It has gobs of welding on the right side. It looked as if it had one of Racer Chris's ear reinforcements installed. It was never treated for corrosion so it rusted out badly. A big 3 inch washer had been welded in to gain some life on the inner ear. It was pretty bad. A dust pan full of rust came out when I cut the console off. It's getting lighter by the day! Before any cutting I took some measurements. All 914's seems to have some variance at the suspension mounting area's in as much as 1/2 inch measured center to each side. I measured from the center hole at the upper firewall just above the lower firewall seam to the inner console bolt hole. Considering how much rot the right rear console had no sag was found and was equal side to side. The measurement was 28-1/4 from the firewall hole to the front edge of the console bolt hole. I prefer center to center hole measurements but the right console was so far gone I couldnt rely on it. Side to side from inner console to inner console was 33-1/2 from outside to outside on the bolt hole. I have some measurements from 914World, Pelican and an old Mitchell book. I have still been trying to locate datum (height) measurements to no avail. A this point I am not worried as my car still has consistency side to side. The jigs are a plus as it provides support and a reference point for location with no flex. The body is so light stripped nothing moves. My front suspension control points were not perfect from the factory. The forward bracket on the body that locate's the front suspension crossmember was about an 1/8 to far back on the right side. The bracket on the suspension crossmember has slotted holes that go to the rear mount so it still fits without binding. A lot of caster and camber adjustment is available on the strut tower it probably doesnt make much difference but I decided to remove and reweld the bracket where it should have been for proper Steering Axis Inclination. My car has not had any structural damage from collision which is a plus but the rust work is plenty to keep me busy. |
|
|
|
| tdgray |
Oct 15 2007, 07:56 AM
Post
#37
|
|
Thank God Nemo is not here to see this Group: Members Posts: 9,706 Joined: 5-August 03 From: Akron, OH Member No.: 984 Region Association: None |
Great work Jeff.... great when you get to say... "hey I did it myself"
|
|
|
|
| type11969 |
Oct 15 2007, 08:11 AM
Post
#38
|
|
Senior Member Group: Members Posts: 1,231 Joined: 2-December 03 From: Collingswood, NJ Member No.: 1,410 Region Association: North East States |
Jeff-
Thanks for the info. I've tried using the pics on this site before but they are so blurry that it is sometimes tough to figure out what is what. I have plenty to contend with in the rear first before I start worrying about the front again though . . . -Chris QUOTE(Jeff Hail @ Oct 14 2007, 09:11 PM) QUOTE(type11969 @ Oct 14 2007, 08:50 PM) Jeff- nice work, just figured out that you were the same jeff that posted in my thread! Those underbody jigs are nice . . . wish I had them. I may have to pick your brain at some point to figure out a way to line up the front suspension points on my 914. It was in an accident and the drivers quarter (and then some) was replaced right up to the suspension mounting point. It has to have been knocked out of alignment, if not by the accident, then certainly by the (poor) welding. Keep up the good work! -Chris Chris, My 914 has had the right rear suspension console repaired in it's life. It has gobs of welding on the right side. It looked as if it had one of Racer Chris's ear reinforcements installed. It was never treated for corrosion so it rusted out badly. A big 3 inch washer had been welded in to gain some life on the inner ear. It was pretty bad. A dust pan full of rust came out when I cut the console off. It's getting lighter by the day! Before any cutting I took some measurements. All 914's seems to have some variance at the suspension mounting area's in as much as 1/2 inch measured center to each side. I measured from the center hole at the upper firewall just above the lower firewall seam to the inner console bolt hole. Considering how much rot the right rear console had no sag was found and was equal side to side. The measurement was 28-1/4 from the firewall hole to the front edge of the console bolt hole. I prefer center to center hole measurements but the right console was so far gone I couldnt rely on it. Side to side from inner console to inner console was 33-1/2 from outside to outside on the bolt hole. I have some measurements from 914World, Pelican and an old Mitchell book. I have still been trying to locate datum (height) measurements to no avail. A this point I am not worried as my car still has consistency side to side. The jigs are a plus as it provides support and a reference point for location with no flex. The body is so light stripped nothing moves. My front suspension control points were not perfect from the factory. The forward bracket on the body that locate's the front suspension crossmember was about an 1/8 to far back on the right side. The bracket on the suspension crossmember has slotted holes that go to the rear mount so it still fits without binding. A lot of caster and camber adjustment is available on the strut tower it probably doesnt make much difference but I decided to remove and reweld the bracket where it should have been for proper Steering Axis Inclination. My car has not had any structural damage from collision which is a plus but the rust work is plenty to keep me busy. |
|
|
|
| Jeff Hail |
Oct 16 2007, 09:19 PM
Post
#39
|
|
Senior Member Group: Members Posts: 1,141 Joined: 3-May 07 From: LA/ CA Member No.: 7,712 |
A couple of hours to play today.
Cut the old inner long to prepare for the replacement section at the rear. Measure correctly because you only get one chance. If you cut long you get two chances. If you cut it too short consider eating out. Perfect cut! Here are some mock up's of the new panel being held in with Visegrips. Just double checking the fit and then I ran out of daylight. I use a piece of angle bar stock or anything flat and stiff to backup the old and new panel. This way I know both are level during fitting. When I go to weld I will place bars on all 3 sides of the panel to make sure it is square. Attached image(s) 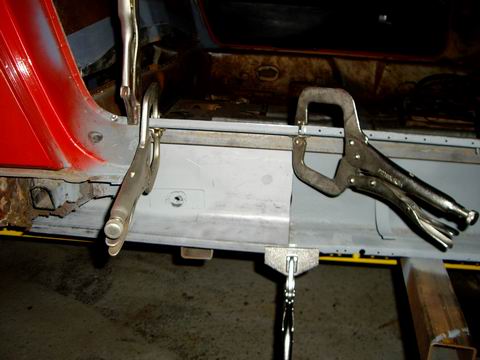 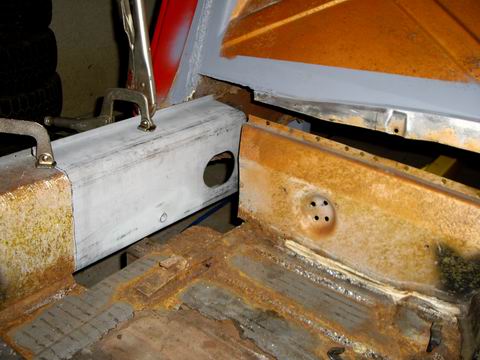 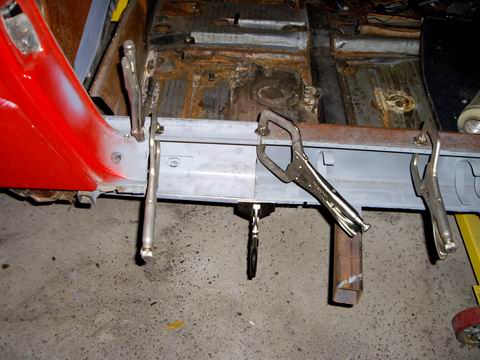 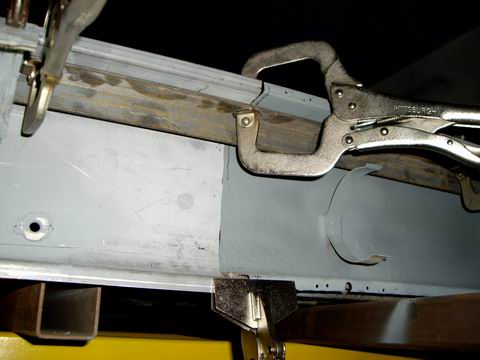
|
|
|
|
| Jeff Hail |
Oct 16 2007, 09:30 PM
Post
#40
|
|
Senior Member Group: Members Posts: 1,141 Joined: 3-May 07 From: LA/ CA Member No.: 7,712 |
Rust is a crafty beast. If you can see rust you are only seeing the surface. My rule of thumb has always been you only see 10-20% on the outside. 914's rust from the inside and this is a perfect example. This is the old rear inner long that was cut out. The airtube area is rusted and was destroyed during removal.
From the outside all you see is the perforation down by the floor. On the inside its history. Unless you remove the outer longs you will never know how bad it really is inside. I guess this area can be referred to as south of hell. It's only metal!!!!!!!!!! Attached image(s) 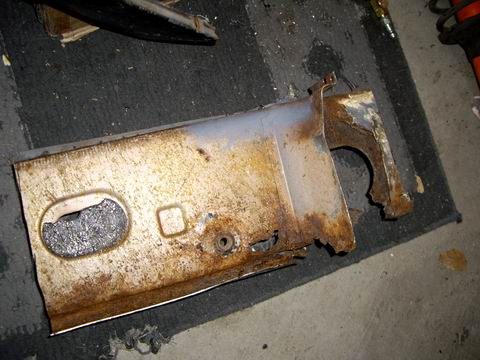 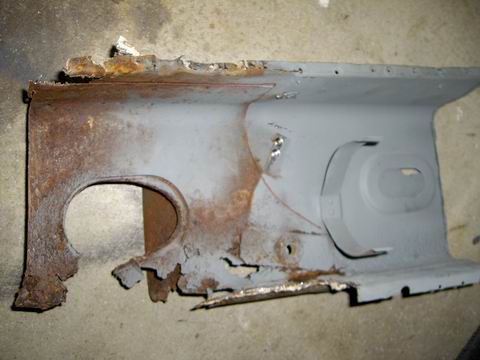
|
|
|
|
| Jeff Hail |
Oct 16 2007, 09:48 PM
Post
#41
|
|
Senior Member Group: Members Posts: 1,141 Joined: 3-May 07 From: LA/ CA Member No.: 7,712 |
I mentioned the other day double walled panels. This is one of them. I traced the second layer with a Sharpie to show where it starts and stops. This is where the lower wheelhouse comes together with the inner long. It is a entirely separate plate from the long and wheelhouse. You will also notice it has a radius to it. The radius is to allow some flex in the panel without making it to rigid.
If panel connections are in a high flex zone they need to be able to move by design. If they do not flex you end up with metal fatigue. A secondary purpose is to reinforce the seatbelt anchor area from pulling out in a collision. Imagine a 200lb man going from 65mph to 0 in 10ths of a second. That is a lot of energy focused on a tiny bolt anchor in a very short time. Cheap insurance. In the back of my mind I think Karmann knew this area was prone to corrosion so they added a little more metal down to the anchor mount. Manufacturers use double walls for a reason. Stressed area's, panel intersections and joints. I will fab the extra layer and add it in later. Notice the seatbelt anchor is located in this strengthened area and it is ready to fall out now from the rust damage. The rear corner of the inner long connects to the inner lower firewall. This area makes up a portion of what is called a torque box. It is one of the strongest area's of the vehicle. It is in this lower area from side to side when all panels are tied together to the center tunnel it forms a structure. Do not compromise here. Do not take shortcuts. Attached image(s) 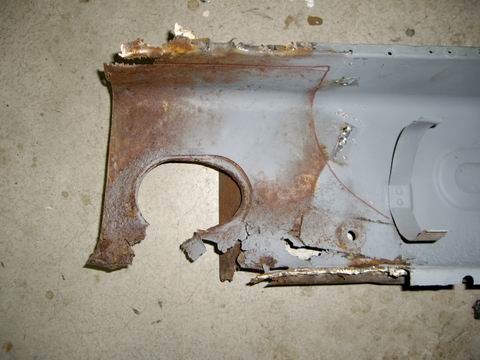
|
|
|
|
| Jeff Hail |
Oct 16 2007, 10:01 PM
Post
#42
|
|
Senior Member Group: Members Posts: 1,141 Joined: 3-May 07 From: LA/ CA Member No.: 7,712 |
A mock up shot from underneath.
Attached image(s) 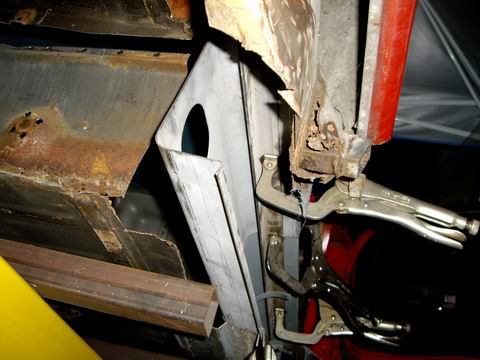
|
|
|
|
| Jeff Hail |
Oct 16 2007, 10:35 PM
Post
#43
|
|
Senior Member Group: Members Posts: 1,141 Joined: 3-May 07 From: LA/ CA Member No.: 7,712 |
An important note I would like to mention: "Inserts and sleeves"The focus here is on the 914 but apply's to any car. More so one without a fixed roof!
Whenever you make a butt welded joint whether on a rocker panel, A-pillar, center post or quarter panel/ sail panel and hinge pillars you have to make a sleeve or an insert and it needs to be properly sized and welded. This would not apply to butt welded flairs and cosmetic items. Any area that is a stressed panel as noted above and butt welded will most likely fail if not sleeved. It may not fail from normal use but you do not want to find out in a collision. Everyone has heard the term "clipped". This is when a car is cut in half and welded back together. You do not see this practice much anymore and I would like to not see it at all. I have seen post collision failure because sleeves were not incorporated and it is ugly at least. A sleeve or an insert is a reinforcement shaped just like the two panels being joined. This can be 3 or 4 sided when say sectioning a rocker panel. Imagine the arm of a long sleeve shirt inside a snug fitting long sleeved sweatshirt. A perfect teaching example using this principle would be it makes thinks stiff. Everyone knows it restricts movement most of the time. It does the same thing with metal. Sleeves and inserts can be made from a piece of an old damaged part or the replacement panel if enough is left over. The reason sleeves and inserts are used are: It provides a backing for the Mig welded butt joint. Keeps burn through to a minimum. Ensures a completely closed joint. Aligns the part's for the best fit possible. Making a sleeve or insert: Should be twice the width of the cross section. For example the 914 has an inner long that is approx 3-1/4 inches wide (thick without the outer long). The sleeve should be 6-1/2 inches long. It should also be equal in thickness to the parent metal it is being welded to. Plug weld's would be used to weld the sleeve to thin sheetmetal. The butt weld and plug welds should not overlap into each other's heat zone. If you haven't got this by now then another easily understood example would be the Engman Long Kit. The exeption here is the Engman Kit covers the entire long and cross section on one side versus bridging two panels welded end to end. |
|
|
|
| SirAndy |
Oct 16 2007, 10:36 PM
Post
#44
|
|
Resident German Group: Admin Posts: 42,359 Joined: 21-January 03 From: Oakland, Kalifornia Member No.: 179 Region Association: Northern California |
very nice! you have some skillz, sir ... (IMG:style_emoticons/default/pray.gif)
(IMG:style_emoticons/default/smilie_pokal.gif) Andy |
|
|
|
| Jeff Hail |
Oct 16 2007, 11:08 PM
Post
#45
|
|
Senior Member Group: Members Posts: 1,141 Joined: 3-May 07 From: LA/ CA Member No.: 7,712 |
We always can use tutorials with pics. Here is a cross section of the inner long and floor joints. The floor connects about half way across the inner long. The factory used a sealer that looks like a ribbon of Pigeon poop. Lumpy acoustic ceiling stuff in appearance and looks just like the 911 poop ribbon used.
Another inch and half of seam sealer and the bean counters would have lost sleep. Another inch and half of seam sealer and half the rust threads would be non existant! Funny thing think of todays new car warranties on outer body rust through. If you have seen how cars are now sealed and the generous use of corrosion products that look like they were applied by a firehose. You have to wonder why they didn't protect cars like the 914 especially since the were produced in Europe of all places? Lets not go there. It was the bean counters.....you can bet on it. Attached image(s) 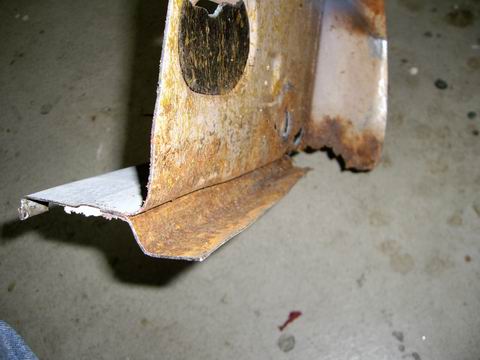
|
|
|
|
|
2 User(s) are reading this topic (2 Guests and 0 Anonymous Users)
0 Members:

|
Lo-Fi Version | Time is now: 8th November 2025 - 04:03 PM |
Invision Power Board
v9.1.4 © 2025 IPS, Inc.