|
|
|
Porsche, and the Porsche crest are registered trademarks of Dr. Ing. h.c. F. Porsche AG.
This site is not affiliated with Porsche in any way. Its only purpose is to provide an online forum for car enthusiasts. All other trademarks are property of their respective owners. |
|
|


| Bogaat |
 Oct 2 2007, 04:33 PM Oct 2 2007, 04:33 PM
Post
#1
|
|
Member  Group: Members Posts: 195 Joined: 8-January 07 From: Charleston, SC Member No.: 7,436 |
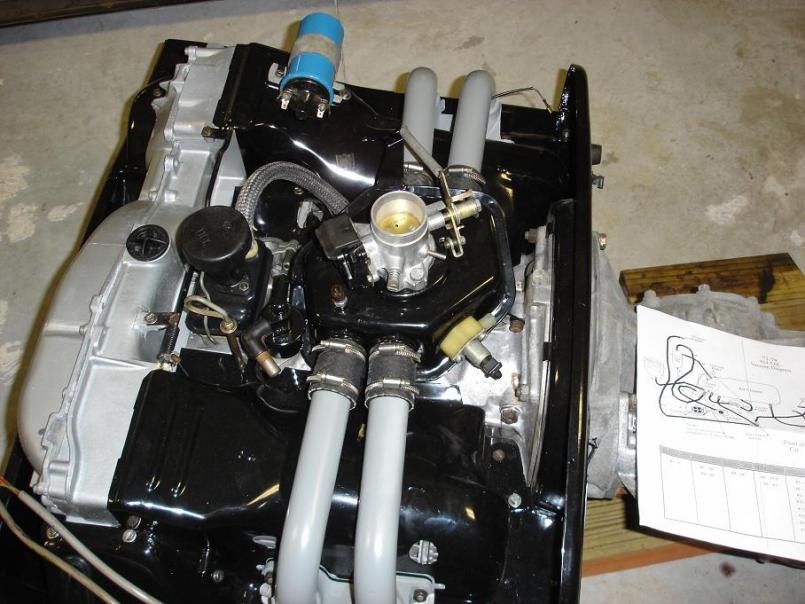
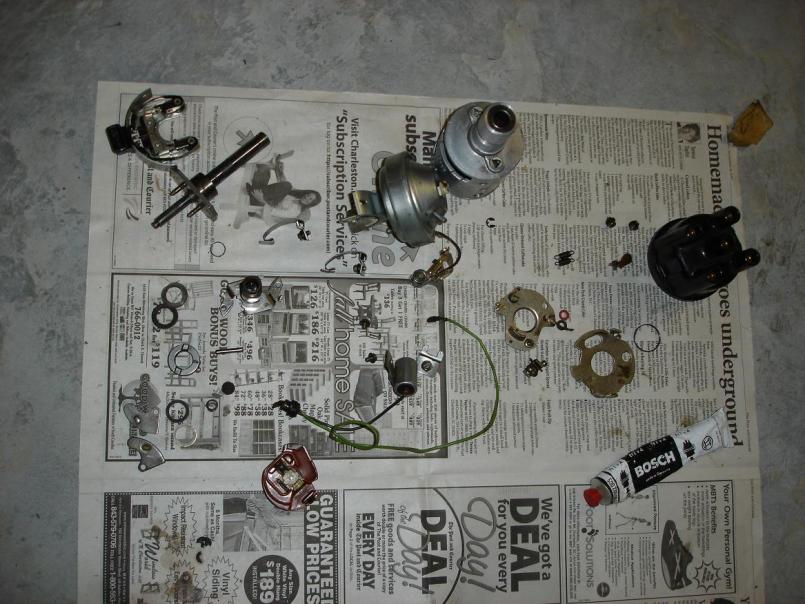
I am finally starting to make some progress. I have the engine all built (stock 2.0 w/ the help of Jakes video) and the car painted. You can see I have the dizzy in pieces ready to be reassembled. Believe it or not, it was full of glass! Somone had obviously busted out the back glass in the middle of a tuneup. The engine was covered in it and the dizzy had chunks as well. One of the springs had popped off...no wonder it was running like junk. Where do these two pieces go? One is a cap with a flat side and the other is just a bendable piece which fits over some edge...some where. Thanks guys!
(IMG:style_emoticons/default/beer3.gif) 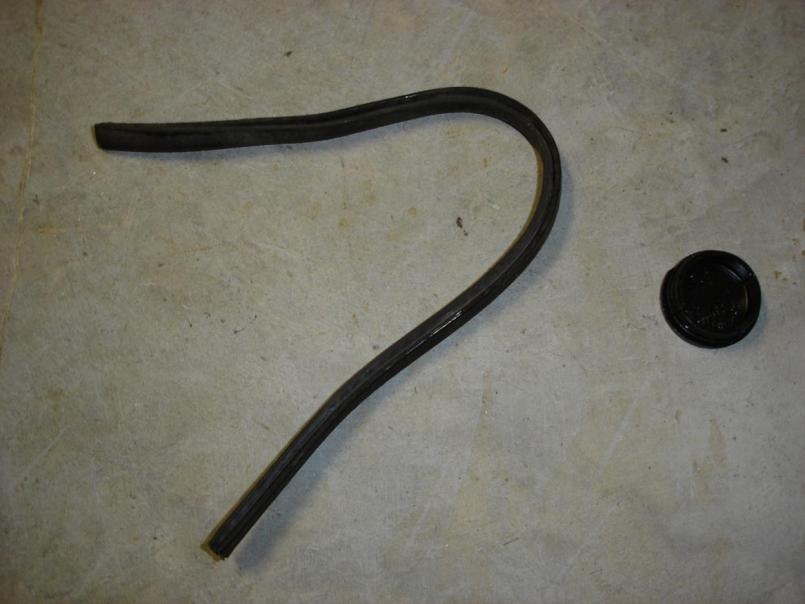 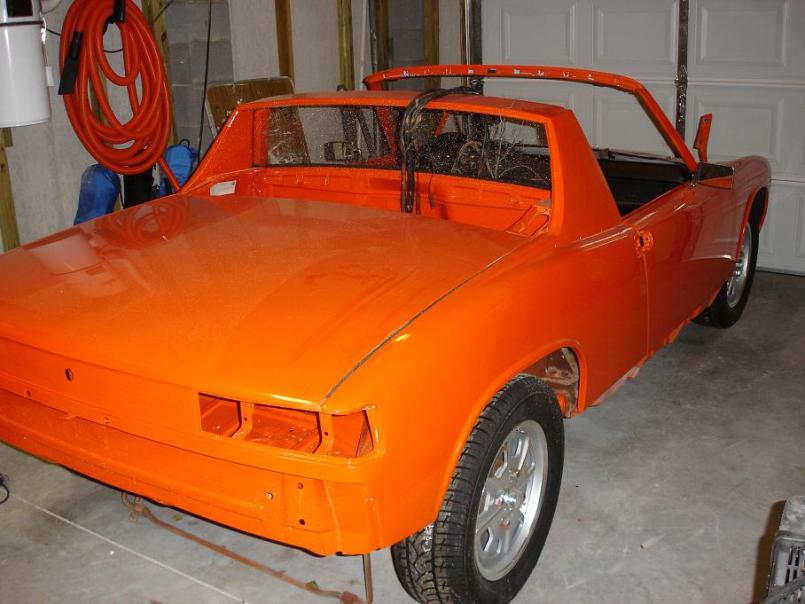 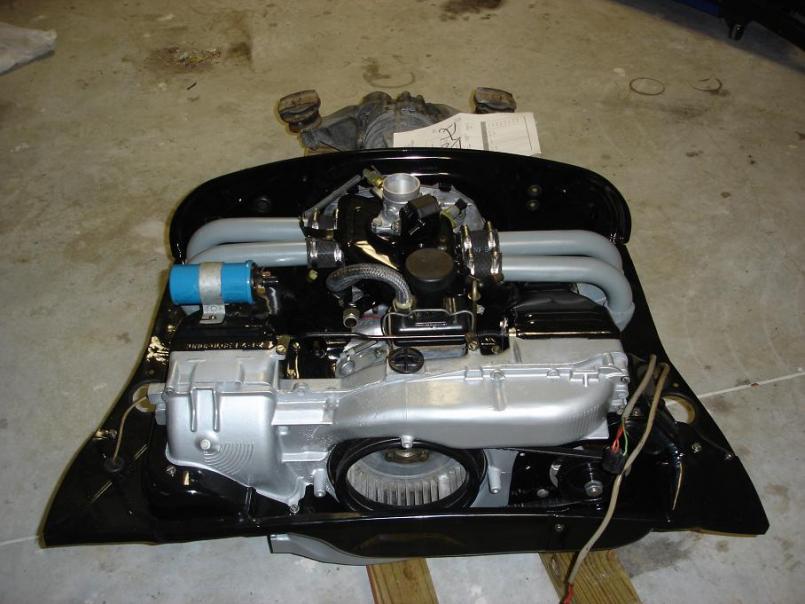 |
   |

 
|
  |
Replies(1 - 19)
| Bogaat |
Oct 2 2007, 04:34 PM
Post
#2
|
|
Member Group: Members Posts: 195 Joined: 8-January 07 From: Charleston, SC Member No.: 7,436 |
  |
|
|
|
| Tom |
Oct 2 2007, 06:37 PM
Post
#3
|
|
Advanced Member Group: Members Posts: 2,139 Joined: 21-August 05 From: Port Orchard, WA 98367 Member No.: 4,626 Region Association: None |
Bogaat,
Looking good. Can't help with where the parts go, sorry. If you are using the fuel inj., make sure you do a continuity check on all of the connectios while you have it out. Also check all of the wiring from the 12 pin connector at the relay board to the different places those wires go. I did mine while the engine was out and found several bad connections. Keep up the good work. Tom |
|
|
|
| SLITS |
Oct 2 2007, 06:45 PM
Post
#4
|
|
"This Utah shit is HARSH!" Group: Benefactors Posts: 13,602 Joined: 22-February 04 From: SoCal Mountains ... Member No.: 1,696 Region Association: None |
The long black piece is either a vacuum hose or trim for the engine grill edge.
The other round thingy appears to be the plastic plug to access the torque converter bolts. Goes in the round hole in the back of the engine case. |
|
|
|
| Bogaat |
Oct 2 2007, 09:22 PM
Post
#5
|
|
Member Group: Members Posts: 195 Joined: 8-January 07 From: Charleston, SC Member No.: 7,436 |
Thanks for the reponse on the parts...both wrong though. Those pieces are all in and accounted for. Any other thoughts?
(IMG:style_emoticons/default/beer3.gif) Here is the beast before I tore into it... 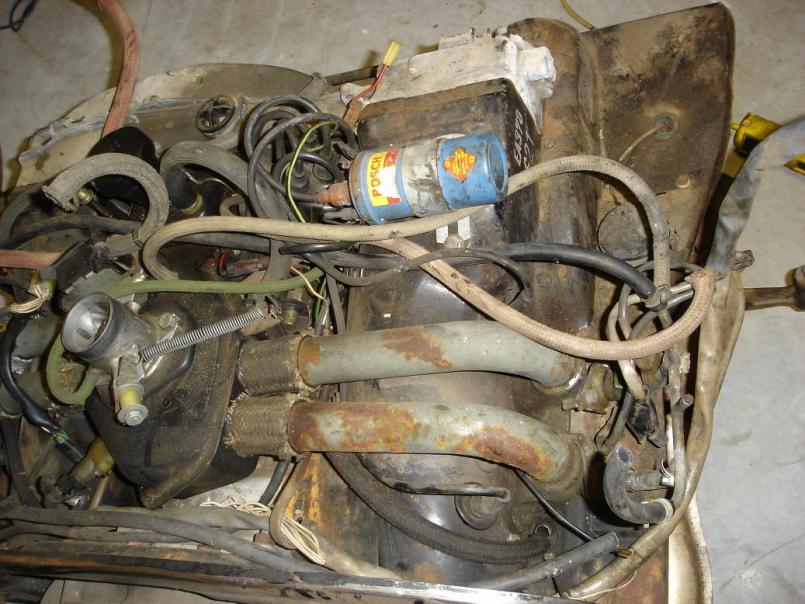 |
|
|
|
| SLITS |
Oct 2 2007, 09:35 PM
Post
#6
|
|
"This Utah shit is HARSH!" Group: Benefactors Posts: 13,602 Joined: 22-February 04 From: SoCal Mountains ... Member No.: 1,696 Region Association: None |
Well since the photo is dark and I can't tell relative size to anything .... and yes, I pulled it into Photoshop and tried to blow it up and lighten it.
Last two Heater "J" tube cap off .... '74 and above with only a single feed from the blower to the HEs Window "fuzzy" strip So, whadda ya want for free? Throw 'em into the trash ... you don't need them. |
|
|
|
| Hammy |
Oct 2 2007, 10:56 PM
Post
#7
|
|
mr. Wonderful Group: Members Posts: 1,826 Joined: 20-October 04 From: Columbia, California Member No.: 2,978 Region Association: Northern California |
How'd you get everything so clean?
|
|
|
|
| effutuo101 |
Oct 2 2007, 11:44 PM
Post
#8
|
|
Advanced Member Group: Members Posts: 2,734 Joined: 10-April 05 From: Lemon Grove Member No.: 3,914 Region Association: Southern California |
(IMG:style_emoticons/default/beer.gif) (IMG:style_emoticons/default/FERG.gif) (IMG:style_emoticons/default/beer.gif) (IMG:style_emoticons/default/FERG.gif) (IMG:style_emoticons/default/gint.gif) (IMG:style_emoticons/default/FERG.gif) (IMG:style_emoticons/default/whip[1].gif) (IMG:style_emoticons/default/FERG.gif)
we need a paint smiley. (IMG:style_emoticons/default/drunk.gif) |
|
|
|
| Bogaat |
Oct 3 2007, 06:50 AM
Post
#9
|
|
Member Group: Members Posts: 195 Joined: 8-January 07 From: Charleston, SC Member No.: 7,436 |
QUOTE(Hammy @ Oct 3 2007, 12:56 AM)  How'd you get everything so clean? Pressure wash and a trip to the powder coaters for most of it. I did paint random small items and took a wire brush to the case. |
|
|
|
| So.Cal.914 |
Oct 3 2007, 06:56 AM
Post
#10
|
|
"...And it has a front trunk too." Group: Members Posts: 6,588 Joined: 15-February 04 From: Low Desert, CA./ Hills of N.J. Member No.: 1,658 Region Association: None |
(IMG:style_emoticons/default/agree.gif)
If you can't find where they go it was probably over engineered anyway. The long black thing does look like it covers the edge of sheetmetal somewhere. |
|
|
|
| Bogaat |
Oct 3 2007, 06:58 AM
Post
#11
|
|
Member Group: Members Posts: 195 Joined: 8-January 07 From: Charleston, SC Member No.: 7,436 |
QUOTE(SLITS @ Oct 2 2007, 11:35 PM) Well since the photo is dark and I can't tell relative size to anything .... and yes, I pulled it into Photoshop and tried to blow it up and lighten it. Last two Heater "J" tube cap off .... '74 and above with only a single feed from the blower to the HEs Window "fuzzy" strip So, whadda ya want for free? Throw 'em into the trash ... you don't need them. Thanks for the feedback. I will try to take a better pic and find parts numbers. The cap is about the size of a quarter and is threaded with a flat side on the "circle" top. The bendy strip is about a foot long. I am 99% sure it came off of the engine as it was in that pile of stuff. |
|
|
|
| type47 |
Oct 3 2007, 09:37 AM
Post
#12
|
|
Viermeister Group: Members Posts: 4,254 Joined: 7-August 03 From: Vienna, VA Member No.: 994 Region Association: MidAtlantic Region |
the "bendy thing about a foot long" could be a piece that fits on the edge of the engine tin that is the vertical piece on the flywheel end of the engine, like an edge guard. the rubber seals in the mounts in the engine bay will touch the edges of the engine sheet metal. i think that piece is a "guard" on the end/edge of the sheet metal.
|
|
|
|
| jasons |
Oct 3 2007, 09:53 AM
Post
#13
|
|
Jackstand Extraordinaire Group: Members Posts: 2,002 Joined: 19-August 04 From: Scottsdale, AZ Member No.: 2,573 Region Association: None |
Looks great! One small piece of advice.... Make sure you are getting a good ground between the alternator and the case. I think powdercoating the alt brackets can induce some resistance. I powdercoated all my stuff and it wasn't a problem.
|
|
|
|
| Bogaat |
Oct 3 2007, 09:56 AM
Post
#14
|
|
Member Group: Members Posts: 195 Joined: 8-January 07 From: Charleston, SC Member No.: 7,436 |
QUOTE(jasons @ Oct 3 2007, 11:53 AM) Looks great! One small piece of advice.... Make sure you are getting a good ground between the alternator and the case. I think powdercoating the alt brackets can induce some resistance. I powdercoated all my stuff and it wasn't a problem. Thanks man. I am good to go there...I decided against using powder on those and the shroud (used a ceramic spray paint and a spray clear coat). I have heard stories on here and decided to avoid them. I even ground the paint I put on there to be sure I was good (IMG:style_emoticons/default/beer3.gif) |
|
|
|
| Demick |
Oct 3 2007, 10:28 AM
Post
#15
|
|
Ernie made me do it! Group: Benefactors Posts: 2,312 Joined: 6-February 03 From: Pleasanton, CA Member No.: 257 |
Small black cap could be the cap that goes on the PCV valve (inside the oil filler box). About the size of a quarter.
|
|
|
|
| Bogaat |
Oct 3 2007, 10:47 AM
Post
#16
|
|
Member Group: Members Posts: 195 Joined: 8-January 07 From: Charleston, SC Member No.: 7,436 |
|
|
|
|
| Bogaat |
Oct 3 2007, 10:53 AM
Post
#17
|
|
Member Group: Members Posts: 195 Joined: 8-January 07 From: Charleston, SC Member No.: 7,436 |
QUOTE(Bogaat @ Oct 3 2007, 12:47 PM) and could this be my cap? Not sure how it is supposed to fit in there...have to go home and check it out. Number 37 http://www.pelicanparts.com/PartsLookup/HT...5-05-Frame3.htm |
|
|
|
| Bogaat |
Oct 3 2007, 11:06 AM
Post
#18
|
|
Member Group: Members Posts: 195 Joined: 8-January 07 From: Charleston, SC Member No.: 7,436 |
QUOTE(Demick @ Oct 3 2007, 12:28 PM) Small black cap could be the cap that goes on the PCV valve (inside the oil filler box). About the size of a quarter. http://www.pelicanparts.com/PartsLookup/HT...4-05-Frame3.htm Time to go home and dig... Thanks all! (IMG:style_emoticons/default/beer3.gif) |
|
|
|
| Bogaat |
Oct 3 2007, 09:23 PM
Post
#19
|
|
Member Group: Members Posts: 195 Joined: 8-January 07 From: Charleston, SC Member No.: 7,436 |
QUOTE(Demick @ Oct 3 2007, 12:28 PM) Small black cap could be the cap that goes on the PCV valve (inside the oil filler box). About the size of a quarter. #9 http://www.pelicanparts.com/PartsLookup/HT...4-05-Frame3.htm By the part number... that seems to be it! How the heck does it attach? I haven't taken off the filler neck yet, but did the PCV. I am not seeing it. Thanks! |
|
|
|
| Demick |
Oct 3 2007, 09:38 PM
Post
#20
|
|
Ernie made me do it! Group: Benefactors Posts: 2,312 Joined: 6-February 03 From: Pleasanton, CA Member No.: 257 |
It just snaps onto the bottom of the PCV valve. But it doesn't stay on very well. It's very common for them to fall off and you'll find it in the engine recess where the oil filler box sits. Luckily they can't quite get all the way into the engine.
|
|
|
|
|
1 User(s) are reading this topic (1 Guests and 0 Anonymous Users)
0 Members:

|
Lo-Fi Version | Time is now: 17th May 2024 - 02:26 PM |
Invision Power Board
v9.1.4 © 2024 IPS, Inc.