|
|
|
Porsche, and the Porsche crest are registered trademarks of Dr. Ing. h.c. F. Porsche AG.
This site is not affiliated with Porsche in any way. Its only purpose is to provide an online forum for car enthusiasts. All other trademarks are property of their respective owners. |
|
|


| toon1 |
 Oct 28 2007, 09:04 PM Oct 28 2007, 09:04 PM
Post
#1
|
|
Senior Member  Group: Members Posts: 1,849 Joined: 29-October 05 From: tracy,ca Member No.: 5,022 |
so far the liift is good, cam card say's .426, I've got about .428.
Here is a pic. with the vave at half lift. Seems a little off(leaning back) to me. Attached image(s) 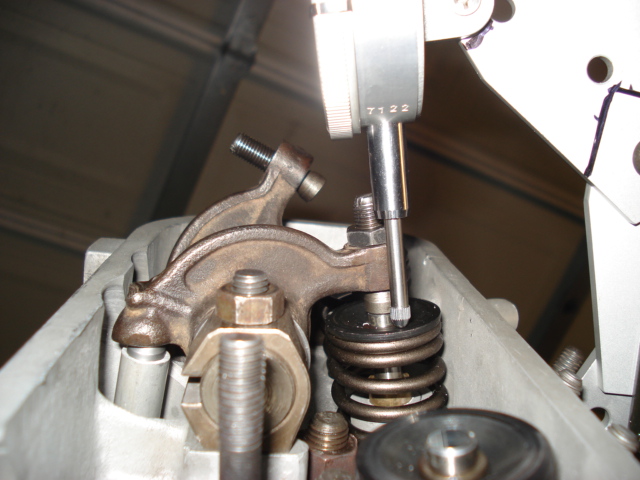 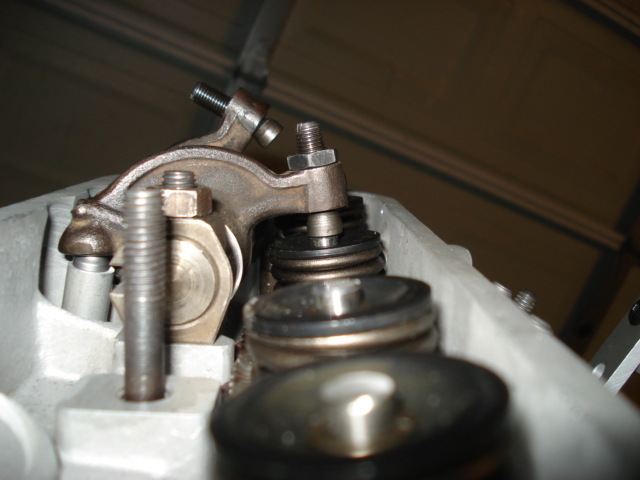
|
   |

 
|
  |
Replies(1 - 19)
| toon1 |
Oct 28 2007, 09:20 PM
Post
#2
|
|
Senior Member Group: Members Posts: 1,849 Joined: 29-October 05 From: tracy,ca Member No.: 5,022 |
here are somemore pics of the spacers. notice the stagered washers. This seemed necassary to get the adjusters to line up with the valvge stem.
Attached image(s) 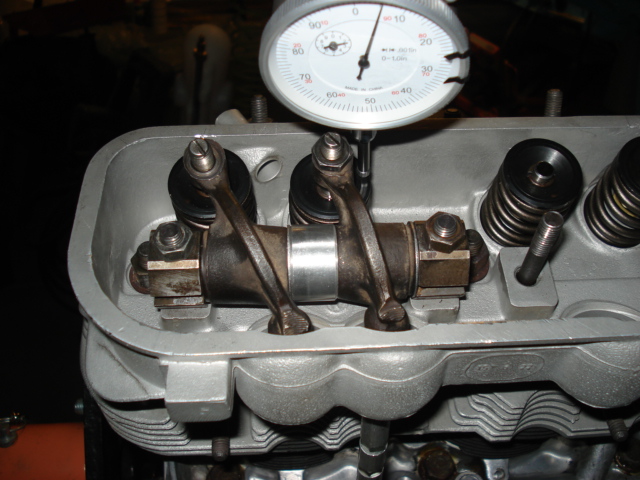 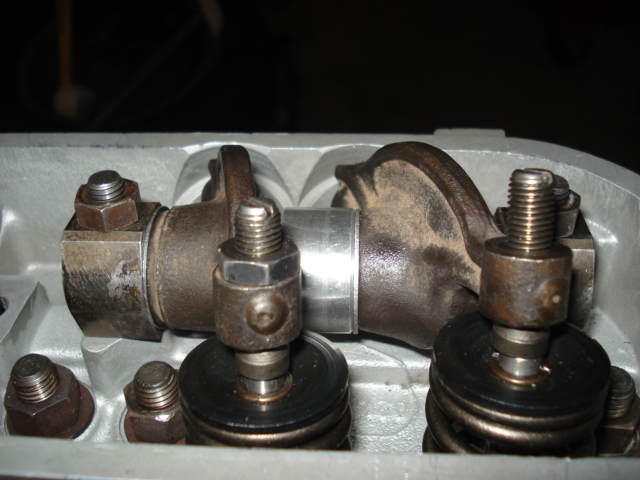
|
|
|
|
| toon1 |
Oct 28 2007, 09:20 PM
Post
#3
|
|
Senior Member Group: Members Posts: 1,849 Joined: 29-October 05 From: tracy,ca Member No.: 5,022 |
one more
Attached image(s) 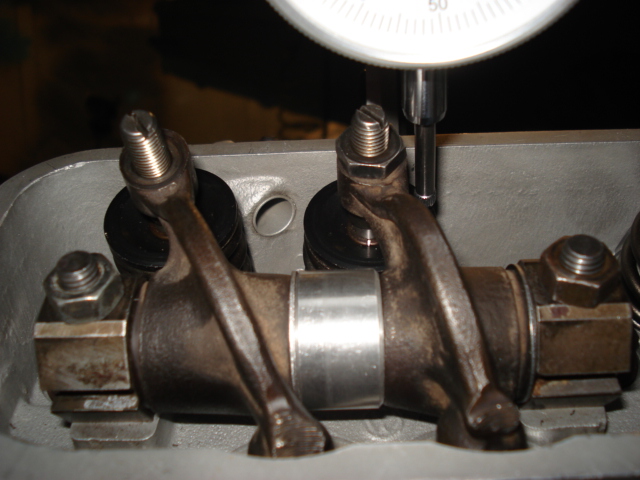
|
|
|
|
| Twystd1 |
Oct 28 2007, 11:16 PM
Post
#4
|
|
You don't want to know... really..... Group: Members Posts: 2,515 Joined: 12-September 04 From: Newport Beach, California Member No.: 2,743 |
Did you mill your rockers about 60 thou for those 9eleben adjusters?
And yes your adjuster is not parallel to the valve stem. And you have no adjusting room left on your swivel foot. (Bad) What cam do you have? Me thinks you might need rocker pad shims. Yes you sometimes have to move washers around to make it work. PM Craig Downs and have him look at your pics. HE IS VERY GOOD AT GEO. He can show you some tricks to make your life easier. Bottom line: For me it ain't right. Clayton |
|
|
|
| Joe Ricard |
Oct 29 2007, 06:08 AM
Post
#5
|
|
CUMONIWANNARACEU Group: Members Posts: 6,811 Joined: 5-January 03 From: Gautier, MS Member No.: 92 |
Hey what kinda push rod is that?
Did you make one out of an old stock one? ya know that the ball tip is a different size. and where it you oil for the rockers? them need to ne oiled or you will be really screwing things up. You dial indicator is not on in the same plane as the valve stem, it makes a difference. Just for reference my adjusters have 3-4 threads before bottoming out. Well you aked if it looks good Honesty sucks huh? |
|
|
|
| TC.356 |
Oct 29 2007, 07:34 AM
Post
#6
|
|
Member Group: Members Posts: 83 Joined: 10-January 07 From: Massachusetts Member No.: 7,443 |
Shims beneath the rocker assemblies and longer (adjustable?) push rods might be necessary here. Help flatten out the rocker arm and build in some adjustability.
|
|
|
|
| toon1 |
Oct 29 2007, 09:29 AM
Post
#7
|
|
Senior Member Group: Members Posts: 1,849 Joined: 29-October 05 From: tracy,ca Member No.: 5,022 |
QUOTE(Joe Ricard @ Oct 29 2007, 05:08 AM)  Hey what kinda push rod is that? Did you make one out of an old stock one? ya know that the ball tip is a different size. and where it you oil for the rockers? them need to ne oiled or you will be really screwing things up. You dial indicator is not on in the same plane as the valve stem, it makes a difference. Just for reference my adjusters have 3-4 threads before bottoming out. Well you aked if it looks good Honesty sucks huh? The truth does NOT hurt in this case. I didn't post because I was proud of what I did, I thought something was wrong and needed help. I'm getting the answers I was looking for. Thank you! Yes, the p/r was made from a stock p/r. I drilled the ends and installed the correct tips. You mentioned oil for the rockers, should it be on the tips of the adjusters? I placed the dial indicator back into position for the pic but didn,t really alighn it well with the valve stem. When I am checking the lift I make sure it's alighned. It's good to know about the amount of threads that should be exposed. I did take the .060 off the rocker for clearance. I will try some shims this eve. thank's again, Keith |
|
|
|
| Joe Ricard |
Oct 29 2007, 10:26 AM
Post
#8
|
|
CUMONIWANNARACEU Group: Members Posts: 6,811 Joined: 5-January 03 From: Gautier, MS Member No.: 92 |
I oil the rocker shafts with the same oil I do everything else with. left-over 10W-30 You know from a partial bottle.
Hmm good idea about the stock push rod and the Manton tips. (wish I woulda thought of that. Might still think of of that as a matter of fact. |
|
|
|
| G e o r g e |
Oct 29 2007, 10:33 AM
Post
#9
|
|
Dr Group: Members Posts: 1,905 Joined: 20-September 05 From: Southern Cal Member No.: 4,832 Region Association: None |
QUOTE(toon1 @ Oct 29 2007, 08:29 AM) You mentioned oil for the rockers, should it be on the tips of the adjusters? I believe Joe is asking if you put any oil on your rockers, they look way to dry edit joe beat me to it |
|
|
|
| toon1 |
Oct 29 2007, 11:24 AM
Post
#10
|
|
Senior Member Group: Members Posts: 1,849 Joined: 29-October 05 From: tracy,ca Member No.: 5,022 |
there is oil on the rocker shafts, I didnt' oil the rockers themselvs.
I will put oil on tip of the adjuster tonight. Joe I will take a pic of how I moded the p/r if you'd like. |
|
|
|
| Joe Ricard |
Oct 29 2007, 11:44 AM
Post
#11
|
|
CUMONIWANNARACEU Group: Members Posts: 6,811 Joined: 5-January 03 From: Gautier, MS Member No.: 92 |
What really want to know is how much of a clearance do you have between valve and piston.
Just for reference. I am aiming for .100 but don't think I am going to make it. Using play-doh as the measuring medium. |
|
|
|
| toon1 |
Oct 31 2007, 12:23 AM
Post
#12
|
|
Senior Member Group: Members Posts: 1,849 Joined: 29-October 05 From: tracy,ca Member No.: 5,022 |
here are some more pics. I added .030 shims under the rockers blocks. the alignment looks good to me BUT the swivel foot is still far into the rocker.
I took the .060 off the rocker, how much more can I take off? The cam card say's.426, I am getting .436, still within 5%. Attached image(s) 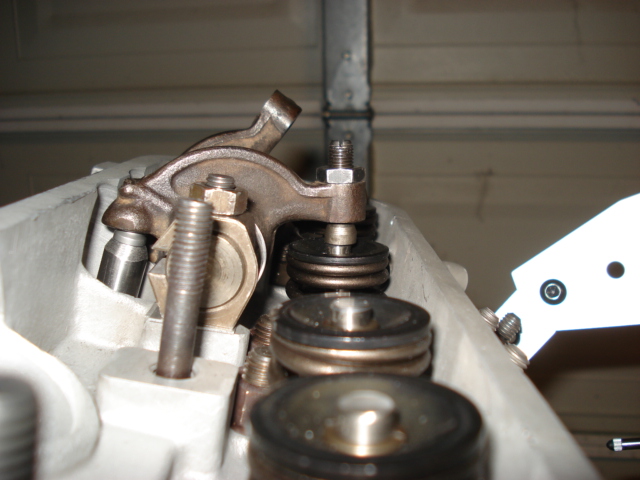 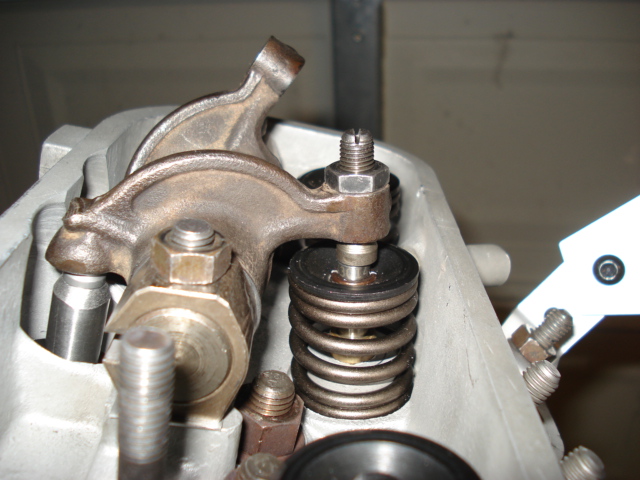
|
|
|
|
| toon1 |
Oct 31 2007, 12:24 AM
Post
#13
|
|
Senior Member Group: Members Posts: 1,849 Joined: 29-October 05 From: tracy,ca Member No.: 5,022 |
2 more
Attached image(s) 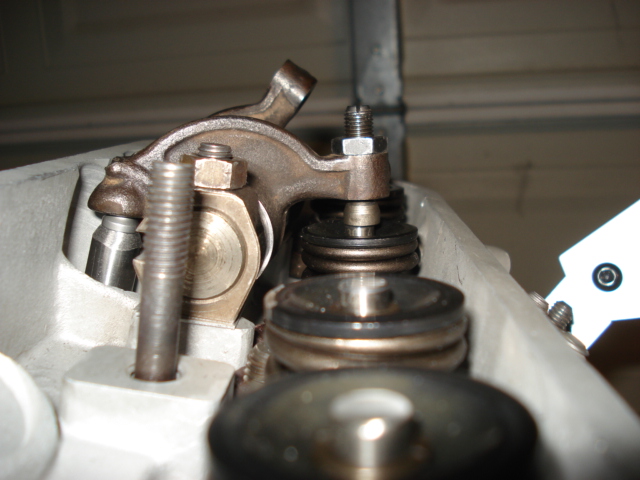 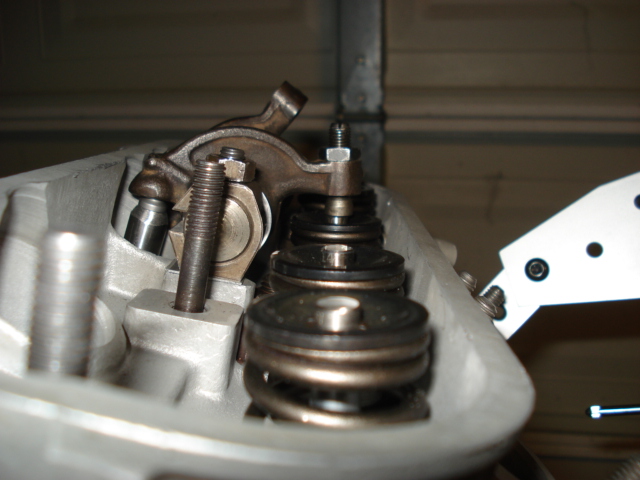
|
|
|
|
| Twystd1 |
Oct 31 2007, 01:13 AM
Post
#14
|
|
You don't want to know... really..... Group: Members Posts: 2,515 Joined: 12-September 04 From: Newport Beach, California Member No.: 2,743 |
Uhhhh...
1) Are you setting up your rocker GEO at HALF LIFT...??????? (I don't see that in these last pics) 2) AND are you using an adjustable pushrod to check GEO????? 3) If so (see #2) Is the adjustable pushrod have the same tip as the the other 8 full length pushrods that you will be installing in your engine? 4) Have you read Jakes article on Rocker GEO at his web site? It's a long read. And it might help you figure this out. Clayton |
|
|
|
| toon1 |
Oct 31 2007, 11:15 AM
Post
#15
|
|
Senior Member Group: Members Posts: 1,849 Joined: 29-October 05 From: tracy,ca Member No.: 5,022 |
QUOTE(Twystd1 @ Oct 31 2007, 12:13 AM) Uhhhh... 1) Are you setting up your rocker GEO at HALF LIFT...??????? (I don't see that in these last pics) 2) AND are you using an adjustable pushrod to check GEO????? 3) If so (see #2) Is the adjustable pushrod have the same tip as the the other 8 full length pushrods that you will be installing in your engine? 4) Have you read Jakes article on Rocker GEO at his web site? It's a long read. And it might help you figure this out. Clayton The second set of pics were taken with the rocker sitting at 1/2 lift. I am using the adjustable p/r to check geo The p/r does have the same tip I will be using I have read (and re read, and re read (IMG:style_emoticons/default/biggrin.gif) ) Jakes article. I had to make a new adjustable p/r. It's quite a bit better than the one I was using. I went through the whole process again with the new p/r, without the rocker block shims. Once that was complete, I was not satisfied with the 1/2 lift results so I added the shims and left the p/r locked at the same measurment. I then added the shims installed the p/r, adjusted the swivel foot to make contact with the valve and cycled the engine. The total lift was ok but the half lift geo was still off. I then made the corrections to the p/r and swivel foot. after the corrections the FULL lift was good(i lost about .002 total lift but well within the 5% range) and the 1/2 lift geo was quite a bit better. These are the second set of pics, after all the corrections, with he .030 shims and at half lift. My p/r measures 251mm end to end w/o the tips, so 271 total length I |
|
|
|
| toon1 |
Oct 31 2007, 07:52 PM
Post
#16
|
|
Senior Member Group: Members Posts: 1,849 Joined: 29-October 05 From: tracy,ca Member No.: 5,022 |
(IMG:style_emoticons/default/icon_bump.gif) el bumpo thank's guy's
|
|
|
|
| Twystd1 |
Oct 31 2007, 08:47 PM
Post
#17
|
|
You don't want to know... really..... Group: Members Posts: 2,515 Joined: 12-September 04 From: Newport Beach, California Member No.: 2,743 |
Do me a favor.....
Throw a straight edge across ALL 4 valve stems. Tell me if they are all the same length give or take a hair. And your last pictures look MUCH closer to correct. Clayton |
|
|
|
| toon1 |
Oct 31 2007, 10:20 PM
Post
#18
|
|
Senior Member Group: Members Posts: 1,849 Joined: 29-October 05 From: tracy,ca Member No.: 5,022 |
with the sraight edge on the tops of the valve stems.
the biggest gap I had was .013 on the #3 ex valve. The other gap was .004 |
|
|
|
| Twystd1 |
Nov 1 2007, 12:16 AM
Post
#19
|
|
You don't want to know... really..... Group: Members Posts: 2,515 Joined: 12-September 04 From: Newport Beach, California Member No.: 2,743 |
Your gaps are survivable.
If ya want it perfect. You will have to cut the stems to match height. Or get a new valve job. (not needed) (just depends on how anal you are) It looks like you are on the right path. Just keep it going. The first ones are the hardest. Then it gets faster. (NOT easier) Here is a trick that Craig Downs taught me. Grab yourself a stock pushrod (PS) Cut it in half. (Hack saw or Lathe or arrow/pipe cutter) Then thread the hollow end with the same thread as your rocker arm adjuster. Then simply screw the half PS onto your adjusters. Place one on the intake and and one on the exhaust adjuster (the pair you are working on) It will look like you just made the adjuster threaded section about 4 inches long. Now with these extensions screwed onto the adjuster. It is MUCH easier to visually see the alignment of the adjuster VS the stem angle as you look across the valve train. It's kinda like trying trying to make a big wall plumb with a 2 inch level. If you put a 6 foot level on the wall. You can stand back and really see the angles easily. This a GREAT tool to see what the hell you are doing. I can't thank Craig enough for this tip. (IMG:style_emoticons/default/KMA.gif) It works very well and saves time. This tool should be mandatory for a first timer. (as well as us old guys with shit for eyes) As it SHOWS the stem / rocker angles in a way that you can get your HEAD AND EYES INVOLVED IN THE PROCESS WITHOUT HAVING TO CONSTANTLY SECOND GUESS WHAT YOU ARE REALLY SEEING. By the way. While you are in there. Just for shits and grins. After you have set your GEO on one pair of Intakes and Exhaust valves. Run the cam up to full lift. Check how much clearance you have for coil bind. Since I have no clue what you are using for springs. This is always a good practice. Coil bind kills parts... QUICK. It's also a good time to find out if any valves are hitting pistons once the GEO is done on one cylinder. If you are building a known combo. This will probably not be a problem. Just thought you might like the technical exercise. I dunno. Is there anything else we can help you with? If we are lucky. Jake will pop in and take us all to school. I reiterate. PM Craig Downs for more input. He is VERY good with this and he taught me a trick or 2 I that didn't know. But he is kinda ugly and smells bad.... Thats just some of the shit you have to put up with dealing with Craig. (IMG:style_emoticons/default/chair.gif) (IMG:style_emoticons/default/agree.gif) Cheers, Clayton |
|
|
|
| craig downs |
Nov 1 2007, 01:29 AM
Post
#20
|
|
Senior Member Group: Members Posts: 769 Joined: 25-November 05 From: mira loma ca. Member No.: 5,189 Region Association: Southern California |
ahhhhh I guess its time to say something and probably will get spanked but what the hell.
While I was doing mine it was difficult to see the adjuster lining up with the valve stem. So I thought if the adjuster stem was a little bit longer it would be easier to see the angle. What I came up with was to cut about a 4" piece from a stock push rod and chuck it up in a lathe and face the cut end so it will be square. Then tapped the end to thread over the stem of adjuster. Then I took a valve with a flat face and set it on top of the valve stem next to the one I was measuring and lined it up with the extension I made. It really made it easier to see. If anyone is interested I can take some pics. |
|
|
|
|
1 User(s) are reading this topic (1 Guests and 0 Anonymous Users)
0 Members:

|
Lo-Fi Version | Time is now: 2nd May 2026 - 07:21 AM |
Invision Power Board
v9.1.4 © 2026 IPS, Inc.