|
|
|
Porsche, and the Porsche crest are registered trademarks of Dr. Ing. h.c. F. Porsche AG.
This site is not affiliated with Porsche in any way. Its only purpose is to provide an online forum for car enthusiasts. All other trademarks are property of their respective owners. |
|
|


| my928s4 |
 Nov 25 2007, 03:13 PM Nov 25 2007, 03:13 PM
Post
#101
|
|
Member  Group: Members Posts: 349 Joined: 18-August 07 From: Spokane, WA Member No.: 8,018 Region Association: Pacific Northwest |
So a couple months back I posted about getting a hold of the project candidate,
feel like I have moved on from that so thought it I would post some pics on progress and I will add to this thread as time (and progress) goes on. I did not get around to stripping the car down till earlier in the month as I drove my 928 down to Sharktoberfest in LA and I was performing last minute tinkering before the drive. Anyway back to 914 subject matter, the good news is I have not found too many issues which is a relief and I can start to order parts and make some investment in tools. It is a perfect time of year for indoor projects as it is below freezing all the time now and skiing does not start here till after xmas. Surface rust and dirt in the front trunk but that is about it, will need to repiar a couple of areas around the hood seal. 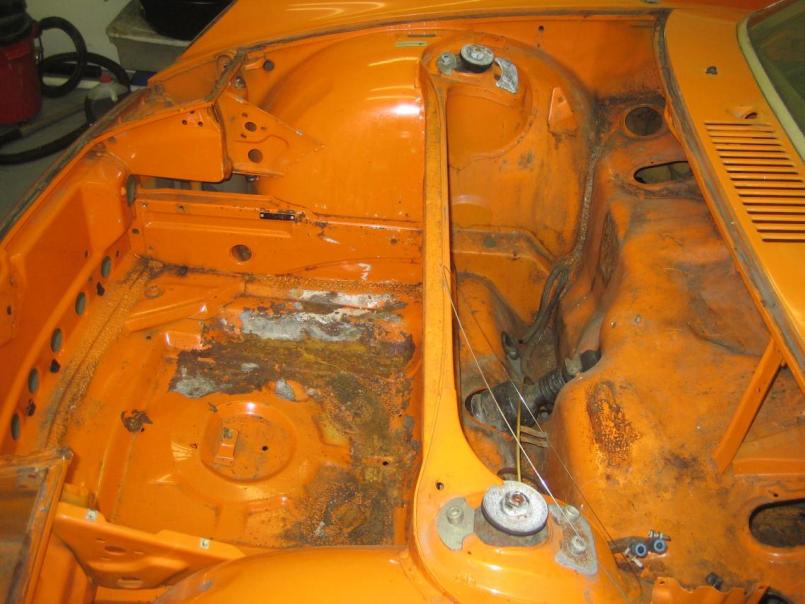 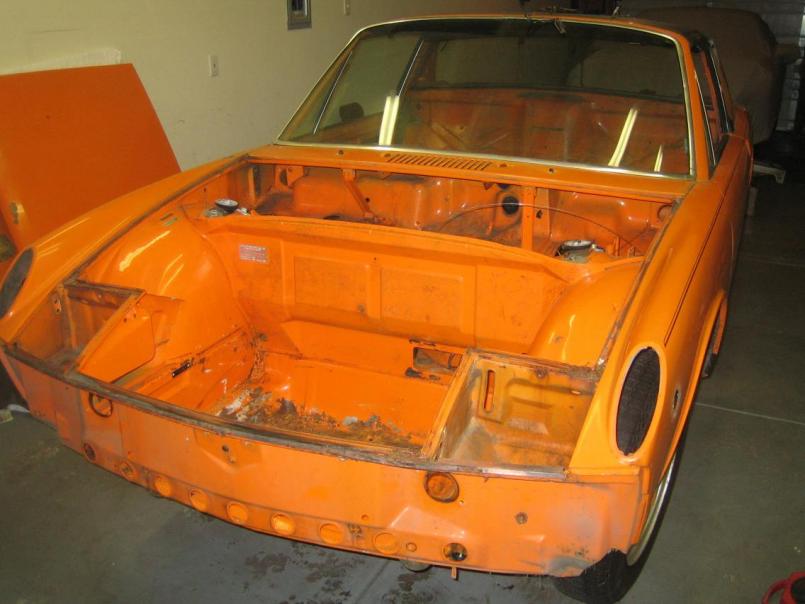  Chris |
   |

 
|
Posts in this topic
my928s4 Orange 75 project Nov 25 2007, 03:13 PM my928s4 Interior needs a bit more work, car was in Seattle... Nov 25 2007, 03:16 PM my928s4 Some more surface rust around the pedals but every... Nov 25 2007, 03:20 PM my928s4 Despite prodigous prodding with a large screwdrive... Nov 25 2007, 03:24 PM orthobiz I love orange! Keep posting progress and good ... Nov 25 2007, 08:16 PM Dan (Almaden Valley) save the orange cars :D
keep up the good work...... Nov 25 2007, 08:23 PM 9146FAN :agree:
Orange is the best. Looking good! Nov 25 2007, 10:04 PM my928s4 OK got a couple of hours in yesterday and today wi... Dec 30 2007, 02:30 PM my928s4 The bad
The good
Dec 30 2007, 02:35 PM my928s4 Messed up. Dec 30 2007, 02:37 PM scotty b rear pan section is definitely needed. IMHO that s... Dec 30 2007, 05:18 PM
my928s4 Interior needs a bit more work, car was in Seattle... Nov 25 2007, 03:16 PM my928s4 Some more surface rust around the pedals but every... Nov 25 2007, 03:20 PM my928s4 Despite prodigous prodding with a large screwdrive... Nov 25 2007, 03:24 PM orthobiz I love orange! Keep posting progress and good ... Nov 25 2007, 08:16 PM Dan (Almaden Valley) save the orange cars :D
keep up the good work...... Nov 25 2007, 08:23 PM 9146FAN :agree:
Orange is the best. Looking good! Nov 25 2007, 10:04 PM my928s4 OK got a couple of hours in yesterday and today wi... Dec 30 2007, 02:30 PM my928s4 The bad
The good
Dec 30 2007, 02:35 PM my928s4 Messed up. Dec 30 2007, 02:37 PM scotty b rear pan section is definitely needed. IMHO that s... Dec 30 2007, 05:18 PM my928s4 B)-->
QUOTE(scotty b @ D... Dec 30 2007, 07:13 PM
 my928s4 B)-->
my928s4 B)-->QUOTE(scotty b @ D... Dec 30 2007, 09:17 PM
McMark I would section in the rear pan, not do a complete... Dec 30 2007, 10:59 PM
my928s4 So while making progress with the grinder and wire... Jan 13 2008, 05:51 PM
my928s4 And then a 2nd coat, looked pretty good so I will ... Jan 13 2008, 05:55 PM
my928s4 OK, couple of questions.
What should I do with th... Jan 13 2008, 05:59 PM
scotty b IMO the jack post should ALWAYS be cut out as they... Jan 13 2008, 06:48 PM
my928s4 B)-->
McMark I would section in the rear pan, not do a complete... Dec 30 2007, 10:59 PM my928s4 So while making progress with the grinder and wire... Jan 13 2008, 05:51 PM my928s4 And then a 2nd coat, looked pretty good so I will ... Jan 13 2008, 05:55 PM my928s4 OK, couple of questions.
What should I do with th... Jan 13 2008, 05:59 PM scotty b IMO the jack post should ALWAYS be cut out as they... Jan 13 2008, 06:48 PM my928s4 B)-->QUOTE(scotty b @ J... Jan 14 2008, 08:36 AM
finstermojo When i did my resto and did the same thing you are... Jan 13 2008, 08:12 PM
my928s4
When i did my resto and did the same thing you ar... Jan 14 2008, 08:40 AM
sixaddict Thanks for post on rust bullet info. I asked a wel... Feb 8 2009, 04:05 AM
 my928s4
Thanks for post on rust bullet info. I asked a we... Feb 12 2009, 09:12 PM
my928s4
Thanks for post on rust bullet info. I asked a we... Feb 12 2009, 09:12 PM
my928s4 Still waiting for the rear pan (should be here nex... Jan 27 2008, 11:44 AM
Root_Werks I have seen many-o-914's and your's is not... Jan 27 2008, 06:54 PM
my928s4
I have seen many-o-914's and your's is no... Jan 27 2008, 07:24 PM
my928s4 Cleaned up the battery area in the engine bay when... Jan 27 2008, 07:31 PM
bandjoey In the Jan 13 post you've just finished cleani... Jan 27 2008, 08:25 PM
my928s4
In the Jan 13 post you've just finished clean... Jan 27 2008, 10:17 PM
my928s4 OK so still waiting for the floor panel so I decid... Feb 3 2008, 09:08 PM
my928s4 OK so still waiting for the floor panel so I decid... Feb 3 2008, 09:09 PM
my928s4 Here are the two holes after grinding. Feb 3 2008, 09:13 PM
my928s4 So bumper shock holes are now done, last one went ... Feb 9 2008, 04:50 PM
my928s4 OK now onto the BIG job of the day, the floor pan ... Feb 9 2008, 04:53 PM
my928s4 Got the wire wheel attachment on the grinder and d... Feb 10 2008, 04:44 PM
my928s4 Another weekend lying mainly under the car, I thou... Feb 17 2008, 09:22 PM
my928s4 I ordered some seat mount hinges from restoration ... Feb 17 2008, 09:25 PM
jim912928 Excellent progress! Feb 17 2008, 10:24 PM
my928s4 OK, spent some serious time on the car yesterday a... Feb 24 2008, 06:39 PM
my928s4 Well it has been a while, had a never ending honey... May 24 2008, 10:11 PM
my928s4 After grinding and 120 grit sander
Passenger si... May 24 2008, 10:13 PM
my928s4 Antenna hole, this one did not come out as well ..... May 24 2008, 10:17 PM
my928s4 Finally the drivers side, I posted pics of the rus... May 24 2008, 10:20 PM
my928s4 It has been a while, this summer I spent doing oth... Oct 26 2008, 11:05 AM
my928s4 Two new rear jack points were welded in.
Here y... Oct 26 2008, 11:09 AM
plymouth37 Nice project! You are well on your way to a gr... Oct 26 2008, 12:32 PM
Gint :agree:
You're doing some nice work there. K... Oct 26 2008, 12:51 PM
my928s4 Thanks for the words of encouragement, learning a ... Oct 27 2008, 11:08 PM
9146986 After you tack the perimeter of the stiffening pla... Oct 28 2008, 12:10 AM
charliew Your work looks really good for your experience le... Oct 28 2008, 12:47 AM
Cheapsnake Very nice work there and an inspiration to those o... Oct 28 2008, 09:56 AM
blabla914 good looking work. Lots of hard, dirty work to ma... Oct 28 2008, 12:02 PM
bandjoey Now that it's many moons since the first coat ... Oct 28 2008, 10:53 PM
my928s4
After you tack the perimeter of the stiffening pl... Oct 29 2008, 07:59 AM
watsonrx13 BTW, if you can't find the copper plate, go to... Oct 29 2008, 12:33 PM
my928s4 After removing the undercoating I printed the temp... Nov 2 2008, 06:36 PM
my928s4
Last but not least I removed the front suspe... Nov 2 2008, 06:39 PM
Todd Enlund
Last but not least I removed the front suspension... Nov 29 2008, 02:34 PM
bigkensteele Please tell me that you are independently wealthy,... Nov 2 2008, 11:02 PM
my928s4
Please tell me that you are independently wealthy... Nov 29 2008, 01:24 PM
my928s4 I was going to leave most of the underside which I... Nov 29 2008, 01:32 PM
3d914 Chris,
Excellent job, and you're making great... Nov 29 2008, 03:49 PM
my928s4
I am curious about a couple of things. What type... Nov 29 2008, 04:49 PM
Lou W Chris,
You're doing a great job, keep up the ... Nov 29 2008, 11:42 PM
my928s4 Another long break but work has been progressing, ... Feb 7 2009, 10:25 PM
sendjonathanmail Looking good man, keep the pics and the progress c... Feb 7 2009, 10:33 PM
my928s4 So this week I decided to attach the flares as I n... Feb 7 2009, 10:36 PM
Todd Enlund
So this week I decided to attach the flares as I ... Feb 8 2009, 02:14 AM
my928s4 I bought a HF blasting cabinet and have been clean... Feb 7 2009, 10:40 PM
PanelBilly You've been busy. Looks good. Feb 8 2009, 01:35 AM
my928s4 OK, finished tack welding the rear flares.
G... Feb 12 2009, 09:17 PM
my928s4 I am finished (or hope I am) welding on the 1st fl... Feb 22 2009, 05:23 PM
charliew POR 15 has a tiecoat primer, it's baby blue co... Feb 26 2009, 11:26 PM
my928s4
POR 15 has a tiecoat primer, it's baby blue c... Mar 15 2009, 01:05 PM
my928s4 Got some parts plated, calipers came out crap so a... Mar 15 2009, 01:13 PM
my928s4 Still working on the fenders, got the third (passe... Mar 15 2009, 01:17 PM
charliew One things for sure Chris, you aren't afraid o... Mar 15 2009, 11:52 PM
al weidman Chris, I have the HF bead blast cabinet and am usi... Mar 16 2009, 09:00 PM
my928s4
One things for sure Chris, you aren't afraid ... Mar 16 2009, 09:42 PM
al weidman Chris, I also got the small vacuum system from HF ... Mar 16 2009, 09:46 PM
914Tom :popcorn: Mar 17 2009, 03:16 AM
nsr-jamie I love this post!! Awesome!! Keep ... Mar 17 2009, 05:42 AM
Phoenix914 I just read through this entire thread. What a fa... Mar 17 2009, 07:10 AM
my928s4 Went back to the local paint and supply shop and p... Mar 20 2009, 07:08 AM
my928s4 After the failed experiment with the Schutz I boug... Mar 20 2009, 07:12 AM
Kansas 914
After the failed experiment with the Schutz I bou... Mar 20 2009, 07:20 AM
dakotaewing I'll be doing the same with my project shortly... Mar 20 2009, 09:01 AM
914Tom why not apply a PVC coat and paint the underside a... Mar 20 2009, 11:05 AM
my928s4
How many cans did you use to coat the underside? ... Mar 20 2009, 11:50 AM
my928s4 Well not too much to report, I took a 3 week break... Apr 19 2009, 02:24 PM
charliew You might want to check out a caliper rebuild thre... Apr 19 2009, 05:19 PM
my928s4
You might want to check out a caliper rebuild thr... Apr 20 2009, 09:03 AM
MDG Chris, just finished reading through this thread; ... Apr 20 2009, 04:43 PM
my928s4
Chris, just finished reading through this thread;... Apr 20 2009, 06:52 PM
my928s4 At last the lowest part of the car is done, the 2n... Apr 25 2009, 04:43 PM
Lou W Sure looking good, very nice job. :beer2: Apr 25 2009, 08:34 PM
Slider Nice job Chris, keep up the good work you are an i... Apr 25 2009, 10:13 PM
charliew I held my fg rocker from aa up to my 75 body and I... Apr 26 2009, 09:39 PM
my928s4 Not too much going on but took some parts to the p... May 5 2009, 07:01 PM
finstermojo When i did my resto and did the same thing you are... Jan 13 2008, 08:12 PM my928s4
When i did my resto and did the same thing you ar... Jan 14 2008, 08:40 AM sixaddict Thanks for post on rust bullet info. I asked a wel... Feb 8 2009, 04:05 AM my928s4
Thanks for post on rust bullet info. I asked a we... Feb 12 2009, 09:12 PM my928s4 Still waiting for the rear pan (should be here nex... Jan 27 2008, 11:44 AM Root_Werks I have seen many-o-914's and your's is not... Jan 27 2008, 06:54 PM my928s4
I have seen many-o-914's and your's is no... Jan 27 2008, 07:24 PM my928s4 Cleaned up the battery area in the engine bay when... Jan 27 2008, 07:31 PM bandjoey In the Jan 13 post you've just finished cleani... Jan 27 2008, 08:25 PM my928s4
In the Jan 13 post you've just finished clean... Jan 27 2008, 10:17 PM my928s4 OK so still waiting for the floor panel so I decid... Feb 3 2008, 09:08 PM my928s4 OK so still waiting for the floor panel so I decid... Feb 3 2008, 09:09 PM my928s4 Here are the two holes after grinding. Feb 3 2008, 09:13 PM my928s4 So bumper shock holes are now done, last one went ... Feb 9 2008, 04:50 PM my928s4 OK now onto the BIG job of the day, the floor pan ... Feb 9 2008, 04:53 PM my928s4 Got the wire wheel attachment on the grinder and d... Feb 10 2008, 04:44 PM my928s4 Another weekend lying mainly under the car, I thou... Feb 17 2008, 09:22 PM my928s4 I ordered some seat mount hinges from restoration ... Feb 17 2008, 09:25 PM jim912928 Excellent progress! Feb 17 2008, 10:24 PM my928s4 OK, spent some serious time on the car yesterday a... Feb 24 2008, 06:39 PM my928s4 Well it has been a while, had a never ending honey... May 24 2008, 10:11 PM my928s4 After grinding and 120 grit sander
Passenger si... May 24 2008, 10:13 PM my928s4 Antenna hole, this one did not come out as well ..... May 24 2008, 10:17 PM my928s4 Finally the drivers side, I posted pics of the rus... May 24 2008, 10:20 PM my928s4 It has been a while, this summer I spent doing oth... Oct 26 2008, 11:05 AM my928s4 Two new rear jack points were welded in.
Here y... Oct 26 2008, 11:09 AM plymouth37 Nice project! You are well on your way to a gr... Oct 26 2008, 12:32 PM Gint :agree:
You're doing some nice work there. K... Oct 26 2008, 12:51 PM my928s4 Thanks for the words of encouragement, learning a ... Oct 27 2008, 11:08 PM 9146986 After you tack the perimeter of the stiffening pla... Oct 28 2008, 12:10 AM charliew Your work looks really good for your experience le... Oct 28 2008, 12:47 AM Cheapsnake Very nice work there and an inspiration to those o... Oct 28 2008, 09:56 AM blabla914 good looking work. Lots of hard, dirty work to ma... Oct 28 2008, 12:02 PM bandjoey Now that it's many moons since the first coat ... Oct 28 2008, 10:53 PM my928s4
After you tack the perimeter of the stiffening pl... Oct 29 2008, 07:59 AM watsonrx13 BTW, if you can't find the copper plate, go to... Oct 29 2008, 12:33 PM my928s4 After removing the undercoating I printed the temp... Nov 2 2008, 06:36 PM my928s4
Last but not least I removed the front suspe... Nov 2 2008, 06:39 PM Todd Enlund
Last but not least I removed the front suspension... Nov 29 2008, 02:34 PM bigkensteele Please tell me that you are independently wealthy,... Nov 2 2008, 11:02 PM my928s4
Please tell me that you are independently wealthy... Nov 29 2008, 01:24 PM my928s4 I was going to leave most of the underside which I... Nov 29 2008, 01:32 PM 3d914 Chris,
Excellent job, and you're making great... Nov 29 2008, 03:49 PM my928s4
I am curious about a couple of things. What type... Nov 29 2008, 04:49 PM Lou W Chris,
You're doing a great job, keep up the ... Nov 29 2008, 11:42 PM my928s4 Another long break but work has been progressing, ... Feb 7 2009, 10:25 PM sendjonathanmail Looking good man, keep the pics and the progress c... Feb 7 2009, 10:33 PM my928s4 So this week I decided to attach the flares as I n... Feb 7 2009, 10:36 PM Todd Enlund
So this week I decided to attach the flares as I ... Feb 8 2009, 02:14 AM my928s4 I bought a HF blasting cabinet and have been clean... Feb 7 2009, 10:40 PM PanelBilly You've been busy. Looks good. Feb 8 2009, 01:35 AM my928s4 OK, finished tack welding the rear flares.
G... Feb 12 2009, 09:17 PM my928s4 I am finished (or hope I am) welding on the 1st fl... Feb 22 2009, 05:23 PM charliew POR 15 has a tiecoat primer, it's baby blue co... Feb 26 2009, 11:26 PM my928s4
POR 15 has a tiecoat primer, it's baby blue c... Mar 15 2009, 01:05 PM my928s4 Got some parts plated, calipers came out crap so a... Mar 15 2009, 01:13 PM my928s4 Still working on the fenders, got the third (passe... Mar 15 2009, 01:17 PM charliew One things for sure Chris, you aren't afraid o... Mar 15 2009, 11:52 PM al weidman Chris, I have the HF bead blast cabinet and am usi... Mar 16 2009, 09:00 PM my928s4
One things for sure Chris, you aren't afraid ... Mar 16 2009, 09:42 PM al weidman Chris, I also got the small vacuum system from HF ... Mar 16 2009, 09:46 PM 914Tom :popcorn: Mar 17 2009, 03:16 AM nsr-jamie I love this post!! Awesome!! Keep ... Mar 17 2009, 05:42 AM Phoenix914 I just read through this entire thread. What a fa... Mar 17 2009, 07:10 AM my928s4 Went back to the local paint and supply shop and p... Mar 20 2009, 07:08 AM my928s4 After the failed experiment with the Schutz I boug... Mar 20 2009, 07:12 AM Kansas 914
After the failed experiment with the Schutz I bou... Mar 20 2009, 07:20 AM dakotaewing I'll be doing the same with my project shortly... Mar 20 2009, 09:01 AM 914Tom why not apply a PVC coat and paint the underside a... Mar 20 2009, 11:05 AM my928s4
How many cans did you use to coat the underside? ... Mar 20 2009, 11:50 AM my928s4 Well not too much to report, I took a 3 week break... Apr 19 2009, 02:24 PM charliew You might want to check out a caliper rebuild thre... Apr 19 2009, 05:19 PM my928s4
You might want to check out a caliper rebuild thr... Apr 20 2009, 09:03 AM MDG Chris, just finished reading through this thread; ... Apr 20 2009, 04:43 PM my928s4
Chris, just finished reading through this thread;... Apr 20 2009, 06:52 PM my928s4 At last the lowest part of the car is done, the 2n... Apr 25 2009, 04:43 PM Lou W Sure looking good, very nice job. :beer2: Apr 25 2009, 08:34 PM Slider Nice job Chris, keep up the good work you are an i... Apr 25 2009, 10:13 PM charliew I held my fg rocker from aa up to my 75 body and I... Apr 26 2009, 09:39 PM my928s4 Not too much going on but took some parts to the p... May 5 2009, 07:01 PM  |
2 User(s) are reading this topic (2 Guests and 0 Anonymous Users)
0 Members:

|
Lo-Fi Version | Time is now: 28th July 2026 - 03:33 AM |
Invision Power Board
v9.1.4 © 2026 IPS, Inc.
| All rights reserved 914World.com © since 2002 |
|
914World.com is the fastest growing online 914 community! We have it all, classifieds, events, forums, vendors, parts, autocross, racing, technical articles, events calendar, newsletter, restoration, gallery, archives, history and more for your Porsche 914 ... |