|
|
|
Porsche, and the Porsche crest are registered trademarks of Dr. Ing. h.c. F. Porsche AG.
This site is not affiliated with Porsche in any way. Its only purpose is to provide an online forum for car enthusiasts. All other trademarks are property of their respective owners. |
|
|

  |

| 3d914 |
 Nov 29 2008, 03:49 PM Nov 29 2008, 03:49 PM
Post
#61
|
|
Senior Member  Group: Members Posts: 1,275 Joined: 24-September 03 From: Benson, AZ Member No.: 1,191 Region Association: Southwest Region |
Chris,
Excellent job, and you're making great progress. I have all of the above responsibilities (plus school) and haven't made near the progress you have. Good job. Plus I keep getting distracted building the V6 engine I'm planning to install. I am curious about a couple of things. What type of citrus paint remover are you using? I tried one of the Por products - it works OK, but not great. Plus it has nasty fumes. Also, where did you find the replacement rear jack points? I need to replace both mine too. I think the PO - or whoever stole the car then - ran this thing over numerous parking curbs or something. Keep up the great job! Enjoy! |
   |

 
|
| my928s4 |
Nov 29 2008, 04:49 PM
Post
#62
|
|
Member Group: Members Posts: 349 Joined: 18-August 07 From: Spokane, WA Member No.: 8,018 Region Association: Pacific Northwest |
QUOTE(3d914 @ Nov 29 2008, 01:49 PM)  I am curious about a couple of things. What type of citrus paint remover are you using? I tried one of the Por products - it works OK, but not great. Plus it has nasty fumes. Also, where did you find the replacement rear jack points? I need to replace both mine too. I think the PO - or whoever stole the car then - ran this thing over numerous parking curbs or something. Citrus paint remover is "Citrastrip" from HomeDepot, I got luckyI guess as it works great on paint and the fumes are OK. Comes in a spray can and is inexpensive to boot. Will not work on undercoat though. Rear jack points are from RestorationDesign. Good luck with your project ! Cheers Chris |
|
|
|
| Lou W |
Nov 29 2008, 11:42 PM
Post
#63
|
|
"Here Kitty Kitty" my ass...... Group: Members Posts: 4,109 Joined: 9-May 04 From: Roseburg, OR. Member No.: 2,039 Region Association: Spain |
Chris,
You're doing a great job, keep up the good work and keep posting pictures. (IMG:style_emoticons/default/beerchug.gif) |
|
|
|
| my928s4 |
Feb 7 2009, 10:25 PM
Post
#64
|
|
Member Group: Members Posts: 349 Joined: 18-August 07 From: Spokane, WA Member No.: 8,018 Region Association: Pacific Northwest |
Another long break but work has been progressing, sometimes prepping areas of the car takes a while.
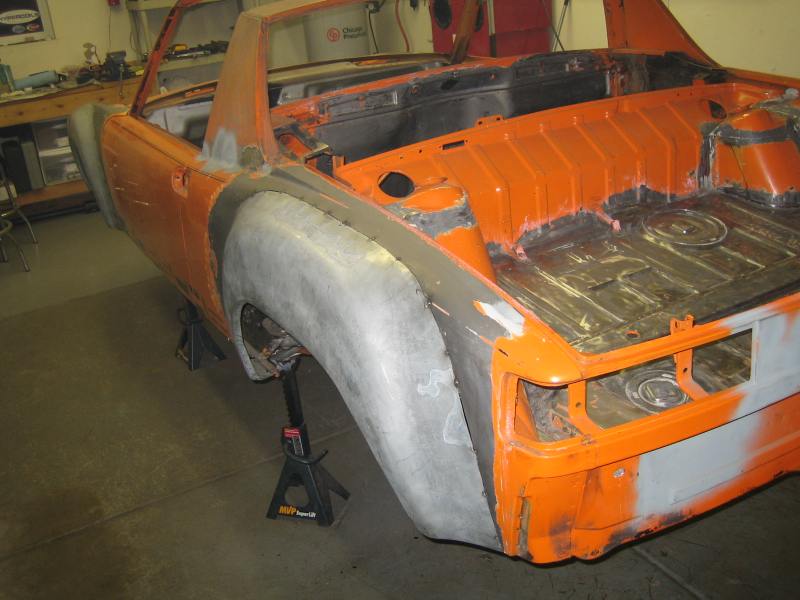
I finally removed most of the underseal and primer from the rear underside, I drilled out the spot welds for the heat shield and am glad I removed it. There was some surface rust under there and needless to say the area was devoid of underseal. Still needs a final going over but 99% there. 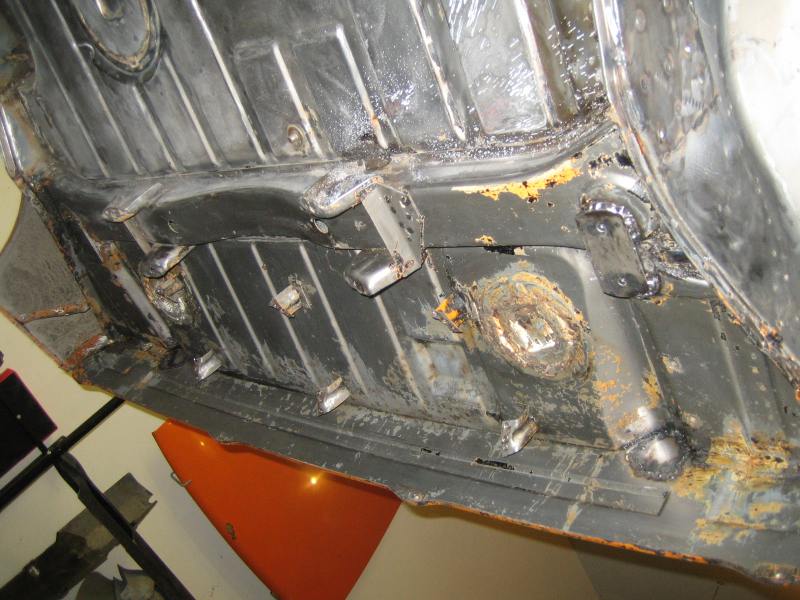 Next I attacked the trunk area, rust looked much worse once I got rid of the paint but no holes so that is good. Interesting that paint is much harder to strip and remove when it is covering corroded metal. 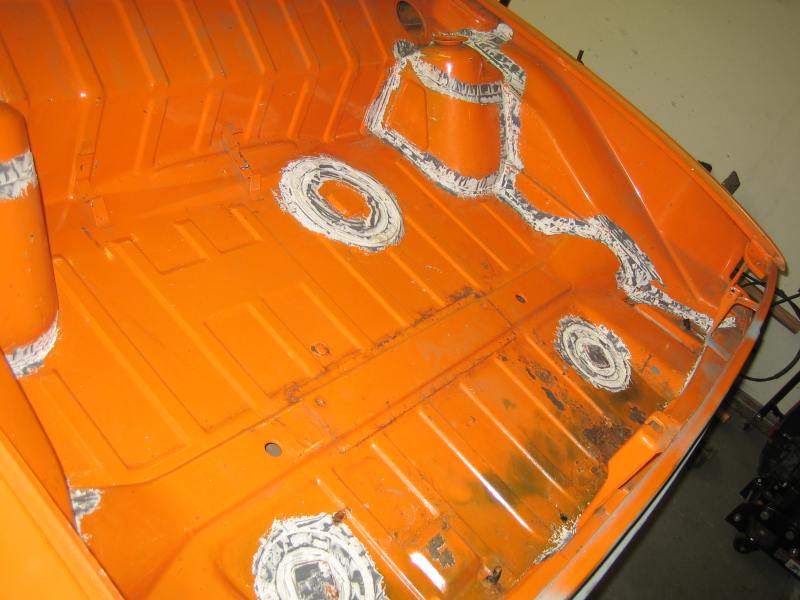 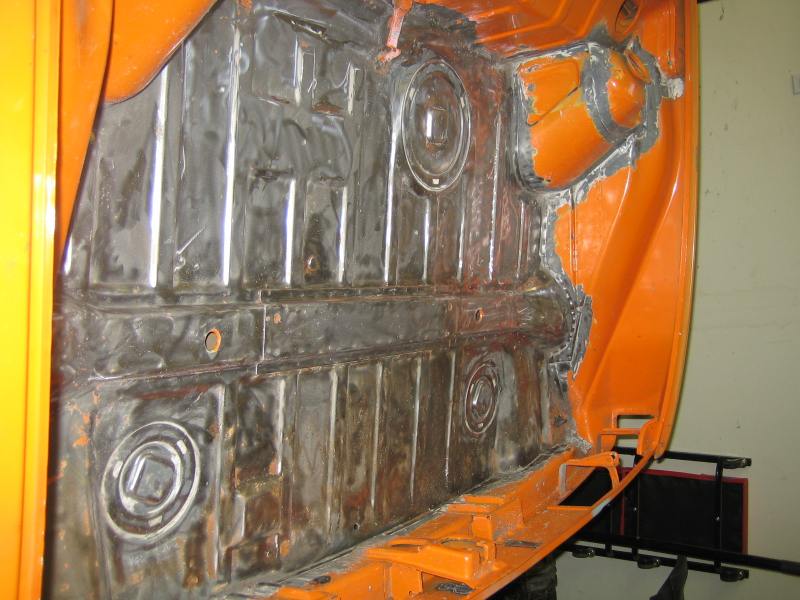 Next onto the front and under the fuel tank, it is a bear to clean that area up and been through most of my tool kit to get it like you see below. First pic shows the corrosion after paint stripper and the second pic is after wire wheels and abrasives. 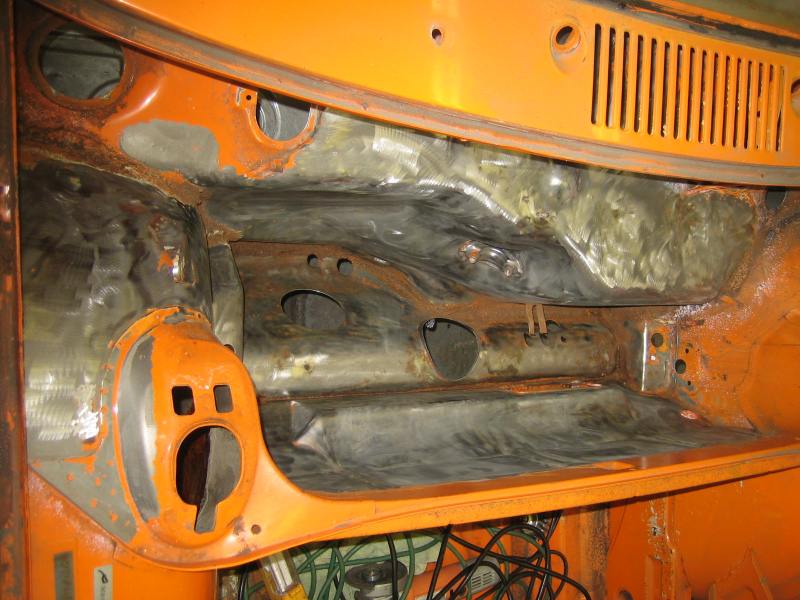 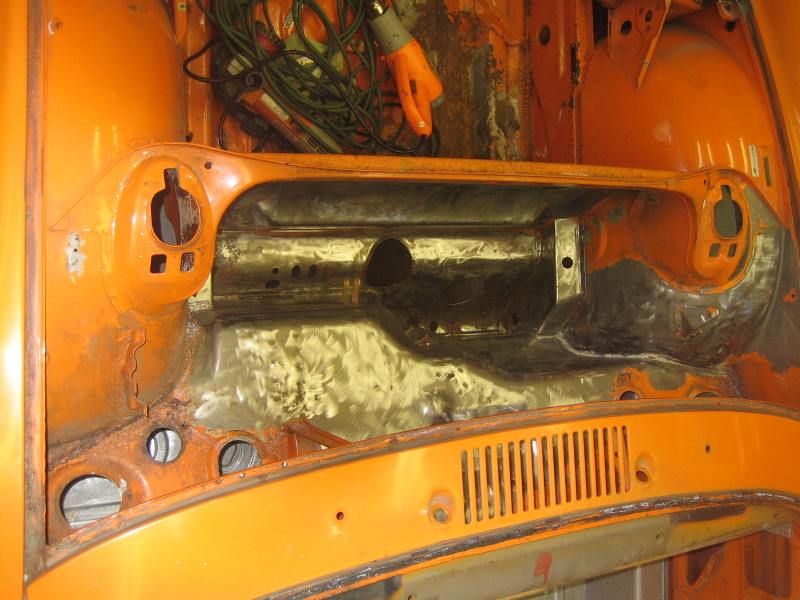 |
|
|
|
| jonferns |
Feb 7 2009, 10:33 PM
Post
#65
|
|
Advanced Member Group: Members Posts: 2,081 Joined: 29-March 07 From: New Jersey Member No.: 7,631 Region Association: North East States |
Looking good man, keep the pics and the progress coming.
|
|
|
|
| my928s4 |
Feb 7 2009, 10:36 PM
Post
#66
|
|
Member Group: Members Posts: 349 Joined: 18-August 07 From: Spokane, WA Member No.: 8,018 Region Association: Pacific Northwest |
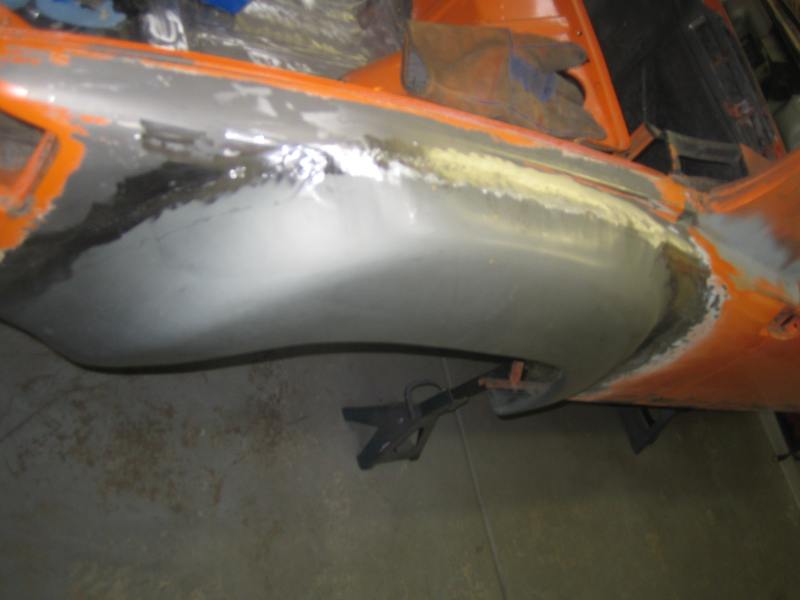
So this week I decided to attach the flares as I now hvae the GT rockers, started on the passenger side front as I figured that the second side would inevitably be an improvement over the first. That way every time I walk up to the drivers door I will see less mistakes ... well that is the hope.
There are plenty of other threads with more talented individuals showing how to put the flares on so I will spare you the amatuerism. To get the flares snug before major cutting I removed slots on either side so the bottoms of the flare would slide in. Second pic is bit blurry but you get the idea. 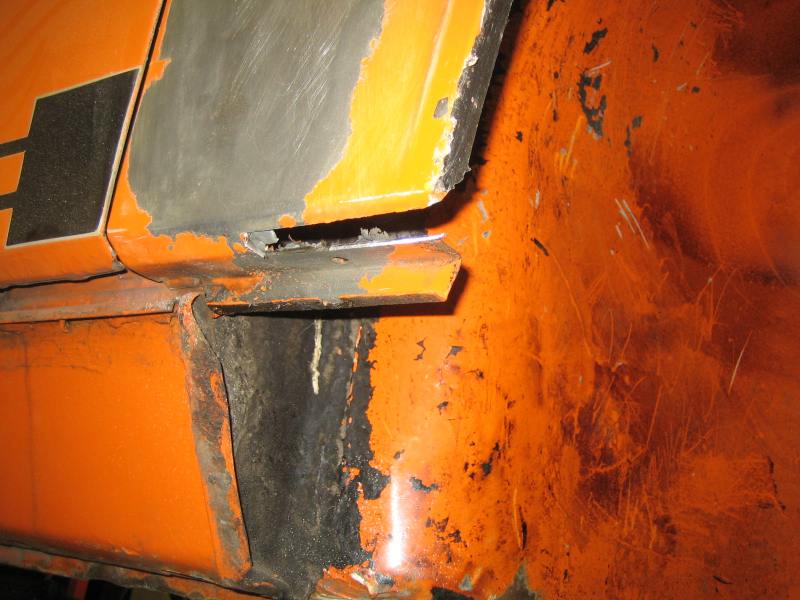 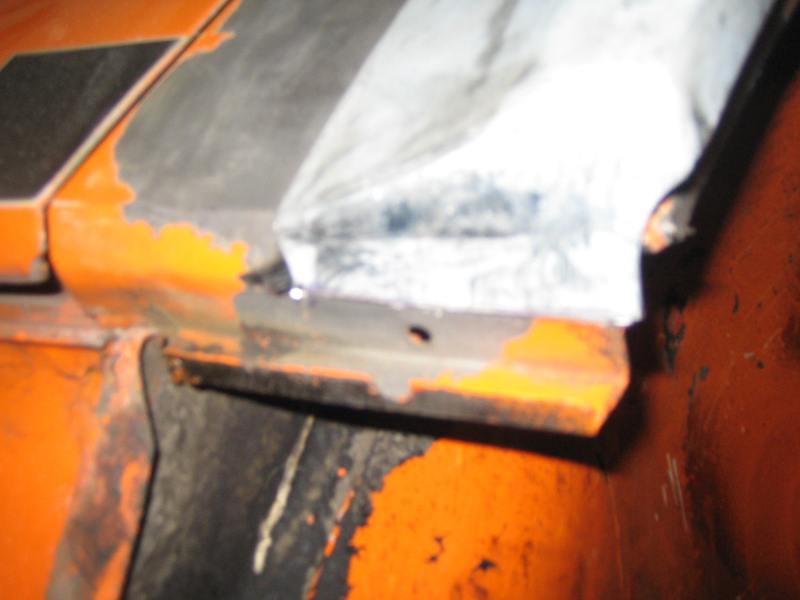 Then I got the jig saw out and started to tack weld, my mistake on the first one was to align both bottom edges and then work my way up either side so the top was the last. Big mistake, don't anyone else do that. I made it work and in the end I am sure no-one will ever know but I created some work for myself. Here is the passenger side front tacked. 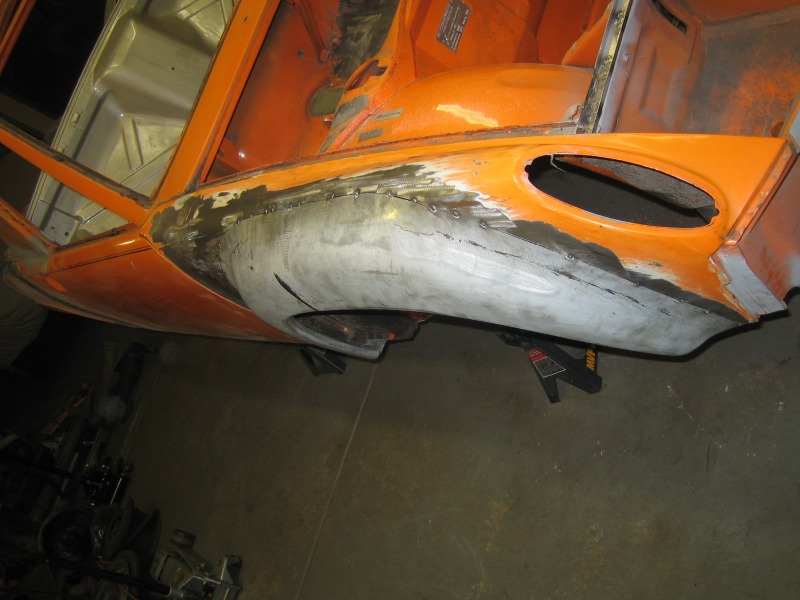 Drivers front is much better, right now I am just tack welding them all on and will do the finish later. I found that 2 hours at a time was just about right to avoid getting frustrated and just taking my time. 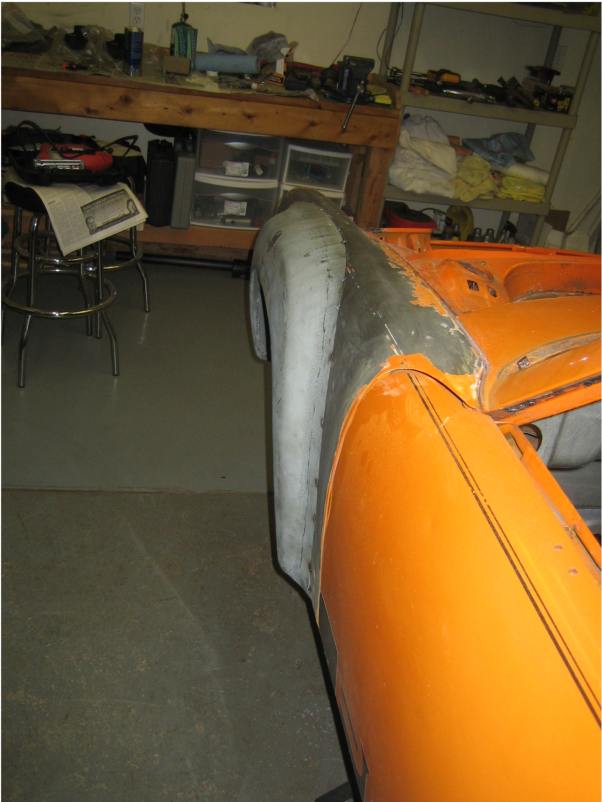 I now have the passenger rear mounted and ready to be completed tomorrow. 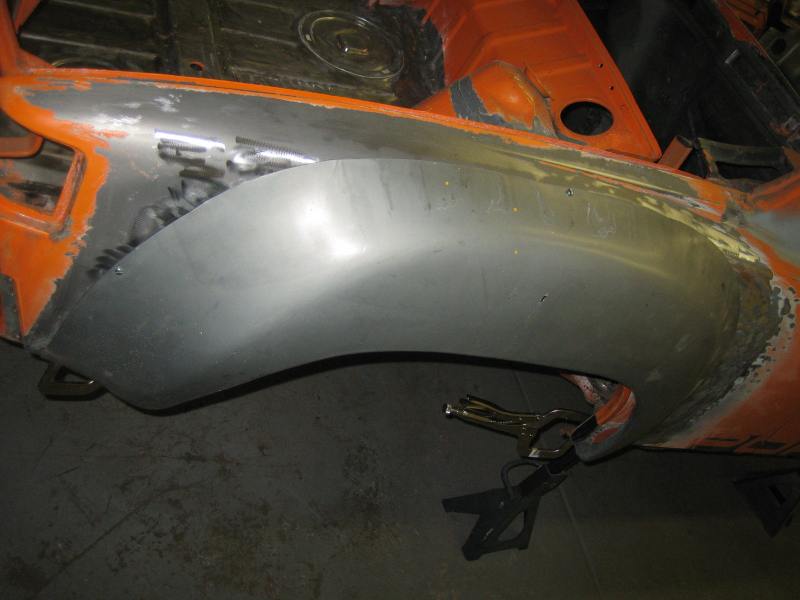 I also found out that the drives side rocker is over 1/2" shorter than the passenger side so that will need some modification in the future. |
|
|
|
| my928s4 |
Feb 7 2009, 10:40 PM
Post
#67
|
|
Member Group: Members Posts: 349 Joined: 18-August 07 From: Spokane, WA Member No.: 8,018 Region Association: Pacific Northwest |
I bought a HF blasting cabinet and have been cleaning up all kinds of stuff.
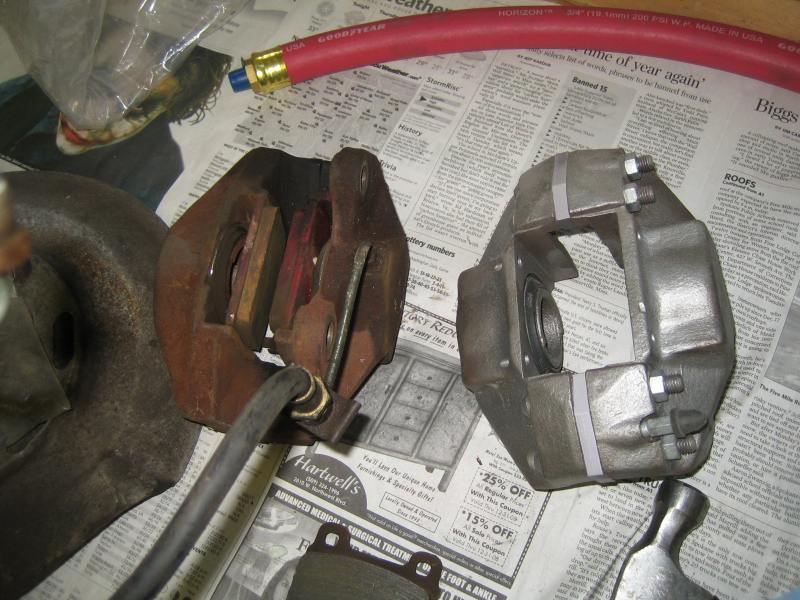 Above shows an 'M' caliper before and after, I also cleaned up the a-arms and have those and the x-member at the powder coaters. I also procurred some late rear calipers and SC hubs. Fingers crossed I may have some 3.5" struts in the next few weeks. |
|
|
|
| PanelBilly |
Feb 8 2009, 01:35 AM
Post
#68
|
|
914 Guru Group: Members Posts: 5,996 Joined: 23-July 06 From: Kent, Wa Member No.: 6,488 Region Association: Pacific Northwest |
You've been busy. Looks good.
|
|
|
|
| Todd Enlund |
Feb 8 2009, 02:14 AM
Post
#69
|
|
Resident Photoshop Guru Group: Members Posts: 3,252 Joined: 24-August 07 From: Reed (Portland), Oregon Member No.: 8,032 Region Association: Pacific Northwest |
QUOTE(my928s4 @ Feb 7 2009, 08:36 PM) So this week I decided to attach the flares as I now hvae the GT rockers, started on the passenger side front as I figured that the second side would inevitably be an improvement over the first. That way every time I walk up to the drivers door I will see less mistakes ... well that is the hope. Good plan! (IMG:style_emoticons/default/biggrin.gif) |
|
|
|
| sixaddict |
Feb 8 2009, 04:05 AM
Post
#70
|
|
Senior Member Group: Members Posts: 1,082 Joined: 22-January 09 From: Panama City Beach, FL Member No.: 9,961 Region Association: South East States |
Thanks for post on rust bullet info. I asked a well known Porsche resto guy about por15 and he never said anything bad but rather recommended other products...Not sure you all know this but por15 must be painted over in a very short time or bond is flawed ...trust me I haev experienced it. i have also had people say por is just not reliable. Have it on one interior and painted over quickly but you must be ready to go ...(not the way most of us do things though).
Any more info would be helpful for me.. TOT QUOTE(finstermojo @ Jan 13 2008, 06:12 PM) When i did my resto and did the same thing you are doing i had mixed results with the POR15 and stopped using it sometimes it would peel right off like a sheet of paper and with more research i found it happed to others too. I found Rust Bullet and sprayed the entire underneath of my car with it and it was 100 times better it flowed better dried better and is so much more reliable without having to go through the process that you have to go through with POR15 I live on the ocean and everything rusts around here and i started using this on everything and it works great. Ive used them both and Rust bullet is simpler and better. I once had a can dry up on me and the paint was like steel . The other part about it is you can paint on top of it without the hassle http://www.rustbullet.com/index.htm?source...KWID=4205382011 |
|
|
|
| my928s4 |
Feb 12 2009, 09:12 PM
Post
#71
|
|
Member Group: Members Posts: 349 Joined: 18-August 07 From: Spokane, WA Member No.: 8,018 Region Association: Pacific Northwest |
QUOTE(sixaddict @ Feb 8 2009, 02:05 AM) Thanks for post on rust bullet info. I asked a well known Porsche resto guy about por15 and he never said anything bad but rather recommended other products...Not sure you all know this but por15 must be painted over in a very short time or bond is flawed ...trust me I haev experienced it. i have also had people say por is just not reliable. Have it on one interior and painted over quickly but you must be ready to go ...(not the way most of us do things though). Any more info would be helpful for me.. TOT I will be covering with Triprimer in the next couple of weeks, hopefully all will be well. Have been hanging out at www.autobodystore.com and seems zerorust is in favor there, evidently more forgiving. |
|
|
|
| my928s4 |
Feb 12 2009, 09:17 PM
Post
#72
|
|
Member Group: Members Posts: 349 Joined: 18-August 07 From: Spokane, WA Member No.: 8,018 Region Association: Pacific Northwest |
OK, finished tack welding the rear flares.
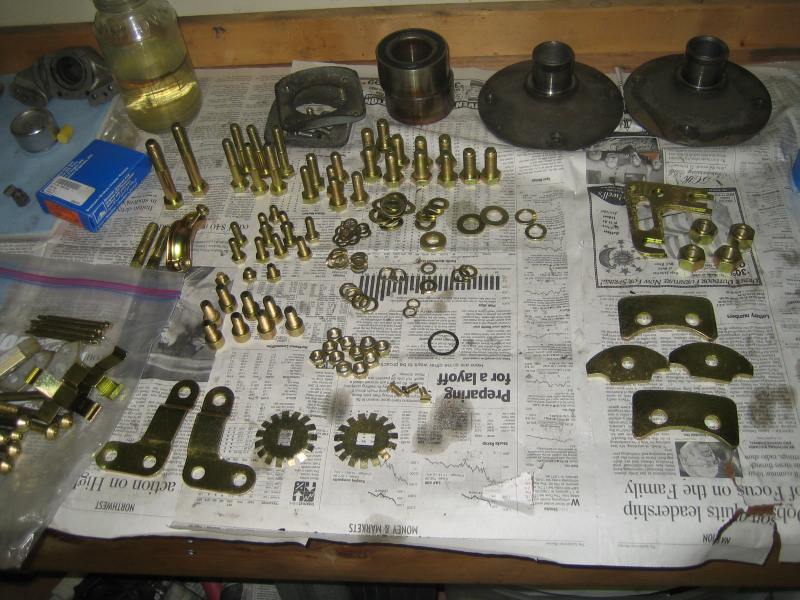
  Got my powder coated front parts back, makes a change to see some nice shiny parts for sure !! Makes you think this thing might go back together at some point. 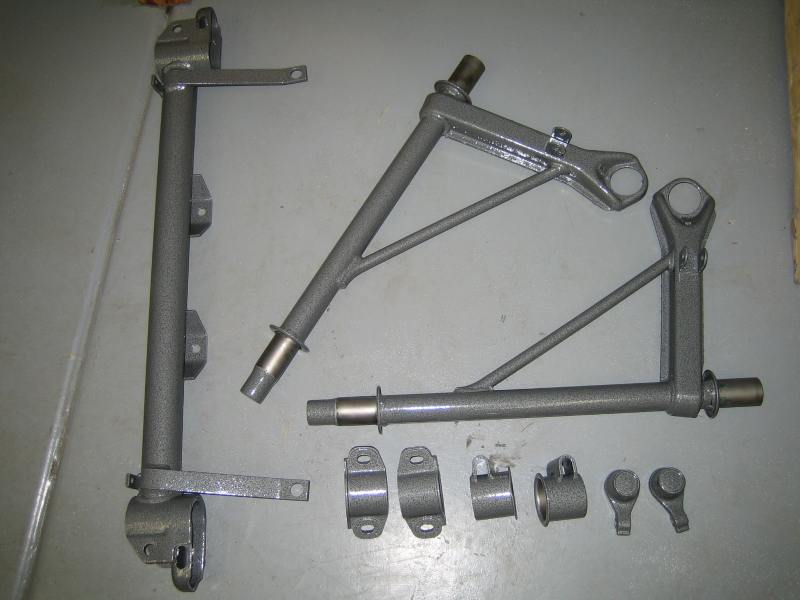 Calipers are ready for disassembly and some plating, I think I have enough parts to make it worth a visit to the platers now. 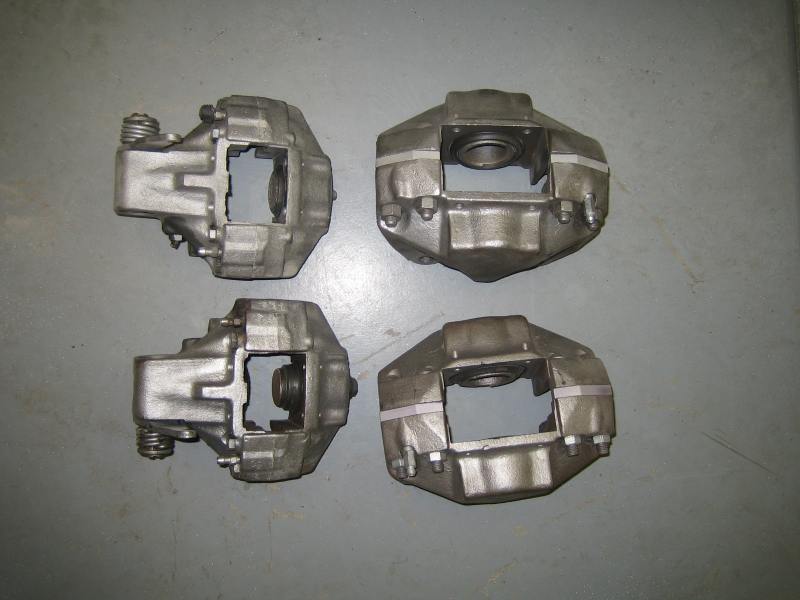 OK, now to some hammer and dolly work and finish welding on the flares. |
|
|
|
| my928s4 |
Feb 22 2009, 05:23 PM
Post
#73
|
|
Member Group: Members Posts: 349 Joined: 18-August 07 From: Spokane, WA Member No.: 8,018 Region Association: Pacific Northwest |
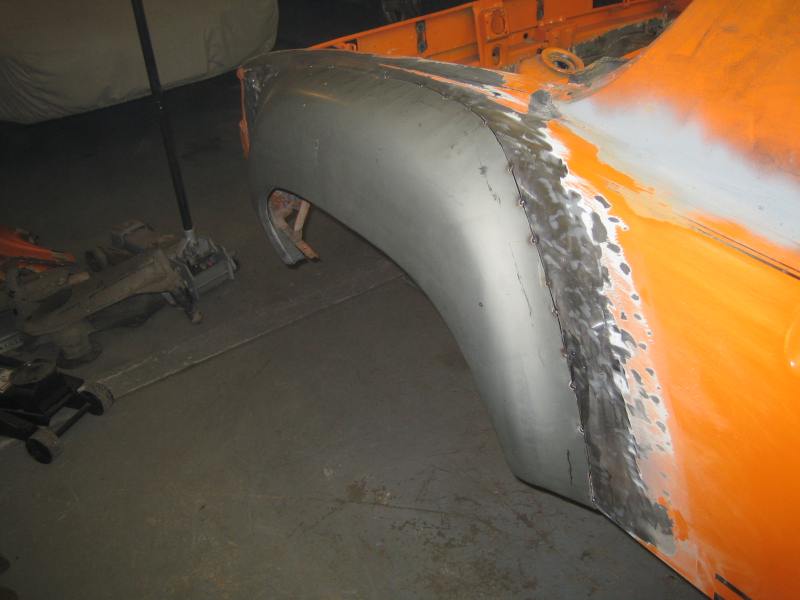
I am finished (or hope I am) welding on the 1st flare, posting mainly to see if there is anything I am not doing correctly so I do no propogate my mistakes onto the next one.
At this moment in time my next step with this flare is to add some filler, this is what I plan on using for the first step. Filler Step One 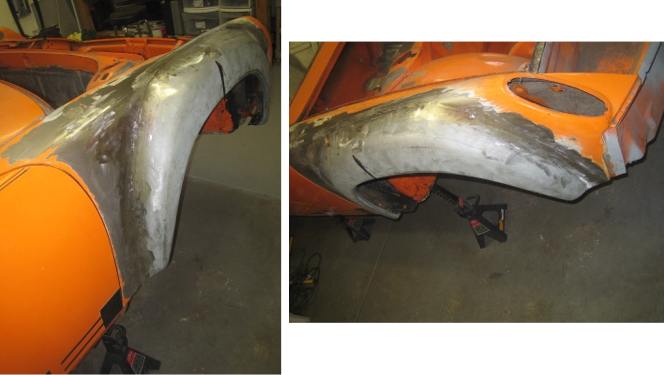 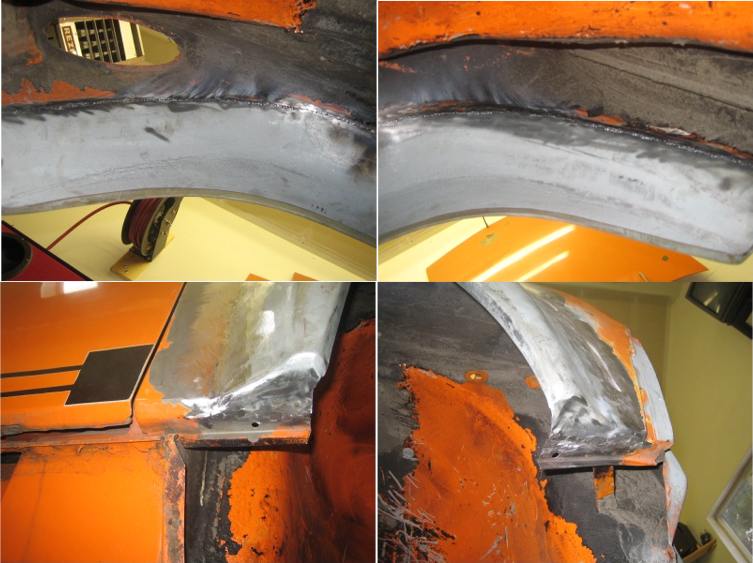 |
|
|
|
| charliew |
Feb 26 2009, 11:26 PM
Post
#74
|
|
Advanced Member Group: Members Posts: 2,363 Joined: 31-July 07 From: Crawford, TX. Member No.: 7,958 |
POR 15 has a tiecoat primer, it's baby blue colored, that can be put over POR15 and it works good to get other paint to adhere. The problem with that is is more cost involved to use their products. If I were doing those flares I would epoxy primer the welded areas before applying the filler. You can't hammer epoxy primer off of well prepared clean metal. The welds will be sealed and if there are any pin holes they might also be sealed to stop the rust from starting under the filler and bubbling it after a few years.
|
|
|
|
| my928s4 |
Mar 15 2009, 01:05 PM
Post
#75
|
|
Member Group: Members Posts: 349 Joined: 18-August 07 From: Spokane, WA Member No.: 8,018 Region Association: Pacific Northwest |
QUOTE(charliew @ Feb 26 2009, 10:26 PM) POR 15 has a tiecoat primer, it's baby blue colored, that can be put over POR15 and it works good to get other paint to adhere. The problem with that is is more cost involved to use their products. If I were doing those flares I would epoxy primer the welded areas before applying the filler. You can't hammer epoxy primer off of well prepared clean metal. The welds will be sealed and if there are any pin holes they might also be sealed to stop the rust from starting under the filler and bubbling it after a few years. I have the tiecoat primer for the inside and I agree all the steps are a PIA but if you do not have a compressor and spray gun then it is a good alternative. |
|
|
|
| my928s4 |
Mar 15 2009, 01:13 PM
Post
#76
|
|
Member Group: Members Posts: 349 Joined: 18-August 07 From: Spokane, WA Member No.: 8,018 Region Association: Pacific Northwest |
Got some parts plated, calipers came out crap so are on their way to Eric.
 Finally decided it was time to unpack the spray gun and all of the associated gear and give it a go. I bought the DeVilbiss Finishline 3 for primer use with the cup liner kit for easy clean up. Epoxy sprayed on great, two wet coats as advertised, jsut did under the front trunk to get the feel. 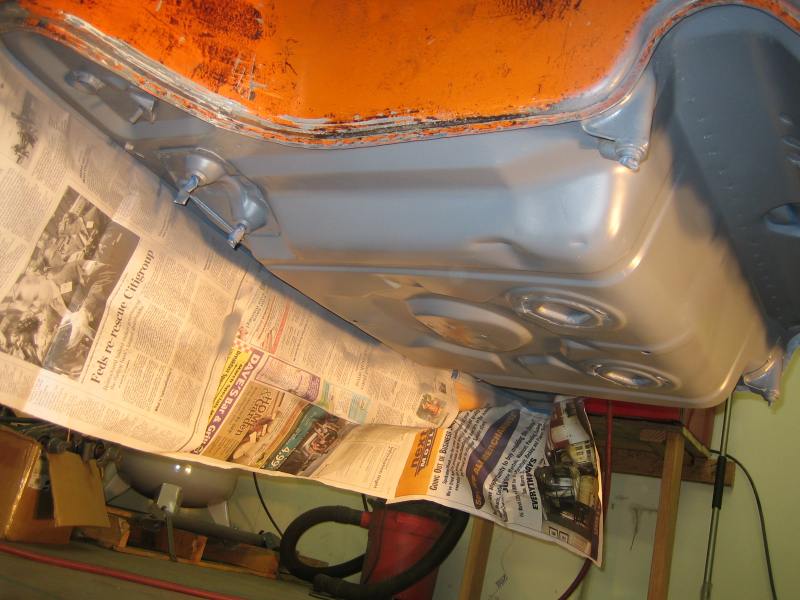 Funny every time you do something on the car you always go one step too far, should have quit with the Epoxy while I was ahead. Got out the 3M Schutz and applicator gun and thought this would be the easy bit ... noooo. This stuff is messy, it is up there with CV grease IMO. Anyway I tried a patch and it came out way to rough a finish, no change in pressure had an effect and then I realized it is probably gravity working against me as this is supposed to be sprayed horizontal with the applicator gun. I am thinking I should have bought the cans. 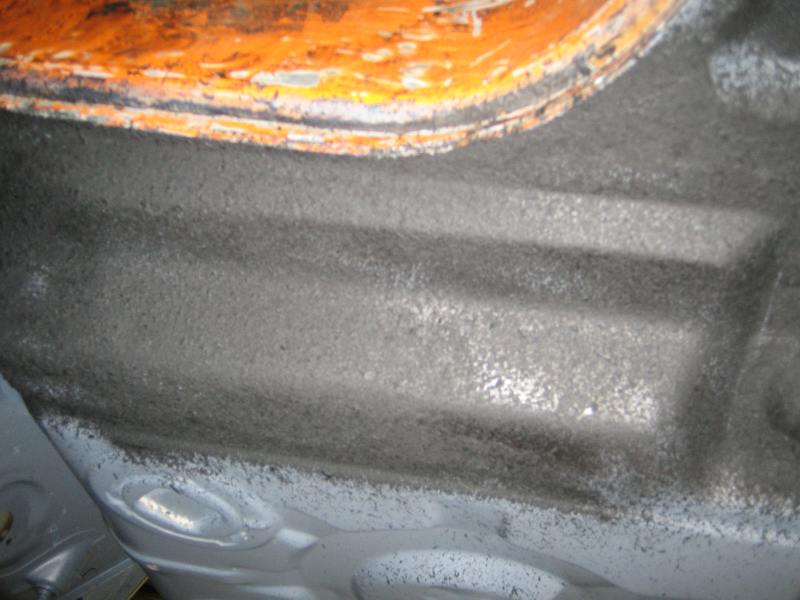 |
|
|
|
| my928s4 |
Mar 15 2009, 01:17 PM
Post
#77
|
|
Member Group: Members Posts: 349 Joined: 18-August 07 From: Spokane, WA Member No.: 8,018 Region Association: Pacific Northwest |
Still working on the fenders, got the third (passenger rear) pretty much completed now. A dent in the rear made this a little trickier but getting better, next to get some filler.
 Dismantled and cleaned the rear trialing arm as best I could, this is ready to head off to the powder coaters with the same finish as the front a-arms. Hubs, bearings and bushings ordered from Eric. 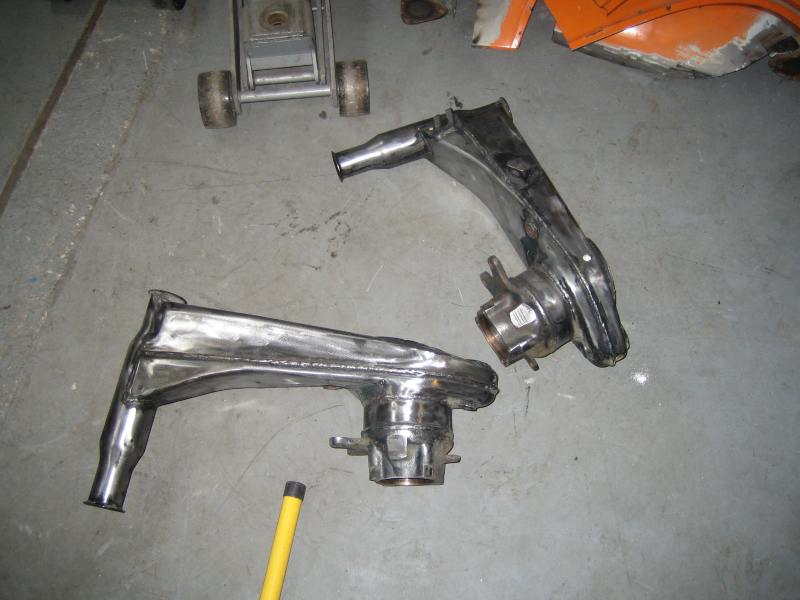 Front arms are now rebuilt and ready for assembly at some point in the future. 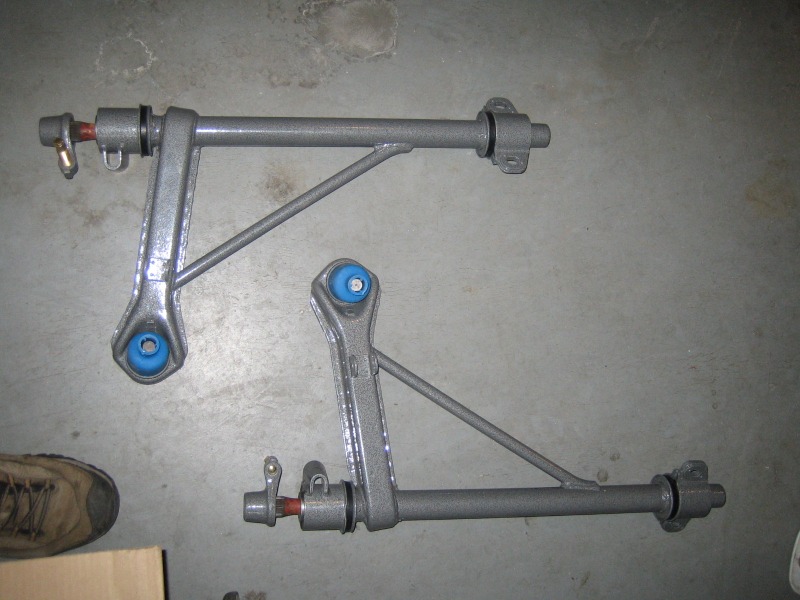 Now have some 3.5" struts (thanks Jeff !), they sure are purty, just need some shocks ($$$$) and a sway bar. 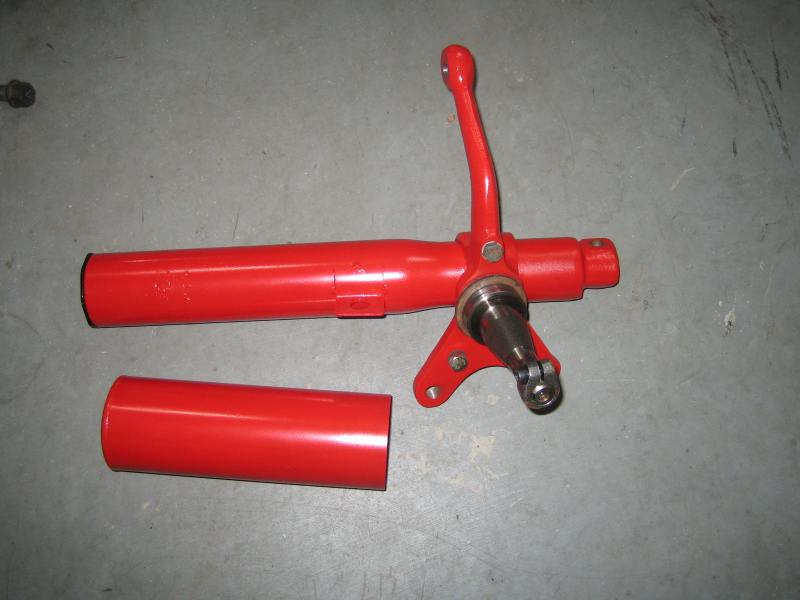 |
|
|
|
| charliew |
Mar 15 2009, 11:52 PM
Post
#78
|
|
Advanced Member Group: Members Posts: 2,363 Joined: 31-July 07 From: Crawford, TX. Member No.: 7,958 |
One things for sure Chris, you aren't afraid of work. That upside down scraping and stripping and wirewheeling is hard work. I've done several bottoms, dune buggys, vw sedans, jeep and chev pickups, international harvestor scouts and such and it doesn't get easier with each one.
I think I will try a rotisserie I built a few years ago on the 914. I'm almost 65 and maybe it will finally get easier if I go that way. One thing though the 914 is also the smallest car I've ever done, maybe that will also help. |
|
|
|
| al weidman |
Mar 16 2009, 09:00 PM
Post
#79
|
|
Al Weidman Group: Members Posts: 156 Joined: 22-February 08 From: Oroville, Ca. Member No.: 8,736 Region Association: Northern California |
Chris, I have the HF bead blast cabinet and am using glass beads but do not clean up near as nice as yours. What media are you using? Al. |
|
|
|
| my928s4 |
Mar 16 2009, 09:42 PM
Post
#80
|
|
Member Group: Members Posts: 349 Joined: 18-August 07 From: Spokane, WA Member No.: 8,018 Region Association: Pacific Northwest |
QUOTE(charliew @ Mar 15 2009, 10:52 PM) One things for sure Chris, you aren't afraid of work. That upside down scraping and stripping and wirewheeling is hard work. I've done several bottoms, dune buggys, vw sedans, jeep and chev pickups, international harvestor scouts and such and it doesn't get easier with each one. I think I will try a rotisserie I built a few years ago on the 914. I'm almost 65 and maybe it will finally get easier if I go that way. I think a rotisserie would be a great idea, no doubt. Work smarter not harder, right ?! QUOTE(al weidman @ Mar 16 2009, 08:00 PM) Chris, I have the HF bead blast cabinet and am using glass beads but do not clean up near as nice as yours. What media are you using? Al. Al, I use the same stuff you probably do HF Glass Beads although the ability of the cabinet to keep the stuff inside is limited. I really need to empty it and seal it. For a while I did suffer from a lot of dust then read that >80psi just turns the beads to dust, turning down to 70 worked much better. |
|
|
|
|
1 User(s) are reading this topic (1 Guests and 0 Anonymous Users)
0 Members:

|
Lo-Fi Version | Time is now: 28th July 2026 - 02:16 AM |
Invision Power Board
v9.1.4 © 2026 IPS, Inc.