|
|
|
Porsche, and the Porsche crest are registered trademarks of Dr. Ing. h.c. F. Porsche AG.
This site is not affiliated with Porsche in any way. Its only purpose is to provide an online forum for car enthusiasts. All other trademarks are property of their respective owners. |
|
|

  |

| Van |
 Mar 14 2008, 08:38 PM Mar 14 2008, 08:38 PM
Post
#41
|
|
Member  Group: Members Posts: 199 Joined: 15-January 08 From: Hyde Park, NY Member No.: 8,571 |
Fantastic work!
|
   |

 
|
| FourBlades |
Mar 19 2008, 06:02 PM
Post
#42
|
|
From Wreck to Rockin Group: Members Posts: 2,056 Joined: 3-December 07 From: Brevard, FL Member No.: 8,414 Region Association: South East States |
Thanks Van, but I am really just an amateur at this. I could never have done anything without all the information and especially photo sequences on 914 world.
John |
|
|
|
| TINCAN914 |
Mar 19 2008, 06:37 PM
Post
#43
|
|
Summer's Commin... Group: Members Posts: 2,440 Joined: 18-August 05 From: Colorado Springs, CO. Member No.: 4,611 Region Association: Rocky Mountains |
(IMG:style_emoticons/default/pray.gif) (IMG:style_emoticons/default/pray.gif) (IMG:style_emoticons/default/welder.gif) Keep it up.. (IMG:style_emoticons/default/aktion035.gif)
|
|
|
|
| charliew |
Mar 26 2008, 01:04 PM
Post
#44
|
|
Advanced Member Group: Members Posts: 2,363 Joined: 31-July 07 From: Crawford, TX. Member No.: 7,958 |
John good work. I have used por 15 for many years and some of it has come back to haunt me. Several years ago I got a 79 jeep J10 in pretty bad shape an redid it for hunting. I sand blasted the entire outside below the windows and under the bottom with all of the front end off. I sprayed por 15 on everything. I then used a light blue primer they also sold to be a coating I could paint over. I didn't use the blue primer under the wheel wells just the por15. Now it appears after about 6 years the undercoat I put over the por 15 has come off and some of the por15 has gotten beat off from rocks or just came off. This has only showed up on the front and rear wheel wells. I used a rubber undercoat. I am going to do it over but I will use PPG black epoxy non sanding primer this time and re apply the rubber under coat. I think it is too hard to get por 15 to take top coats. It is very durable but there might be a better rust sealer and base coat. I may try the eastwood products on the 914.
Just my experience. Charliew |
|
|
|
| sean_v8_914 |
Mar 26 2008, 01:25 PM
Post
#45
|
|
Chingon 601 Group: Members Posts: 4,011 Joined: 1-February 05 From: San Diego Member No.: 3,541 |
you guys are true 914 champions.
the POR 15 needs to be primmered while its still tacky. nothing will adhere to it once its cured. POR15 has poor adhesion to smooth metal |
|
|
|
| Richard Casto |
Mar 26 2008, 03:41 PM
Post
#46
|
|
Blue Sky Motorsports, LLC Group: Members Posts: 1,465 Joined: 2-August 05 From: Durham, NC Member No.: 4,523 Region Association: South East States |
John,
Great work. It is nice to see someone save a car that many people would say is not worth the trouble and would just cut up. There is only a finite number of these cars. I am doing some repair to similar areas on my car, but mine is not in as bad as shape as yours. Richard |
|
|
|
| FourBlades |
Mar 27 2008, 08:36 PM
Post
#47
|
|
From Wreck to Rockin Group: Members Posts: 2,056 Joined: 3-December 07 From: Brevard, FL Member No.: 8,414 Region Association: South East States |
Thanks for all the responses. Its nice to know I am not the only crazy person out here. I believe the 914 will go the way of the 356 and early 911, i.e. people will realize what a cool car they are and stop cutting up any but badly wrecked ones. With some modern upgrades not available when they were new these cars can whale on nearly anything through the turns...see my Roebling post about 914 versus Carrera GT. I have heard a lot of mixed reviews about POR 15 as well. I most wire wheel away all the rust, then wash with paint prep solution, then spray on metal ready, then wipe with a moist shop towel, and then finally spray on Eastwood etching primer. I will cover this with a few coats of some compatible sealer before painting. I intend to talk to Eastwood folks about what I should use. If I can't get all the rust off with the wire wheel, I usually use a rust desolving product, clean with water and then metal ready, etc. If I am going to weld a patch or part, I paint the inside with high zinc weldable primer. I sprayed that liberally inside my longs after the metal ready rather than POR 15. I did not open up the longs enough to paint them all so I just blasted the zinc primer (which you are not supposed to paint over) down from each side. It took my car 35 years to get as rusty as it did, including many years with no windshield sitting a few miles from the ocean. I think the inside of the longs were originally galvanized, and where there was no water standing, they looked pretty much new. I have seam welded the top edge of any patches I put on and will liberally seam seal them to keep water from getting back inside (which caused the rust problems in the first place). I plan to weld up all the holes in the roll bar, use painted sail panels instead of vinyl and generally get rid of any potential holes in the metal were water can get in and cause further problems. I left the drain holes in the bottom of the longs. I may even weld up the cowl solid to the fenders. Its not like you can unscrew the fenders and remove them like you can on some other cars. That seam appears to be little more than a place for water to get in an rust the front part of your doors and longs. As an experiment, I painted a piece of new steel with the high zinc primer and left it outside for a month or so. I live about 1000 feet from the ocean so its pretty damn salty here. A brand new (cheap) gas grill is transformed into a pile of rusty metal in about 2 years (no kidding). So far there is a little surface rust on the metal where I scratched it by accident but other pieces I did not treat have 1 mm of crusty rust on them. If I get ambitious I may do a test with some of the common rust treatments to see what happens. Sorry for the long winded speach but rust is on my mind every time I work on my car. If I don't go through the rust fighting ritual on any bare metal at the end of each session, the metal has a good coat of surface rust in 2 or 3 days... John |
|
|
|
| FourBlades |
Mar 31 2008, 08:31 PM
Post
#48
|
|
From Wreck to Rockin Group: Members Posts: 2,056 Joined: 3-December 07 From: Brevard, FL Member No.: 8,414 Region Association: South East States |
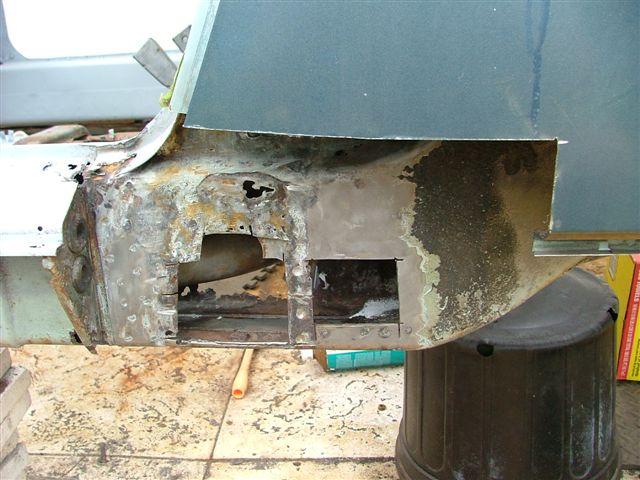
Fixing the driver's side jacking point. I cut off the lower part of the fender to be able to get to this area. I hated to do it, but it is really the only way to fix this right. I hope I can weld it back on without pretzeling my whole fender. Cut out all the rusted areas, and after much grinding, wire wheeling, and metal ready it looked like this.
 Welded on some 16 gauge patches. I always coat the back of patches with high zinc weldable primer. 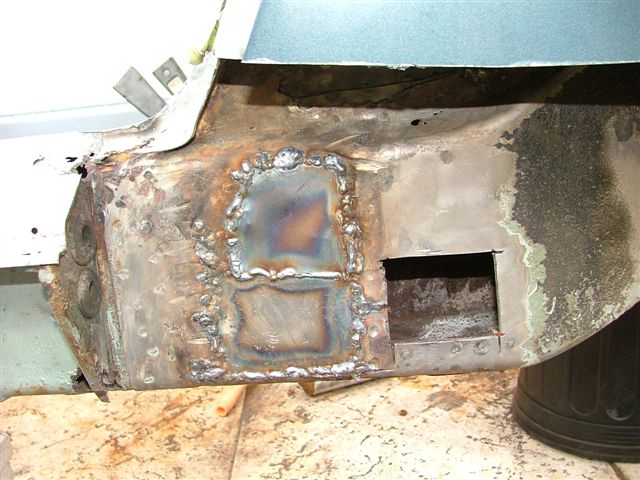 Welded a new jacking tube onto the patch and then welded a new jack plate over it. Welded a patch over the other hole. You can see some seam welded repairs at the top where I fixed some holes in the engine compartment above the long. 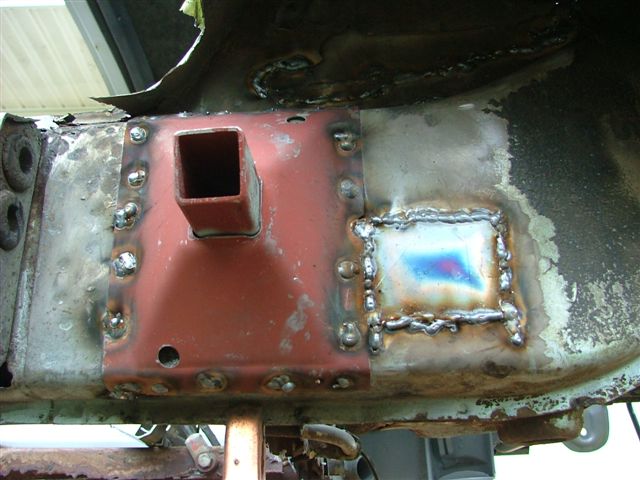 Ground as much as I could stand it and primed. 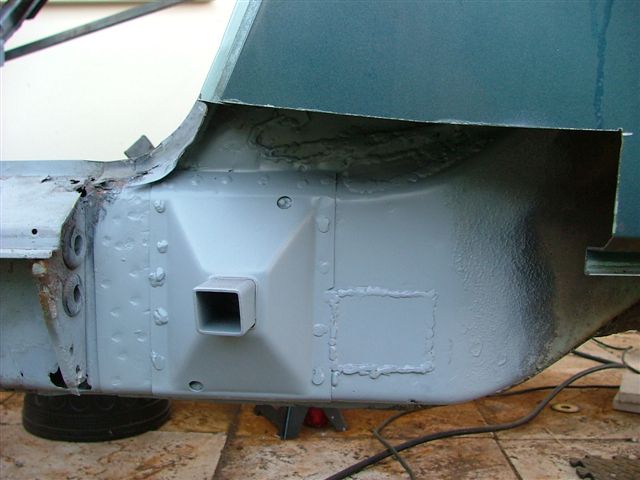 I have a new set of door sills to put on. AA is out of sill triangles or I would tackle this now. I could make some but I would rather just get the ones I already ordered than spend time on it. |
|
|
|
| SirAndy |
Mar 31 2008, 08:38 PM
Post
#49
|
|
Resident German Group: Admin Posts: 42,483 Joined: 21-January 03 From: Oakland, Kalifornia Member No.: 179 Region Association: Northern California |
|
|
|
|
| FourBlades |
Mar 31 2008, 08:44 PM
Post
#50
|
|
From Wreck to Rockin Group: Members Posts: 2,056 Joined: 3-December 07 From: Brevard, FL Member No.: 8,414 Region Association: South East States |
One more major longitudinal problem to fix. Made a home brewed "lower inner long patch" out of 16 guage steel. I say lower because mine wrap around the lower part of the long, unlike the Engman and other long kits that wrap around the upper part. This works because I have no floors on my car. I realize this will lower my floors by one fourteenth (IMG:style_emoticons/default/biggrin.gif) of an inch.
There are some waves in the lower side of the longs that fit the factory floor pan edge. I will have to flatten my floor pans in these areas to fit the now flat bottom of my longs. We'll see if this is a big problem or not pretty soon. (IMG:style_emoticons/default/dry.gif) I can also add an upper long kit cut off half way down to meet with my lower kit later if I want to. 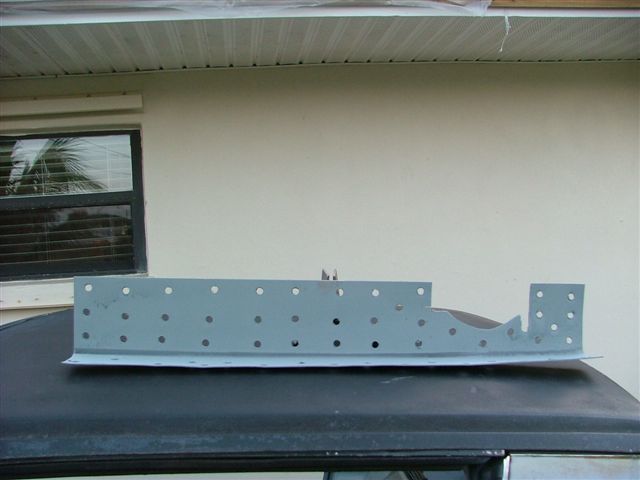 Welded it on. The weird shape allows it to fit around the firewall and the heater tube. I welded it to the heater tube pretty solidly. You can also see some patches I made to my firewall. The entire firewall and engine bay is pretty much done at this point. (IMG:style_emoticons/default/beerchug.gif) (IMG:style_emoticons/default/beerchug.gif) 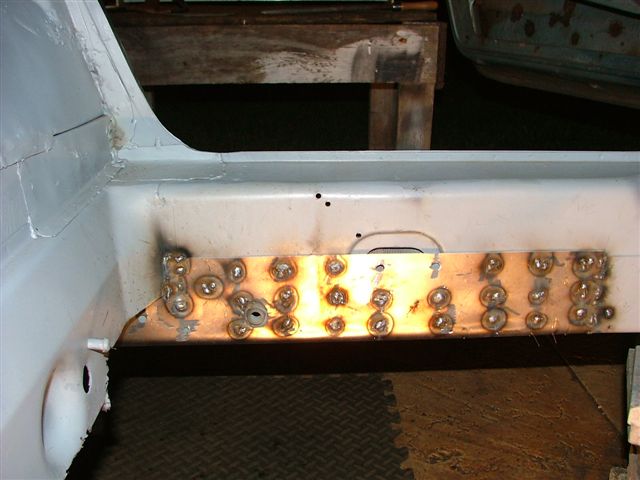 |
|
|
|
| FourBlades |
Mar 31 2008, 09:06 PM
Post
#51
|
|
From Wreck to Rockin Group: Members Posts: 2,056 Joined: 3-December 07 From: Brevard, FL Member No.: 8,414 Region Association: South East States |
I got a rear half of a tunnel plus cross member from a 914 world member. I started de-spotting it from the chunk they sent me and cleaning it up. Here is where it goes on the rear floor pan. I had to research just what is supposed to be inside a 914 tunnel because mine was mostly rust and mummified lizards.
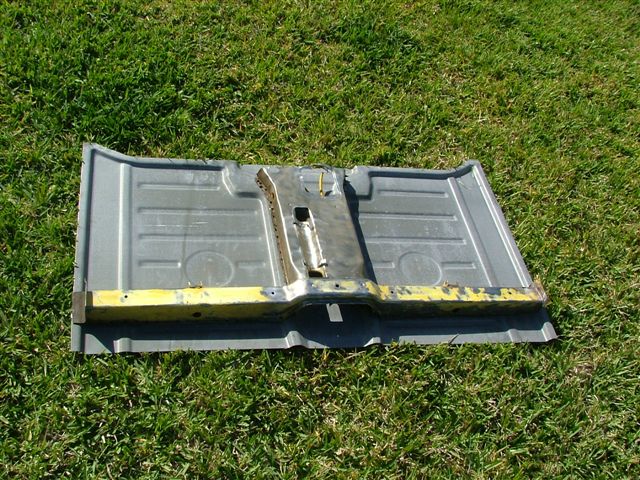 Moved on to fixing the front of the passenger area. It used to look like this: 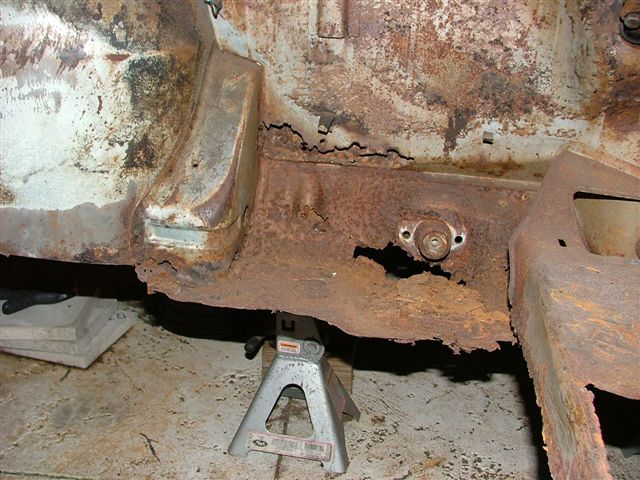 I got tired of how nasty the whole interior was so I spent a few hours with a wire wheel, brake cleaner, and metal ready. Then I primed it all. I highly recommend you do this because it will stop your car from rusting any more and it looks so much more like you are getting somewhere. I got a pedal area cut out of a wreck from another 914 world member and welded it into position. Then I test fit the front part of the floor pan!!!! (IMG:style_emoticons/default/drooley.gif) 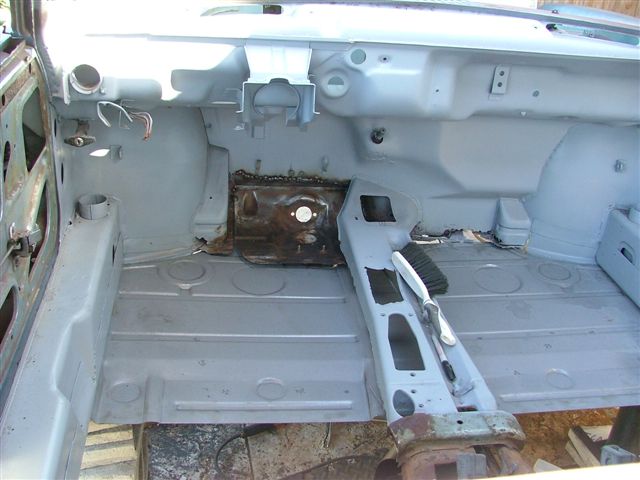 The floor pan fit perfectly around the hammer formed front fender parts I made a while back, which I consider a minor miracle. (IMG:style_emoticons/default/aktion035.gif) I am going to cut out the tunnel and fix it in the comfort of my garage then weld it back in. I plan to use stainless tubing for all those tubes and weld them to supports more frequently than Porsche did, so they don't break off. Fixing the tunnel out of the car means I can put the floor pans on soon, which will make this seem much more like a car. Now its time for some (IMG:style_emoticons/default/beer3.gif) |
|
|
|
| solex |
Mar 31 2008, 09:18 PM
Post
#52
|
|
Senior Member Group: Members Posts: 789 Joined: 12-January 05 From: Long Island, NY Member No.: 3,439 Region Association: North East States |
John,
I''m impressed not only do you have great skill but incredible patience Nice work gives me motivation to continue... Dan |
|
|
|
| FourBlades |
Mar 31 2008, 09:26 PM
Post
#53
|
|
From Wreck to Rockin Group: Members Posts: 2,056 Joined: 3-December 07 From: Brevard, FL Member No.: 8,414 Region Association: South East States |
Thanks Dan. I'm telling you, it really helps mentally to make part of the car look good. I also cleaned up and primed the engine bay and the difference is amazing. It looks so much less like a rust bucket. I also try to pick one thing to get done each time I work on it and not add up how many are still left. John |
|
|
|
| FourBlades |
Apr 8 2008, 07:29 PM
Post
#54
|
|
From Wreck to Rockin Group: Members Posts: 2,056 Joined: 3-December 07 From: Brevard, FL Member No.: 8,414 Region Association: South East States |
Two big milestones today. Finished off a 10 pound spool of MIG wire I started with this project. Probably 8.5 pounds of it is now dust I ground off. My yard is really dark green around my work area, all that iron dust seems to be helping it. (IMG:style_emoticons/default/biggrin.gif) Started welding in the front floor pan today!!! Got a bunch a holes to fill in around the gas tank area. I am thinking of rolling the car over on its top to do it like I saw someone else on this board do. (IMG:style_emoticons/default/happy11.gif) Trying to get the front struts out, the damn taper pin at the bottom is stuck big time. I soaked it in PB blaster and will take the air chisel to it tommorrow. Tired of getting beaten by Caymans at the autocross, can't wait to get my teener on the road. Got a very nice engine in the works. I know that this thread is worthless without pictures so I will get some soon... |
|
|
|
| Sleepin |
Apr 8 2008, 11:37 PM
Post
#55
|
|
Advanced Member Group: Members Posts: 3,647 Joined: 20-November 07 From: Grand Junction, Co. Member No.: 8,357 Region Association: Rocky Mountains |
Great work! I really enjoyed the read so far!
|
|
|
|
| jbyron |
Apr 9 2008, 10:11 AM
Post
#56
|
|
Jamie Group: Members Posts: 155 Joined: 17-July 07 From: Ballwin, MO Member No.: 7,916 Region Association: Upper MidWest |
Wow! Very educational. Keep up the good work!
|
|
|
|
| FourBlades |
Apr 13 2008, 06:15 PM
Post
#57
|
|
From Wreck to Rockin Group: Members Posts: 2,056 Joined: 3-December 07 From: Brevard, FL Member No.: 8,414 Region Association: South East States |
Flip Your 914 the CSOB Way
I got fed up with working on the ground under my 914 so I decided to do something about it. I remembered a B&W photo showing a framework used in the olden days to flip a car and decided to build my own. I drew a careful scale drawing with extensive engineering analysis. Notice how I indicated where the Center of Gravity of the flipped car would end up. The computer enhanced drawing shows the car (to scale) in light blue. The key joint is indicated in scribbled shading. I also did a detailed study of the joint needed when frame members met in all three dimensions. 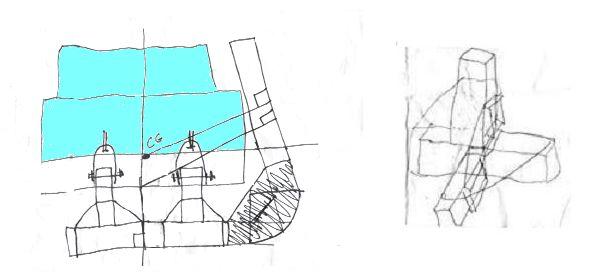 I decided the framework had to be 10 degrees from vertical so that it would be stable in either position and not show any unhealthy tendency to flip back unexpectedly. The key joint is between the flat and flipped parts of the frame. I made it round to make it easier to roll the car from one state to another. I briefly toyed with the idea of an octagonal frame with the car inside, however, scrap 2x4s on hand were limited. Here is how the key joint is made: 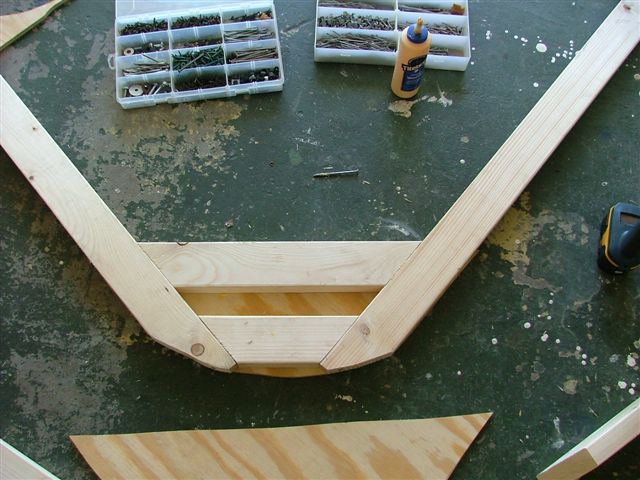 After making two of the key joint I got started putting it together. I leveled the two ground frame members and then bolted them to the front and rear suspension mounting points using equal length legs. I noticed my tub is about 1/4 inch twisted along its length. After that, I added additional support and frame members, bracing them with plywood triangles. This stage was part planning, part organic growth, and part paranoia over the whole thing collapsing. For those wishing to build a similar structure, the dimensions are: Length : whatever a 2x4 stud is (I think 93" because of the floor and top plates) Width: about 53" and 3 of those really little marks Height: 4 notches on those big ass sears jack stands on the rear, less on the front Anyway, I got it all together and started jacking up the side. 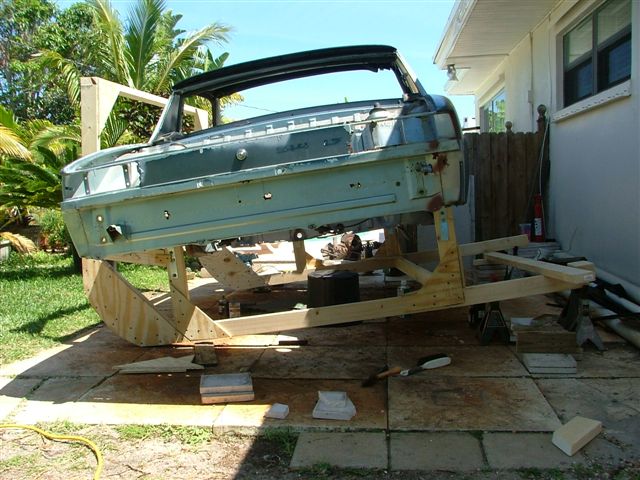 Here is a detail shot of the framework. Not sure it is elegant or minimal but it is surprisingly rigid and I did not run out of screws. 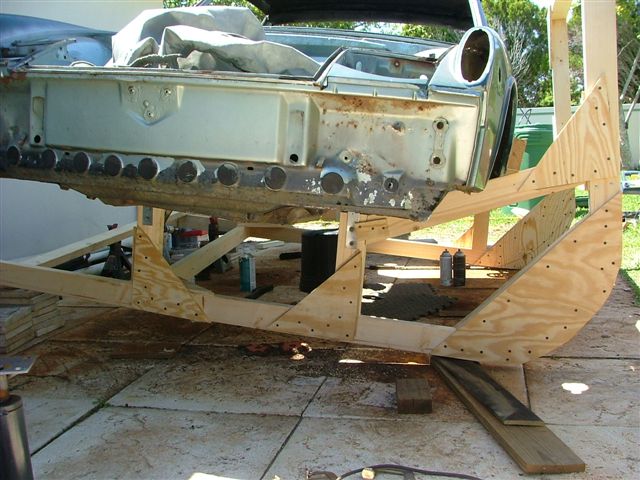 More frame details. Notice the 2x4 used to lever the frame higher and higher. Levering one end off the ground did not cause the other to sag noticebly. I don't know if that is a testament to the 914 rigidity or to my framework. My 3 dimensional joint study pays off... 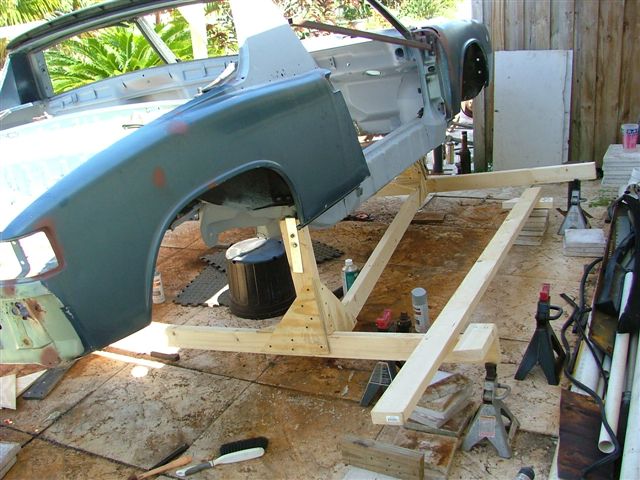 |
|
|
|
| FourBlades |
Apr 13 2008, 06:21 PM
Post
#58
|
|
From Wreck to Rockin Group: Members Posts: 2,056 Joined: 3-December 07 From: Brevard, FL Member No.: 8,414 Region Association: South East States |
Flip Your 914 Part Deux
When the car was tipped about 40 degrees it started to get very light. At this point I figured I would see what happened if I pushed it the rest of the way by hand. 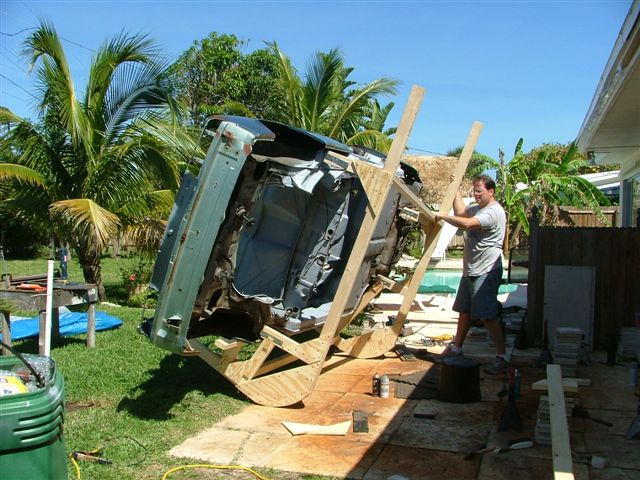 Tipping it the rest of the way was much like using a large dolly to move a filing cabinet. It is easy to get it back to the balancing point but going back to flat from there it gets really heavy. 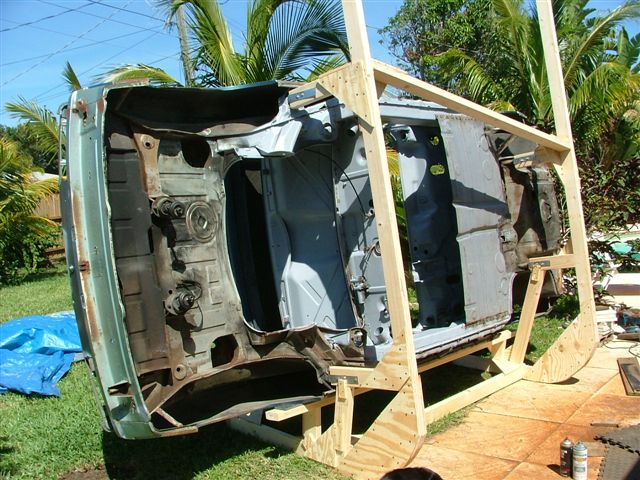 Thanks to careful calculations and planning it all worked out. (IMG:style_emoticons/default/rolleyes.gif) Looking forward to finishing the floor in a more vertical position. John |
|
|
|
| slow914 |
Apr 13 2008, 06:50 PM
Post
#59
|
|
Member Group: Members Posts: 150 Joined: 5-February 08 From: Kirkland, WA Member No.: 8,671 Region Association: Pacific Northwest |
dude, that is badass
|
|
|
|
| FourBlades |
Apr 13 2008, 06:59 PM
Post
#60
|
|
From Wreck to Rockin Group: Members Posts: 2,056 Joined: 3-December 07 From: Brevard, FL Member No.: 8,414 Region Association: South East States |
No, it is cheap ass! I think this cost about $50. But I'm glad you liked it. |
|
|
|
|
10 User(s) are reading this topic (10 Guests and 0 Anonymous Users)
0 Members:

|
Lo-Fi Version | Time is now: 6th June 2026 - 10:53 PM |
Invision Power Board
v9.1.4 © 2026 IPS, Inc.