|
|
|
Porsche, and the Porsche crest are registered trademarks of Dr. Ing. h.c. F. Porsche AG.
This site is not affiliated with Porsche in any way. Its only purpose is to provide an online forum for car enthusiasts. All other trademarks are property of their respective owners. |
|
|

  |

| FourBlades |
 Apr 13 2008, 06:15 PM Apr 13 2008, 06:15 PM
Post
#57
|
|
From Wreck to Rockin  Group: Members Posts: 2,056 Joined: 3-December 07 From: Brevard, FL Member No.: 8,414 Region Association: South East States |
Flip Your 914 the CSOB Way
I got fed up with working on the ground under my 914 so I decided to do something about it. I remembered a B&W photo showing a framework used in the olden days to flip a car and decided to build my own. I drew a careful scale drawing with extensive engineering analysis. Notice how I indicated where the Center of Gravity of the flipped car would end up. The computer enhanced drawing shows the car (to scale) in light blue. The key joint is indicated in scribbled shading. I also did a detailed study of the joint needed when frame members met in all three dimensions. 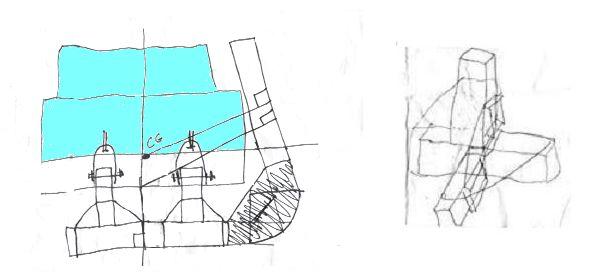 I decided the framework had to be 10 degrees from vertical so that it would be stable in either position and not show any unhealthy tendency to flip back unexpectedly. The key joint is between the flat and flipped parts of the frame. I made it round to make it easier to roll the car from one state to another. I briefly toyed with the idea of an octagonal frame with the car inside, however, scrap 2x4s on hand were limited. Here is how the key joint is made: 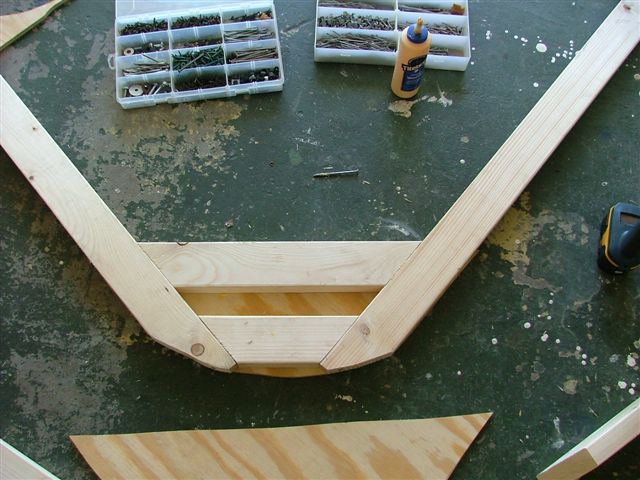 After making two of the key joint I got started putting it together. I leveled the two ground frame members and then bolted them to the front and rear suspension mounting points using equal length legs. I noticed my tub is about 1/4 inch twisted along its length. After that, I added additional support and frame members, bracing them with plywood triangles. This stage was part planning, part organic growth, and part paranoia over the whole thing collapsing. For those wishing to build a similar structure, the dimensions are: Length : whatever a 2x4 stud is (I think 93" because of the floor and top plates) Width: about 53" and 3 of those really little marks Height: 4 notches on those big ass sears jack stands on the rear, less on the front Anyway, I got it all together and started jacking up the side. 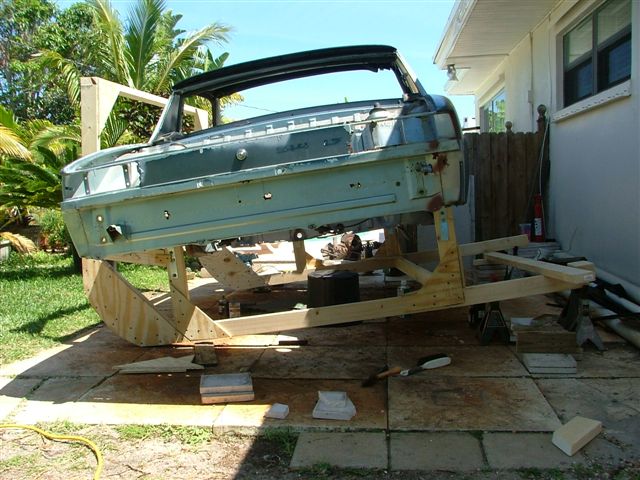 Here is a detail shot of the framework. Not sure it is elegant or minimal but it is surprisingly rigid and I did not run out of screws. 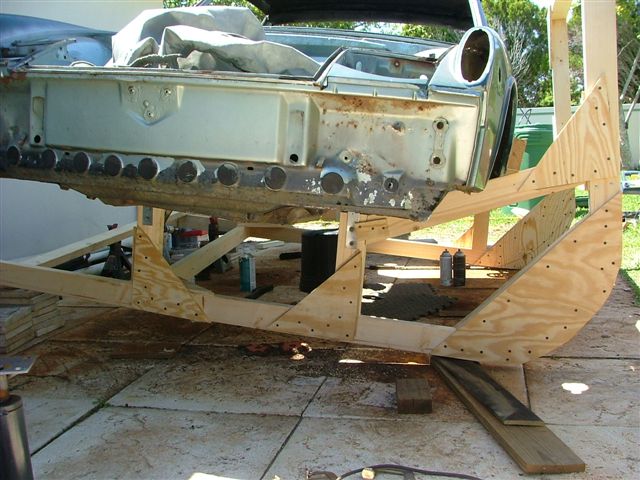 More frame details. Notice the 2x4 used to lever the frame higher and higher. Levering one end off the ground did not cause the other to sag noticebly. I don't know if that is a testament to the 914 rigidity or to my framework. My 3 dimensional joint study pays off... 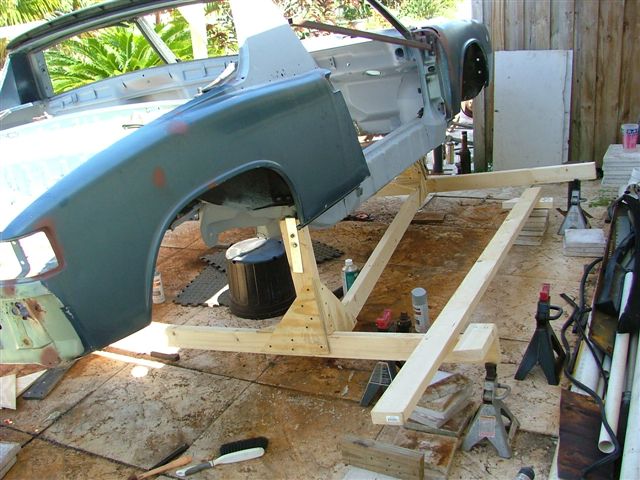 |
   |

 
|
| FourBlades |
Apr 13 2008, 06:21 PM
Post
#58
|
|
From Wreck to Rockin Group: Members Posts: 2,056 Joined: 3-December 07 From: Brevard, FL Member No.: 8,414 Region Association: South East States |
Flip Your 914 Part Deux
When the car was tipped about 40 degrees it started to get very light. At this point I figured I would see what happened if I pushed it the rest of the way by hand. 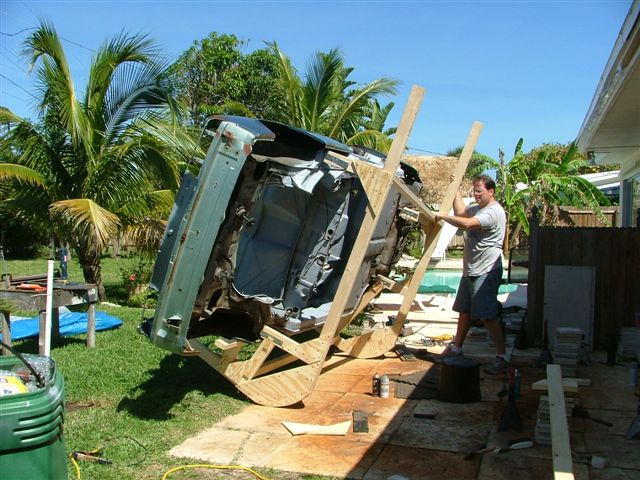 Tipping it the rest of the way was much like using a large dolly to move a filing cabinet. It is easy to get it back to the balancing point but going back to flat from there it gets really heavy. 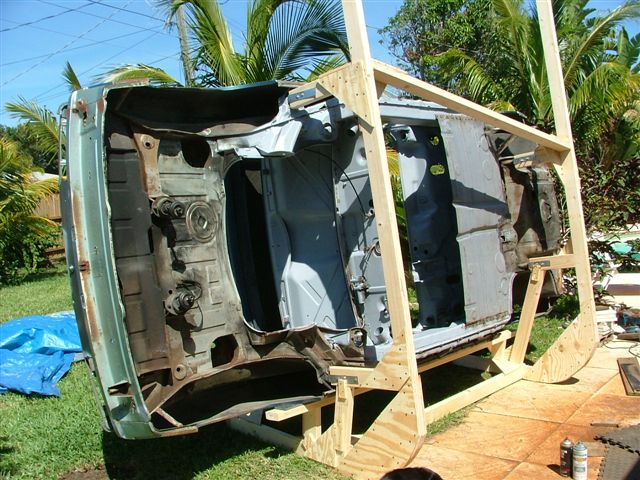 Thanks to careful calculations and planning it all worked out. (IMG:style_emoticons/default/rolleyes.gif) Looking forward to finishing the floor in a more vertical position. John |
|
|
|
| slow914 |
Apr 13 2008, 06:50 PM
Post
#59
|
|
Member Group: Members Posts: 150 Joined: 5-February 08 From: Kirkland, WA Member No.: 8,671 Region Association: Pacific Northwest |
dude, that is badass
|
|
|
|
| FourBlades |
Apr 13 2008, 06:59 PM
Post
#60
|
|
From Wreck to Rockin Group: Members Posts: 2,056 Joined: 3-December 07 From: Brevard, FL Member No.: 8,414 Region Association: South East States |
No, it is cheap ass! I think this cost about $50. But I'm glad you liked it. |
|
|
|
| Bartlett 914 |
Apr 14 2008, 09:04 AM
Post
#61
|
|
Advanced Member Group: Members Posts: 2,218 Joined: 30-August 05 From: South Elgin IL Member No.: 4,707 Region Association: Upper MidWest |
Looks pretty good. My car is on a rotisserie. It is a lot more versatile but your solution looks like it will be more than enough to change the pans. I can't imagine doing the pans on my back looking up. I am sure you will be able to do a good job on the pans and tunnel work.
|
|
|
|
| FourBlades |
Apr 15 2008, 08:13 AM
Post
#62
|
|
From Wreck to Rockin Group: Members Posts: 2,056 Joined: 3-December 07 From: Brevard, FL Member No.: 8,414 Region Association: South East States |
Mark, My motivation for doing it this way was to avoid spending $1000 on a rotisserie and use materials I mostly had already. I welded on the front part of the pans the old fashion way and it was hard to get good welds. I have fixed some problems in the steering rack area already that would have been a real pain with the car the normal way. John |
|
|
|
| Gint |
Apr 15 2008, 08:21 PM
Post
#63
|
|
Mike Ginter Group: Admin Posts: 16,106 Joined: 26-December 02 From: Denver CO. Member No.: 20 Region Association: Rocky Mountains |
That's kickass! Thanks for posting that.
|
|
|
|
| TROJANMAN |
Apr 15 2008, 08:38 PM
Post
#64
|
|
Looks nice in pictures......... Group: Members Posts: 5,275 Joined: 5-March 04 From: Colorado Member No.: 1,753 Region Association: None |
QUOTE(FourBlades @ Apr 13 2008, 05:21 PM)  Flip Your 914 Part Deux It's like a 914 Rocking Chair.............Cool (IMG:style_emoticons/default/aktion035.gif) |
|
|
|
| tracks914 |
Apr 15 2008, 09:14 PM
Post
#65
|
|
Canadian Member Group: Benefactors Posts: 2,083 Joined: 15-January 03 From: Timmins, Ontario, Canada Member No.: 153 Region Association: None |
That's just insane!!! For the 914 world that is definitely the best/cheapest rotisserie I have ever seen. I love it.
BTW good work on the car. |
|
|
|
| ericread |
Apr 16 2008, 12:15 AM
Post
#66
|
|
The Viper Blue 914 Group: Members Posts: 2,177 Joined: 7-December 07 From: Irvine, CA (The OC) Member No.: 8,432 Region Association: Southern California |
QUOTE(TROJANMAN @ Apr 15 2008, 07:38 PM) QUOTE(FourBlades @ Apr 13 2008, 05:21 PM) Flip Your 914 Part Deux It's like a 914 Rocking Chair.............Cool (IMG:style_emoticons/default/aktion035.gif) (IMG:style_emoticons/default/av-943.gif) A 914 rocking chair. Sounds like a good idea for some of us older owners. |
|
|
|
| McMark |
Apr 16 2008, 02:16 AM
Post
#67
|
|
914 Freak! Group: Retired Admin Posts: 20,180 Joined: 13-March 03 From: Grand Rapids, MI Member No.: 419 Region Association: None |
Either way you were gonna be famous. This way you're famous for making a wooden 'rotisserie'. The other way, your picture gets passed around the internet for a week of the guy who purposefully flipped his car and crushed it. (IMG:style_emoticons/default/av-943.gif)
I'm really glad it worked out, and that's a bad-ass rig! This thread has taught me that I need to think more in wood, and not confine myself to metal. I would have never thought of what you did. CHEERS! (IMG:style_emoticons/default/smilie_pokal.gif) |
|
|
|
| tdgray |
Apr 16 2008, 08:28 AM
Post
#68
|
|
Thank God Nemo is not here to see this Group: Members Posts: 9,706 Joined: 5-August 03 From: Akron, OH Member No.: 984 Region Association: None |
Congrats... now there is thinking outside the box. WELL DONE!
|
|
|
|
| Eric_Shea |
Apr 16 2008, 09:12 AM
Post
#69
|
|
PMB Performance Group: Admin Posts: 19,304 Joined: 3-September 03 From: Salt Lake City, UT Member No.: 1,110 Region Association: Rocky Mountains |
Way to go... cool thread! (IMG:style_emoticons/default/smilie_pokal.gif)
|
|
|
|
| FourBlades |
Apr 16 2008, 12:45 PM
Post
#70
|
|
From Wreck to Rockin Group: Members Posts: 2,056 Joined: 3-December 07 From: Brevard, FL Member No.: 8,414 Region Association: South East States |
Wow, thanks everyone. I'm glad people liked the idea. I was a little worried the whole thing would collapse and I would be digging a big hole to bury the wreckage. 914, what 914? (IMG:style_emoticons/default/confused24.gif) (IMG:style_emoticons/default/confused24.gif) I used to do a lot of wood working, like building accoustic guitars, so making stuff from wood is like second nature to me. I really like welding and working with metal now though, it is so much stronger and you can weld more metal back on if you cut off too much. Can't do that with wood. John |
|
|
|
| Eric_Shea |
Apr 16 2008, 02:17 PM
Post
#71
|
|
PMB Performance Group: Admin Posts: 19,304 Joined: 3-September 03 From: Salt Lake City, UT Member No.: 1,110 Region Association: Rocky Mountains |
QUOTE I really like welding and working with metal now though, it is so much stronger and you can weld more metal back on if you cut off too much. Can't do that with wood. Make me a Resonator! (IMG:style_emoticons/default/biggrin.gif) |
|
|
|
| FourBlades |
Apr 16 2008, 10:28 PM
Post
#72
|
|
From Wreck to Rockin Group: Members Posts: 2,056 Joined: 3-December 07 From: Brevard, FL Member No.: 8,414 Region Association: South East States |
Eric, I can make you a Dobro style guitar with a chrome 914 hubcap for the resonator cone. It would probably be a disaster sonically, but it would look really cool. (IMG:style_emoticons/default/biggrin.gif) (IMG:style_emoticons/default/biggrin.gif) (IMG:style_emoticons/default/biggrin.gif) John |
|
|
|
| FourBlades |
Apr 25 2008, 12:03 PM
Post
#73
|
|
From Wreck to Rockin Group: Members Posts: 2,056 Joined: 3-December 07 From: Brevard, FL Member No.: 8,414 Region Association: South East States |
Finished welding on the floor pans and primed them. Cleaned up a lot of little
holes and imperfections that were noticeable with the car on its side. 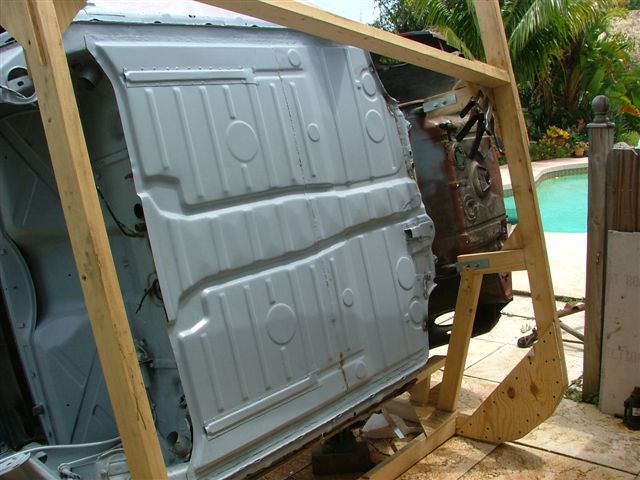 Spent some time cleaning the back of the engine bay and underside of the rear trunk while I have the car this way. 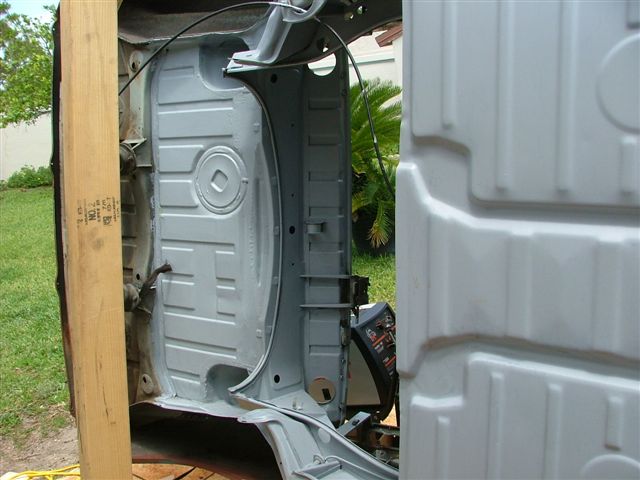 Moved on to finishing the front of the passenger area. All the lower 2" of this area was rusted to nothing. I made 11 separate patches to fix all this, some a while back and some today. A few of the patches are inside the gas tank area so you can't see them all here. The car looks like a jigsaw puzzle in a lot of places now. 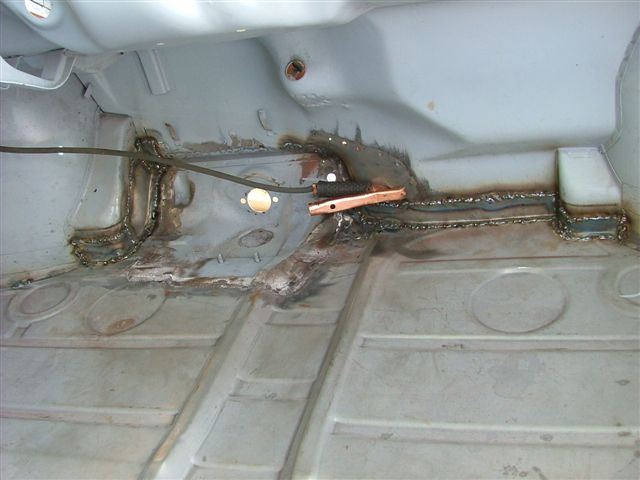 After grinding and priming this I will start rebuilding the tunnel. Thanks to Jeff Hail's awesome post on this I think I have some idea what to do. I also ordered some chromoly tubing from McMaster for this purpose. This article is also very useful in figuring out what all those tubes are for: http://www.pelicanparts.com/techarticles/9...nter_tunnel.htm I got front and rear trunk sections from PorscheAddic. He went way above and beyond the call of duty cutting way around the trunks to make sure I had enough metal. The pieces arrived in two coffin sized boxes with about 10 layers of cardboard added on. Great guy...thanks again. John |
|
|
|
| FourBlades |
Apr 26 2008, 05:44 PM
Post
#74
|
|
From Wreck to Rockin Group: Members Posts: 2,056 Joined: 3-December 07 From: Brevard, FL Member No.: 8,414 Region Association: South East States |
Primed front of passenger compartment and floor pan: 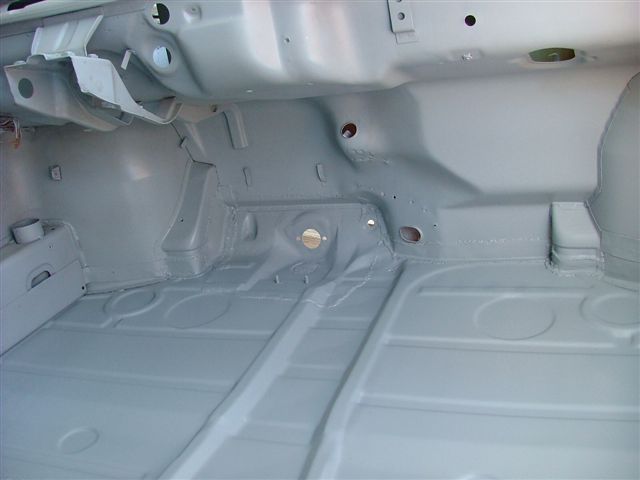 Nice.... |
|
|
|
| McMark |
Apr 27 2008, 01:22 AM
Post
#75
|
|
914 Freak! Group: Retired Admin Posts: 20,180 Joined: 13-March 03 From: Grand Rapids, MI Member No.: 419 Region Association: None |
Lookin' GREAT!!!!
|
|
|
|
| swl |
Apr 27 2008, 07:07 AM
Post
#76
|
|
Senior Member Group: Members Posts: 1,409 Joined: 7-August 05 From: Kingston,On,Canada Member No.: 4,550 Region Association: Canada |
Just freakin' awesome. I'm so impressed with guys like you, michelko, tracks914, freezing914 et al who have the patience and skill to bring rotted chassis back to life. Makes me feel inadequate too but I can live with that (IMG:style_emoticons/default/smile.gif)
|
|
|
|
|
1 User(s) are reading this topic (1 Guests and 0 Anonymous Users)
0 Members:

|
Lo-Fi Version | Time is now: 23rd March 2026 - 07:32 PM |
Invision Power Board
v9.1.4 © 2026 IPS, Inc.