|
|
|
Porsche, and the Porsche crest are registered trademarks of Dr. Ing. h.c. F. Porsche AG.
This site is not affiliated with Porsche in any way. Its only purpose is to provide an online forum for car enthusiasts. All other trademarks are property of their respective owners. |
|
|

  |

| 3d914 |
 Apr 21 2013, 09:51 PM Apr 21 2013, 09:51 PM
Post
#261
|
|
Senior Member  Group: Members Posts: 1,275 Joined: 24-September 03 From: Benson, AZ Member No.: 1,191 Region Association: Southwest Region |
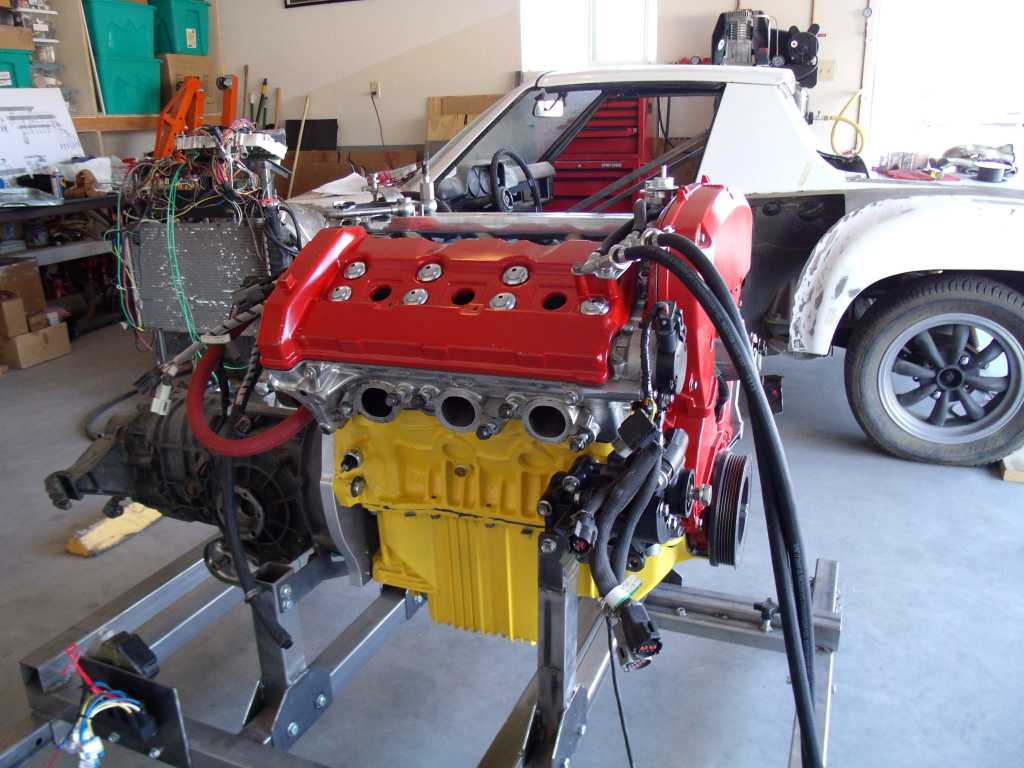
Got the motor back on the stand. Valve covers are on, oils in it, just need a few more hours to finish up the accessories, coolant plumbing, and connect up the wiring. Should be ready for a mid-week startup.
 |
   |

 
|
| 3d914 |
Apr 25 2013, 10:30 PM
Post
#262
|
|
Senior Member Group: Members Posts: 1,275 Joined: 24-September 03 From: Benson, AZ Member No.: 1,191 Region Association: Southwest Region |
Good news! Its back together, full of fluids, and ready for round two of bench tests.
Just got the oil pressure test done, and the light went out in about 20 seconds. Here's the video. Should be ready to run this weekend. |
|
|
|
| AZ914 |
Apr 26 2013, 07:36 AM
Post
#263
|
|
914 Dumbass Group: Members Posts: 1,469 Joined: 6-January 03 From: Sunny Tucson Member No.: 98 Region Association: Southwest Region |
Good Luck!!!
|
|
|
|
| 3d914 |
Apr 28 2013, 09:26 PM
Post
#264
|
|
Senior Member Group: Members Posts: 1,275 Joined: 24-September 03 From: Benson, AZ Member No.: 1,191 Region Association: Southwest Region |
Thanks, Jason.
Spent yesterday doing a basic breakin of the motor. It will still be many hours before these chrome rings seat fully, so I'll just keep running it off & on while finishing the bodywork on the 914. Here's a video of the latest run. Sound pretty good, but still getting some mild surging. Cold start seems to have more, but I'll sort that out as I go along. |
|
|
|
| Cairo94507 |
Apr 29 2013, 06:59 AM
Post
#265
|
|
Michael Group: Members Posts: 10,627 Joined: 1-November 08 From: Auburn, CA Member No.: 9,712 Region Association: Northern California |
Nice- Looking forward to seeing that in the car.
|
|
|
|
| 3d914 |
May 7 2013, 05:51 PM
Post
#266
|
|
Senior Member Group: Members Posts: 1,275 Joined: 24-September 03 From: Benson, AZ Member No.: 1,191 Region Association: Southwest Region |
Thanks, Cairo. Been working on some motor issues - mild surging has turned into stumbling. Will post some more when I have something solid.
I did decide to get back to the bodywork even though the engine isn't in peak condition. I'll just have to balance both. |
|
|
|
| 3d914 |
May 19 2013, 03:04 PM
Post
#267
|
|
Senior Member Group: Members Posts: 1,275 Joined: 24-September 03 From: Benson, AZ Member No.: 1,191 Region Association: Southwest Region |
Been dealing with stumbling idle and mid-rpm surging. Decided to pull the intake to check injectors, injector wiring, timing sensors, etc.
All the timing sensors checked out and injector wiring is correct. Got the O2 sensors cleaned along with the IAC (air by-pass). IAC was filthy - so it was likely contributing to cold start stumbling. I also checked all the injectors and all had good healthy spray of fuel. All held full pressure individually - so no leaking concerns. I did notice some cracking in all injector's black cushion rings so a new set is on order. Should be ready for another test run next weekend. Will report back then. |
|
|
|
| 3d914 |
May 24 2013, 02:17 PM
Post
#268
|
|
Senior Member Group: Members Posts: 1,275 Joined: 24-September 03 From: Benson, AZ Member No.: 1,191 Region Association: Southwest Region |
Well injectors seals are back on, fuel rails in, manifolds on, fuels lines are all hooked up and I'm ready to test this motor again.
But wait - daughters HS graduation is this evening so rest of the afternoon will be spent elsewhere. But I'll be back bright and early tomorrow to see how this runs. |
|
|
|
| Cairo94507 |
May 24 2013, 05:20 PM
Post
#269
|
|
Michael Group: Members Posts: 10,627 Joined: 1-November 08 From: Auburn, CA Member No.: 9,712 Region Association: Northern California |
Congratulations and good luck (IMG:style_emoticons/default/beer.gif)
|
|
|
|
| 3d914 |
Jun 3 2013, 07:57 PM
Post
#270
|
|
Senior Member Group: Members Posts: 1,275 Joined: 24-September 03 From: Benson, AZ Member No.: 1,191 Region Association: Southwest Region |
After long last - Yee Ha - I've got a good running SHO! (IMG:style_emoticons/default/piratenanner.gif)
Spent the weekend working out the final bugs, here's what it took:
Rechecked O2 output and its now steady and w/in spec. Fuel pressure is holding properly. I need to recheck the IAC valve on a cold-start because the last values I got over the weekend didn't look good. But it's sounding really good. The little bit of hunting at idle I think has to do with run time. I just need to get more time for the PCM to register settings. Here's an updated video. (IMG:style_emoticons/default/piratenanner.gif) |
|
|
|
| Chris H. |
Jun 3 2013, 09:19 PM
Post
#271
|
|
Senior Member Group: Members Posts: 4,083 Joined: 2-January 03 From: Chicago 'burbs Member No.: 73 Region Association: Upper MidWest |
Sounds really smooth! Nice work!
|
|
|
|
| Mike Bellis |
Jun 3 2013, 09:34 PM
Post
#272
|
|
Resident Electrician Group: Members Posts: 8,348 Joined: 22-June 09 From: Midlothian TX Member No.: 10,496 Region Association: None |
Get it on the road! Time to drive!!! (IMG:style_emoticons/default/driving.gif)
|
|
|
|
| Cairo94507 |
Jun 4 2013, 03:36 PM
Post
#273
|
|
Michael Group: Members Posts: 10,627 Joined: 1-November 08 From: Auburn, CA Member No.: 9,712 Region Association: Northern California |
Gerard- Sounds good. Really looking forward to seeing it in the car. Love those Yamaha engines - they rev so nice.
|
|
|
|
| 3d914 |
Jun 6 2013, 07:27 PM
Post
#274
|
|
Senior Member Group: Members Posts: 1,275 Joined: 24-September 03 From: Benson, AZ Member No.: 1,191 Region Association: Southwest Region |
Thanks guys.
Next up is a rolling stand for the car so that I can do test fitting of the motor. I'm sure it will require multiple attempts so the body will sit at a fixed height. I'll use my ATV lift under the engine cradle to lift it to the needed height. Pics to follow. |
|
|
|
| 3d914 |
Jun 16 2013, 05:26 PM
Post
#275
|
|
Senior Member Group: Members Posts: 1,275 Joined: 24-September 03 From: Benson, AZ Member No.: 1,191 Region Association: Southwest Region |
Well got the steel for the car dolly Saturday so I hope to start on that during the week. Had a good run of the SHO motor today. With a single fan/shroud I borrowed from a buddy I was able to run it longer. Did a 30 minute run today. I varied the rpm range every little bit and only let idle twice. Will do a 60 min run sometime this next week.
|
|
|
|
| 3d914 |
Jun 20 2013, 10:31 PM
Post
#276
|
|
Senior Member Group: Members Posts: 1,275 Joined: 24-September 03 From: Benson, AZ Member No.: 1,191 Region Association: Southwest Region |
OK another good test run, this time an hour long. Still getting codes on the IAC valve - which makes sense because the values were off when I tested it at cold start. Time to order a new one.
Other than that the run went well. |
|
|
|
| 3d914 |
Jul 7 2013, 08:02 PM
Post
#277
|
|
Senior Member Group: Members Posts: 1,275 Joined: 24-September 03 From: Benson, AZ Member No.: 1,191 Region Association: Southwest Region |
OK, well rainy season hit before I got the gutters on the house finished so I've been dodging the rain. Got them finished up Friday though with the long weekend.
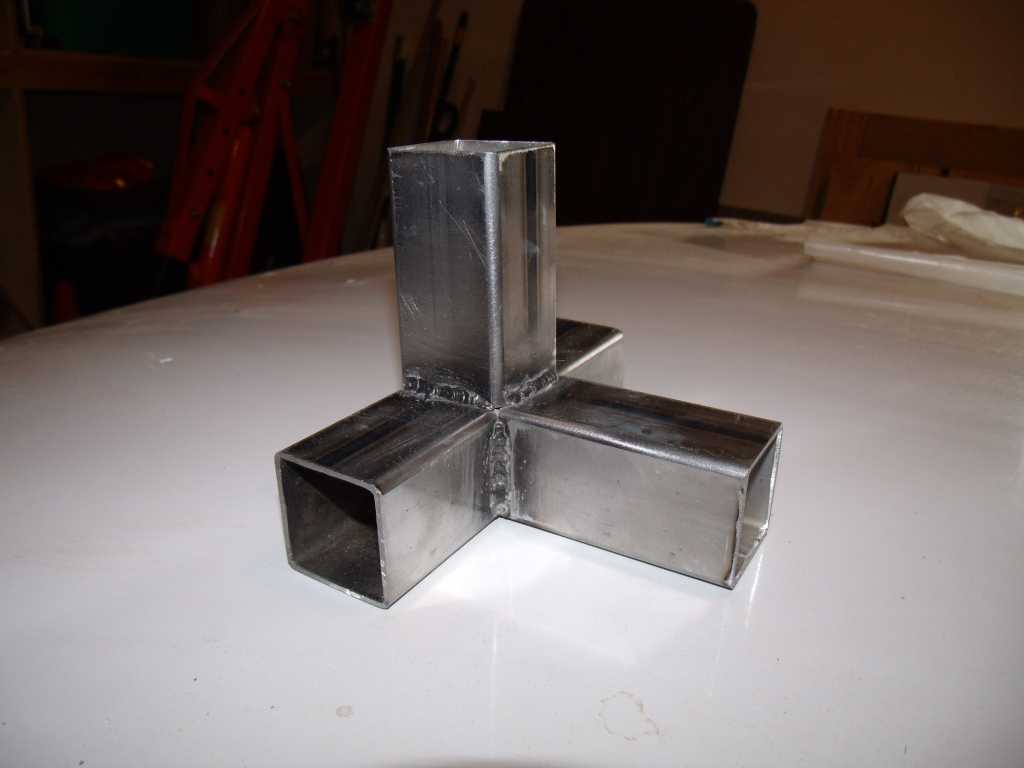
Spent today building a fixture for the car dolly weldments from some scrap wood. The weldments are made from 3-inch and 6-inch 1-1/2 inch sq tubing - all at right angles. So hopefully I can do a decent job of getting them to come out right. There are ten separate weldments. Should be able to get some time during the week to begin welding, so I'll post some pictures as I do. |
|
|
|
| 3d914 |
Jul 10 2013, 07:18 AM
Post
#278
|
|
Senior Member Group: Members Posts: 1,275 Joined: 24-September 03 From: Benson, AZ Member No.: 1,191 Region Association: Southwest Region |
Here's the first of the three weldments. This is a three-way bracket for the lower four corners of the dolly. They're rotated at each corner so that each side gets one pass-thru and one butt joint. This allows me to adjust the fit. The lower cross pieces will be approx 54" in length, bolted at the butt joint and match-drilled and bolted to fit at the pass-thru end.
 |
|
|
|
| 3d914 |
Jul 13 2013, 06:56 PM
Post
#279
|
|
Senior Member Group: Members Posts: 1,275 Joined: 24-September 03 From: Benson, AZ Member No.: 1,191 Region Association: Southwest Region |
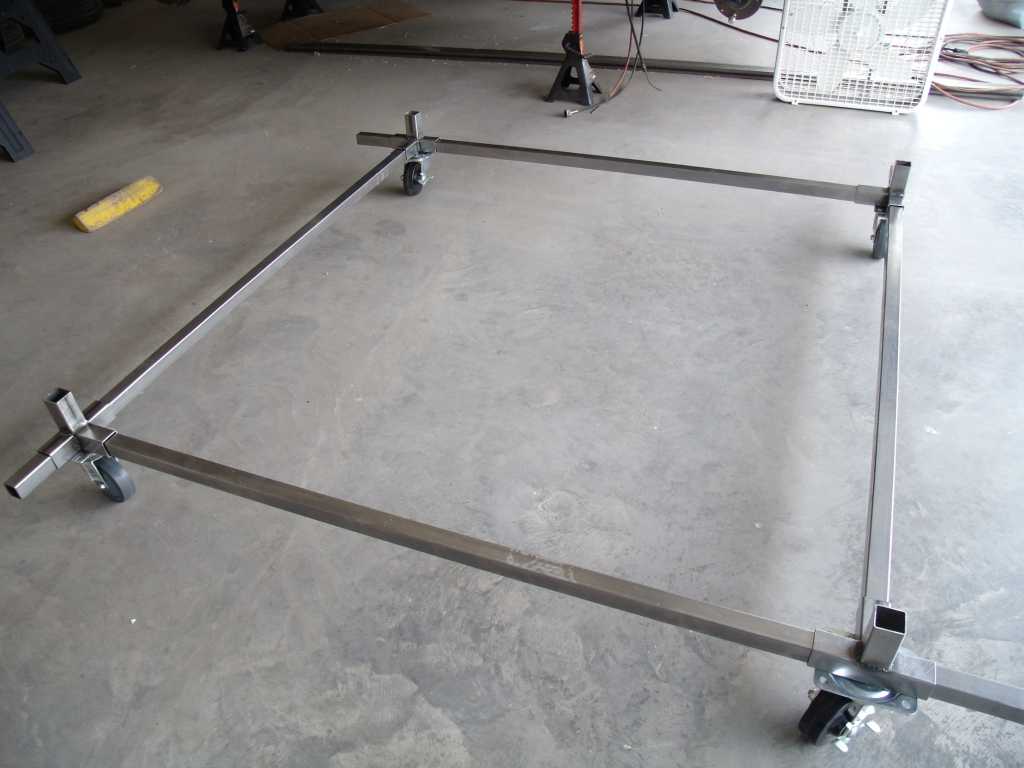
Got the 3-ways mounted to the casters and cut the cross pieces that will be match-drilled. Next are the vertical pieces.
 |
|
|
|
| bulitt |
Jul 13 2013, 07:37 PM
Post
#280
|
|
Achtzylinder Group: Members Posts: 4,189 Joined: 2-October 11 Member No.: 13,632 Region Association: South East States |
You must be German, the time and effort spent on engine test stand, dolly, WOW.
I had three inch casters on my dolly. The tube without engine or suspension was difficult to move and kept popping ball bearings out. Just went to the 5" rubber casters from HD. The car rolls so easy its scary. Cant tell what your are using but you may want to consider putting big ones on before you get it all finished and the car loaded. |
|
|
|
|
1 User(s) are reading this topic (1 Guests and 0 Anonymous Users)
0 Members:

|
Lo-Fi Version | Time is now: 9th May 2026 - 08:34 PM |
Invision Power Board
v9.1.4 © 2026 IPS, Inc.