OK here goes . . .
I sold my beautiful Ravenna 914/2.0 so I could develop a custom 914 in good conscience. The sweet Ravenna was to stock to cut up and customize, & an admiring buyer wanted to return her to full stock - so it seemed like the perfect match.
Now I've found a 74 1.7 that someone has already led down the path of the Dark Side (as the puritans see it), and I'll simply take it the rest of the way. Just as a warning - this is not meant to be a factory GT look alike or anything close. I want to incorporate some of my own ideas and those I like that others have done. In fact at this point its not even going to be a Porsche six. My initial intent is to go with the Ford 3.0L SHO. Plans may change when I get to that point, but that's where I'm headed.
It seems reasonable to start with Before pics, so heres a couple of the car before I started any dismantling:
Click to view attachment
Click to view attachment
Full Version: 3D914s 914-6 SHO 3.2L v6
OK now we get down to the fun stuff - stripping! 
First are the bumpers and that very overstated rear spoiler.
Click to view attachment
You'll note that the original color is black, and it doesn't look like there are any other colors between that and the current white. This should simplify some of the prep work for a complete strip sown and repaint.
Click to view attachment
Next I wanted to clean out most of the interior. The seats are in good order as is the upper & lower dash. The seat rails had the adjustment arms jammed up in between the rails, so it was necessary to use a lonnnnngg screw driver to lift the rear portion of the arm so I could move the seats forward.
Anyone with a used set of seat rails in good condition - let me know.
The back pad was already in pieces, no console, or A/C (though all are on my list of desirables).
I'm limiting the stripping at this point to just what is needed to ascertain the overall body condition, locate any holes or rust, and identify any repair work for the FG flares.
So here's the interior as it stands. I'm wondering if this insulator pad can be removed all in one piece. I know its glued on, but I think it will stay together. Anyone BTDT?
Click to view attachment
Floor material is still in good order also. I've cleaned around some areas where surface rust is visible, but removing the edge of the rubberized sealer reveals clean metal. Since this stuff is still pliable, I'm going to leave what I can. I'll just expose the surface rust, treat it, then recover with Wurth's or something similar.
Click to view attachment
Being the suspicious type that I am (especially of PO's) I decided to focus my initial efforts on the FiberGlass flares. After viewing them from underneath it was evident that someone (I suspect Maaco since I found their business card in the car) took some shortcuts installing the flares.
The metal was cut to overlap the FG joint & this was good. However, it doesn't look like any kind of sealant or adhesive was used between the metal and the flares - this is bad. They used the rivet method, and all the rivets appear to be holding. There are only a few minor cracks around the flares, but I don't know how long they've been on.
So its on to see what lies beneath the paint.
However, before starting all that sanding I need to find a simple way to contain this mess. So I made a trip down to the local hardware store and picked up some 3/4in PVC and fittings to build myself a 3x5x6 ft sanding booth.
Click to view attachment
I enclosed it with some 4-5mil plastic I had around on all but the bottom and half the front - to give me an area to work. I could then drape the rest over the car.
Click to view attachment
Well the portable sanding booth worked well. I started on the right rear fender using a 6in orbital sander. Since I'm new to pneumatic tools I wanted to start off with just 80 grit so as not to sand right through the fender. Within 30 minutes I moved down to 40 grit and was able to make good progress.
What I discovered though only indicated that more work was ahead. It appears my friends at Maaco used Body Filler as their means of bonding the flares to the metal. This won't do. After consulting with the body shop that did the terrific repair work on Ravenna's tail end, it seems there will be more work needed as I thought.
Since they did not use any FG matt and resin to bond the flares to the metals fenders, I will need to sand down the existing filler so that this can be done. I also want to repeat the similar process underneath and close off the gap between the flares and the cut fender edge to prevent moisture from getting up underneath the fiberglass.
Click to view attachment
another one saved (sort of  )
)
 Andy
Andy
PS: wouldn't hurt to add it to our VIN database either ...
http://www.914world.com/bbs2/index.php?act=membervins
) AndyPS: wouldn't hurt to add it to our VIN database either ...
http://www.914world.com/bbs2/index.php?act=membervins
Thanks for posting the progress pics. Looking forward to future installments.
Jim
Jim
bondo to attach the flares!? seems like a good push on the flare would have broken them off...is this normal for shops to do that?
Very cool Gerard. When will we see it completed at a local dinner?
Thanks for the encouragement guys. I think this one is going take more than the summer to complete - maybe two!
OK, I've reached one of those - "Am I on the right track" moments (Bodyshop newbie). I've sanded down enough to see that adjacent to the edge of the FG flares there is body filler over the metal all the way around the flare. Here's a pic. Yellow indicates metal, red indicates body filler.
Click to view attachment
Since I want to do this correctly and apply FG & resin to adhere the flare to the metal, I need to get all the adjacent body filler sanded down to metal - right?
And I should have a small lip where the flare overlaps the metal fender that will get filled with the bonding FG - right?
See some more pics.
Click to view attachment
Now to move over to the driver's side. This is not going to be pretty.
QUOTE(3d914 @ Apr 4 2008, 06:50 PM) 
Since I want to do this correctly and apply FG & resin to adhere the flare to the metal, I need to get all the adjacent body filler sanded down to metal - right?
I would. Glassing to bondo is like the tail wagging the dog.
QUOTE(3d914 @ Apr 4 2008, 06:50 PM)
And I should have a small lip where the flare overlaps the metal fender that will get filled with the bonding FG - right?
Seems reasonable to me.
A propane torch makes removing bondo a lot easier. Not sure what it would do to your glass flares though. Are you planning to pull the flares off or leave them riveted on and glass them to the steel?
AT this point I'm planning to leave them riveted on since they appear to be securely attached - at least in that regard.
Go to your local Harbor Frieght and pick up a portable sand blaster and blast all the filler off. They are inexpensive. Do it in the yard, the sand is good for the grass!  The is the only way to remove it all.
Try this: http://www.harborfreight.com/cpi/ctaf/disp...temnumber=34202
The is the only way to remove it all.Try this: http://www.harborfreight.com/cpi/ctaf/disp...temnumber=34202
Randy,
That's not a bad idea. My only concern would be how to keep from affecting the FG at the same time. Can you direct the flow of the sand that accurately to get precise?
PS: Harbor Freight has become my second home.
Thanks,
That's not a bad idea. My only concern would be how to keep from affecting the FG at the same time. Can you direct the flow of the sand that accurately to get precise?
PS: Harbor Freight has become my second home.
Thanks,
OH the shame of it! I've never seen anything so  up!.
up!.
I knew something was squirly with the drivers side, but I couldn't tell exactly. That is until I got past some of the body filler.
All I can say is SEE FOR YOURSELF!
Click to view attachment
It appears someone cut out the lower portion adjacent to the flare. Probably before the flare was added.
I was at the point of chipping away filler with a CHISEL!
Click to view attachment
Now it looks like I'll have some metal work to do. Guess I'll get some use out of that welder finally. Now I just have to find a decent quarter panel to cut pieces from.
I'm just glad I didn't pay more for this car than I did.
up!.I knew something was squirly with the drivers side, but I couldn't tell exactly. That is until I got past some of the body filler.
All I can say is SEE FOR YOURSELF!
Click to view attachment
It appears someone cut out the lower portion adjacent to the flare. Probably before the flare was added.
I was at the point of chipping away filler with a CHISEL!
Click to view attachment
Now it looks like I'll have some metal work to do. Guess I'll get some use out of that welder finally. Now I just have to find a decent quarter panel to cut pieces from.
I'm just glad I didn't pay more for this car than I did.
QUOTE(3d914 @ Apr 5 2008, 04:19 PM)
OH the shame of it! I've never seen anything so
up!.I knew something was squirly with the drivers side, but I couldn't tell exactly. That is until I got past some of the body filler.
All I can say is SEE FOR YOURSELF!
Having owned a car that was banged in the same spot, I always put my hand in there (through the wheel well) to feel for a cave in or wrinkle.


Oh and remember that post about propane and bondo? That will really help you there.
This is the first I've been able to get back to the "black hole" since last week. After a couple hours of sanding, cutting, banging, I've cleared out the bulk of the filler to expose the metal around the edges that I have to work with.
It's as I thought. But there is enough there to do either a lap joint or a butt joint, depending on how badly mis-shaped the metal is. I feel a lot better at least knowing whats not behind there anymore. The filler is typically 3/8-1/2in thick!
Its also a given that the entire flare will have to be removed from this side. That's the next step.
Click to view attachment
Click to view attachment
Oh yeh!
About the propane & bondo thing, and the sand-blasting. How do I protect the flares so that they are unaffected by the heat or the sand?
TIA,
About the propane & bondo thing, and the sand-blasting. How do I protect the flares so that they are unaffected by the heat or the sand?
TIA,
here is what I did....I actually cut each and every section you see here @ about 1.5" and then bent in in 90 deg and then moved outabout 1/8" and bent it back up(with simple vice grips) in essense I recessed the metal to allow the flares to sit almost flush and therfore minimized the amount of bondo. I should also add that this was VERY time consuming and took 50 rvits per fender but damn it looks good!!
BTW this was from my "jackstand resto" 8 yrs ago!
Sorry for the poor pic!
Josh
Click to view attachment
BTW this was from my "jackstand resto" 8 yrs ago!
Sorry for the poor pic!
Josh
Click to view attachment
QUOTE(3d914 @ Apr 10 2008, 08:08 PM)
Oh yeh!
About the propane & bondo thing, and the sand-blasting. How do I protect the flares so that they are unaffected by the heat or the sand?
TIA,
Not sure. Just don't put the flame directly on the glass?
QUOTE(3d914 @ Apr 10 2008, 08:06 PM)
This is the first I've been able to get back to the "black hole" since last week. After a couple hours of sanding, cutting, banging, I've cleared out the bulk of the filler to expose the metal around the edges that I have to work with.
It's as I thought. But there is enough there to do either a lap joint or a butt joint, depending on how badly mis-shaped the metal is. I feel a lot better at least knowing whats not behind there anymore. The filler is typically 3/8-1/2in thick!
Its also a given that the entire flare will have to be removed from this side. That's the next step.
Click to view attachment
Click to view attachment
I'd drill out all those frigging rivets. Their just gonna allow moisture to wick up and create rust spots and electrolysis problems due to aluminum and steel next to each other. Heat the metal with a torch while working a putty knife between the flare and the flare should pop right off. When it comes time to bond the flare back on either use epoxy or urethane panel adhesive with temporary screws to hold fender on. When cured unscrew the screws and massage adhesive into the screw holes. This typically will create a more likely to be bullet proof repair.
Its been a while but I haven't been slacking. . .
I stayed with just sanding for the time being, using 60 grit and an electric orbital sander. I'm comfortable with this technique and can accurately control how much I take off. On the flares I'm going down to the gel-coat (if its still called that) - its white in this case.
I've drilled out the rivets on the drivers side & removed the tire for better access. I've discovered that they did use some type of bonding material between the flare and the metal - as its apparent from the underside, even though there is a 1 1/2 - 2in overlap of metal. The material appears blackish in color, is very hard, and seems somewhat brittle. I've encountered some areas of this near the bottoms of the flare where they connect to the body panel.
So its not going to be just a matter of removing the rivets and filler and pulling off the flare. I'd like to be able to get them off without damaging them.
Ideally if this bonding agent is satisfactory, I'd be glad to leave it & the flares in place, and continue with FG cloth and resin on the outer part of the flare/fender. I also came across a combination bonding agent/filler called Dyna-Weld. It would be better to have this material between the flares and metal. But if I can't get them off without breaking them off, it will serve well as an outer filler/bonding agent.
Well, some good news.
I took a break from the back flares and decided to see whats under the front flares. Starting with the right-front, I found some good news. It appears this one was done correctly in that they used FG cloth and resin to bond/blend the outer flare to the body panel. I can still feel rivets underneath, but at least this technique should provide a better basis to work from.
If the left-front flare is the same, I'll plan on leaving them in place and just remove all the extra filler. It almost seems like they wanted to change the shape of the flares because all the nice radii are filled with putty to increase the radius. Weird!
Click to view attachment
Click to view attachment
I also checked on the underside, and here they also used cloth and resin to completely enclose the seam. Sure hope the left-front flare is the same.
i think you're taking a real sensible approach to the flares. how was the trapped area behind the sealent? any rust?
k
k
rhodyguy,
No rust in the fender/flares at all so far. Its been real clean aside from the mediocre assembly in the rear. I'm sure it helped that the car has been limited to CA & AZ.
No rust in the fender/flares at all so far. Its been real clean aside from the mediocre assembly in the rear. I'm sure it helped that the car has been limited to CA & AZ.
Well, I made some important progress this weekend. I set aside the sander and started getting measurements for the transmission and the cross-section of the engine bay. From this I feel I can get a good idea of engine fit. I've entered all the data into CAD and here is what I have so far.
Click to view attachment
The different colors should be obvious as to what they represent with the exception of the two blue lines. Those are the front-to-back limits of the SHO V6 engine relative to the forward face of the tranny - or in this case the adapter plate in front of the tranny. The upper part of the heads/intake over-hangs to the rear. I don't have the various heights yet.
I have a local contact that I'll be following up with to get some accurate dimensions of the engine. Once these are plugged in and I do a back view, I'll have a decent idea of what interferences I may have.
Keep you posted.
OK,
First let me say a big THANK YOU to Tom ( a local SHO rail owner) for allowing me access to his shop to get the necessary dimensions. Tom's been using SHO motors in his rails for years and has amassed a great deal of data and insight into these engines - including turbos & super-chargers.
Here's how it came out. The engine of choice for a longitudinal mount would be the 3.2L used in the automatics. One main reason is that the 3.2 has a single auto-tensioning serpentine belt, whereas the 3.0L has two and require manual adjustment and more space.
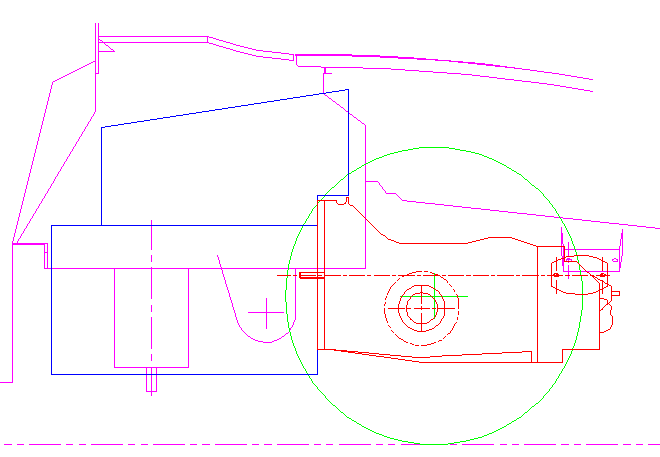
Take a look at the final best-fit I can come up with.
Magenta - engine bay and body parts.
Red - 901 Tranny
Green - 24" dia wheel/tire
Blue - engine outline
Click to view attachment
Here's a few things I have to consider:
Now the tough part. Do I proceed?
First let me say a big THANK YOU to Tom ( a local SHO rail owner) for allowing me access to his shop to get the necessary dimensions. Tom's been using SHO motors in his rails for years and has amassed a great deal of data and insight into these engines - including turbos & super-chargers.
Here's how it came out. The engine of choice for a longitudinal mount would be the 3.2L used in the automatics. One main reason is that the 3.2 has a single auto-tensioning serpentine belt, whereas the 3.0L has two and require manual adjustment and more space.
Take a look at the final best-fit I can come up with.
Magenta - engine bay and body parts.
Red - 901 Tranny
Green - 24" dia wheel/tire
Blue - engine outline
Click to view attachment
Here's a few things I have to consider:
- The centerline for the crank is just below the seam where the oil pan and block mate. This leaves the stock oil pan in place with no mods and out of harms way.
- The 901 transaxle will need to be brought foward and down 1" in each direction. Its likely this will move backward as the adapter plate and clutch may require more depth than I allowed.
- The angled part of the trunk will have to be removed and re-aligned up to match the adjacent vertical wall. That way an extra rib can be added to the trunk and it can still be sealed properly, with space for luggage.
- The firewall at the seats will have to be modified. I don't mind eliminating this as I was going to do a custom back-pad anyway, and I never have my seat all the way back.
- The center section of the forward part of the trunk lid will have to be cut to accommodate the intake & throttle body. The TB can be rotated vertically and air could be fed via a custom ram scoop. I'd even considering adjusting the engine height upward slightly so that the intake manifold can be exposed.
- THe only other BIG downer on the whole deal is the weight. Fully dressed, this engine comes in at 500 lbs. That is first hand info, not second hand speculation.
Now the tough part. Do I proceed?
QUOTE(3d914 @ May 14 2008, 08:05 PM)
Now the tough part. Do I proceed?
Man, thats a lot of work for 220hp and 500lbs. Practical answer, I would do a suby. But if you want the challenge, then.......
Have you given thought to either transverse mount with the SHO manual tranny? What about the Duratec 3.0 V6?
Bryan,
Yes, I've thought about both. No on the transverse. And the Duratec 3.0 is on my list of engines along with the EG33 and another Ford, the Essex 3.8L. I need to get a weight on the EG33 to compare. I know the Essex is cast-iron block, while the Duratec is alumiyumyum.
A strange thought occurred to me - what would it take to machine an aluminum block for the SHO motor? Probably more than I think.
I'll also have to get an idea of what some of the V8's weigh in at. If its comparable to those, then I'd go for it.
It may seem like a lot for 220HP, but I'm thinking down the road. In turbo or super-charged form, the SHO is good for upto 500hp or more.
Still thinking . . .
I'm having a hard time deciding since I'd really like to use the SHO, so I decided to wait and collect more data on my top engine choices before I commit to one. It may just be a process of elimination.
Here is my current list of potential swaps. The blue rows are top choices based on the data I've found so far.
Click to view attachment
I did get the remaining front flare sanded this weekend. So now I have a better scope of the repair work.
For the fronts I'm just going to remove the remaining filler; leave the existing bonded flare in place; leave the existing clothe and resin blend, and put added clothe and resin on the back side as extra precaution.
For the backs, I'm going to visit the body shop and see if they can give me some idea what the bonding material in the back is. If its acceptable, I'll leave the flares attached, but go through redoing all the blending and sealing of the front and back sides as it should have been done. If the bonding material isn't acceptable - they'll have to come off.
I am no expert but 500hp and a 901 transaxle may not be compatible.
Are you sure? 
QUOTE(3d914 @ May 22 2008, 12:38 PM)
Are you sure?
WHY WHY WHY cant you just put a flat 6 in the damn thing and drive the wheels off it .Your gonna dump a crappie ford motor in it have too much power and twist it all up and have to add stiffners and all that crap.and spend tons just to have it in the bone yard shortly after you wreck it !!!!!!!!! dont bendem mendem..good luck whatever you do.................... Just had to vent

QUOTE(6freak @ May 22 2008, 12:53 PM)
QUOTE(3d914 @ May 22 2008, 12:38 PM)
Are you sure?
WHY WHY WHY cant you just put a flat 6 in the damn thing and drive the wheels off it .Your gonna dump a crappie ford motor in it have too much power and twist it all up and have to add stiffners and all that crap.and spend tons just to have it in the bone yard shortly after you wreck it !!!!!!!!! dont bendem mendem..good luck whatever you do.................... Just had to vent
'crappie ford' motors? Conan O'Brien really likes them Check this Video

Well - excuuuuse meeee!
If you can't stomach Ford's, then perhaps a Subi EG33 will suit you pallet.
Here's my fit check for the Subi EG33 (SVX) motor from dimensions Kent (914Helo) provided. This looks a lot more promising, fit wise. Especially since Ken't had the engine in his 914 and has verified the fit.
Still . . . it is tempting to try something no one else has done yet - even if it is a FORD!
EG33 Fit check:
QUOTE(bryanc @ May 22 2008, 07:06 PM)
QUOTE(6freak @ May 22 2008, 12:53 PM)
QUOTE(3d914 @ May 22 2008, 12:38 PM)
Are you sure?
WHY WHY WHY cant you just put a flat 6 in the damn thing and drive the wheels off it .Your gonna dump a crappie ford motor in it have too much power and twist it all up and have to add stiffners and all that crap.and spend tons just to have it in the bone yard shortly after you wreck it !!!!!!!!! dont bendem mendem..good luck whatever you do.................... Just had to vent
'crappie ford' motors? Conan O'Brien really likes them Check this Video
Calls his motor the "RANCH" , cause that were the 220 Horses live.
Smitty
QUOTE(Smitty911 @ May 22 2008, 09:56 PM)
QUOTE(bryanc @ May 22 2008, 07:06 PM)
QUOTE(6freak @ May 22 2008, 12:53 PM)
QUOTE(3d914 @ May 22 2008, 12:38 PM)
Are you sure?
WHY WHY WHY cant you just put a flat 6 in the damn thing and drive the wheels off it .Your gonna dump a crappie ford motor in it have too much power and twist it all up and have to add stiffners and all that crap.and spend tons just to have it in the bone yard shortly after you wreck it !!!!!!!!! dont bendem mendem..good luck whatever you do.................... Just had to vent
'crappie ford' motors? Conan O'Brien really likes them Check this Video
Calls his motor the "RANCH" , cause that were the 220 Horses live.
Smitty
Ford Chevy Subi .How bout a Cummins Turbo deisel600 pounds of torque 300 ponys
.Its your car and money do what YOU want to! I guess i just hate see`n um get cut up............... seriously good luck
Come on guys - give me a break. If you've read any of the previous posts you'd know that this is not my first 914 (my 4th) and that I purposely picked a delinquent car and not a nice roller to do this Non-Standard conversion on.
(Previous three 914's)


I want, as much as anyone else, to maintain those nice stock 914's as much as possible - which is the very reason I sold my previous Ravenna beauty and didn't do a conversion (not even a Porsche six) on her. And I was careful to sell her to someone who intended to return her closer to stock that I had.
I can assure you this is not going to be an everyday "hack job". In fact I'm going to great lengths to undo someone else's "hack job". So let's keep this all in perspective - shall we!
Here's an eye-opener link you need to view if you think that non-porsche motivation in 914's is an uncommon thing. Keep in mind also that this link is over three years old.
Enjoy!
Now back to the show!
(Previous three 914's)
I want, as much as anyone else, to maintain those nice stock 914's as much as possible - which is the very reason I sold my previous Ravenna beauty and didn't do a conversion (not even a Porsche six) on her. And I was careful to sell her to someone who intended to return her closer to stock that I had.
I can assure you this is not going to be an everyday "hack job". In fact I'm going to great lengths to undo someone else's "hack job". So let's keep this all in perspective - shall we!
Here's an eye-opener link you need to view if you think that non-porsche motivation in 914's is an uncommon thing. Keep in mind also that this link is over three years old.
Enjoy!
Now back to the show!
QUOTE(Cevan @ May 18 2008, 05:47 PM)
I am no expert but 500hp and a 901 transaxle may not be compatible.
 the 901 won't hold up to the torque ... Andy
QUOTE(3d914 @ May 18 2008, 03:55 PM)
I'm having a hard time deciding since I'd really like to use the SHO, so I decided to wait and collect more data on my top engine choices before I commit to one. It may just be a process of elimination.
Here is my current list of potential swaps. The blue rows are top choices based on the data I've found so far.
Click to view attachment
I did get the remaining front flare sanded this weekend. So now I have a better scope of the repair work.
For the fronts I'm just going to remove the remaining filler; leave the existing bonded flare in place; leave the existing clothe and resin blend, and put added clothe and resin on the back side as extra precaution.
For the backs, I'm going to visit the body shop and see if they can give me some idea what the bonding material in the back is. If its acceptable, I'll leave the flares attached, but go through redoing all the blending and sealing of the front and back sides as it should have been done. If the bonding material isn't acceptable - they'll have to come off.
I found a notation on the SVX/Vanagon site that the eg33 weighs 387# according to KEP. That is minus flywheel and clutch. The case and heads are aluminum alloy.
Thanks Kelty,
I'll add that to my database info.
I'll add that to my database info.
Didn't do much this weekend. My son was home from college for just a few days to get everything ready for his summer internship. This included lots of little prep items for the 924S he taking over to CA to use during the summer. Biggest job was replacing the drive and balance belts & one tension roller. Went real smooth though.
I did take an extra couple days off though. So I was able to work on the front end a little. Started off by removing all the adhesive from the trunk firewall. Used the Aircraft Decal & Adhesive Remover. Works OK.
I also removed the head lights, motors, assemblies, and all the associated wiring.
Click to view attachment
And removed the trunk lid.
Click to view attachment
You may not be able to notice in the pic, but the spliced every single wire in the front and only crimped the connections. I'll have to go through all this and solder connections, and add appropriate heat-shrink. Don't need any flaky electrical problems. I'll be deleting some of the wiring in the process - like the side marker lights.
Click to view attachment
I also spent some time taking measurements on the engine in my wife's Windstar Ltd. Its the Ford HO 3.8L (200hp) motor. I've always thought this would be a good motor for the 914 because of its decent torque. Since its on my list I wanted to see how it would stack up to the other sixes since its a 90deg.
Here's the fit results:
Click to view attachment
As you can see, even though its 90deg, with the FI intake its just as high as the other 60deg V6's. It is much shorter, though they waste nearly 6 inches for all the accessaries in the front.
So far the Subi EG33 is looking the most promising. Its under 400lbs, and the fit is good. It should only require minimal adjustments to make everything work. Now I'm going to get a hold of a local supplier to get more info.
So which will it be:
___SHO_____^______EG33__
(SHO)
Well, I got quite a bit done today. I found an awesome paint supply store over in Mesa, AZ. They have everything you need from start to finish. It was mind numbing. They also sell the POR products I was looking for.
I'm using the following: POR-Strip for paint-stripping trunk and areas difficult to sand.
POR-Marine-Clean to clean all bare-metal after sanding, prior to treating with POR Metal-Ready.
I also picked up the fiberglass clothe and resin/hardener I need to redo the rear flares. First I needed to remove any of the body filler still adjacent to the flares. I haven't found anything to do this cleanly without possibly damaging the flares, so I just used a hand-help chisel and dug out the filler. It worked quite well and was actually faster than trying to use a small diameter wire wheel.
Click to view attachment
You'll notice there is black paint adjacent to the flares. This was under the body filler. They didn't even sand it down to bare metal before adding the flares.
Click to view attachment
I still have some hand sanding to remove the black paint. I ran out of 60-grit paper and need to pick up some more. I was able to get the drivers side done though.
Click to view attachment
More fun ahead . . .
Since that final prep before applying the fiberglass took me nearly six hours, minus a short break for the root-beer float my wife brought me, I won't have time today to get to the fiberglass part.
That's a good thing though. What I realized in the process was that there is still a fit problem that I have to address along with sealing up the underside of the flares as well. To get to the underside I'm going to need to build my rotisserie first. I guess I'll work on that during the week.
However, I still have a bit of a fitting problem at the bottom of the flares. Here's a couple of pics.
Front of flare:
Click to view attachment
Back of flare:
Click to view attachment
The normal line of the body panels should continue through the flare (marked in red), but doesn't. It's almost like they didn't bring the flare up high enough on the top of the fender. But when I look across the fender and the flare from the back, the flare seems to be high enough - and continues the gentle arc.
So my thoughts are to cut the flare (front & back) to match the line of the body panels, then buildup a new bottom edge at the same angle as the body panels. I would think this is whats needed so that the valance and outer rocker panel blend correctly as shown in this example (from someone's else's progress thread - I forgot who):
Click to view attachment
I have the FG outer rocker panels - though they are not very good ones. It looks like I'll need to locate the appropriate original style front & rear valances with the flared option to check fit before I do any major FG cutting & repair.
In the meantime I can continue getting the two trunks stripped of paint.
On with the show . . .
Space Age is an awesome store isn't it?
QUOTE(bryanc @ May 31 2008, 08:07 PM)
Space Age is an awesome store isn't it?
they've been around forever...Do they still have that goofy blimp car in the showroom?
EDIT: Obviously they do.....
http://www.spaceagepaint.com/custom.aspx?id=15
Yes it is. I didn't see that car, but I did see this one . . .

Progress today was minimal. I've started the paint stripping in the rear trunk while doing interim sanding while I wait for the stripper to work. It seems to work really fast on the enamel that was sprayed on top of the factory color, but the factory paint - probably a lacquer - takes several iterations of spray and wait to loosen it up.
Click to view attachment
Its going to take some time to get the whole trunk done. Just have to chase it a couple hours at a time during the week. I'd like to shoot it with primer next weekend.
Now my question is what to do with the factory rubberized seam sealer they used throughout the trunks. If I clean all this out - can it be replaced & with what?
Click to view attachment
I think I'll post a separate question on this to get some more feedback.
This is a "lo-fi" version of our main content. To view the full version with more information, formatting and images, please click here.