Got the mods to the left reinforcement piece done this evening. I added a cutout at the forward oval section to provide access to the heater tube inside the long. This will get a metal plate to fit that I'll cement or screw on. I also scribed two lines to improve the bends for the recessed portion of the long - which provides access to the e-brake handle. And my seatbelt attachment point didn't fit centered in the slot intended for it so a notch was needed.
Click to view attachment
You'll notice the e-brake cable guide is missing also. I removed mine to get to the rust underneath. Turns out it had some rust also - so it will get replaced with a new one. Calling Restoration Design . . .
Full Version: 3D914s 914-6 SHO 3.2L v6
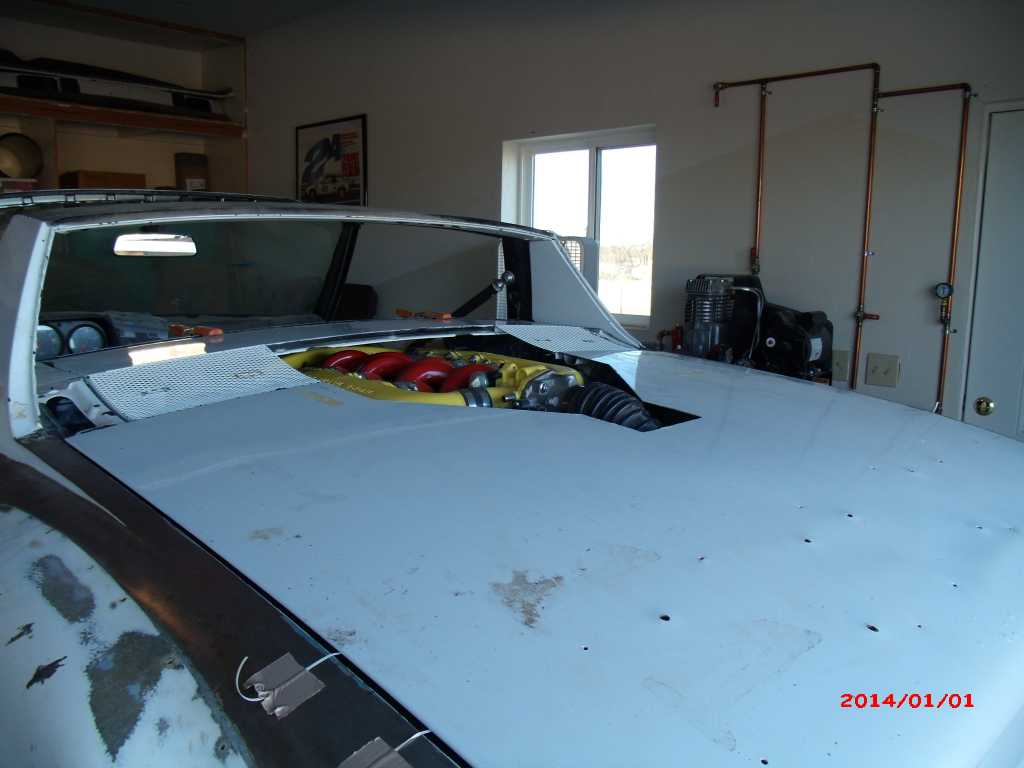
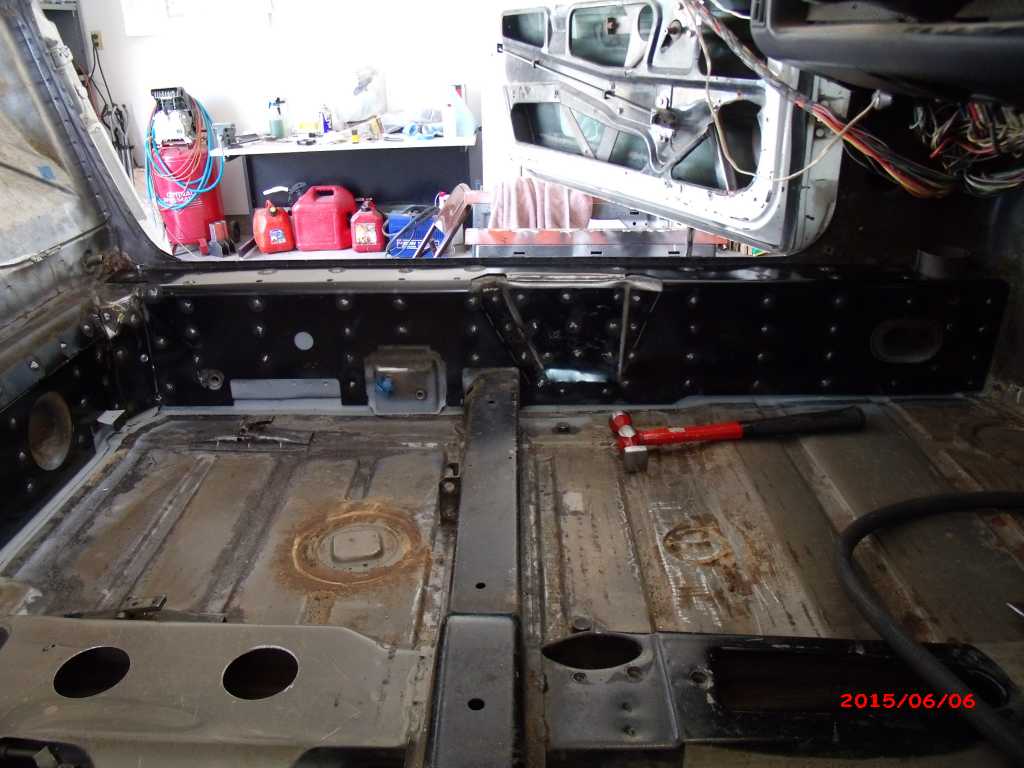
Got about 4 hours on the 914 today. Pulled all the wiring out of the cockpit floor. Continued fitting the reinforcement panels. Marked the weld spots for the left & back piece and cleaned off the paint with a wire attachment. Also pulled the shifter and shifter bar along with the original fuel lines. These metal/plastic lines will get replaced with all metal.
I also have plenty of surface rust inside the center tunnel, so I drilled some additional holes for clean-out and to be able to apply rust treatment. I wanted to ad some holes in the forward part of the tunnel, but my drill won't fit under the dash. Like most 914's that sit for any period, little critters like to nest in this spot - and mine was full of nesting material. Perfect kindling for a possible fuel leak and subsequent fire.
Click to view attachment
Click to view attachment
Got the mods for the right reinforcement panel finished and got some time this morning to start on the welding. I've put in over six hours but am only about a third done. Been taking long breaks between welding periods to diagnose issues on the Mini and Subaru. The welding has to go slowly so as not to warp the longitudinals. Plus it takes longer when you're down on your side - head stuck under the dash.
Click to view attachment
Click to view attachment
Click to view attachment
Click to view attachment
Fitment looks good! I remember it took me 6 hours of straight welding on mine...
QUOTE(Andyrew @ May 31 2015, 03:49 PM) 
Fitment looks good! I remember it took me 6 hours of straight welding on mine...
Thanks Andrew - Engman makes a nice kit - so part of the credit goes to him. I was hoping I could get mine done in about that time (accumulated) - but it will likely take more. Probably closer to 9 hours. Doing it on the car dolly means I can't easily walk around and get to sections to weld. I've been climbing up into the car to work from there - and of course I have to make sure all the tools I'll need are accessible from there. At 5'-4" its still awkward to climb around in there with tools, air hose, welding cable, flash-light, etc.
Once these are in - then the car goes back on the rotisserie. That should make the final fixes easier.
Put a few more hours in today - continuing welds around the three pieces. Spent a little extra time to get the left inset area (for the brake handle) shaped and welded in several spots. Because of the way the reinforcement is made, there is a gap on three sides of this area that I'll fill with weld. Even though carpet will go over this, I don't want any sharp corners that could work through the carpet and scrap up ones hand.
Click to view attachment
Click to view attachment
Looking good. Take your time. You don't want to deal with shrinkage issues. It does take longer than you imagine it will. 
Thanks, I keep moving forward. Been at it since around 7:30 this morning, but getting too hot now and my legs are tired from all the bending. Have all but half a dozen welds along the top on R & L side, then a few seam welds to do. Not much changing visually, but here are some pics anyhow.
Click to view attachment
Click to view attachment
Click to view attachment
Click to view attachment
Click to view attachment
Click to view attachment
Got more welding done today until I ran out of wire. Guess I'll switch to grinding till it comes in.
Switched gears for a while to put in a 10x12' shade area for my daughters horses. Unfortunately the daytime temps have really jumped - and working out in this heat for hours really tares me up. Gonna try shifting to early mornings before work, but if I can't swing that it'll have to wait till it cools down some. That would mean back to the 914 - darn!
Well, been working a few mornings for a couple hours before work to get the horse shade up. Got the four posts leveled and ready last week and cemented in yesterday. Then spent this morning getting the two side channels up, leveled and attached. That is after I spent half an hour corralling the horse back in after they got out.
So next are the cross purlins and the R panels.
Click to view attachment
So next are the cross purlins and the R panels.
Click to view attachment
After spending most the morning in Tucson chasing my tail, I was able to get one of the rotisserie legs extended (at both ends). There's very slight difference in material dimensions, but thickness is the same. Depending on the weather tomorrow, I might get far enough to have the rotisserie done and the car up on it.
Click to view attachment
Click to view attachment
Got both Rotisserie stands done, but not gonna get the car moved onto it. Between a crappy nights sleep and heat in the garage - I'm pooped. Also, gotta wait for the wind to settle down before I can attempt to put up roof panels for the horses shade. I'll need the room on the floor to slide the car dolly out.
Click to view attachment
Got the stylish bumpers on also.
Click to view attachment
Click to view attachment
Got the stylish bumpers on also.
Click to view attachment
Well, aside from some fun on the fourth & great fireworks, I was able to be a little productive on this three-day weekend. I did manage to get the roof on the horse shade, even though I was up there in the dark finishing it.
Click to view attachment
Also got another 914 distraction earlier in the week. HF has a sale on their 4x8 trailers so I picked one up and started working on it in the garage. Here's after about an hour.
Click to view attachment
Got a few more hours in over the weekend and just have the wiring to complete. It's a nice setup. I'm surprised at the high grade hardware and decent fit. I only ran into one spot where I had to loosen some bolts so I could line up thru-holes. It should do the job for hauling hay and stuff for the horses.
Click to view attachment
Click to view attachment
Also got another 914 distraction earlier in the week. HF has a sale on their 4x8 trailers so I picked one up and started working on it in the garage. Here's after about an hour.
Click to view attachment
Got a few more hours in over the weekend and just have the wiring to complete. It's a nice setup. I'm surprised at the high grade hardware and decent fit. I only ran into one spot where I had to loosen some bolts so I could line up thru-holes. It should do the job for hauling hay and stuff for the horses.
Click to view attachment
This is what you need to haul hay! 100 bales all loaded by me myself and I right out of the field.
QUOTE(trojanhorsepower @ Jul 6 2015, 03:39 PM)
This is what you need to haul hay! 100 bales all loaded by me myself and I right out of the field.
 Be glad you got the energy to do all that. Shoot, if we had fields like that I wouldn't need to haul hay - just let them out to pasture. You can be sure, if it were up to my daughter, she'd love all the toys that go with horse ownership. Especially a nice big truck.
Got to take a break last weekend and make a run out to the G&R 914 Swap meet in Riverside. Was able to meet up with my son. Got to drive his Targa. Also picked up a couple of rear trunk lids from Bruce - thanks.
You might be thinking - what do you need two for? Well to do the mods planned (see first pic) I need to cut the ribbing along the front, and I'm cutting two small openings for the NACA ducts, and a big chuck out to clear the intake tube. That will get a new piece, but I want to reinforce the underside with the same ribbing - so one trunk is for the finished lid, the other is for the ribbing. Plus I have my original white lid for ribbing also.

I lucked out and Bruce had one that already had the duck-tail spoiler - which I was thinking about adding. Unfortunately it's got a slight tweak to it - but I thought I can fix that - so bought it with that in mind. It's in pretty good shape & I like the smooth transition from the spoiler into the lid.
Click to view attachment
From the on-end view you can see how the right side (left in photo) doesn't curve as much as the left, and so its raised up slightly.
Click to view attachment
On the underside, you can see the bent rib. I'm thinking I can make a wood form of the correct curvature & use that to re-bend the lid into shape. If it doesn't work, I can use this lid for its ribbing, and use the other lid for my final one. I'll just have to add the spoiler myself.
Click to view attachment
This one still needs some minor work, you can see there's some cracking under the paint. They probably used just bondo, instead of something with a little more strength.
Click to view attachment
Click to view attachment
Also decided to up the height of my rotisserie stands by 7.5 inches. This will enable me to move the car right from the dolly onto the rotisserie and back onto the dolly without having to do a lot of jacking. I just have to raise the adjustable pads on the dolly to their max, connect the rotisserie, then lower the pads & slide the dolly out. Now I just have to get over to Tucson to buy the steel.
You might be thinking - what do you need two for? Well to do the mods planned (see first pic) I need to cut the ribbing along the front, and I'm cutting two small openings for the NACA ducts, and a big chuck out to clear the intake tube. That will get a new piece, but I want to reinforce the underside with the same ribbing - so one trunk is for the finished lid, the other is for the ribbing. Plus I have my original white lid for ribbing also.
I lucked out and Bruce had one that already had the duck-tail spoiler - which I was thinking about adding. Unfortunately it's got a slight tweak to it - but I thought I can fix that - so bought it with that in mind. It's in pretty good shape & I like the smooth transition from the spoiler into the lid.
Click to view attachment
From the on-end view you can see how the right side (left in photo) doesn't curve as much as the left, and so its raised up slightly.
Click to view attachment
On the underside, you can see the bent rib. I'm thinking I can make a wood form of the correct curvature & use that to re-bend the lid into shape. If it doesn't work, I can use this lid for its ribbing, and use the other lid for my final one. I'll just have to add the spoiler myself.
Click to view attachment
This one still needs some minor work, you can see there's some cracking under the paint. They probably used just bondo, instead of something with a little more strength.
Click to view attachment
Click to view attachment
Also decided to up the height of my rotisserie stands by 7.5 inches. This will enable me to move the car right from the dolly onto the rotisserie and back onto the dolly without having to do a lot of jacking. I just have to raise the adjustable pads on the dolly to their max, connect the rotisserie, then lower the pads & slide the dolly out. Now I just have to get over to Tucson to buy the steel.
No work this weekend on the teener. Got the mini torn down for a new thermostat housing - what a bogus design. Put up some extra fencing for the horses, and replaced rear struts & springs on a neighbors Toyota.
Finished work early so got to spend some time on the teener. Added almost eight inches height to each stand to match the car's position on the car dolly. I'll probably need to jack the front up a little extra to get the height I need. Probably won't get it on there until Sunday.
Click to view attachment
Click to view attachment
Got rained out on Saturday morning, so spent the time getting car on the rotisserie. Had just enough space to jack the front a couple of inches and fit that end of the rotisserie on. Slid jack out, then slid dolly out. Now swinging free.
Click to view attachment
Click to view attachment
Spent several hours today removing front struts and suspension. This is all original so I know it was going to be a bear. The only easy part was the nuts on the top of the struts - neither was torqued properly. Everything else took grunting and penetrating oil, and more grunting. No broken knuckles though.
The 914 suspension is actually well designed and easy to maintain. I haven't decided completely on what's going in to replace it. Soo many options.
Click to view attachment
And one with it all off. Going to wait to remove the steering. Need to do a little more research.
Click to view attachment
The 914 suspension is actually well designed and easy to maintain. I haven't decided completely on what's going in to replace it. Soo many options.
Click to view attachment
And one with it all off. Going to wait to remove the steering. Need to do a little more research.
Click to view attachment
Great build, and yes, I will be using some of your ideas. Like the rear trunk hinge setup, been trying to figure that one out for a while. With out using a Buick LaSabre piece.
QUOTE(914forme @ Aug 15 2015, 06:45 PM)
Great build, and yes, I will be using some of your ideas. Like the rear trunk hinge setup, been trying to figure that one out for a while. With out using a Buick LaSabre piece.
Stephen, My thoughts exactly on the LaSabre hinge. I found that the first gen Mini from early 2000s has the proper shape hinge & with an off-center mounting - it will rotate up & backward so the trunk lid clears the rear vertical body panel.
Pic kinda illustrates - but poor image.
Now that its up on dolly, I'm finishing up the welding on the reinforcements and grinding all the welds. It'll be a while before that's all done. Lots of welds!
Nice to hear from you and know progress is being made. Remember your eye protection 
Making progress on the welding and grinding. Its much easier to do certain areas with the car on the rotisserie. Spent more than a couple of hours on this section. Lots of welding and I had to let things cool before continuing. Filled in the time gaps with grinding.
This is what it started out like.
Mostly finished except for the gaps along the top. There was no material there, but I'm thinking about cutting some pieces to fit and fill it in.
Click to view attachment
This is what it started out like.
Mostly finished except for the gaps along the top. There was no material there, but I'm thinking about cutting some pieces to fit and fill it in.
Click to view attachment
Got this area finished along with rest of the grinding for this side. Got a couple of welds in areas near the floor where my 4" won't fit. Need to find something to get these few welds down.
Click to view attachment
Also fixed the two plugs in the floor that were bent inward. Looks like the seam sealer was supposed to hold them in place - but these two were pushed in. So I cleaned off the seam sealer and welded instead. They'll get more seal sealer once the rest of the floor is done.
Click to view attachment
Click to view attachment
Also fixed the two plugs in the floor that were bent inward. Looks like the seam sealer was supposed to hold them in place - but these two were pushed in. So I cleaned off the seam sealer and welded instead. They'll get more seal sealer once the rest of the floor is done.
Click to view attachment
Reinforcement kit is done and ready for primer - which I just happen to be out of. Now I just have to remember if seam sealer goes on after primer or before.
Edit: It can go on after primer.
Edit: It can go on after primer.
Got some time this afternoon to get the steering rack out and look closer at both sides of the floor-board under the pedal cluster.
Here's the outside before cleaning.
Click to view attachment
Here's the inside before cleaning.
Click to view attachment
Here's the outside before cleaning.
Click to view attachment
Here's the inside before cleaning.
Click to view attachment
Now to the cleaning. It looks like the outside was light surface rust - no pitting at all. I think I'll go ahead and re-enforce the portion I've cleaned. Even another layer of metal the same thickness will help a lot.
Click to view attachment
Got far enough on the inside to see that its not as clean & there is some pitting, but it's not as bad as I thought. Definitely salvageable. Treatment with some rust inhibitor should do the job.
Click to view attachment
There is a circular plug (just sheet metal) that came off of the gob of seam sealer under it. I'll clean most that out so I can weld a new cover on it. Not sure why this one is different then the others.
Click to view attachment
Got far enough on the inside to see that its not as clean & there is some pitting, but it's not as bad as I thought. Definitely salvageable. Treatment with some rust inhibitor should do the job.
Click to view attachment
There is a circular plug (just sheet metal) that came off of the gob of seam sealer under it. I'll clean most that out so I can weld a new cover on it. Not sure why this one is different then the others.
I've cleaned out the sealer on both sides and cut the end off the support piece - now you can see the sheet metal tab. I'll cut a new support piece that covers this and extends up into the area where the master cylinder mounts.
Click to view attachment
On the inside there's a shelf for the plug. I'll need to cut a new one out of slightly thicker material and weld it in. First will be rust treatment, then weld in a new plug on both sides, then finish off with seam sealer.
Click to view attachment
Click to view attachment
On the inside there's a shelf for the plug. I'll need to cut a new one out of slightly thicker material and weld it in. First will be rust treatment, then weld in a new plug on both sides, then finish off with seam sealer.
Click to view attachment
Working up front on the underside, here is something else I discovered. I know this car was beaten up when it was previously stolen - but I thought I had found all the damage - Not!
Gonna look to see if I can find a decent replacement section. If not I'll have to cut it out, repair it and weld it back in. Got a break with the floor - just to find more work under here.
Click to view attachment
Gonna look to see if I can find a decent replacement section. If not I'll have to cut it out, repair it and weld it back in. Got a break with the floor - just to find more work under here.
Click to view attachment
Finished up the underside of plug by welding the piece I cut off back on. I filled in the hole and then drilled a couple of holes for spot welds to keep the plug in place.
Click to view attachment
Welded in the plug cap on the inside, and with all the rust already treated, was able to get several coats of self-etching primer on. All that's left will be to fill this area with seam sealer.
Click to view attachment
Click to view attachment
Welded in the plug cap on the inside, and with all the rust already treated, was able to get several coats of self-etching primer on. All that's left will be to fill this area with seam sealer.
Click to view attachment
Making more progress on the scope of metal work for the under body so I wanted to track what's getting done:
-
Inner suspension (dog-ear) reinforcement -
Model pieces and weld while on dolly -
Limit material thickness to 0.075" -
Remove Doorway supports & keep doors -
Repair small sections in floor pan -
Install engman inner long kit while on dolly -
Repair floor under pedal cluster - Weld outer body patch panels - currently exposing wheel wells (L & R)
- Cement L side to FG flare
Also finished up some welds on the dog ear reinforcements that I couldn't get to until now. Rotisserie sure helps.
Got it up on its side now to work on the underbody. Trying to locate a replacement piece for the front trunk area. Started stripping the remaining underbody treatment. There's not much left after all these years, and I'm just taking it down to the factory primer. It'll get seam sealer in a view places, more primer and black paint, then finally some fresh underbody treatment. I'm only focusing on the cockpit area since there's still work to do fore & aft.
Got the underbody coating off and mostly down to the factory primer. There are plenty of places where its fresh metal. I also treated any of the surface rust areas - so they'll be ready for primer tomorrow.
Click to view attachment
Click to view attachment
Also got some new parts in from Mark at Restoration Design - the left & right jack donuts for the rear. The parts are premium for sure.
Click to view attachment
Click to view attachment
Unfortunately, the underbody on this 914 isn't. It's quite beat up. You'll notice in the corners ahead of these donut pieces, someone has jacked the car repeatedly - and deformed the metal.
On the left side - this doesn't appear to be much of an issue.
Click to view attachment
On the right side - it's a difference story. There's quite a gap between the double-wall shelf and the new piece. Also the angled ridge adjacent to the shelf is smashed in - also leaving a considerable gap. I'm gonna have to research a little to see if that corner piece is available. I don't think I have the tools to fab those small radius' and sharp angles.
Click to view attachment
Click to view attachment
Click to view attachment
Unfortunately, the underbody on this 914 isn't. It's quite beat up. You'll notice in the corners ahead of these donut pieces, someone has jacked the car repeatedly - and deformed the metal.
On the left side - this doesn't appear to be much of an issue.
Click to view attachment
On the right side - it's a difference story. There's quite a gap between the double-wall shelf and the new piece. Also the angled ridge adjacent to the shelf is smashed in - also leaving a considerable gap. I'm gonna have to research a little to see if that corner piece is available. I don't think I have the tools to fab those small radius' and sharp angles.
Click to view attachment
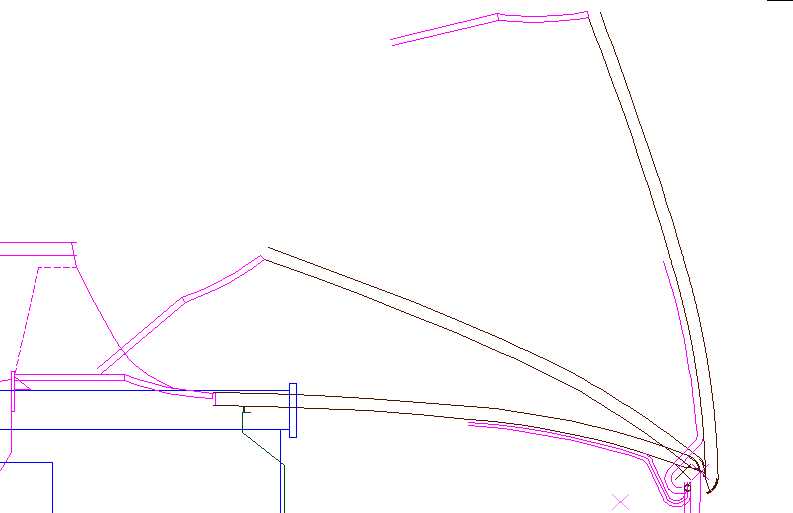
Was reading trojanhorsepower's restoration thread and saw a couple of good images of the corners from his new rear floor panel.
So here's the corner I'd have to form up for each side. Seeing the finished form, I think I have a way of doing it right on the body. I won't be able to get to this for a while, so that'll give me some time to think more about it.
Click to view attachment
Click to view attachment
So here's the corner I'd have to form up for each side. Seeing the finished form, I think I have a way of doing it right on the body. I won't be able to get to this for a while, so that'll give me some time to think more about it.
Click to view attachment
Click to view attachment
QUOTE(Chris H. @ Sep 20 2015, 04:38 PM)
Chris, thanks for the link and the cudos. This floor panel may get cut in the future so I was hoping to just find some pieces to patch. Haven't had any luck so I'm going to cut out the bad areas, shape replacements and weld in.
OK, just so ya know I did get something done on the 914-SHO last weekend. Since I couldn't find a replacement section for the damage in the front trunk floor, I decided to cut it out, patch it and reshape it. Got err done!
Here's the damaged section
Click to view attachment
Repaired and ready to weld in
Click to view attachment
I was also able to get the left jack-donut plate welded in since there wasn't any repair work for the body on that side.
Click to view attachment
Here's the damaged section
Click to view attachment
Repaired and ready to weld in
Click to view attachment
I was also able to get the left jack-donut plate welded in since there wasn't any repair work for the body on that side.
Click to view attachment
Had some time today to rough-in the replacement piece up front. Also spent time pounding out the dents in the trunk floor. Just need to finish grinding welds, do a little reshaping, and prep for primer. Still trying to decide whether to take the car to someone to soda blast the remaining paint off, or try to do it myself.
Click to view attachment
Click to view attachment
Click to view attachment
Click to view attachment
Finished cleaning up the welds on the repaired area inside & under the trunk. Also pounded out half a dozen dents in the trunk floor. SOoo, unless I find something else, the majority of metal repair work is done. Now I'll go around with some metal filler to clean up all the pinholes from welding, etc.
All that should be left are my modifications for the rear trunk and lid, but that's quite a bit itself.
Underside view of repair. Discolored areas are from heating metal to fix deep dents.
Click to view attachment
Inside the trunk needs a lot of paint removal. Still have to decide how I want to tackle that - especially with winter approaching.
Click to view attachment
Nice progress. I vote media blaster for paint removal.
QUOTE(Cairo94507 @ Nov 30 2015, 07:32 AM)
Nice progress. I vote media blaster for paint removal.
Thanks Michael. I agree that's the best choice. Just a little over-whelmed that every task really requires two other tasks, so they start adding up fast. SO in order to do the media blasting, aside from getting the equipment, I also have to buy and build a platform to roll the body and dolly out into my gravel driveway. Not too difficult, just additional cost & time.
OK, rant over.
Haven't been doing much on the 914-SHO. Been finishing my work bench so I can get the garage cleaned up. Ongoing projects have a habit of spreading all over the garage. Been pretty good at preventing that - but it's been kinda crazy lately. Feels good to have things somewhat under control. Yeh- I know its just an illusion - but it helps.
Now I just need some warm weather so I can lay down some primer and under-coating. Hope I don't have to wait for Spring. Plan is to get the body to paint in late spring.
Now I just need some warm weather so I can lay down some primer and under-coating. Hope I don't have to wait for Spring. Plan is to get the body to paint in late spring.
Got my work-bench finished and everything moved over to it. Here's a pic before I put the bench top on. I used a solid-core door, cut to size. I'll add retracting wheels and other finishing touches later.
Click to view attachment
For the 914, I was able to get a few hours in after replacing the timing belt on a neighbors truck. Got the right section ahead of the rear jack post finished and spot welded. Will get the rest of the welding done one evening this week.
Click to view attachment
Click to view attachment
For the 914, I was able to get a few hours in after replacing the timing belt on a neighbors truck. Got the right section ahead of the rear jack post finished and spot welded. Will get the rest of the welding done one evening this week.
Click to view attachment
Had some time today to finish up the welding, grinding, and mounted the right jack post as well. Now if it would just warm up I can get the primer, seam-sealer & undercoating on the underside. Guess I'll have to work on the cockpit until then.
Click to view attachment
Click to view attachment
Well, the last thing I worked on for 2015 was getting the rest of the holes drilled in the center console. Aside from the good access for rust-proofing, it will also aid in routing the new fuel lines and tying down the break lines.
Click to view attachment
Click to view attachment
This is a "lo-fi" version of our main content. To view the full version with more information, formatting and images, please click here.