|
|
|
Porsche, and the Porsche crest are registered trademarks of Dr. Ing. h.c. F. Porsche AG.
This site is not affiliated with Porsche in any way. Its only purpose is to provide an online forum for car enthusiasts. All other trademarks are property of their respective owners. |
|
|

  |

| 3d914 |
 Jul 14 2013, 05:06 PM Jul 14 2013, 05:06 PM
Post
#281
|
|
Senior Member  Group: Members Posts: 1,275 Joined: 24-September 03 From: Benson, AZ Member No.: 1,191 Region Association: Southwest Region |
QUOTE(bulitt @ Jul 13 2013, 06:37 PM)  You must be German, the time and effort spent on engine test stand, dolly, WOW. I had three inch casters on my dolly. The tube without engine or suspension was difficult to move and kept popping ball bearings out. Just went to the 5" rubber casters from HD. The car rolls so easy its scary. Cant tell what your are using but you may want to consider putting big ones on before you get it all finished and the car loaded. Bob, Thanks. Yes - admittedly some german in our heines-57 mix. These casters are the 4-inch from HD & Ace. I have a total of six planned - two swivel with locks, two swivels w/o locks, and two non-swivel that are mounted on sleeves. That way I can install them front/back or side-to-side. You should post a pic of your dolly - I'd like to see it. The dolly is actually my $150 alternative to the $1500 lift I wanted to get. That will have to wait till daughter's done with college. |
   |

 
|
| 3d914 |
Jul 28 2013, 05:24 PM
Post
#282
|
|
Senior Member Group: Members Posts: 1,275 Joined: 24-September 03 From: Benson, AZ Member No.: 1,191 Region Association: Southwest Region |
Well it's been a couple of weeks but I haven't been idle. Got the dolly finished. The next time I have to drill this many holes I need to get me a drill press.
Now I just have to figure out how to get the body up on it. (IMG:style_emoticons/default/blink.gif) (We need a jacking emoticon. Ca' mon, they're 914s) 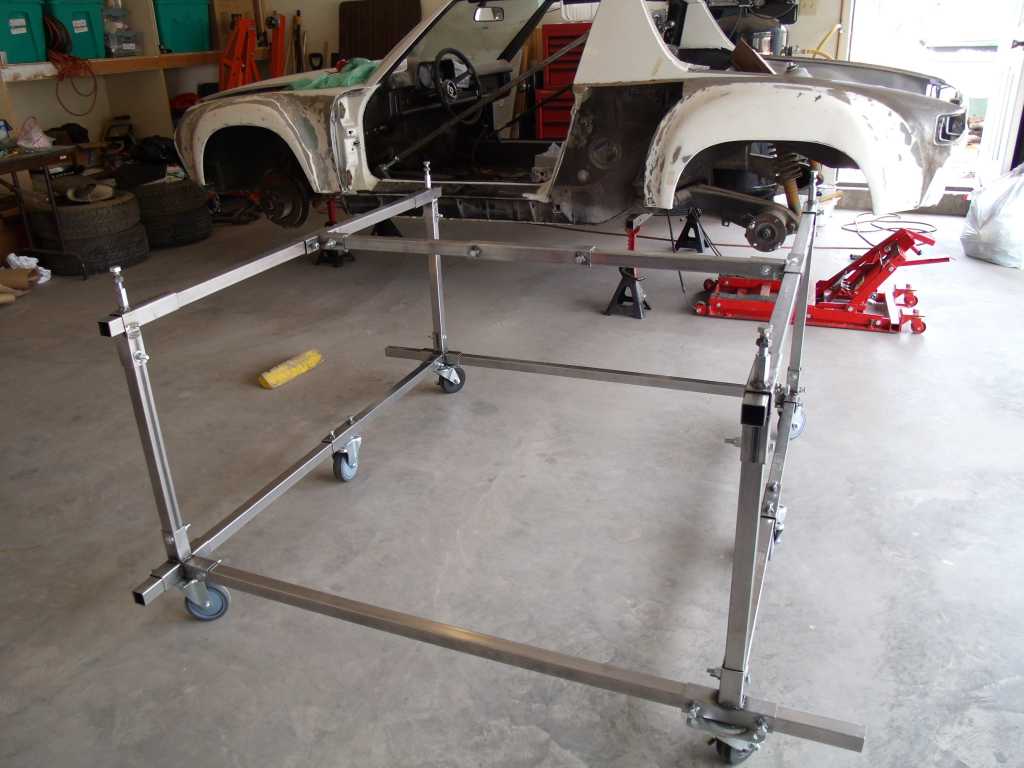 |
|
|
|
| 3d914 |
Aug 10 2013, 05:18 PM
Post
#283
|
|
Senior Member Group: Members Posts: 1,275 Joined: 24-September 03 From: Benson, AZ Member No.: 1,191 Region Association: Southwest Region |
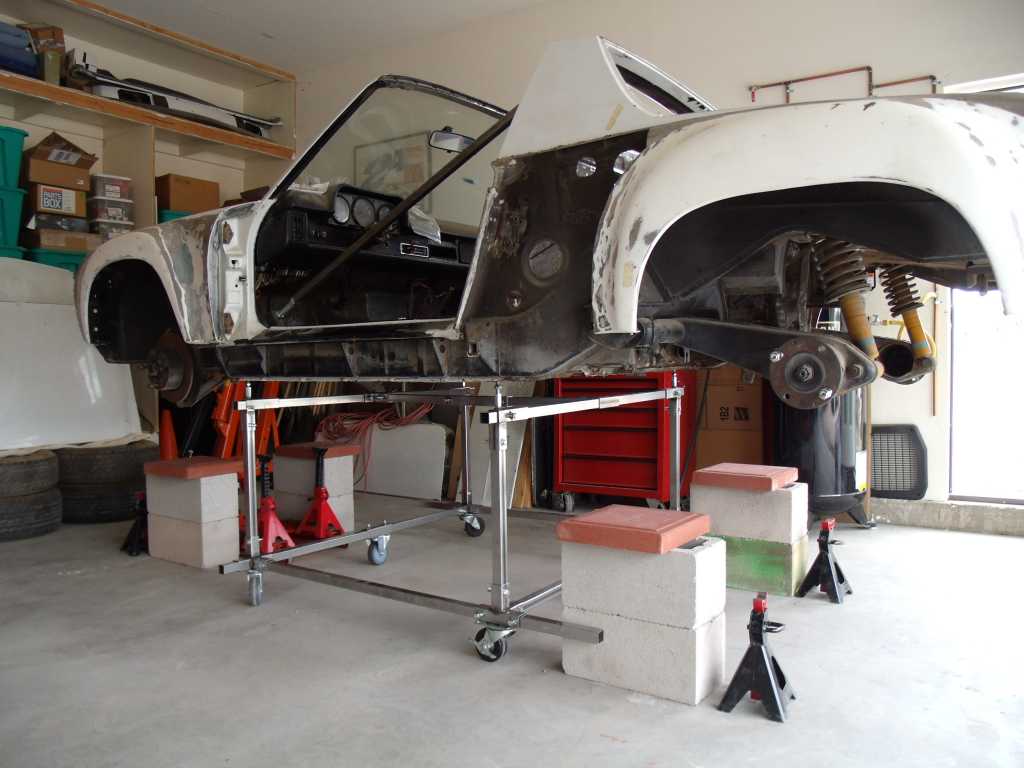
Haven't done much on the 914 until today. Been distracted. I did spend this morning getting the body up on the dolly - with success. I did have to readjust the length of the dolly so that it would not protrude into the engine bay at all - but that's why I made it adjustable.
 Been busy over the last week and a half finding a replacement for our 15 year old Windstar. Its a 2001 Outback with 120K miles. Unfortunately it suffers from the same thing that plagues all 4-cyl Subys - head gasket failure. Its in excellent condition other than that so I felt it was worth it. My daughter in Wyoming will enjoy it first and when she's done with school it comes back to me. 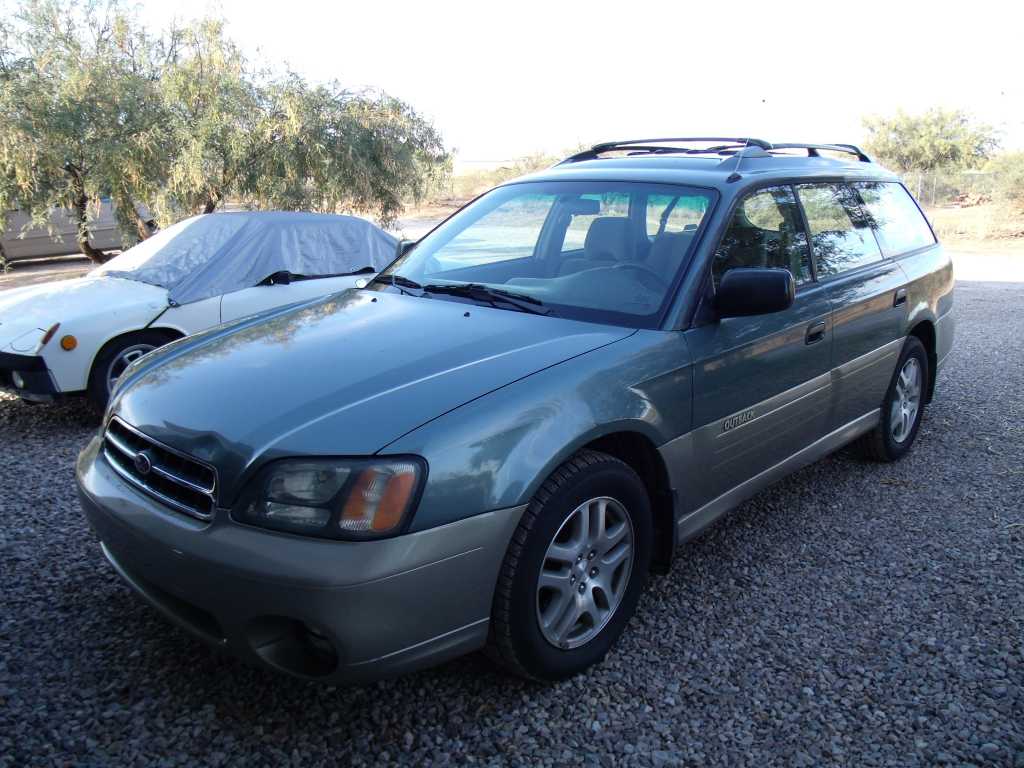 So needless to say the next couple of weekends will be dedicated to getting the heads gaskets replaced and basically doing the equivalent of a 60K mile service on the SHO. |
|
|
|
| 3d914 |
Aug 11 2013, 03:45 PM
Post
#284
|
|
Senior Member Group: Members Posts: 1,275 Joined: 24-September 03 From: Benson, AZ Member No.: 1,191 Region Association: Southwest Region |
While I'm waiting on Subi parts I decided to empty the coolant on the SHO and strip it down. Its now ready for initial fitment.
My height measurements came out pretty good. I was able to roll the motor in from the back. I did have to make a 1/2 inch upward height adjustment because the fuel pressure regulator sticks up above everything else. You may not be able to tell but I'll have to move the lower-rear cross-support of the dolly forward another 4-6 inches so that I can get the motor's cradle farther forward. Flexible plans are the best ones - just can see everything in advance. 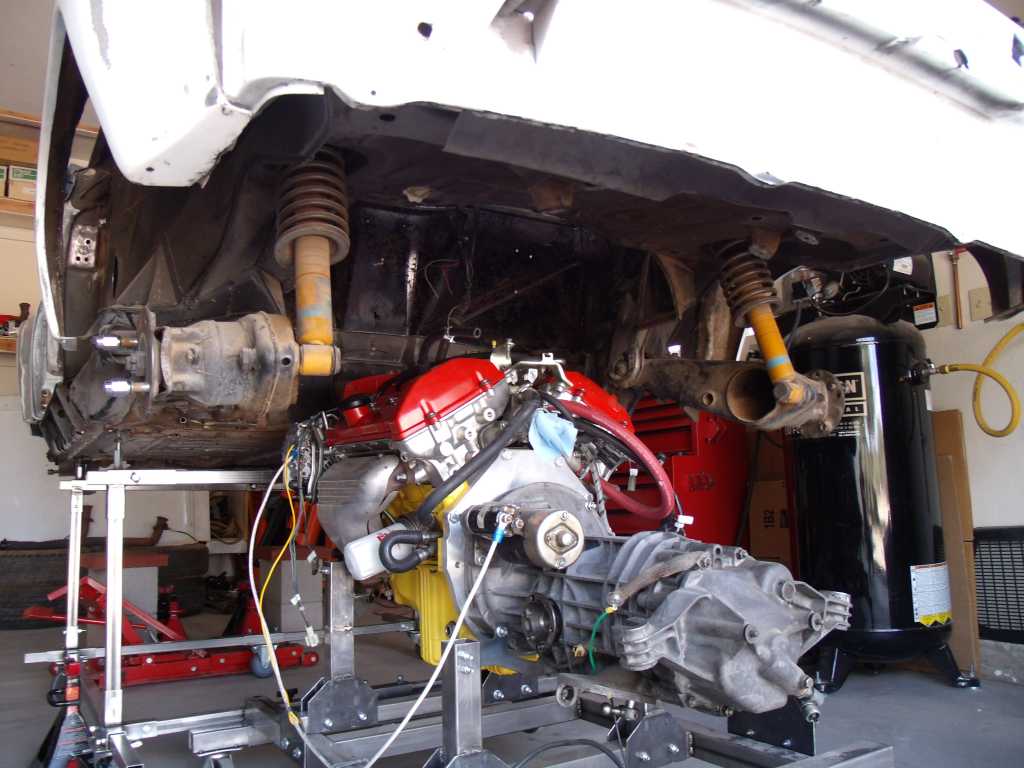 |
|
|
|
| FourBlades |
Aug 11 2013, 04:13 PM
Post
#285
|
|
From Wreck to Rockin Group: Members Posts: 2,056 Joined: 3-December 07 From: Brevard, FL Member No.: 8,414 Region Association: South East States |
|
|
|
|
| bulitt |
Aug 11 2013, 04:23 PM
Post
#286
|
|
Achtzylinder Group: Members Posts: 4,189 Joined: 2-October 11 Member No.: 13,632 Region Association: South East States |
What is the weight on that SHO?
|
|
|
|
| 3d914 |
Aug 12 2013, 08:53 PM
Post
#287
|
|
Senior Member Group: Members Posts: 1,275 Joined: 24-September 03 From: Benson, AZ Member No.: 1,191 Region Association: Southwest Region |
QUOTE(bulitt @ Aug 11 2013, 03:23 PM) What is the weight on that SHO? Bob, steel block, aluminum heads, aluminum intake adds up to around 500lbs. So this 914 won't be a track demon - more like a street demon/cruiser. |
|
|
|
| 76-914 |
Aug 12 2013, 09:25 PM
Post
#288
|
|
Repeat Offender & Resident Subaru Antagonist Group: Members Posts: 13,882 Joined: 23-January 09 From: Temecula, CA Member No.: 9,964 Region Association: Southern California |
That will consume mass quantities of rice rockets. (IMG:style_emoticons/default/evilgrin.gif) Nice work. That's going to be one sweet ride. (IMG:style_emoticons/default/smilie_pokal.gif)
|
|
|
|
| 3d914 |
Aug 20 2013, 09:51 PM
Post
#289
|
|
Senior Member Group: Members Posts: 1,275 Joined: 24-September 03 From: Benson, AZ Member No.: 1,191 Region Association: Southwest Region |
QUOTE(76-914 @ Aug 12 2013, 08:25 PM) That will consume mass quantities of rice rockets. (IMG:style_emoticons/default/evilgrin.gif) Nice work. That's going to be one sweet ride. (IMG:style_emoticons/default/smilie_pokal.gif) Thanks. How'd you know that was my favorite pass time! |
|
|
|
| 3d914 |
Aug 30 2013, 09:14 PM
Post
#290
|
|
Senior Member Group: Members Posts: 1,275 Joined: 24-September 03 From: Benson, AZ Member No.: 1,191 Region Association: Southwest Region |
Still working on the Subi motor. Got the head gaskets replaced and a valve adjustment done. Will try to get some photos up this weekend.
|
|
|
|
| 3d914 |
Aug 31 2013, 06:47 PM
Post
#291
|
|
Senior Member Group: Members Posts: 1,275 Joined: 24-September 03 From: Benson, AZ Member No.: 1,191 Region Association: Southwest Region |
Kinda off topic (but hey it my thread - right). Got the Subi motor back together and ready to go in. Cleaned up the engine bay, so hope to tackle the install tomorrow.
Didn't spend a lot of time cleaning the motor up too much - just the essentials, since I need to get this back on the road and test it all out before the long trip to Wyoming. Here's a good pic of a 2001 EJ25 SOHC motor. They are really decent to work on. The intake and fuel rails come off as an assembly, as do the heads, cams, and cam caps. Even the valve adjustment is easier than the Porsche four. The DOHC appear to be a little more work, but hard to tell from the manual. 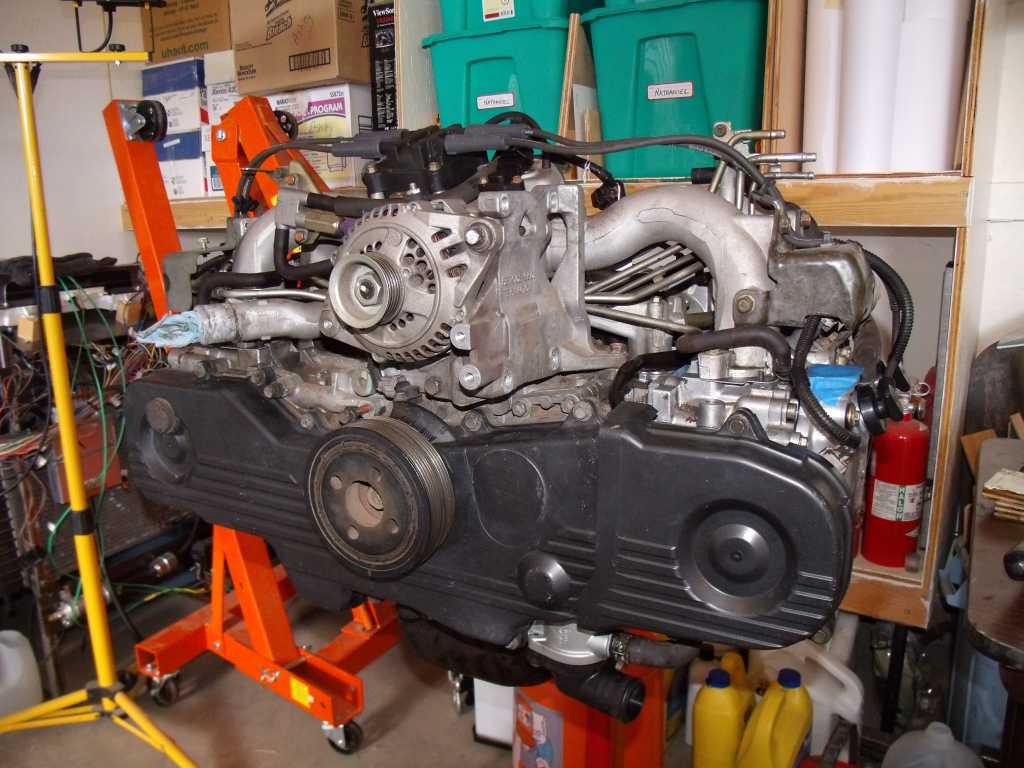 |
|
|
|
| 3d914 |
Sep 15 2013, 05:43 PM
Post
#292
|
|
Senior Member Group: Members Posts: 1,275 Joined: 24-September 03 From: Benson, AZ Member No.: 1,191 Region Association: Southwest Region |
Got some time on the project today. Modified the car dolly so that I could get the engine cradle farther forward - enough to lift the engine in its correct position.
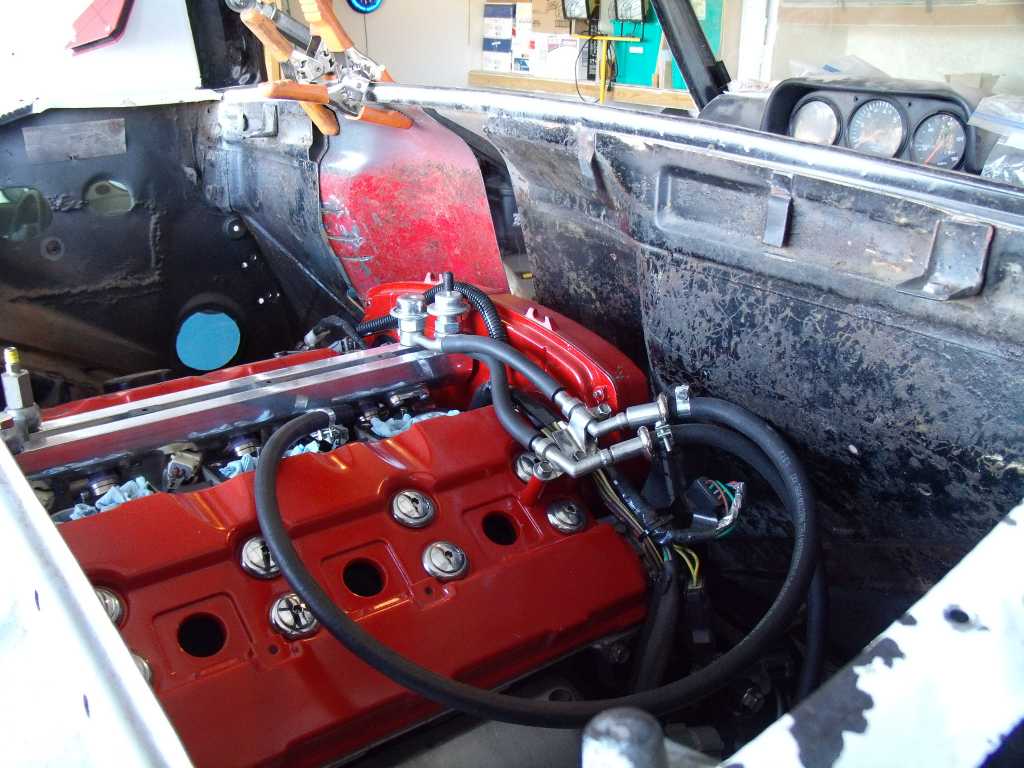
So started the fitting tests. Here's the motor from above - though only partially lifted into place. 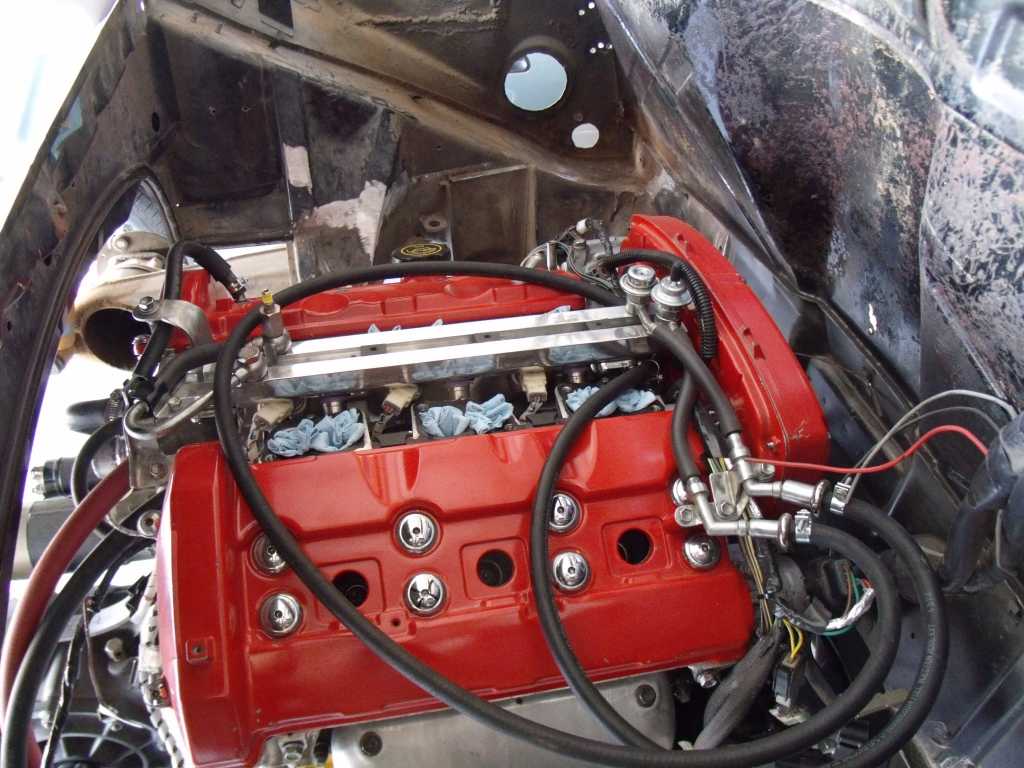 The left head falls where expected & there will be approx 1/2 inch clearance. The issues will obviously be the thermostat housing/return hose and coolant hose #2. 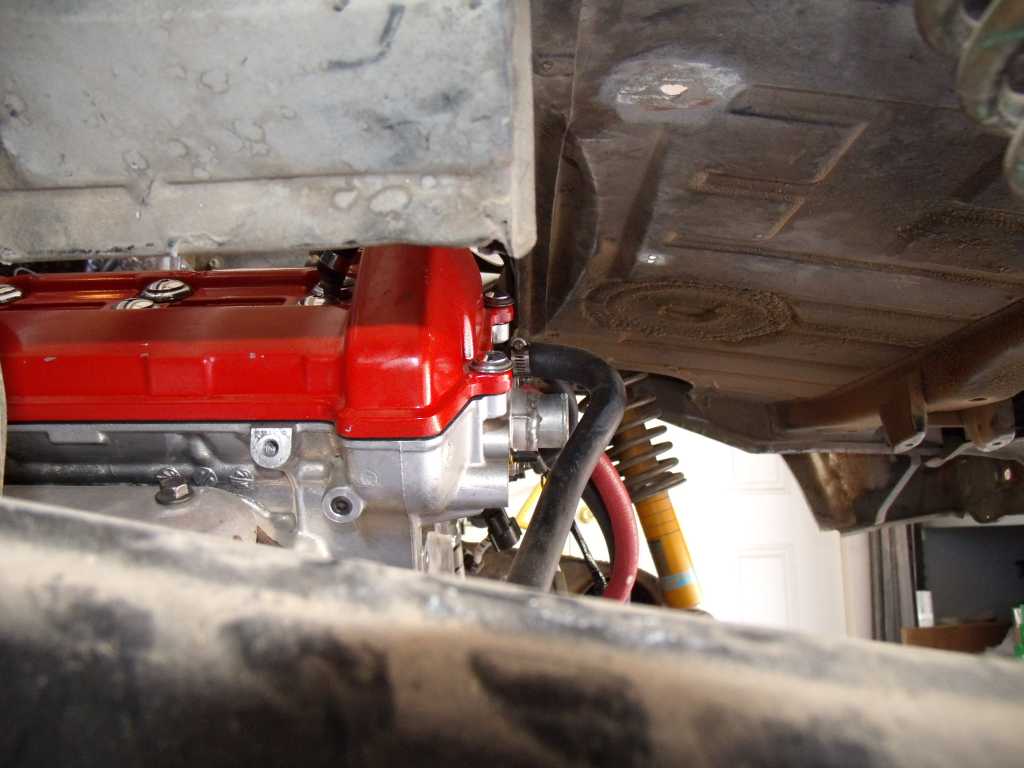 So I'll have to work out these two fittings. Hose #2 should be the easiest to either bend or replace with an equivalent 90 degree elbow. The Tstat housing will be more work to get it modified to a 90 degree bend within two inches. That also means I'll need to modify the rear firewall about three inches back - which was expected. 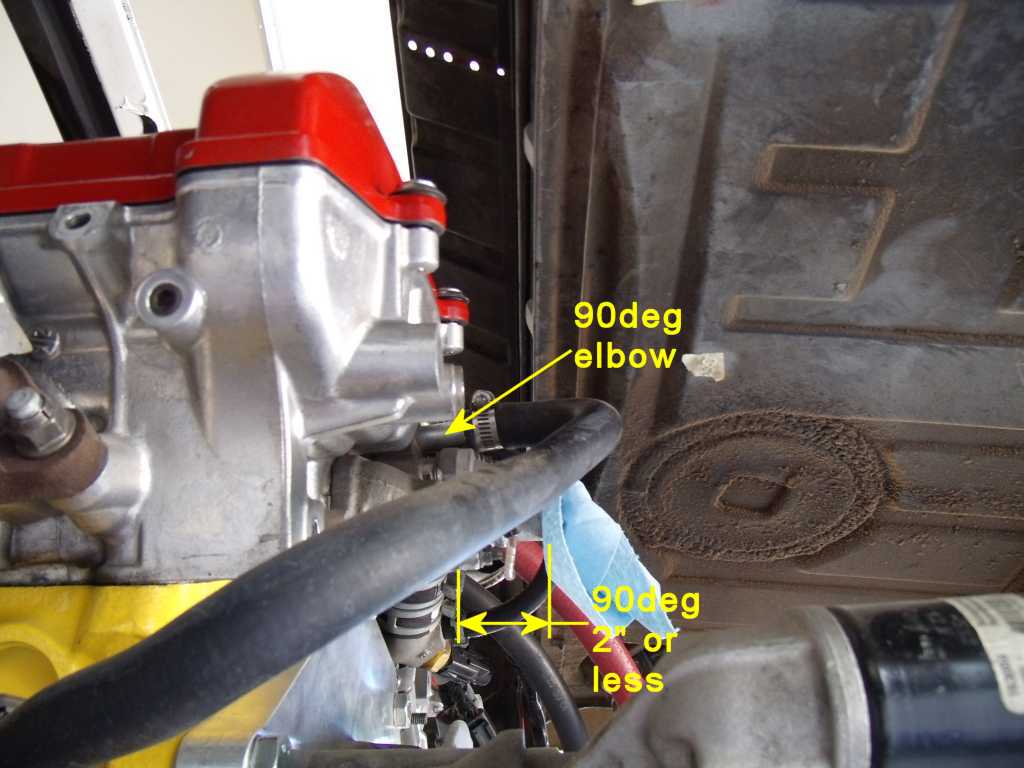 The firewall mod will need to be at least 8 inches - probably 9. This will fit with the trunk mod of 9 inches to accommodate the TPS. 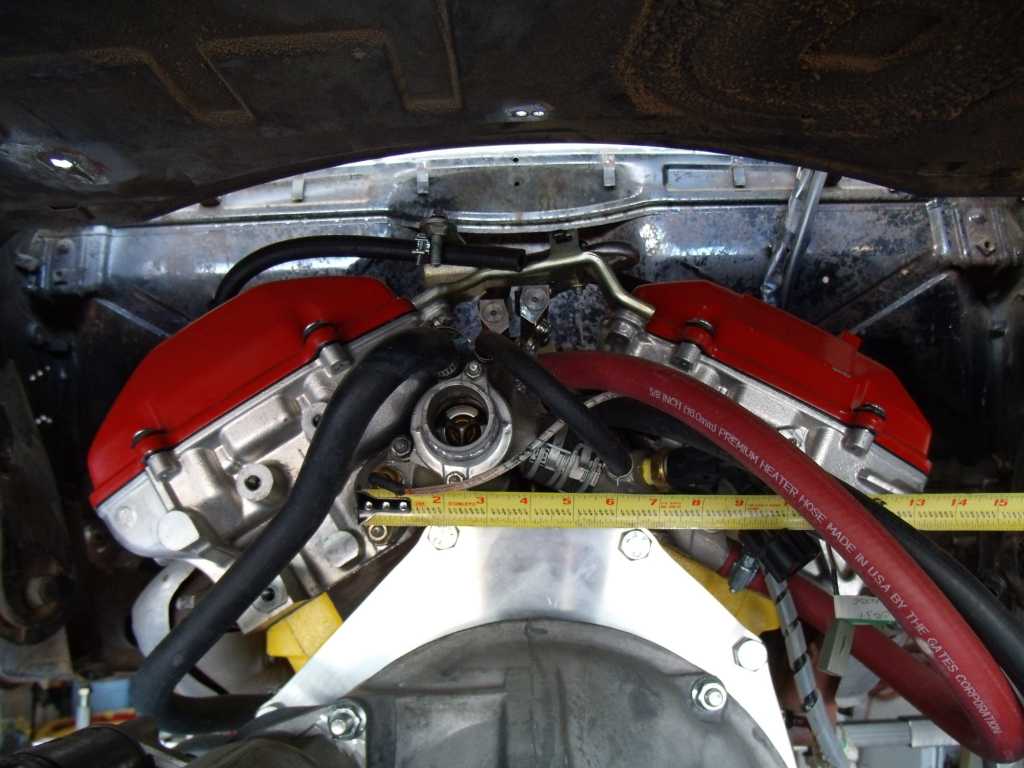 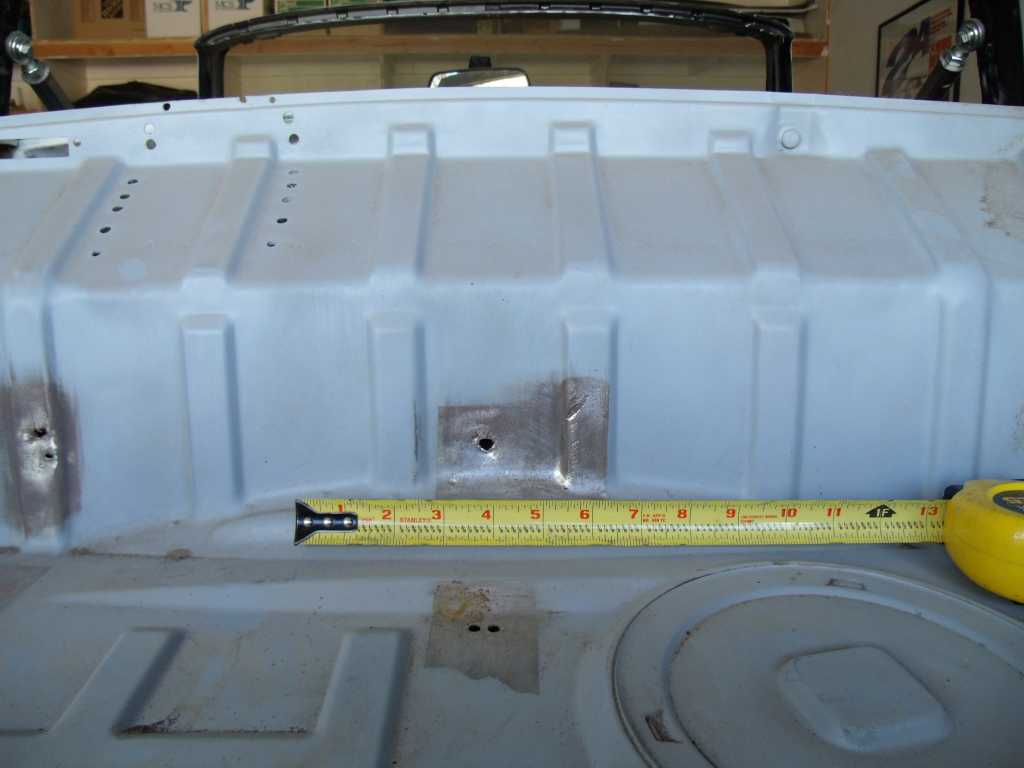 |
|
|
|
| 3d914 |
Sep 20 2013, 07:06 PM
Post
#293
|
|
Senior Member Group: Members Posts: 1,275 Joined: 24-September 03 From: Benson, AZ Member No.: 1,191 Region Association: Southwest Region |
Had to pull the motor out from underneath the car to set the intake back on so I could remeasure. Good thing because the 9 inches I suspected wasn't enough since the outlet and coolant sensor are offset to the left, but the TPS cable connection is offset to the right. I increased the cutout to 10 inches since I also need to taper the side walls slightly that cover the TPS - this lets me match angles with the B-pillar of the car.
Here's the cutout. Also added some reinforcement until I get it all finished off and closed up: 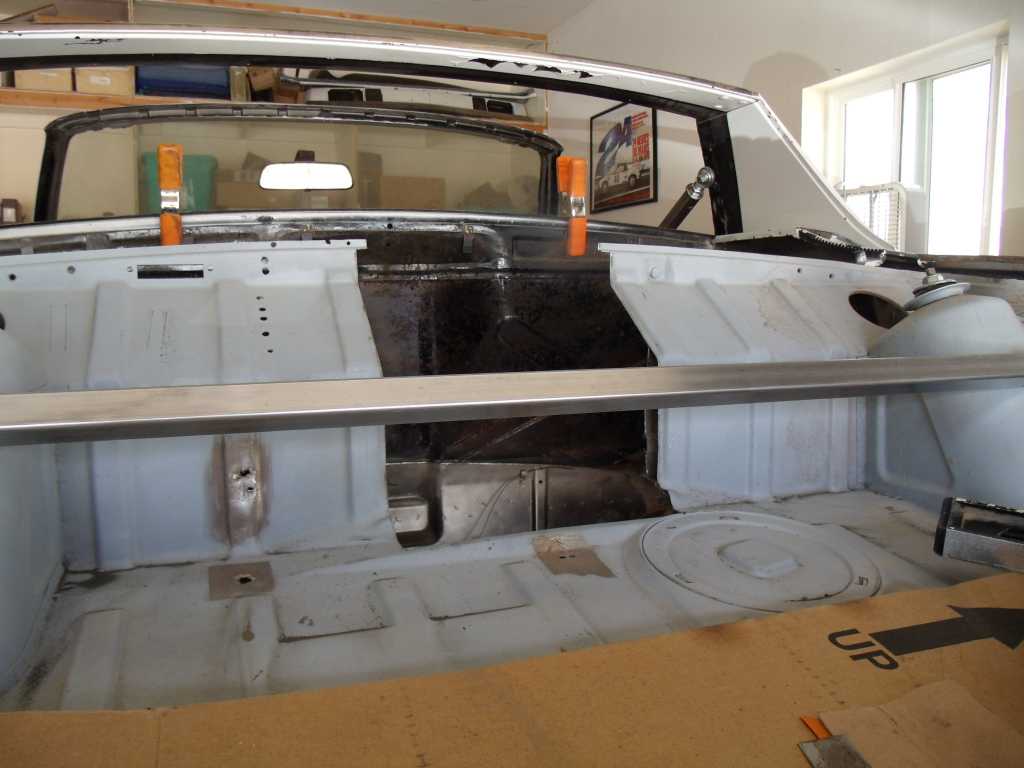 Also started to work on the rear cockpit firewall the forward bulge is only 8 inches wide and needs to be 18 inches wide to fit the front part of the SHO's intake as well as the upper part of the cam cover. I'll be able to leave large portions in place so it won't be a complete cutout and should have enough support I won't have to reinforce this area. 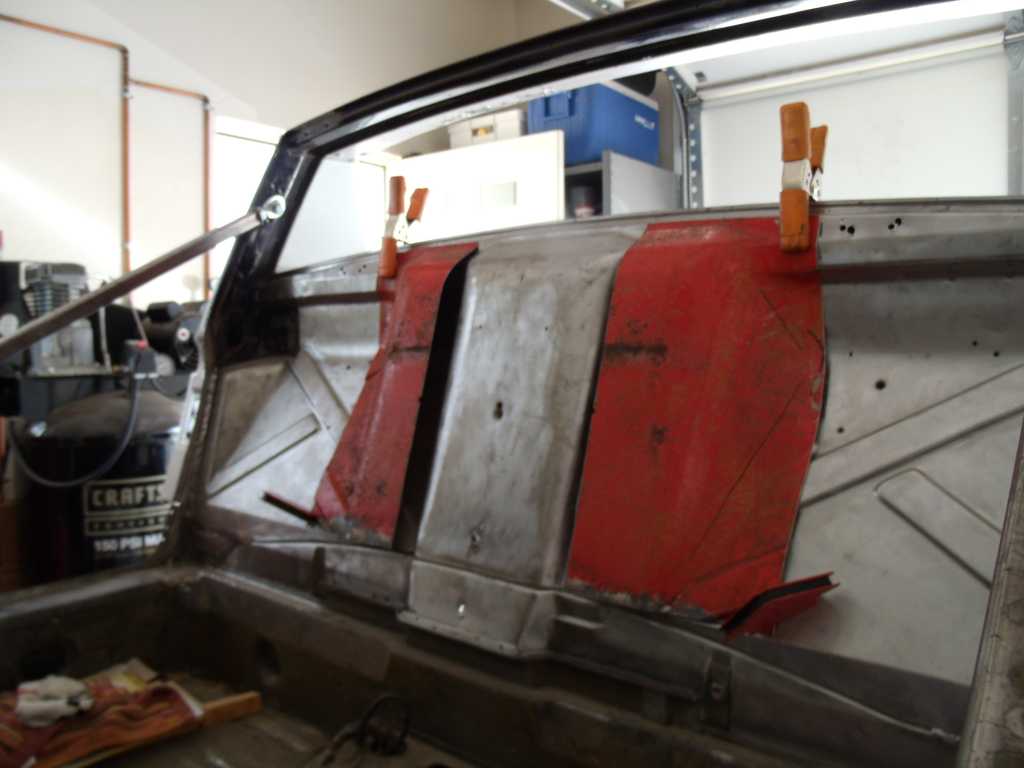 |
|
|
|
| 3d914 |
Sep 22 2013, 03:28 PM
Post
#294
|
|
Senior Member Group: Members Posts: 1,275 Joined: 24-September 03 From: Benson, AZ Member No.: 1,191 Region Association: Southwest Region |
Made some more progress on the left side of the firewall. Started by reshaping the curvature on this side with a spare piece - as it had a convex bulge that needed to be concave. It took a lot of cutting and shaping with a hammer but I'm nearly there.
Also cut out the portion to be replaced so I can start matching edges for the butt joints. I also decided to retain the ribbing toward the center for added strength. The sloping curve along the bottom edge will be cut to match the upper edge of the rib. 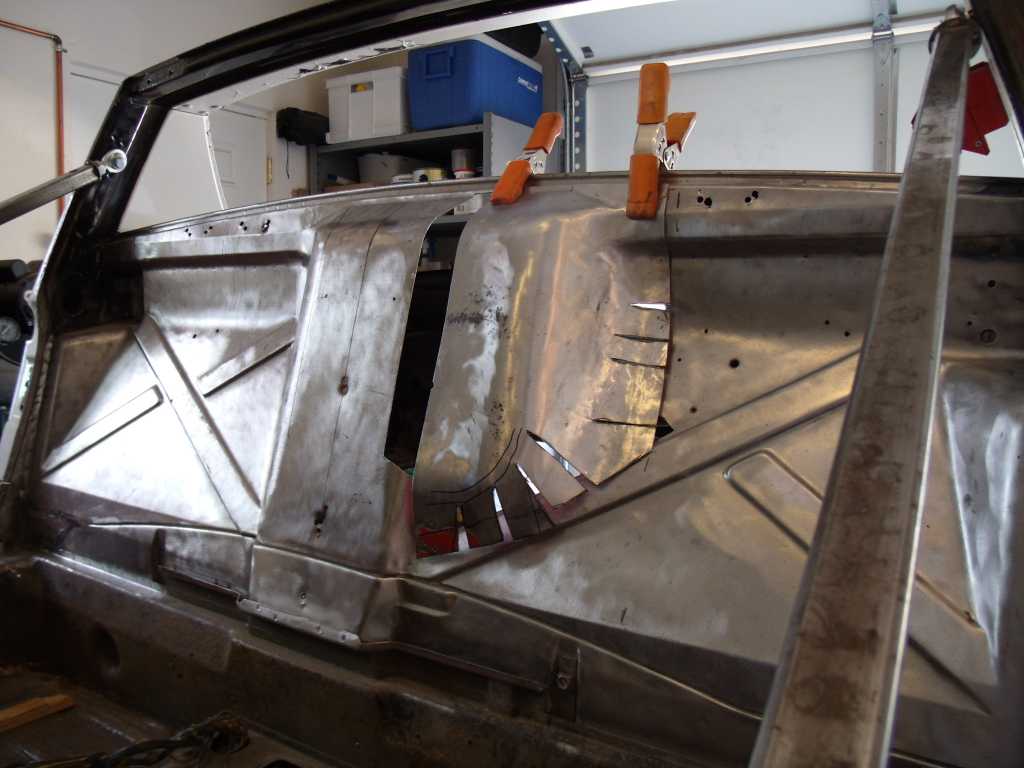 |
|
|
|
| 3d914 |
Sep 28 2013, 06:19 PM
Post
#295
|
|
Senior Member Group: Members Posts: 1,275 Joined: 24-September 03 From: Benson, AZ Member No.: 1,191 Region Association: Southwest Region |
Did another test fit. With the trunk section cut out I was able to lift another 8-10 inches. The right side of the cockpit firewall has not been cut yet so that's a restriction. The bulge provides an extra 4 inches which will be enough for the intake/surge canister.
 The alignment of the drive shafts will be spot on. 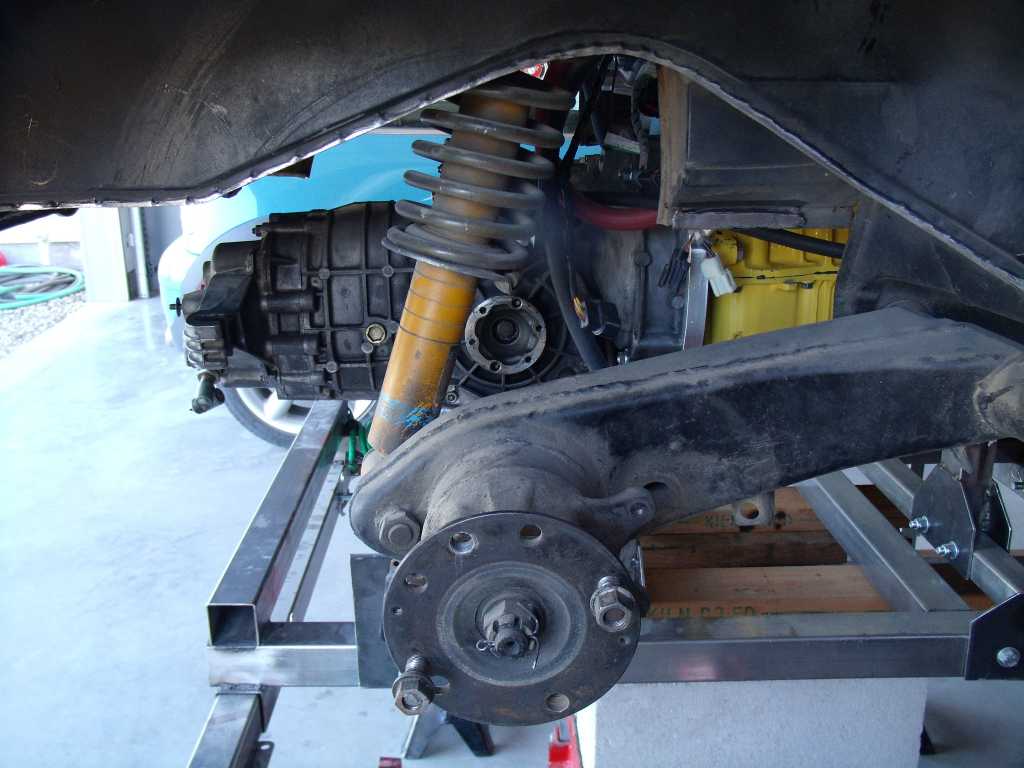 Plenty of clearance at the thermostat now. 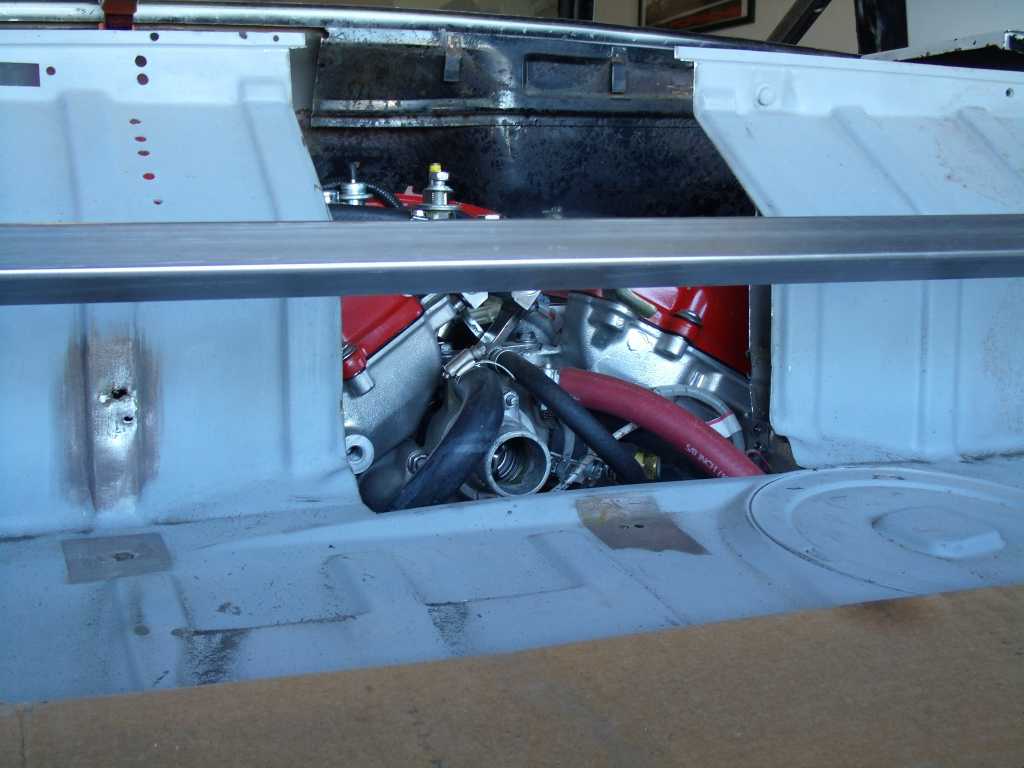 The only thing I'm questioning is the clearance for the alternator and the extended bulge. I'm currently adding 2 inches of material to each side at the middle (see gap in previous post) - but I think I'm going to test fit again with 3 or 4 inches. This will push the bulge left & right even farther. My concern is that I'm strongly considering relocating the A/C to the right side in place of the PS pulley. If I go this route I want as much space at the firewall as possible. 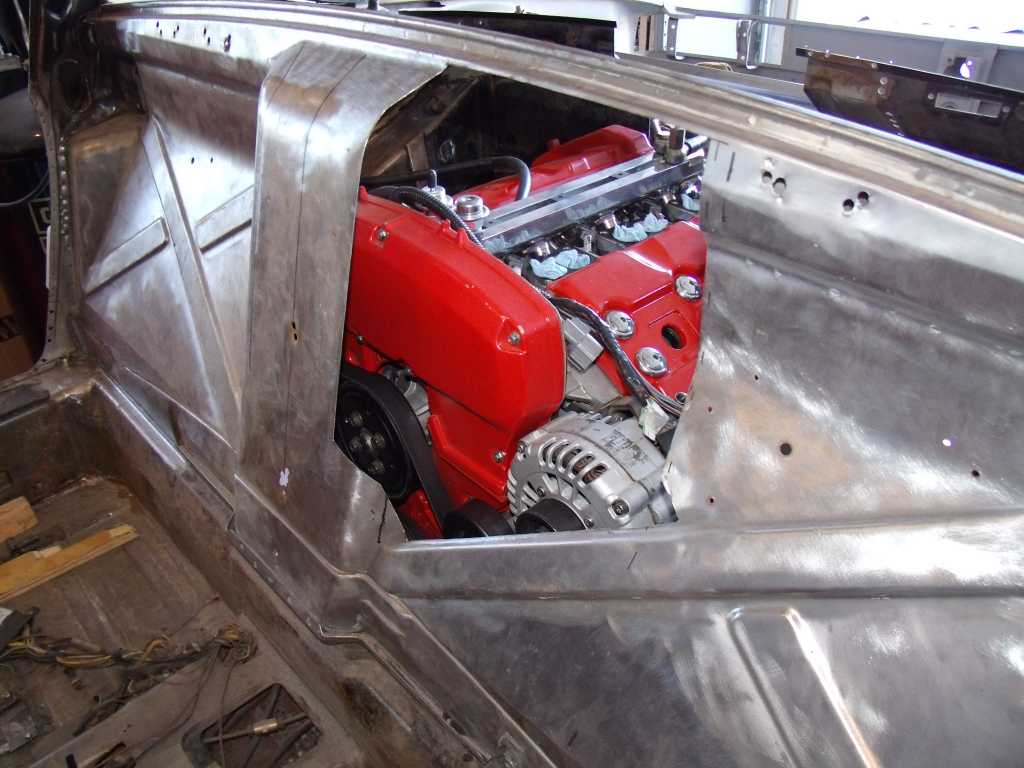 |
|
|
|
| 3d914 |
Oct 8 2013, 08:34 PM
Post
#296
|
|
Senior Member Group: Members Posts: 1,275 Joined: 24-September 03 From: Benson, AZ Member No.: 1,191 Region Association: Southwest Region |
More progress this evening. Was able to cut two 3" sections for the middle bulge. Applied to each side that will give me an added 6" of clearance - which should be plenty. Was able mock up the left side with the added section.
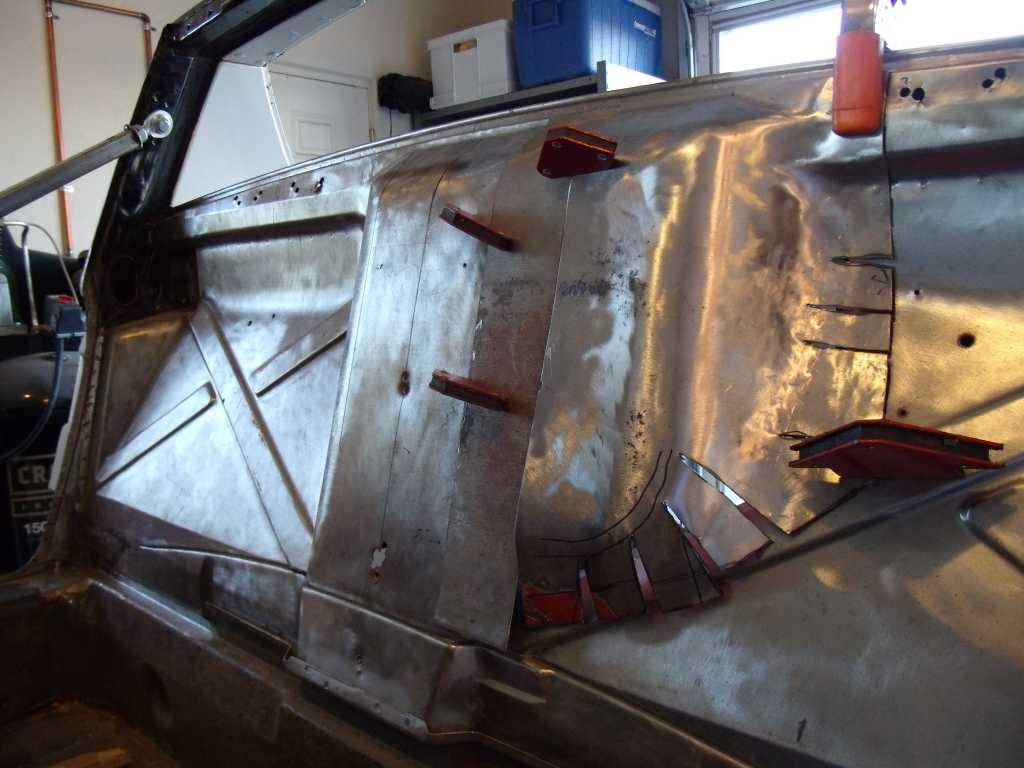 Then went on to cut up the right side of the firewall. The farthest vertical edges have been undercut until I get things shaped and fitted. 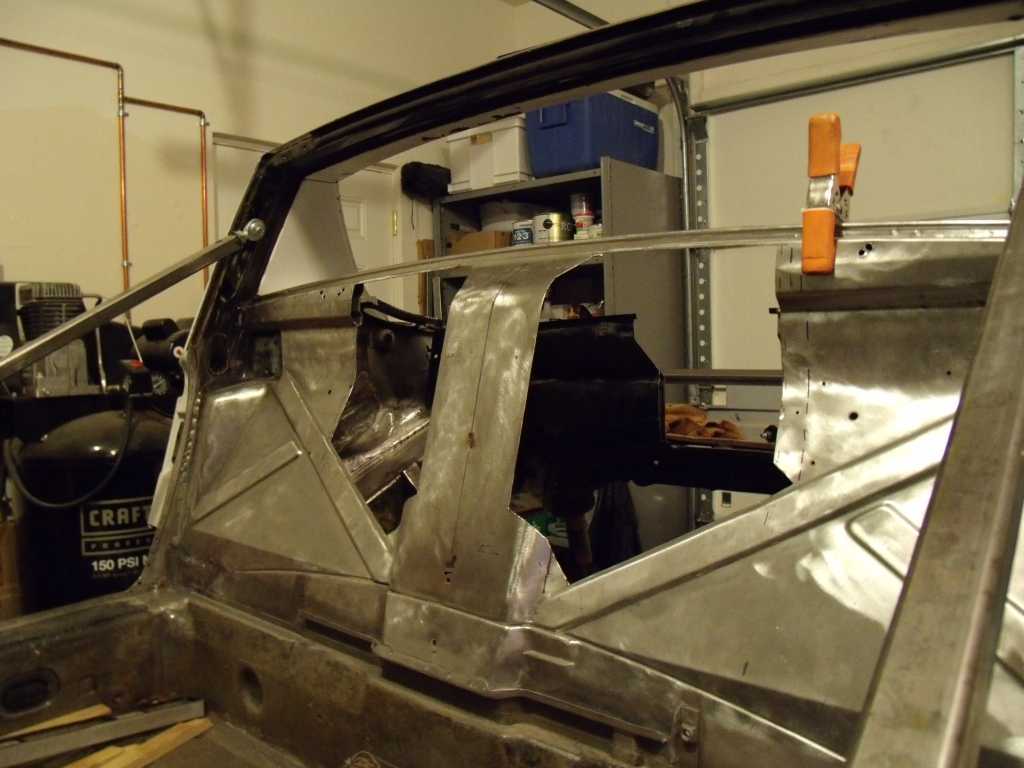 So here's the mockup with all four pieces. Next challenge is to shape the bottom blends into the angled ribs. 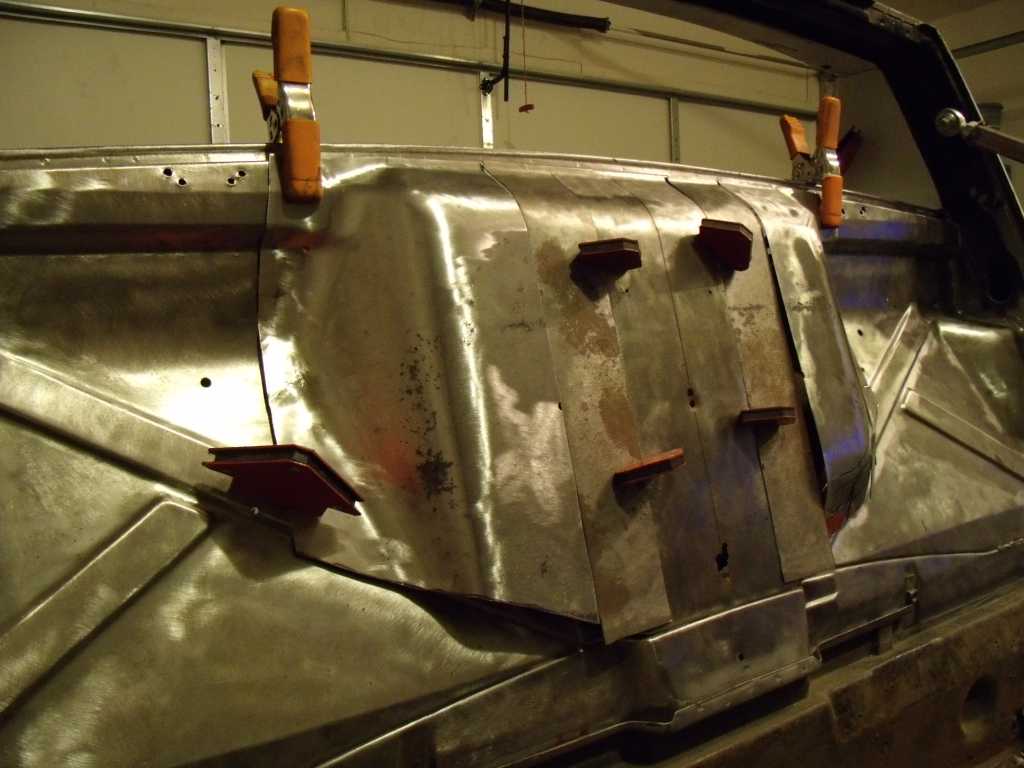 |
|
|
|
| bulitt |
Oct 9 2013, 01:22 AM
Post
#297
|
|
Achtzylinder Group: Members Posts: 4,189 Joined: 2-October 11 Member No.: 13,632 Region Association: South East States |
I'm guessing your seats will fit?
|
|
|
|
| 3d914 |
Oct 11 2013, 09:38 AM
Post
#298
|
|
Senior Member Group: Members Posts: 1,275 Joined: 24-September 03 From: Benson, AZ Member No.: 1,191 Region Association: Southwest Region |
QUOTE(bulitt @ Oct 9 2013, 12:22 AM) I'm guessing your seats will fit? Yeh, I'm only five-four and never have the seat back that far. Also thinking about putting a speaker box behind the seat to further utilize the space. |
|
|
|
| 76-914 |
Oct 11 2013, 11:33 AM
Post
#299
|
|
Repeat Offender & Resident Subaru Antagonist Group: Members Posts: 13,882 Joined: 23-January 09 From: Temecula, CA Member No.: 9,964 Region Association: Southern California |
(IMG:style_emoticons/default/thumb3d.gif) Nice work. Did you make those with a sand bag? What are your plans as far as finishing that area after paint? It's purty enough to leave bare, however. (IMG:style_emoticons/default/popcorn[1].gif)
|
|
|
|
| 3d914 |
Oct 11 2013, 08:34 PM
Post
#300
|
|
Senior Member Group: Members Posts: 1,275 Joined: 24-September 03 From: Benson, AZ Member No.: 1,191 Region Association: Southwest Region |
QUOTE(76-914 @ Oct 11 2013, 10:33 AM) (IMG:style_emoticons/default/thumb3d.gif) Nice work. Did you make those with a sand bag? What are your plans as far as finishing that area after paint? It's purty enough to leave bare, however. (IMG:style_emoticons/default/popcorn[1].gif) Thanks. I'd like to have a sand bag, but been using items I can find that have the correct radius. Used a piece of thick PVC for the smaller radius & the body of a fire extinquisher for the larger. Talk about crude! |
|
|
|
|
1 User(s) are reading this topic (1 Guests and 0 Anonymous Users)
0 Members:

|
Lo-Fi Version | Time is now: 9th May 2026 - 08:43 PM |
Invision Power Board
v9.1.4 © 2026 IPS, Inc.