|
|
|
Porsche, and the Porsche crest are registered trademarks of Dr. Ing. h.c. F. Porsche AG.
This site is not affiliated with Porsche in any way. Its only purpose is to provide an online forum for car enthusiasts. All other trademarks are property of their respective owners. |
|
|

  |

| bulitt |
 Jul 25 2014, 10:03 AM Jul 25 2014, 10:03 AM
Post
#361
|
|
Achtzylinder  Group: Members Posts: 4,189 Joined: 2-October 11 Member No.: 13,632 Region Association: South East States |
Cut it, weld it, grind it, love it (IMG:style_emoticons/default/aktion035.gif)
|
   |

 
|
| 3d914 |
Jul 25 2014, 01:33 PM
Post
#362
|
|
Senior Member Group: Members Posts: 1,275 Joined: 24-September 03 From: Benson, AZ Member No.: 1,191 Region Association: Southwest Region |
Thanks, Bob.
|
|
|
|
| 3d914 |
Aug 17 2014, 01:02 PM
Post
#363
|
|
Senior Member Group: Members Posts: 1,275 Joined: 24-September 03 From: Benson, AZ Member No.: 1,191 Region Association: Southwest Region |
Well the wall's done - well mostly. Started working on the shelf trim and the switch on my table saw went out. SO now I'm delayed until part comes in.
 |
|
|
|
| Chris H. |
Aug 17 2014, 02:42 PM
Post
#364
|
|
Senior Member Group: Members Posts: 4,089 Joined: 2-January 03 From: Chicago 'burbs Member No.: 73 Region Association: Upper MidWest |
This SHOULD buy you some garage time Gerard. Lookin' good.
|
 |
|
| 3d914 |
Aug 17 2014, 02:52 PM
Post
#365
|
|
Senior Member Group: Members Posts: 1,275 Joined: 24-September 03 From: Benson, AZ Member No.: 1,191 Region Association: Southwest Region |
Thanks, Chris. And garage time it was today - over six hours doing templates for outer long reinforcement pieces. Also dropped the rear control arms.
The pieces turned out slightly different for each side so I couldn't just flip the patterns. Also the right side is minus the jack point already so I extended the bracing there forward another six inches. Thinking seriously about deleting the jack point here too since the reinforcement piece can cover the location - and would be stronger & not a water trap. 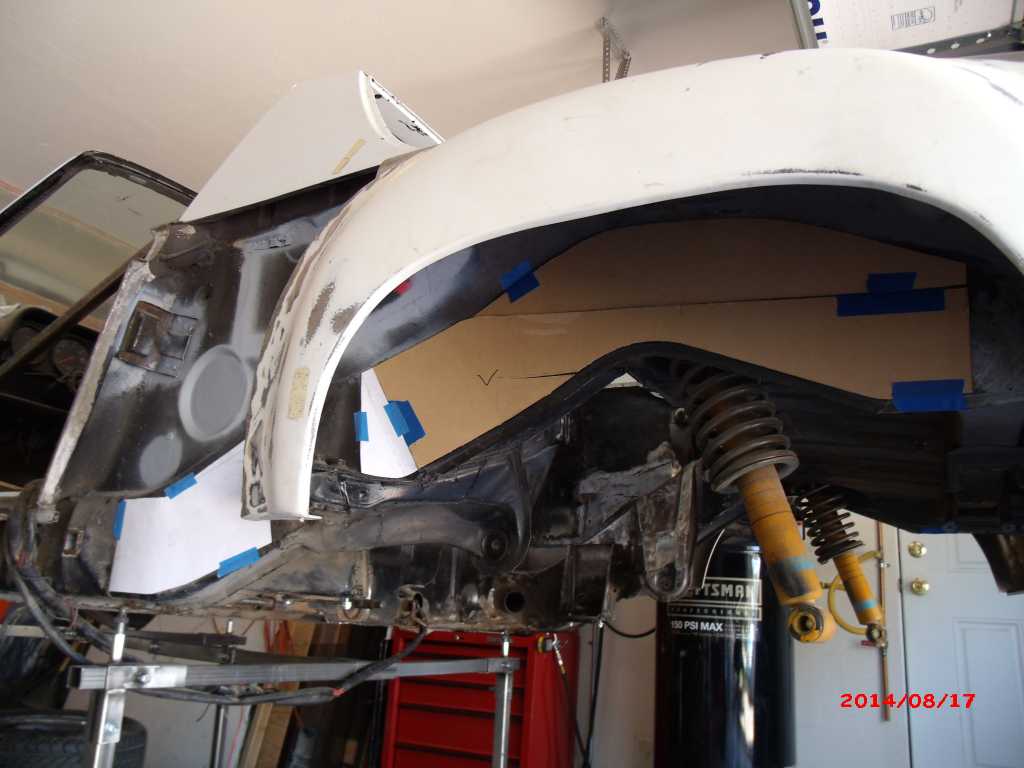 |
|
|
|
| 3d914 |
Sep 1 2014, 05:27 PM
Post
#366
|
|
Senior Member Group: Members Posts: 1,275 Joined: 24-September 03 From: Benson, AZ Member No.: 1,191 Region Association: Southwest Region |
More time in today. Got four of the large reinforcements cut and have the templates setup for drilling holes.
 |
|
|
|
| Cairo94507 |
Sep 3 2014, 07:21 AM
Post
#367
|
|
Michael Group: Members Posts: 10,677 Joined: 1-November 08 From: Auburn, CA Member No.: 9,712 Region Association: Northern California |
Very nice work. Keep posting please.
|
|
|
|
| 3d914 |
Sep 7 2014, 07:16 PM
Post
#368
|
|
Senior Member Group: Members Posts: 1,275 Joined: 24-September 03 From: Benson, AZ Member No.: 1,191 Region Association: Southwest Region |
Thanks, Mike.
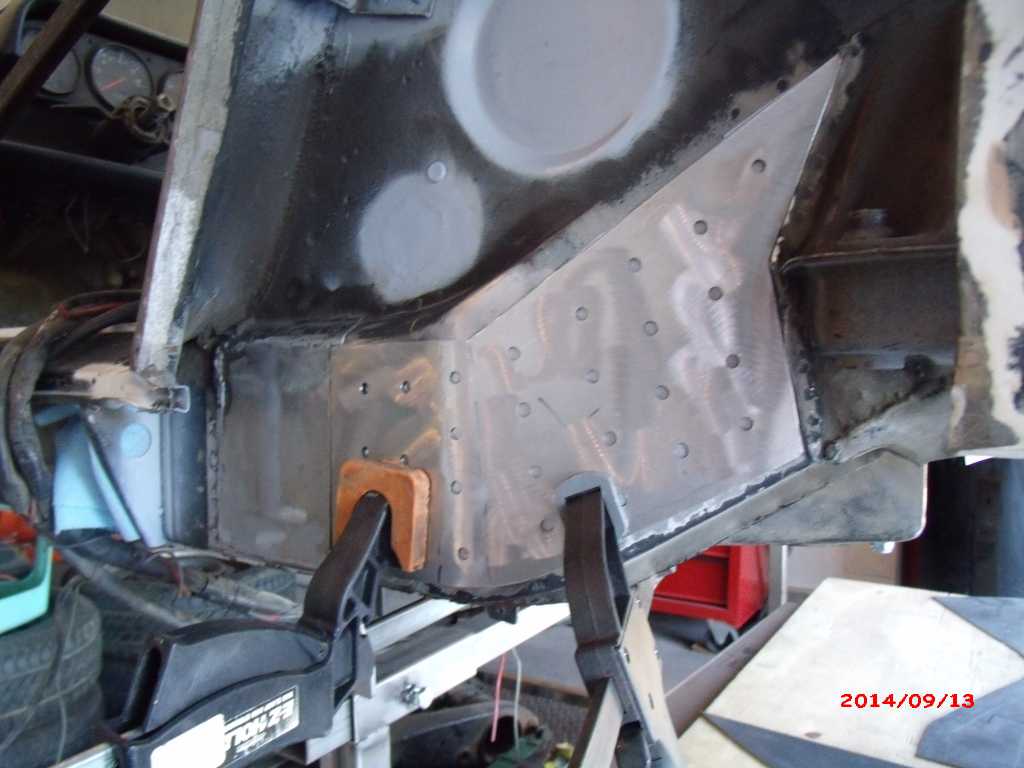
Was out of town most of this weekend but I did get some time in this morning to cut off the jack point. I started drilling out the welds then realized I'll leave the flat sections and just build my reinforcements into them. First photo shows why I don't like these. Even though they have drain holes I've yet to have any of mine actually drain. They all seem to collect crap that adds to rust. Fortunately its not bad. and the metal is till solid. It'll get treated and protected, then covered with reinforcement. Felt kinda crappy so decided to quit for the day. Turned out I had a 103+ fever. Not sure where that came from. 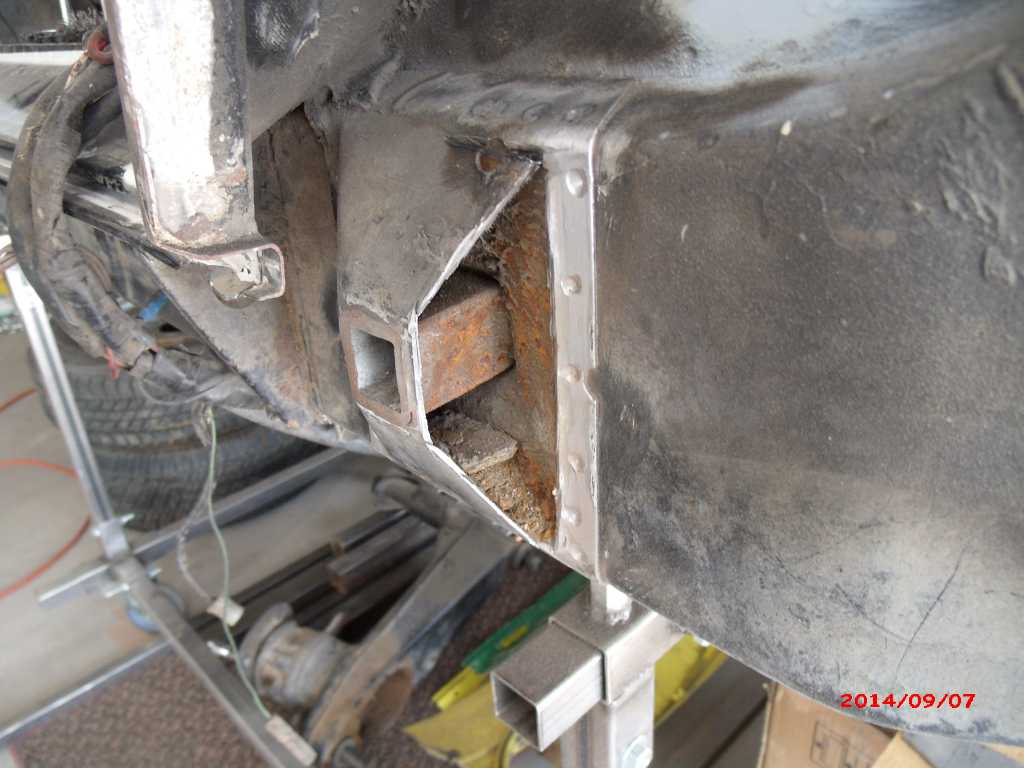 A little more cleaning then ready for treatment. 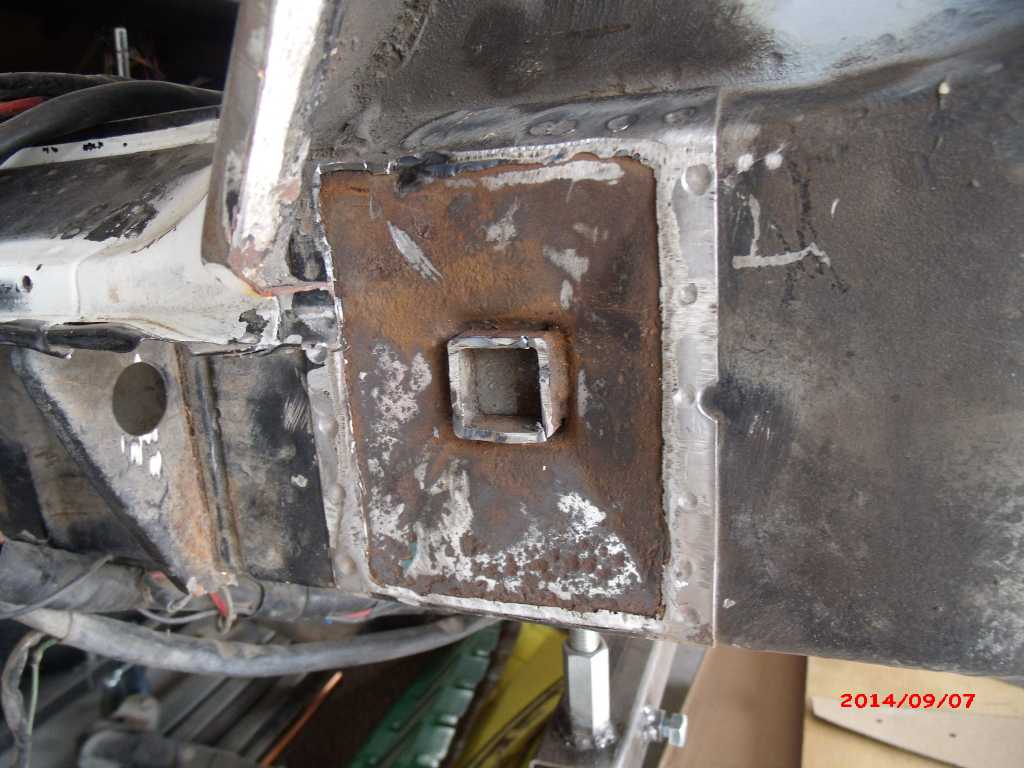 |
|
|
|
| wndsrfr |
Sep 7 2014, 07:26 PM
Post
#369
|
|
Senior Member Group: Members Posts: 1,464 Joined: 30-April 09 From: Rescue, Virginia Member No.: 10,318 Region Association: MidAtlantic Region |
QUOTE(3d914 @ Sep 7 2014, 05:16 PM)  Felt kinda crappy so decided to quit for the day. Turned out I had a 103+ fever. Not sure where that came from. Strange fever in summertime might be tick bite.....just had erlichiosis last year & it did the same to me....simple course of antibiotics cured it... |
|
|
|
| 3d914 |
Sep 13 2014, 07:00 PM
Post
#370
|
|
Senior Member Group: Members Posts: 1,275 Joined: 24-September 03 From: Benson, AZ Member No.: 1,191 Region Association: Southwest Region |
Making progress this weekend. With the jack point off, I was able to put in a filler plate - and then this will connect to the reinforcement piece. Got the plate cut, fit and drilled with 1/4" holes for welding.
 Also cut, fit and drilled the right side.  |
|
|
|
| 3d914 |
Oct 4 2014, 11:30 PM
Post
#371
|
|
Senior Member Group: Members Posts: 1,275 Joined: 24-September 03 From: Benson, AZ Member No.: 1,191 Region Association: Southwest Region |
I have been making some progress over the last few weeks - while taking vacation, hosting visiting relatives, driving to cancelled car shows, etc.
Anyhow, got all the welding done on the on the pieces that cover the jack point. Got the wheel well pieces cut, trimmed, fit and tack-welded. Will continue the welding as I can. 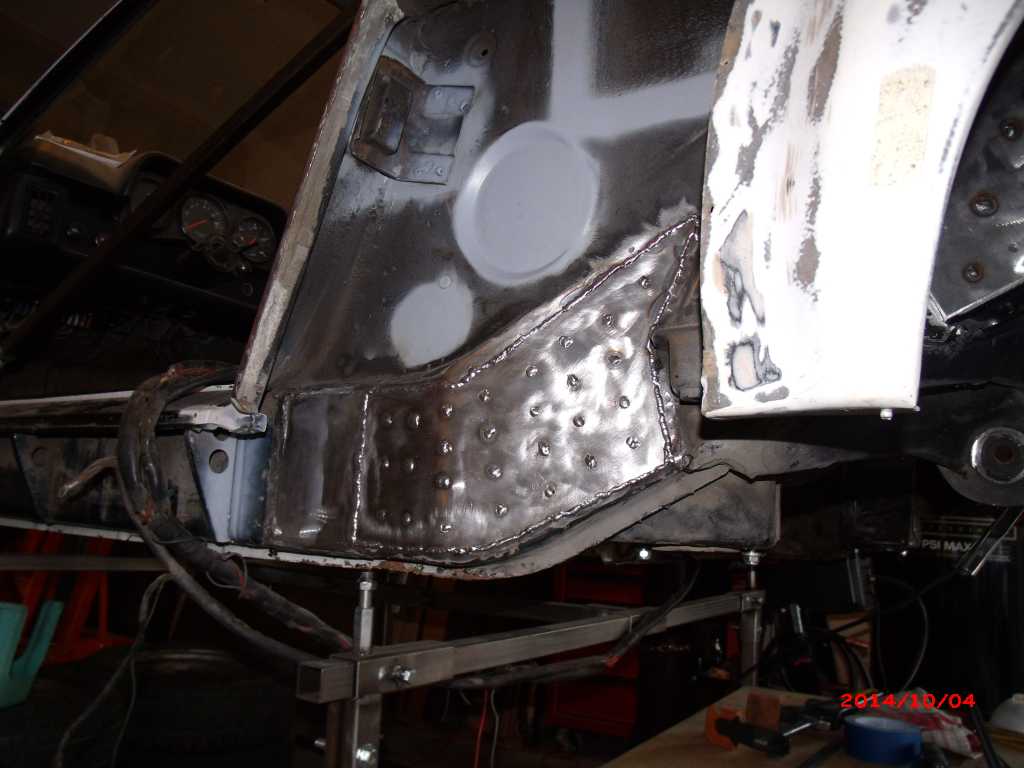  Wheel wells 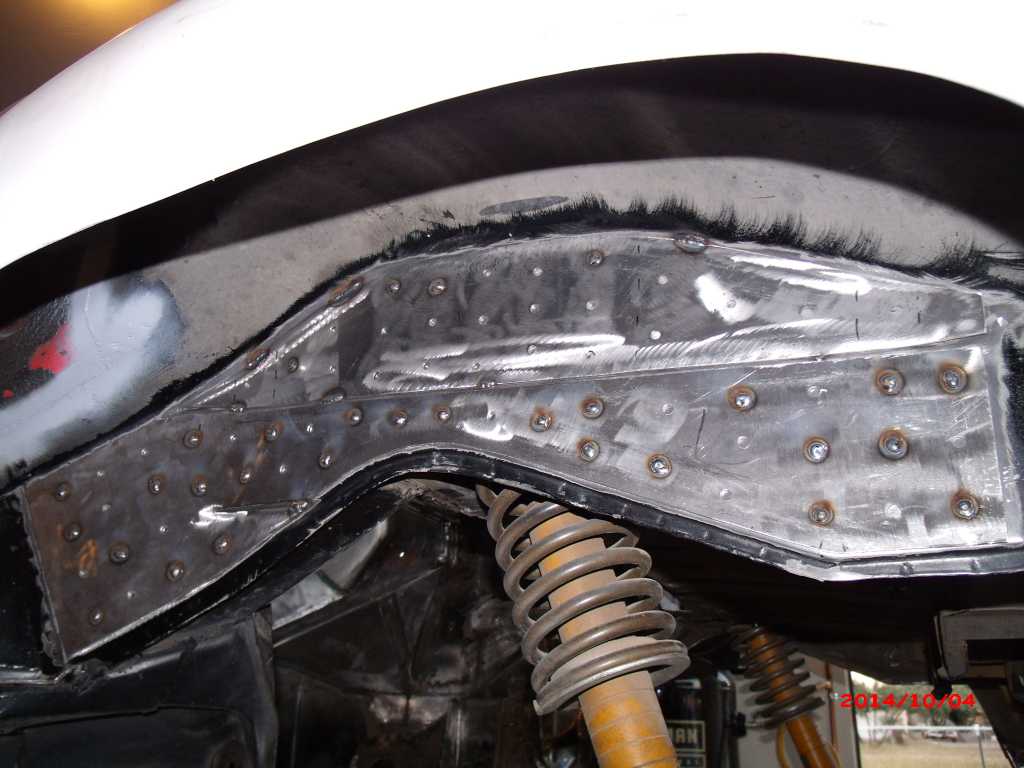 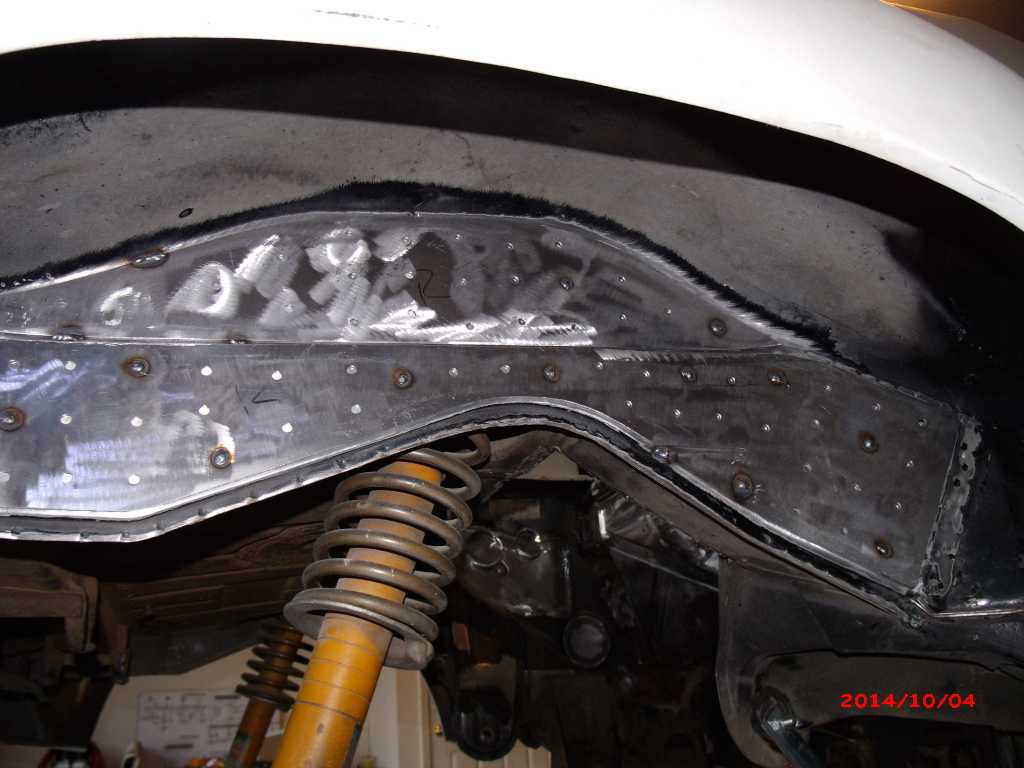 |
|
|
|
| 3d914 |
Oct 21 2014, 10:25 PM
Post
#372
|
|
Senior Member Group: Members Posts: 1,275 Joined: 24-September 03 From: Benson, AZ Member No.: 1,191 Region Association: Southwest Region |
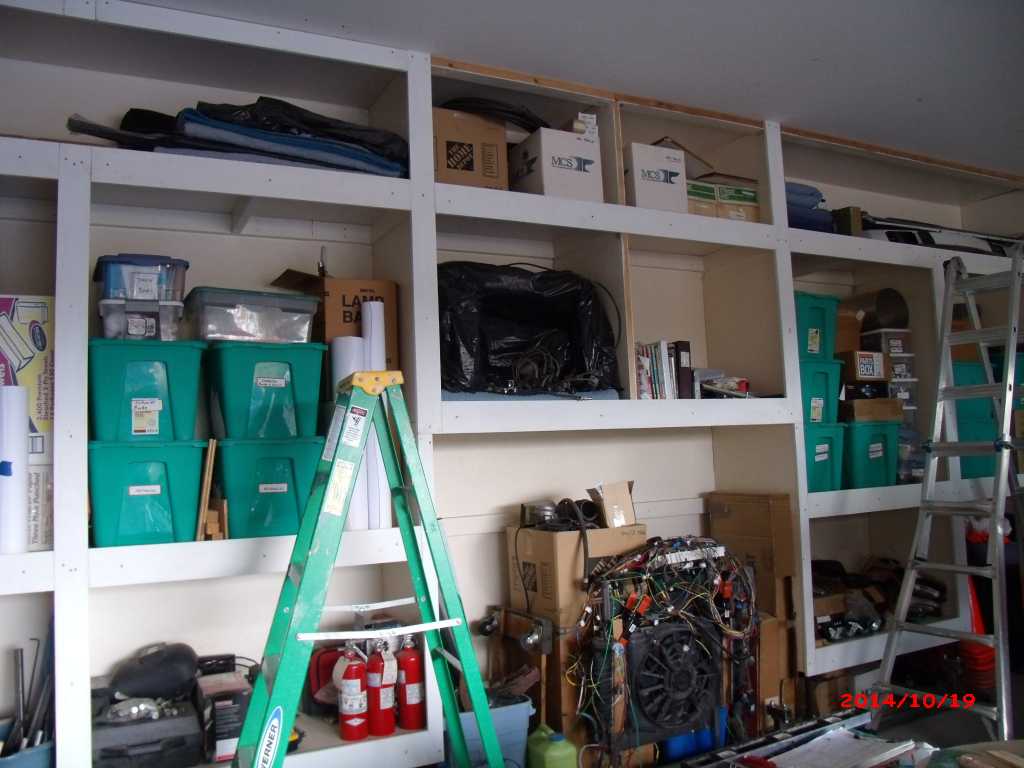
Took a break from welding for the last couple weekends to get my garage cabinet facings cut, fit, primered, and mounted. Hope to get back to welding this weekend while I wait for cabinet hardware.
 |
|
|
|
| 3d914 |
Nov 9 2014, 07:10 PM
Post
#373
|
|
Senior Member Group: Members Posts: 1,275 Joined: 24-September 03 From: Benson, AZ Member No.: 1,191 Region Association: Southwest Region |
Still working on the car & the cabinets. Mostly grinding welds on the car - and there are lots of em. Will get some pics once I get it done and primed.
Decided how to finish the cabinet doors. Didn't want to spend an arm & a leg for hardwood, but needed something straight. My neighbor had some 12-foot 1x6s he was willing to sell so I started with those. They're kiln-dried #2 so they have more knots than I'd like, but their straight - so I'll live with it. After all they'll be painted garage cabinet doors - so I'm trying to keep my perspective and not go overboard. The real challenge was finding 3/8 panels to fit in the style & rails. I went to one HD and two Lowes before I could find some straight sheets. I decided on these siding panels with grooves & decided to run the grooves horizontally - just to be different. Here's some pics of the rough fit before any sanding. 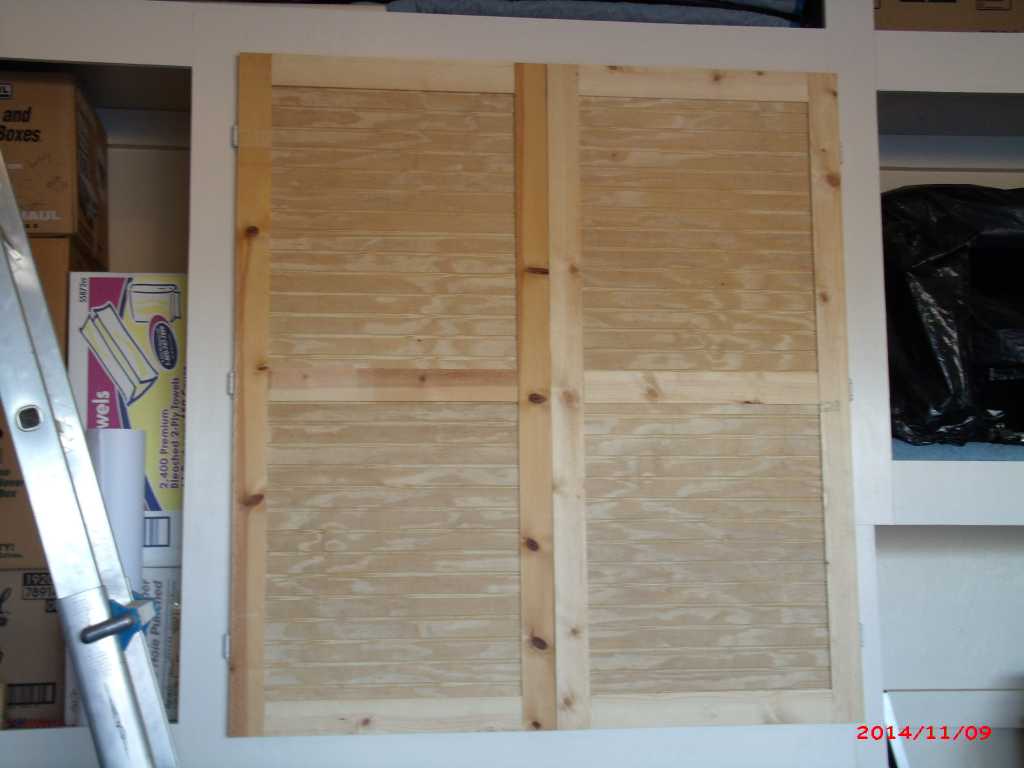 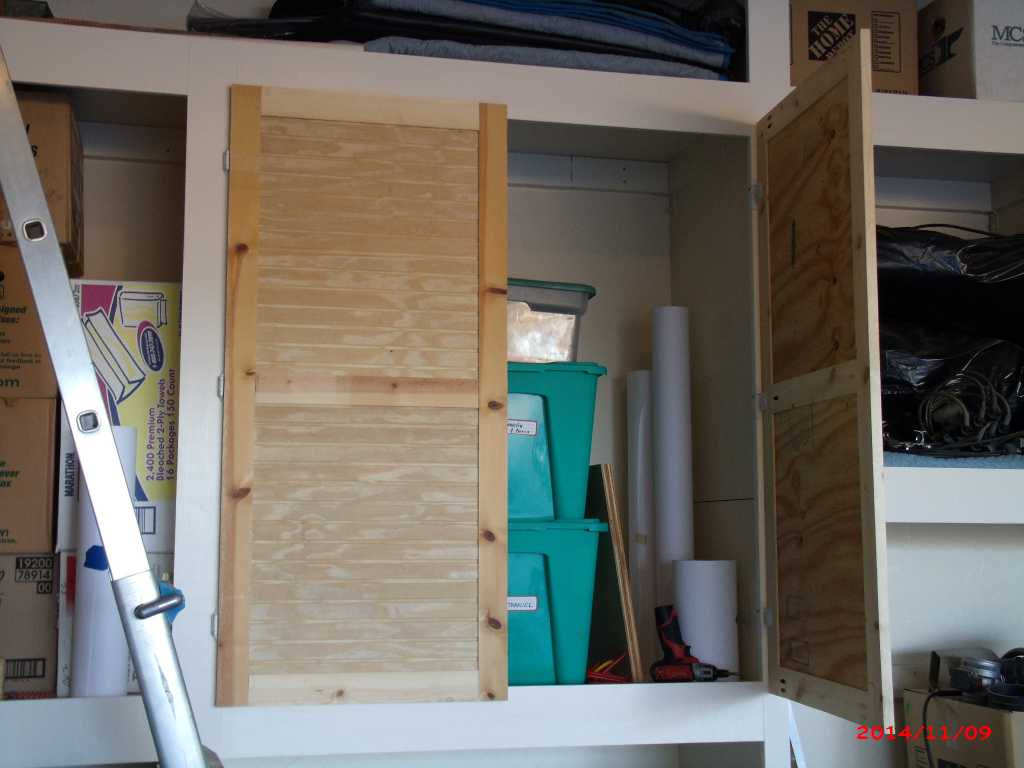 |
|
|
|
| drive-ability |
Nov 9 2014, 09:07 PM
Post
#374
|
|
Senior Member Group: Members Posts: 1,169 Joined: 18-March 05 From: Orange County, California Member No.: 3,782 |
I love this car, the upper end of the engine is one of the coolest looking units.
Your craftsmanship is fantastic, looking at your garage and project screams organization / clean work & work area. Love to see it in person. Nice work !!!!!!!!!!!!!!! (IMG:style_emoticons/default/beer.gif) |
|
|
|
| 3d914 |
Nov 11 2014, 01:03 PM
Post
#375
|
|
Senior Member Group: Members Posts: 1,275 Joined: 24-September 03 From: Benson, AZ Member No.: 1,191 Region Association: Southwest Region |
QUOTE(drive-ability @ Nov 9 2014, 08:07 PM) I love this car, the upper end of the engine is one of the coolest looking units. Your craftsmanship is fantastic, looking at your garage and project screams organization / clean work & work area. Love to see it in person. Nice work !!!!!!!!!!!!!!! (IMG:style_emoticons/default/beer.gif) Thanks. That perty intake is one of the reasons I chose this motor. Can't wait to get it on the road. They run as good as they look! |
|
|
|
| 3d914 |
Nov 29 2014, 06:46 PM
Post
#376
|
|
Senior Member Group: Members Posts: 1,275 Joined: 24-September 03 From: Benson, AZ Member No.: 1,191 Region Association: Southwest Region |
Still doing welding and grinding on the 914 longs in the wheel-wells. Also spent one whole day ripping, cutting and grooving all the panels, rails, and styles for the remaining 18 doors.
Fortunately there are only a couple pieces that I'll need to replace since they're slightly curved. The rest are nice and straight, so assembly can commence later next week. I've got training certification I need to complete nights next week - so no garage time until Friday. 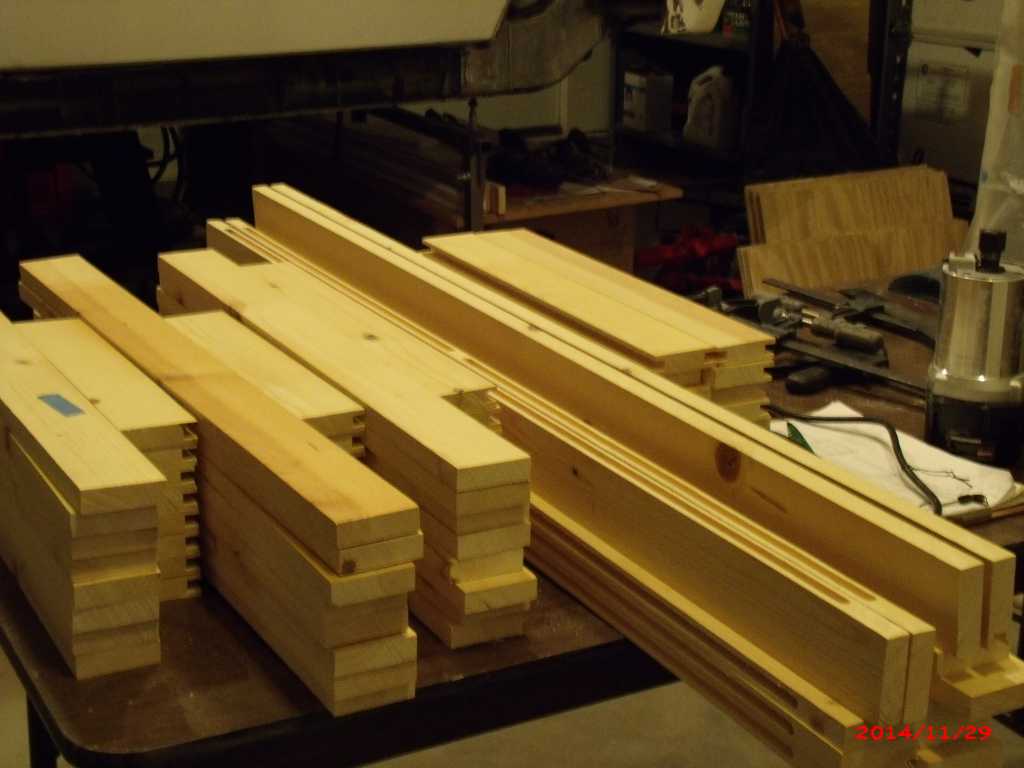 |
|
|
|
| 3d914 |
Jan 2 2015, 01:46 PM
Post
#377
|
|
Senior Member Group: Members Posts: 1,275 Joined: 24-September 03 From: Benson, AZ Member No.: 1,191 Region Association: Southwest Region |
Been working on cabinet doors when I can. Been too cold to do much on the car. Laid out the scope of metal work left on the under body though:
Move body to rotisserie
|
|
|
|
| drive-ability |
Jan 2 2015, 08:08 PM
Post
#378
|
|
Senior Member Group: Members Posts: 1,169 Joined: 18-March 05 From: Orange County, California Member No.: 3,782 |
QUOTE(3d914 @ Jan 2 2014, 10:05 AM) QUOTE(Krieger @ Jan 1 2014, 05:52 PM) Gerard you will have to cut out the rear firewall section before you put the angle iron in. If you look carefully you will see I only cut the forward section on mine. I think since you already cut through the entire firewall it wont make a difference if you remove the remnants. I was able to preserve some usage of the rear trunk. Andy, thanks for the tip. I've added this to my list of reinforcements planned for the higher torque motor. Decided to try a different path on the rear-hinged trunk. Taking an idea from the mini cooper trunk hinge, I saw how I could get the offset I needed when rotating so that it clears the vertical mating surfaces along the back panel. But I also wanted to integrate the engine lid with the trunk so that when the one opens it pulls the engine lid with it. The hinges between the trunk & engine lid will prevent rotation of more then 80-90 degrees. This is so that the engine lid will be in the correct position when closing to land its rollers on a small track added to those little extensions on the body (each side of the engine lid). The front of the engine lid will have a couple of pins to lock it into the main firewall. That's like the trunk I had on my black V8 car. I didn't add the engine cover but had that on my mind. I didn't because I had my engine lid powered by a liner actuator and it came in handy to block out headlights at night. Nice unique car !!!!! |
|
|
|
| 3d914 |
Jan 8 2015, 11:30 PM
Post
#379
|
|
Senior Member Group: Members Posts: 1,275 Joined: 24-September 03 From: Benson, AZ Member No.: 1,191 Region Association: Southwest Region |
QUOTE(drive-ability @ Jan 2 2015, 06:08 PM) That's like the trunk I had on my black V8 car. I didn't add the engine cover but had that on my mind. I didn't because I had my engine lid powered by a liner actuator and it came in handy to block out headlights at night. Nice unique car !!!!! Drive-ability, Thanks. I see you have an even more radical LS1 build. That's awesome. Is it near finished yet? Would like to see some pics if so. |
|
|
|
| 3d914 |
Feb 1 2015, 02:20 PM
Post
#380
|
|
Senior Member Group: Members Posts: 1,275 Joined: 24-September 03 From: Benson, AZ Member No.: 1,191 Region Association: Southwest Region |
Haven't been working much on the car lately - been really burnt out. Getting ramped back up though as the weather starts to improve some. Decided to do something constructive and non-maintenance - so I hung up my schematics that I mounted on some thin fiber board. There are two pages for the 914 wiring and two for the SHO motor wiring.
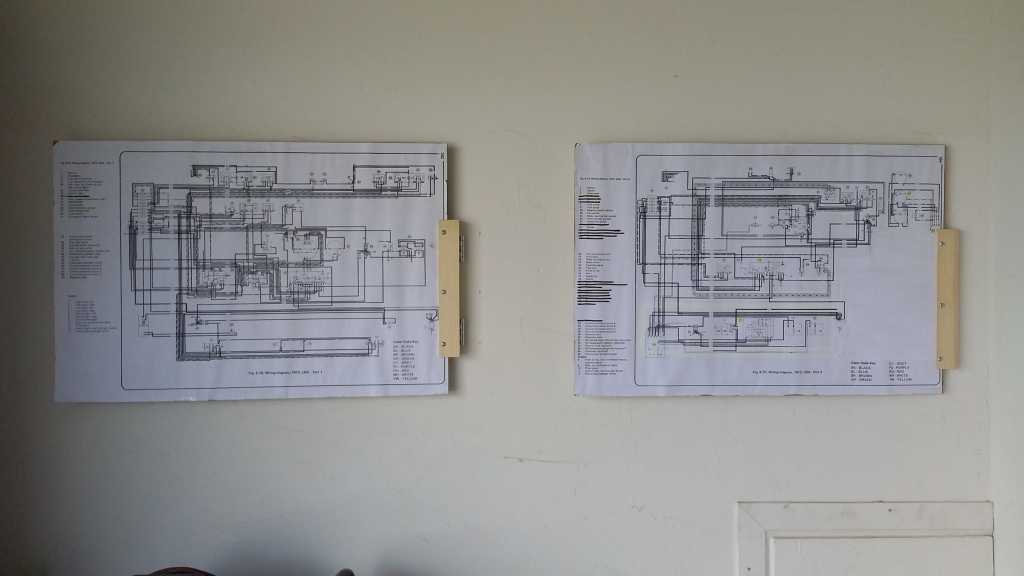 I expect to reference these a great deal as I rewire the car and the engine. 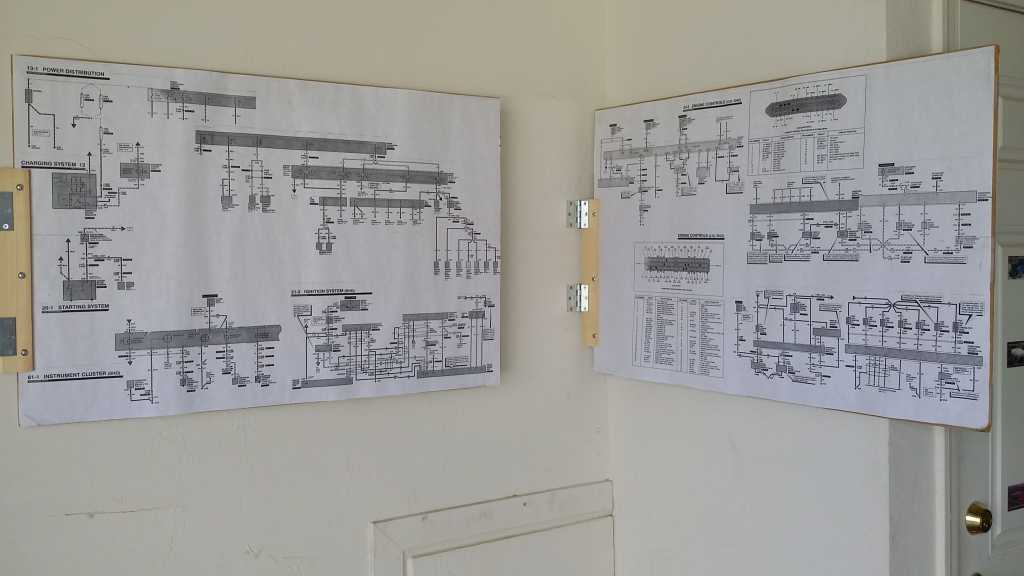 |
|
|
|
|
1 User(s) are reading this topic (1 Guests and 0 Anonymous Users)
0 Members:

|
Lo-Fi Version | Time is now: 22nd June 2026 - 07:59 AM |
Invision Power Board
v9.1.4 © 2026 IPS, Inc.