|
|
|
Porsche, and the Porsche crest are registered trademarks of Dr. Ing. h.c. F. Porsche AG.
This site is not affiliated with Porsche in any way. Its only purpose is to provide an online forum for car enthusiasts. All other trademarks are property of their respective owners. |
|
|

 Model Specific Information
914/4: 70 71 72 73 74 75 76 914/6: 70 71 72
  |

| jonferns |
 May 5 2008, 08:07 PM May 5 2008, 08:07 PM
Post
#1
|
|
Advanced Member  Group: Members Posts: 2,081 Joined: 29-March 07 From: New Jersey Member No.: 7,631 Region Association: North East States |
I've been spending alot of my free time doing some detailing work in the wheel wells while the car was up on jackstands awaiting a replacement fuel pump. The idea was to detail the four wheel wells. On the fronts I was left with large dark spots where there was a thick buildup of road crud; the paint isn't chipped in those areas, and the spots come out when I scrape at them with my fingernail, but the spot is just too large to remove all of it that way. I was looking to see if anyone else has dealt with something like this. Maybe some sort of rubbing compound will contain just enough abrasives to remove it without harming the paint underneath? All in all, not bad for almost 40 year old paint in a vulnerable spot.
Also, the struts are left with some spots after cleaning them, what could I use to clean them up. Pat, think that "simichrome" would be a good idea to use on them? 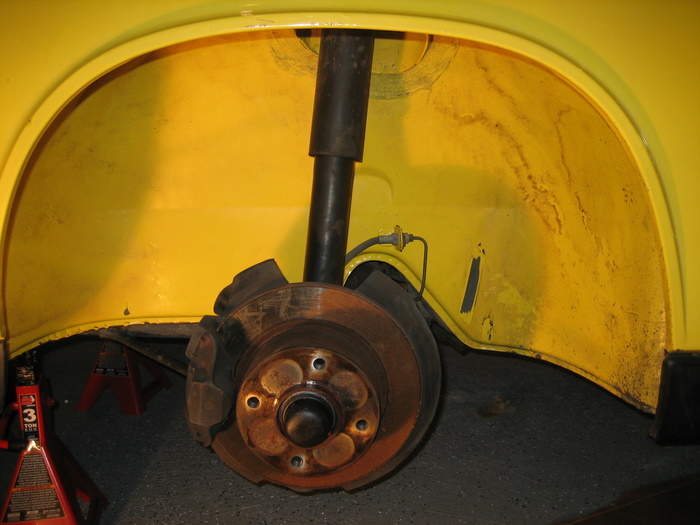 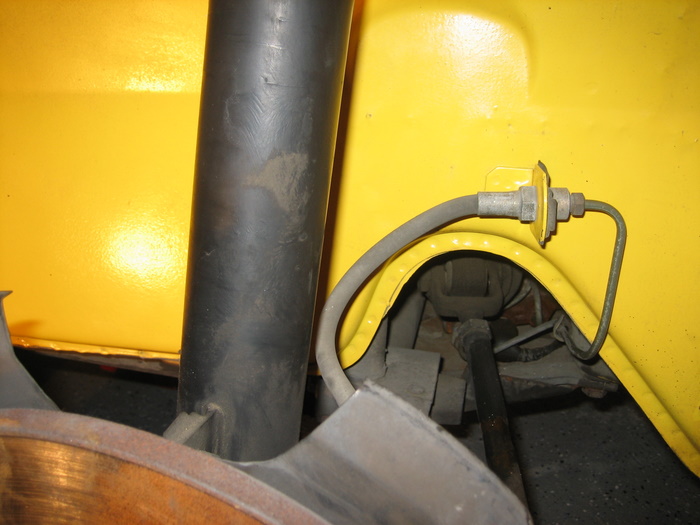 |
   |

 
|
| jonferns |
May 5 2008, 08:08 PM
Post
#2
|
|
Advanced Member Group: Members Posts: 2,081 Joined: 29-March 07 From: New Jersey Member No.: 7,631 Region Association: North East States |
And heres a pic of the strut
 |
|
|
|
| 1970 Neun vierzehn |
May 5 2008, 08:13 PM
Post
#3
|
|
Advanced Member Group: Members Posts: 3,199 Joined: 16-March 06 From: cincinnati, ohio Member No.: 5,727 |
J,
Wow, looking good in the wheel wells. Was there undercoating, rustproofing or sound deadening material in there, or just road grime? Don't use Simichrome on anything painted, it'll dull the paint and eventually abrade through it. I use it only on chrome surfaces. Paul |
|
|
|
| jonferns |
May 5 2008, 08:21 PM
Post
#4
|
|
Advanced Member Group: Members Posts: 2,081 Joined: 29-March 07 From: New Jersey Member No.: 7,631 Region Association: North East States |
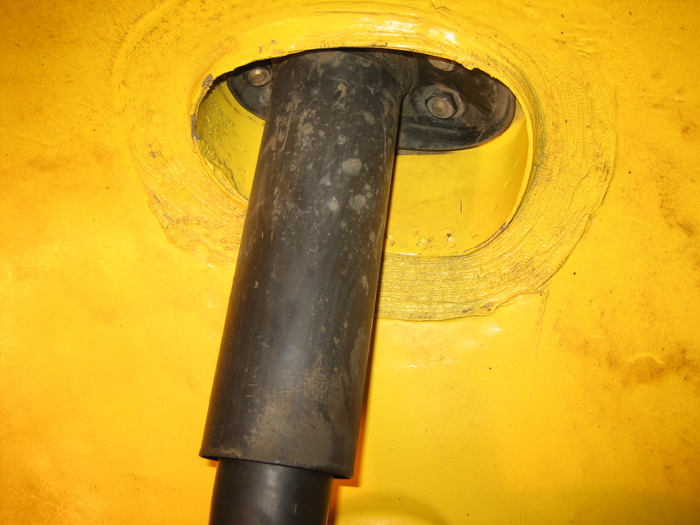
Nope, never had any undercoating. It spent its whole life in CA until last year when we brought it over to NJ.
The strut isn't as dirty now as it is in the picture, as it was taken before I went at it with a toothbrush. Its free of any dirt now, the finish is just a bit dull. |
|
|
|
| Pat Garvey |
May 5 2008, 08:41 PM
Post
#5
|
|
Do I or don't I...........? Group: Members Posts: 5,899 Joined: 24-March 06 From: SE PA, near Philly Member No.: 5,765 Region Association: North East States |
Jon,
If I gave you the impression that Simichrome was a cure-all for everything, I apologize - it is not! Let's look t the background of "S". I first learned about it from bikers. They loved to have the engine cases of the bikes gleaming. Works great for that, but only last a week. Simichrome is only for use on unpainted metal parts. And, moreover, parts that haven't neen cad plated, or the plating is gone & you don't want to invest the money is new parts. Take, for advatage fuel rails. These were originally cad plated (or a derivative). but they are subjected to the environment. You could buy new, or Simichrome them. They are unpainted, so they will look like chrome when you're finished. And, they'll stay that way for a couple of years. Do not use Simichrome for painted surfaces. You could pop off your brake line clips, clean them up, and Simichrome them - they would loook gorgeous, though not original (since they were cad plated). Sorry if I gave you the wrong idea about this product - do NOT use it on painted surfaces, though it won't hurt them - only dull the finish. Pat |
|
|
|
| jonferns |
May 5 2008, 08:49 PM
Post
#6
|
|
Advanced Member Group: Members Posts: 2,081 Joined: 29-March 07 From: New Jersey Member No.: 7,631 Region Association: North East States |
Pat, no worries. I got the idea that it was alright to use on painted finishes from the "NLA Parts" website, where they advertise it as being able to "polish paint".
How about a clay bar for removing the left-over brown film in the wheel wells? |
|
|
|
| Pat Garvey |
May 6 2008, 08:07 PM
Post
#7
|
|
Do I or don't I...........? Group: Members Posts: 5,899 Joined: 24-March 06 From: SE PA, near Philly Member No.: 5,765 Region Association: North East States |
QUOTE(sendjonathanmail @ May 5 2008, 08:49 PM)  Pat, no worries. I got the idea that it was alright to use on painted finishes from the "NLA Parts" website, where they advertise it as being able to "polish paint". How about a clay bar for removing the left-over brown film in the wheel wells? Jon, can't help you here - never used a clay bar. But, others have & they should chime in here! PLEASE! I'm still curious about the efforts & effects of a clay bar. Pat |
|
|
|
| tod914 |
May 9 2008, 12:14 PM
Post
#8
|
|
Advanced Member Group: Members Posts: 3,755 Joined: 19-January 03 From: Lincoln Park, NJ Member No.: 170 |
Maybe start with something like a ps21 paint cleaner. If that doesn't
work then the 3m rubbing compound (get the most mild that you can). Use the least abrassive 1st, then go from there. Remember you'll be removing paint with either product. Rub a little and then check your progress. If you rush it, you'll likely not to have too much paint left in that area when your done. You don't want to burn through the paint. Mequires has a good cleaner too from what I recall, and cheaper in price than the ps21. I used the Mequires cleaner to do my engine bay and was very happy with the results. It's slightly more abrassive then the ps21 and should work fine for your wheel wells. Anxious to see your results (IMG:style_emoticons/default/smile.gif) You might be able to get away with an orbital buffer using the ps21 or mequires. But I would start by hand and see how it goes. Good luck. |
|
|
|
| jonferns |
May 27 2008, 05:46 PM
Post
#9
|
|
Advanced Member Group: Members Posts: 2,081 Joined: 29-March 07 From: New Jersey Member No.: 7,631 Region Association: North East States |
Still haven't gotten around to removing the wheels to address those dark spots in the wheelwells. This weekend I took some time to remove my already loose front trunk seal and clean the gutters. I'm not going to glue the seal down. This way I can periodically remove it to clean up. I was lucky when I removed the seal because no chunks of it stayed behind, just lots of adhesive. I thought about what I could use to remove all of the adhesive, because just soapy water wasn't working. I went out and bought a bottle of Goo-Gone, and tested it on the paint on my parts car (by letting it sit overnight) just to make sure that it wouldn't have an unwanted effects. It worked really well at removing all the adhesive, and now I have a very clean gutter all around my front trunk, with no adhesive residue! After initial cleanup with Goo-Gone, I went over the gutter with soapy water, dried it, then waxed it. Pics to come
Next will be removing the rockers, cleaning under them, then refinishing them and reinstalling with new rivets I got from Tod. I'll also be refinishing the front and rear valances while i'm at it. |
|
|
|
| Pat Garvey |
May 27 2008, 07:26 PM
Post
#10
|
|
Do I or don't I...........? Group: Members Posts: 5,899 Joined: 24-March 06 From: SE PA, near Philly Member No.: 5,765 Region Association: North East States |
QUOTE(sendjonathanmail @ May 27 2008, 05:46 PM) Still haven't gotten around to removing the wheels to address those dark spots in the wheelwells. This weekend I took some time to remove my already loose front trunk seal and clean the gutters. I'm not going to glue the seal down. This way I can periodically remove it to clean up. I was lucky when I removed the seal because no chunks of it stayed behind, just lots of adhesive. I thought about what I could use to remove all of the adhesive, because just soapy water wasn't working. I went out and bought a bottle of Goo-Gone, and tested it on the paint on my parts car (by letting it sit overnight) just to make sure that it wouldn't have an unwanted effects. It worked really well at removing all the adhesive, and now I have a very clean gutter all around my front trunk, with no adhesive residue! After initial cleanup with Goo-Gone, I went over the gutter with soapy water, dried it, then waxed it. Pics to come Next will be removing the rockers, cleaning under them, then refinishing them and reinstalling with new rivets I got from Tod. I'll also be refinishing the front and rear valances while i'm at it. Jon, Not certain about not gluing the front seal, but nice work overall. How are you planning on refinishing the F & R valences? Pat |
|
|
|
| jonferns |
May 27 2008, 07:44 PM
Post
#11
|
|
Advanced Member Group: Members Posts: 2,081 Joined: 29-March 07 From: New Jersey Member No.: 7,631 Region Association: North East States |
Pat, I'm not 100% sure how I will be refinishing them. My initial plan of attack was to sand them smooth (should I take them down to metal?), then prime them (which primer is best to use). I remember you suggested the 3M body schutz for rockers and valences. If the gun is reasonable enough I'll probably go down that path, but I'll practice the spray method before actually applying to the panels. Then I will finish with a satin black, probably the wurth stuff.
Pat, or anyone else, please feel free to give suggestions. I have lots of time to put into them, and I'd really like them to come out near-perfect. |
|
|
|
| jonferns |
May 28 2008, 04:54 PM
Post
#12
|
|
Advanced Member Group: Members Posts: 2,081 Joined: 29-March 07 From: New Jersey Member No.: 7,631 Region Association: North East States |
Pat, im gonna see if I can borrow the gun from someone here, because I can't justify paying $60 for something im gonna use only once or twice, ya im a CSOB. Think 1 quart of the body schutz will be enough to practice the spray pattern and to shoot the pieces?
Here is the only pic that I took while I was cleaning the gutters 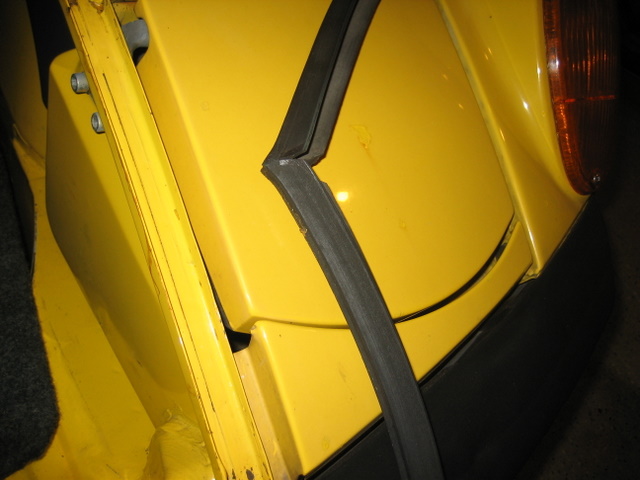 |
|
|
|
| orthobiz |
May 28 2008, 08:10 PM
Post
#13
|
|
Senior Member Group: Members Posts: 1,754 Joined: 8-January 07 From: Cadillac, Michigan Member No.: 7,438 Region Association: Upper MidWest |
Jonathan, I can't believe you're only 17 miles from Chatham, NJ, home of John Paterek! He's one of the national technical concours chairmen for PCA, is a super guy and is beyond knowledgeable about our cars.
Get over to his place, drive your car, I'm sure he'd love to see it and pick his brain. I wound up with a car from CA also last year. He gave me advice regarding the condition via e-mail pics I sent him. However, at 14K he also advised me NOT to pay more than 5K! Anyway, you can tell him Bizzigotti says hi (he remembered my Black 2.0 from the 80's). He will tell you EXACTLY what to do with EVERYTHING. http://paterekbrothersinc.com/index.html Paul |
|
|
|
| 1970 Neun vierzehn |
May 28 2008, 10:30 PM
Post
#14
|
|
Advanced Member Group: Members Posts: 3,199 Joined: 16-March 06 From: cincinnati, ohio Member No.: 5,727 |
Nice work on the H/L weatherstripping gutters. You are indeed a lucky puppy that that metal looks so good, original and solid.
Here's what lay 'neath my rubber.............. Paul Attached image(s) 
|
|
|
|
| 1970 Neun vierzehn |
May 28 2008, 10:38 PM
Post
#15
|
|
Advanced Member Group: Members Posts: 3,199 Joined: 16-March 06 From: cincinnati, ohio Member No.: 5,727 |
What Paulie (Orthobiz) said about the Paterick Bros is (IMG:style_emoticons/default/aktion035.gif)
Last weeks' issue of AutoWeek had a real good article on the Patericks' shop. They and their business do indeed rock. The Paterick name has always seemed to be held in high regard in classic Porsche circles. You, however, are doing a fine job in your own right, especially with regard to "preserving", rather than "restoration" (IMG:style_emoticons/default/clap56.gif) Paul |
|
|
|
| tod914 |
May 31 2008, 01:08 AM
Post
#16
|
|
Advanced Member Group: Members Posts: 3,755 Joined: 19-January 03 From: Lincoln Park, NJ Member No.: 170 |
It's looking good Johnathan. The problem with that front seal is it retains some
moisture and typically water seeps under it while you wash the car. I also pull mine out on the white car after I wash it, and hand dry the gutter. The seal I let dry out before it goes back in. The rear one can also get water under it too. Good idea to pull that out and dry underneath too after a wash. Other culprits are those air vent plugs in the door jams. |
|
|
|
| Pat Garvey |
May 31 2008, 08:09 PM
Post
#17
|
|
Do I or don't I...........? Group: Members Posts: 5,899 Joined: 24-March 06 From: SE PA, near Philly Member No.: 5,765 Region Association: North East States |
QUOTE(tod914 @ May 31 2008, 01:08 AM) It's looking good Johnathan. The problem with that front seal is it retains some moisture and typically water seeps under it while you wash the car. I also pull mine out on the white car after I wash it, and hand dry the gutter. The seal I let dry out before it goes back in. The rear one can also get water under it too. Good idea to pull that out and dry underneath too after a wash. Other culprits are those air vent plugs in the door jams. Relpy from the whacko here! These, and just about all rubber seals, experience the same conditions when you "wash" your 914. Think the door panel seals don't hold moisture? Think that "ultra sponge" inside your sail panels (if you still have it) doesn't hold moisture? Think all of the seals don't hold moisture after you've washed your 914? Think again! And, no, the 914 is no different from any vinatge vehicle. The best, and worst, things we have going are good rubber. Good, because it keeps the elements out (usually). Bad, because it harbors moisture & transfers it to to attached parts, sometimes leading to "scratch-your head" rust - how the hell did that start? For those who insist on routinely driving thier 914's in the rain, then washing it with liberal quantities of water - sorry, you will get rust. That's why I no longer drench my 914 with water - I dry wash it. Rarely gets filthy - last time was (I think) 1982. Still, I dry washed it afterwards. No linering moisture. No rusted surfaces. But, that's just me. Pat |
|
|
|
| jonferns |
Jun 29 2008, 05:47 PM
Post
#18
|
|
Advanced Member Group: Members Posts: 2,081 Joined: 29-March 07 From: New Jersey Member No.: 7,631 Region Association: North East States |
Made some progress this weekend on the restoration of my valances. After sandblasting the rear valance, I smoothed out a few dings with a hammer, then primed it. I'll be using 3M Body Schutz to attain the proper finish. It will get schutz'd along with the front valance later this week, once the front valance is smoothed and primed. For now, heres some pics of the rear valance in primer. I'll post more once the front gets smoothed, and schutz'd.
(IMG:http://i133.photobucket.com/albums/q44/sendjonathanmail/1.jpg) (IMG:http://i133.photobucket.com/albums/q44/sendjonathanmail/2.jpg) (IMG:http://i133.photobucket.com/albums/q44/sendjonathanmail/3.jpg) |
|
|
|
| orthobiz |
Jun 29 2008, 05:54 PM
Post
#19
|
|
Senior Member Group: Members Posts: 1,754 Joined: 8-January 07 From: Cadillac, Michigan Member No.: 7,438 Region Association: Upper MidWest |
So, Jonathan, get out to meet Paterek yet?
Paul |
|
|
|
| jonferns |
Jun 29 2008, 06:12 PM
Post
#20
|
|
Advanced Member Group: Members Posts: 2,081 Joined: 29-March 07 From: New Jersey Member No.: 7,631 Region Association: North East States |
Nope, but one of these days I will.
|
|
|
|
|
1 User(s) are reading this topic (1 Guests and 0 Anonymous Users)
0 Members:

|
Lo-Fi Version | Time is now: 29th April 2024 - 09:29 AM |
Invision Power Board
v9.1.4 © 2024 IPS, Inc.