|
|
|
Porsche, and the Porsche crest are registered trademarks of Dr. Ing. h.c. F. Porsche AG.
This site is not affiliated with Porsche in any way. Its only purpose is to provide an online forum for car enthusiasts. All other trademarks are property of their respective owners. |
|
|

  |

| Andyrew |
 Mar 27 2011, 05:18 PM Mar 27 2011, 05:18 PM
Post
#241
|
|
Spooling.... Please wait  Group: Members Posts: 13,380 Joined: 20-January 03 From: Riverbank, Ca Member No.: 172 Region Association: Northern California |
IIRC Im at .040. And im running the big HEI coil
Plenty of spark for me, I run out of gas in my setup before I run out of spark |
   |

 
|
| computers4kids |
Jun 7 2011, 10:26 PM
Post
#242
|
|
Love these little cars! Group: Members Posts: 2,443 Joined: 11-June 05 From: Port Townsend, WA Member No.: 4,253 Region Association: None |
During the v8 conversion, I went originally with 911 5 lug, all four corners, BMW 320i calipers on the front and stock calipers on the rear, porterfield all four corners--solid 914-6 stock rotors and stock solid 911 rotors up front.
I just installed ventilated rotors up front with aluminum Brembos, 48 pistons on my 3" 911 struts. The best part was it was all complete bolt on...no machine work whatsover. This has been the easiest upgrade I have ever done. The calipers alone are 3lbs lighter for each one. They work great. Now for the rears. I'm thinking of going ventilated rotors with a vent kit for my stock calipers...just not crazy about 914 rear calipers. I could put some brembos on the back and loose the ebrake, but my bias would be pretty srewed up I suppose. The BMW calipers would bolt right up, but then I couldn't go with ventilated rotors and no ebrake. Decisions. 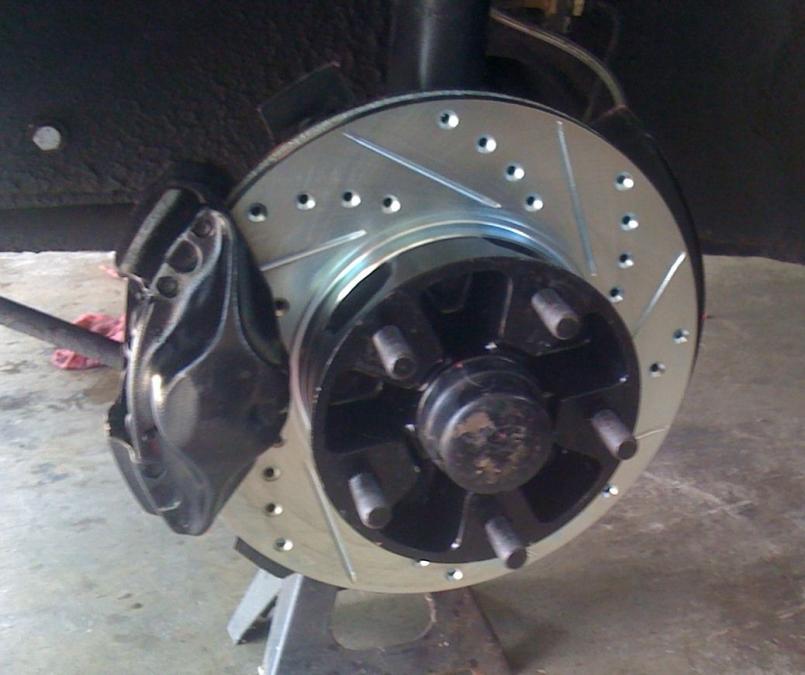 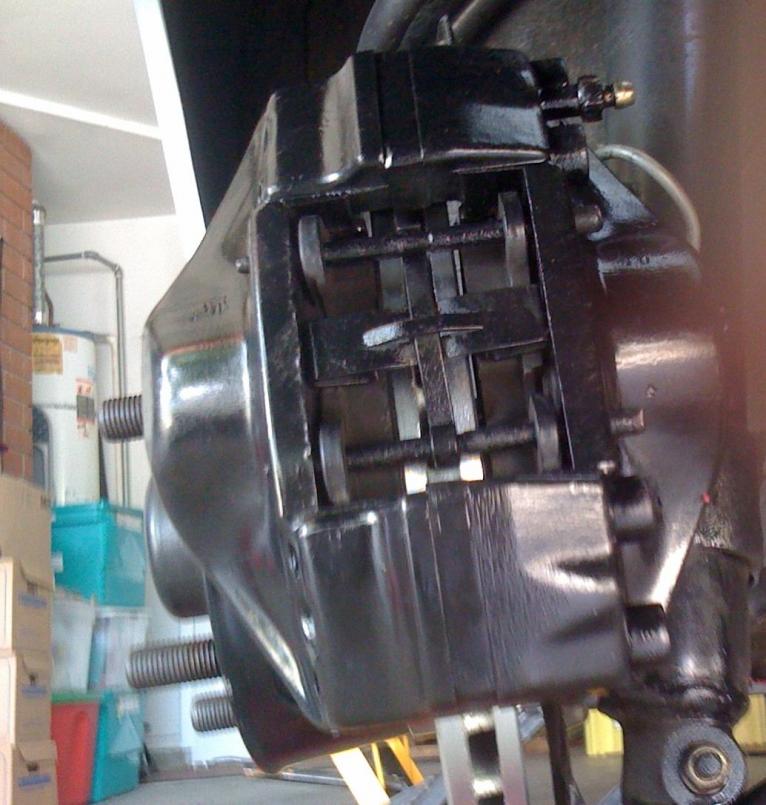  |
|
|
|
| JRust |
Jun 7 2011, 10:41 PM
Post
#243
|
|
914 Guru Group: Members Posts: 6,317 Joined: 10-January 03 From: Albany Oregon Member No.: 129 Region Association: Pacific Northwest |
Nice Mark! I can't wait to see it in person again at WCR (IMG:style_emoticons/default/drooley.gif)
|
|
|
|
| andys |
Jun 8 2011, 10:30 AM
Post
#244
|
|
Advanced Member Group: Members Posts: 2,165 Joined: 21-May 03 From: Valencia, CA Member No.: 721 Region Association: None |
Mark,
I haven't investigated to see how adaptable they would to a 914, but Ford has a caliper with handbrake, as does GM (metric). Cheap, and available everywhere. If the piston sizes and rotor thicknesses are compatible, perhaps they might be worth a look? Andys |
|
|
|
| computers4kids |
Oct 8 2011, 10:26 PM
Post
#245
|
|
Love these little cars! Group: Members Posts: 2,443 Joined: 11-June 05 From: Port Townsend, WA Member No.: 4,253 Region Association: None |
Rear brakes finally got finished. I ended-up adding ventilated rotors and Eric's V-calipers. Together with a new ATE 19mm master and the aluminum Brembos up front, the brakes seem to be a good combination for my teener. I still need to bleed a little more air, but pretty happy.
Before and After 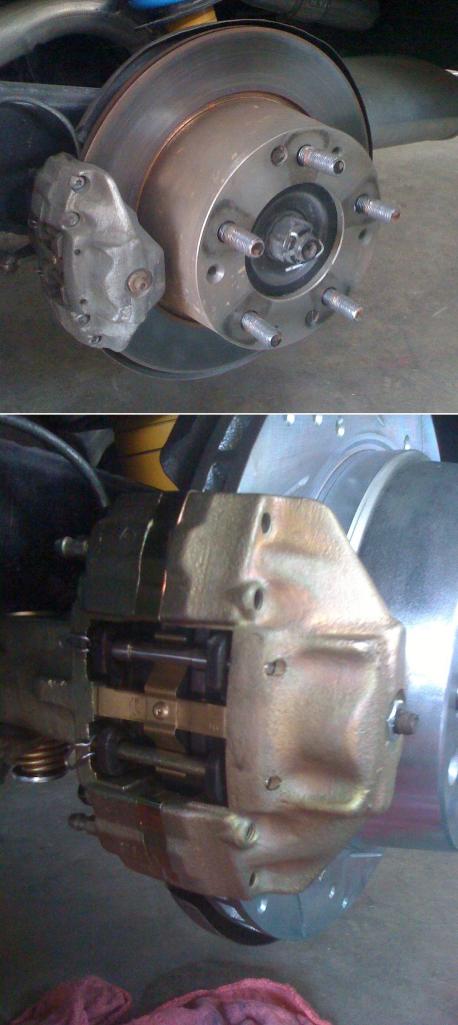 Luckly, there was space for the vcaliper spacer. Tire definitely fills the wheel well. 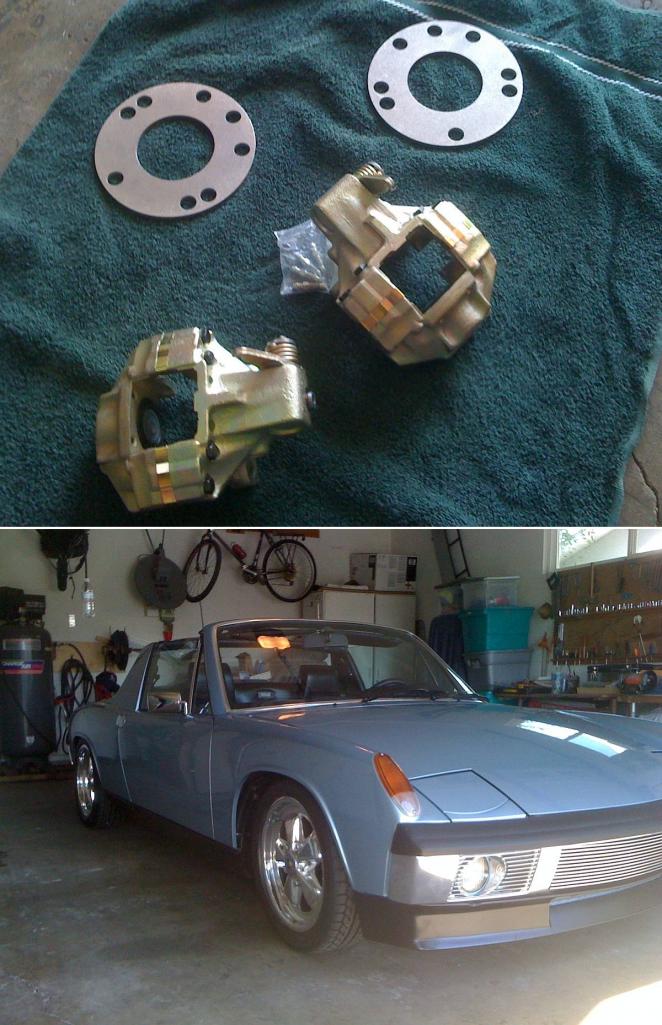 |
|
|
|
| strawman |
Oct 9 2011, 12:50 AM
Post
#246
|
|
Senior Member Group: Members Posts: 891 Joined: 25-January 08 From: Los Osos, CA Member No.: 8,624 Region Association: Central California |
Hi Mark --
That's purty! (IMG:style_emoticons/default/piratenanner.gif) How about some pics of the front brakes? Geoff |
|
|
|
| moparrob |
Oct 9 2011, 01:00 AM
Post
#247
|
|
Senior Member Group: Members Posts: 646 Joined: 27-April 10 From: Los Angeles Member No.: 11,663 Region Association: None |
Are Eric's V-calipers different than stock rears?
|
|
|
|
| computers4kids |
Oct 9 2011, 07:29 AM
Post
#248
|
|
Love these little cars! Group: Members Posts: 2,443 Joined: 11-June 05 From: Port Townsend, WA Member No.: 4,253 Region Association: None |
QUOTE(strawman @ Oct 8 2011, 11:50 PM)  Hi Mark -- That's purty! (IMG:style_emoticons/default/piratenanner.gif) How about some pics of the front brakes? Geoff QUOTE(moparrob @ Oct 9 2011, 12:00 AM) Are Eric's V-calipers different than stock rears? Hi Geoff! I included a picture of Eric's polished Brembos for reference. I sourced my Brembos elsewhere and didn't polish them...just painted them black. Eric's Vcalipers are stock rears with a special spacer plate to accomodate the wider vented rotors. Eric also custom makes new stainless brake pins and springs due to the wider caliper. His workmanship is truly a piece of art. Before and After Fronts Attached thumbnail(s) 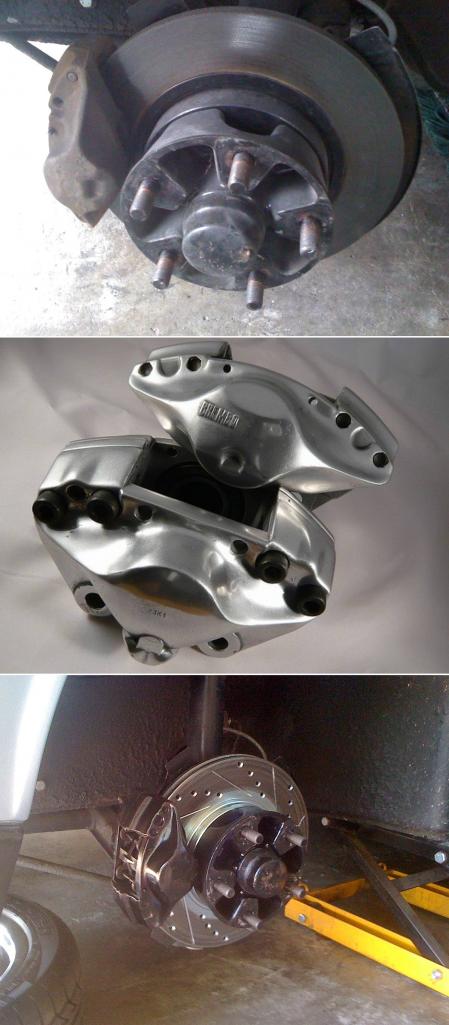
|
|
|
|
| computers4kids |
Dec 11 2011, 11:32 PM
Post
#249
|
|
Love these little cars! Group: Members Posts: 2,443 Joined: 11-June 05 From: Port Townsend, WA Member No.: 4,253 Region Association: None |
Stereo Update, I love it!
Pioneer 4 channel amp (GM-D9500F) 75 RMS x 2 channels (A) 150 RMS bridged channel (B) 150 Watt 8" footwell sub (morph's 8" sub kit) 2 Polk Audio 4 x 6 50RMS (150 peak) No Head Unit--ipod/iphone I thought I wouild post a few pics. The combination really sounds great together and for the most part it all is hidden, looking stock. The floor sub was suppose to fit with my cocoa mats covering them. Unfortunately, there is not enough room for my passenger mat now. Between the stock AC and the raised speaker on the enclosure there is very little space--not even enough for a mat. I'll either have to shorten the passenger mat to the base of the enclosure or see about recessing the speaker into the extension ring on the enclosure. Not sure at this point if there is enough depth for the speaker provided in the kit. Anyway, if I were to do it again, I would probably have just bought the enclosure and found a shallow sub. I shortned the deposit box between the seats and placed the amp in the back half. The front of the box holds my ipod, small items. The top still hinges as it originally did. I used a 6 inch strip of 3 inch wide velco where the hinge used to attach to box. The hinge is actually velcroed to the top of the amp. I added a amp switch and volume control on the outside front of the deposit box for conveince.   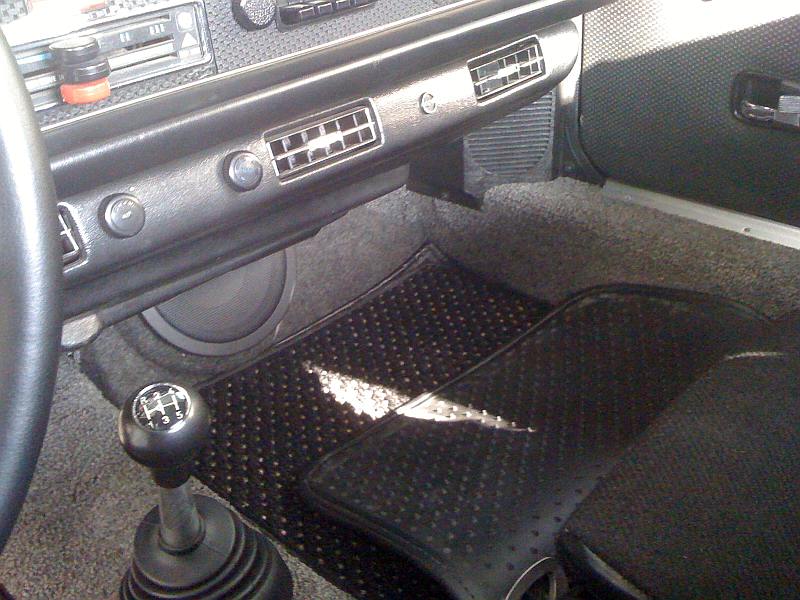 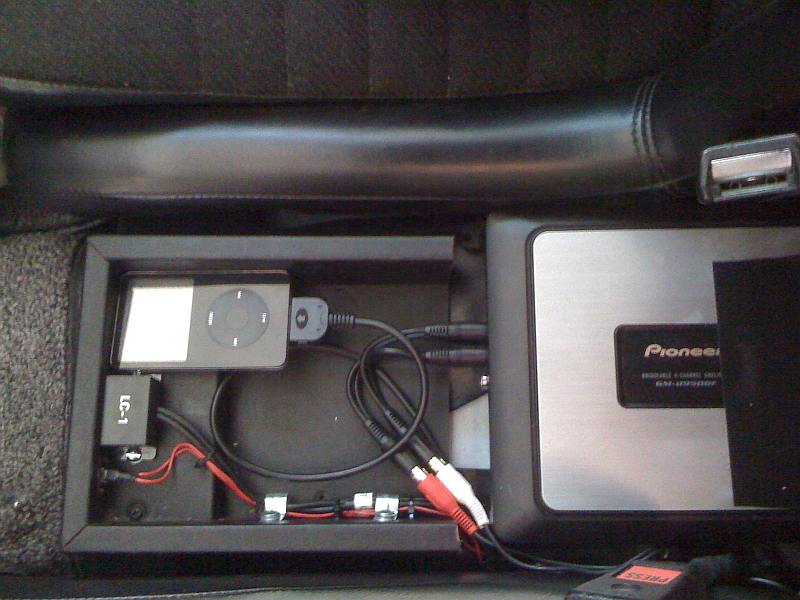 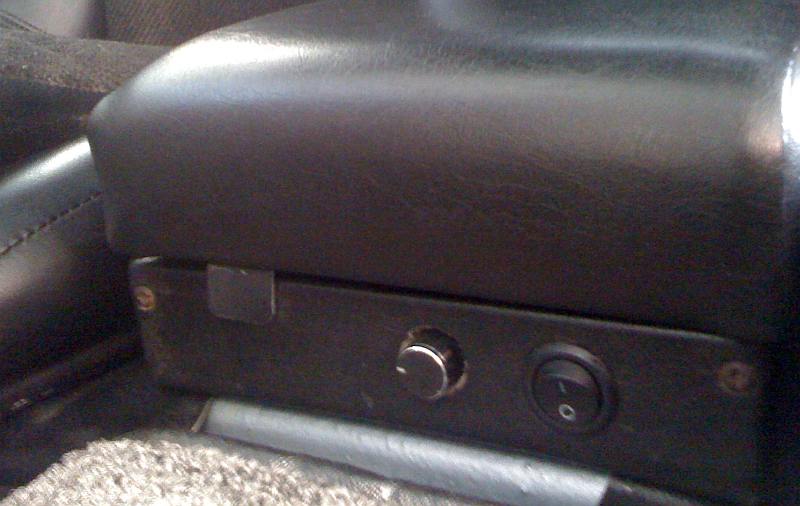 It killed me to do so, but it all worked out pretty nice. I cut a hole in my my cocoa mat which allowed it to lay flush on the floor. 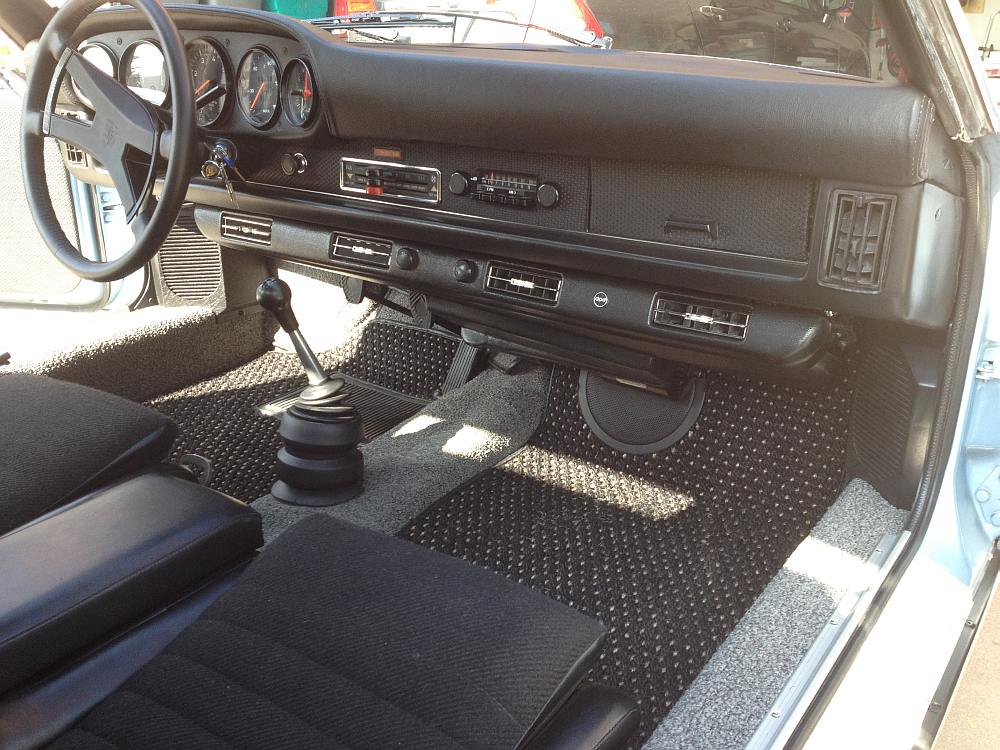 Attached image(s) 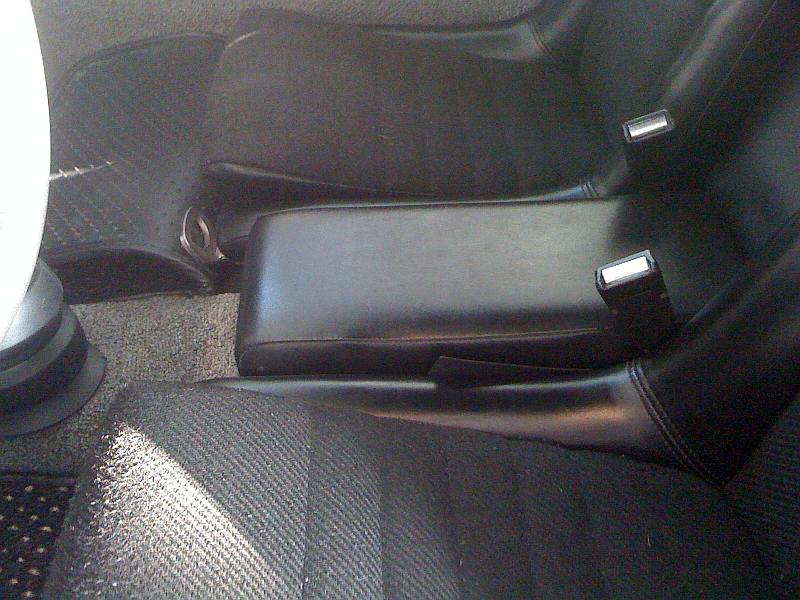
|
|
|
|
| Andyrew |
Dec 12 2011, 10:25 AM
Post
#250
|
|
Spooling.... Please wait Group: Members Posts: 13,380 Joined: 20-January 03 From: Riverbank, Ca Member No.: 172 Region Association: Northern California |
CLEAN!
Looks great man!! |
|
|
|
| chads74 |
Jun 23 2012, 09:34 AM
Post
#251
|
|
Member Group: Members Posts: 386 Joined: 13-March 12 From: Tampa, FL Member No.: 14,252 Region Association: South East States |
 Can any one tell me where I can find a body kit like this? I have found similar rear flares at auto atlanta, but no luck on the front or maybe its custom. Any help would be awesome. Thanks! |
|
|
|
| messix |
Jun 23 2012, 12:04 PM
Post
#252
|
|
AKA "CLUTCH KILLER"! Group: Members Posts: 6,995 Joined: 14-April 05 From: between shit kickers and pinky lifters/ puget sound wa.north of Seattle south of Canada Member No.: 3,931 Region Association: Pacific Northwest |
it look like 930 flares
|
|
|
|
| chads74 |
Jun 24 2012, 09:05 AM
Post
#253
|
|
Member Group: Members Posts: 386 Joined: 13-March 12 From: Tampa, FL Member No.: 14,252 Region Association: South East States |
Yeah they do look like the 930 flares, do you of a company that makes them for the 914?
|
|
|
|
| computers4kids |
Feb 8 2014, 07:40 PM
Post
#254
|
|
Love these little cars! Group: Members Posts: 2,443 Joined: 11-June 05 From: Port Townsend, WA Member No.: 4,253 Region Association: None |
Recently, I've been fixing and updating things that have bothered me since I did this conversion years ago.
1. Install one of McMark's Master Cylinder brace. I've always had a sort of soft brake pedal, so I was hoping to get a firmer pedal removing any possible flex. 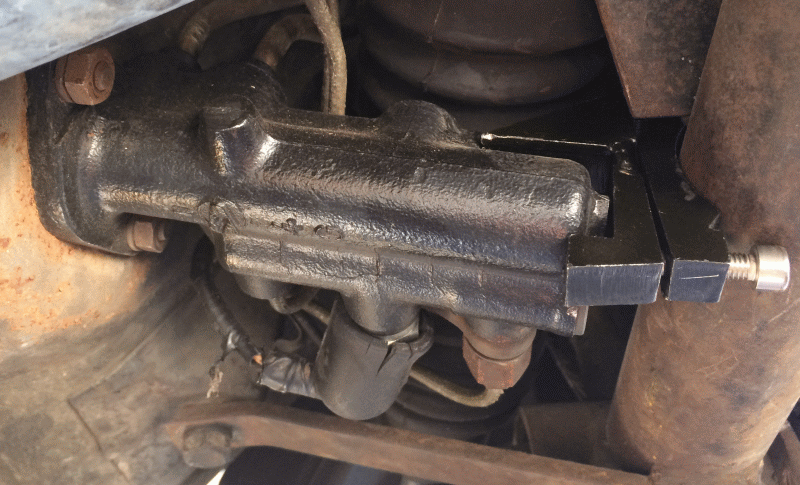 2. Discovered the right front wheel had a bit of wheel bearing slop which in turn was opening the pad on the passenger caliper. Adjusted the nut properly, clearance all the calipers, and bled brakes. The pedal is hard as a rock now... (IMG:style_emoticons/default/piratenanner.gif) 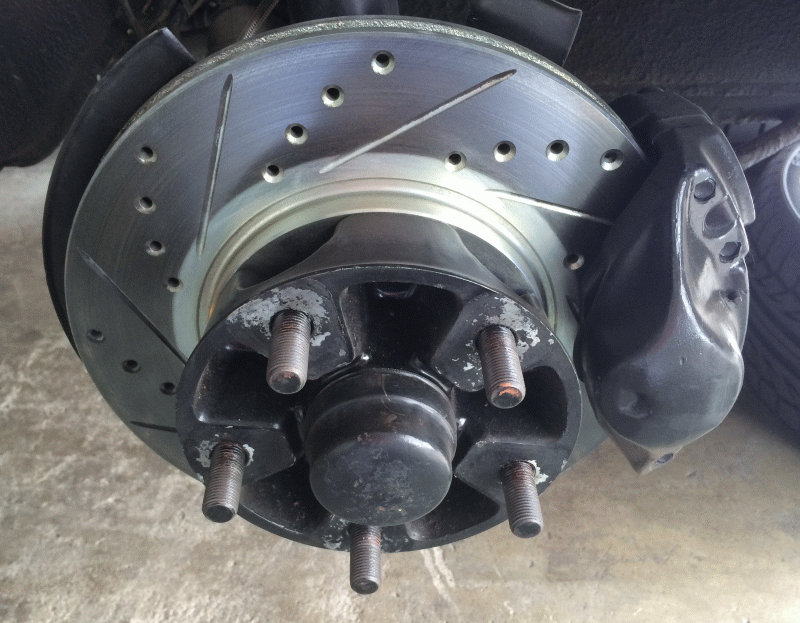 3. The 1 1/4 water line that comes out of the "typical" Renegade water setup requires a sharp 90 degree turn to properly follow the floor of the car to the radiator up front. This would cause the hose to kink, even though once the system pressurized the hose would fill out...it always bothered me. I installed an aluminum 90 degree tube to replace the area of the hose that would kink.  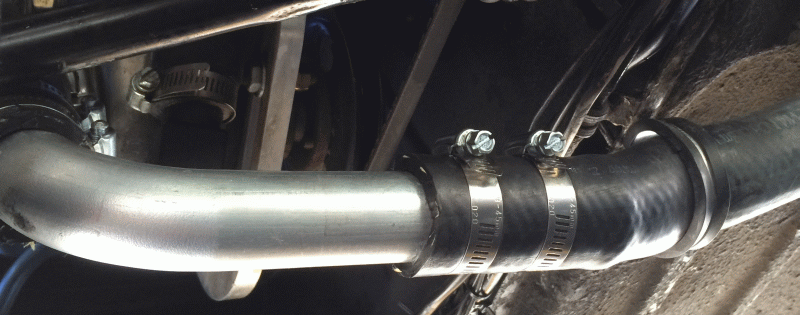 4. Four over 3 years my Renegade dual fan setup worked flawlessly. Both fans were setup to come on at once at full speed. Wanting to reduce the noise of the fans, I rewired them according to the diagram below that utilizes 3 relays to create a multi speed circuit. Thanks to the 914 community for discovering that one of the relays I was sold was incorrect (two 87s, instead of an 87 and a 87a) which really through me for a loop. Here is what I started with. 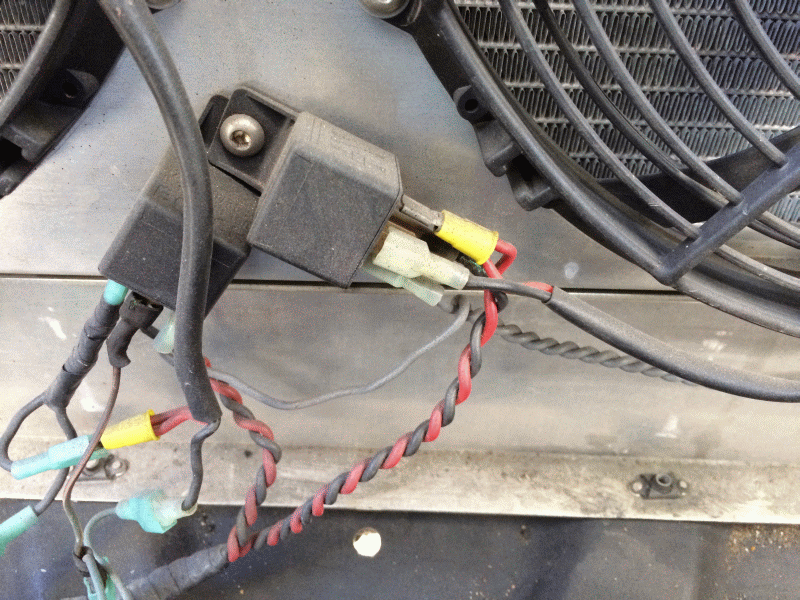 Schematic for using 3 relays and how it works... QUOTE(904svo @ Feb 5 2014, 08:46 PM) C1 grounded Here's the current path, C1 gets ground operates relay #1 , #30 supply's bat to pin 87 which is wired to one side of the fan motor #2 the other side of the motor is wired to #30 on relay #3 which is not operated and flows current to #87a which is wired to the other fan motor the other side of this fan motor is grounded. Both fan motors are in series now ( each motor has 6 volts to them). C2 grounded ( note C1 not grounded) Relays 2,3 operated, Relay' #2 supplys 12v #30 to #87 which is wired to motor#1 the other side of the motor is wired to grounded ( fan #1 has 12 volts Full speed) relay #3 #30 is wired to fan motor #2 the other side is wired to relay #1 #87 motor #1 will not operate till C1 is grounded. So what you have is a 3 speed operation if the fan motor can run on 6 volts C1 grounded both motors have 6 volts on them C2 grounded Motor #1 fullgrounded C1 and C2 gounded motor #1 and #2 full speed 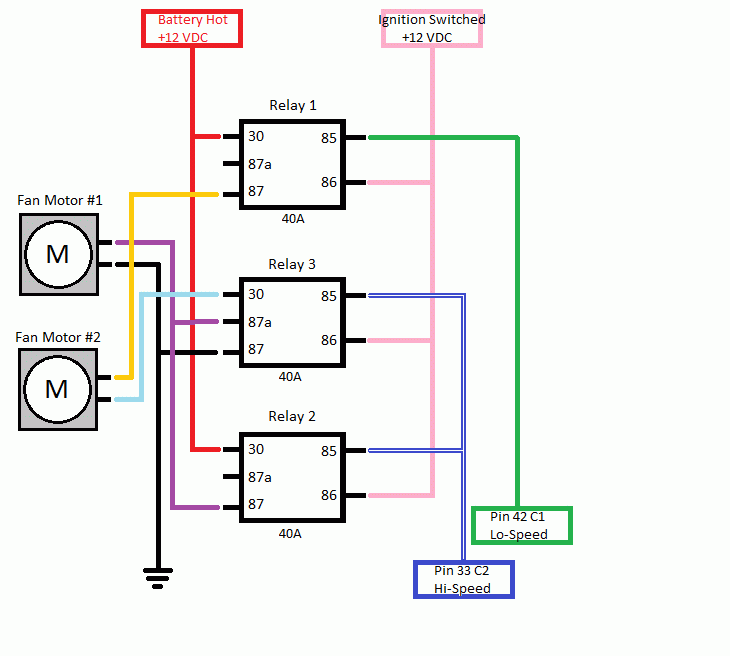 Inside look 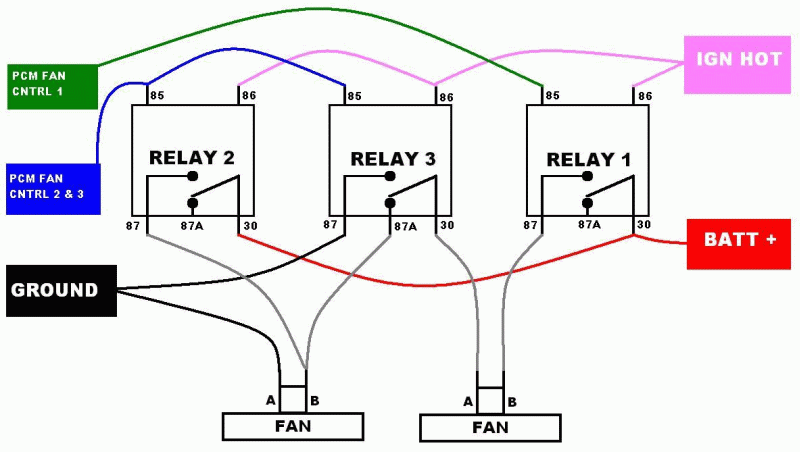 A lot of wires... 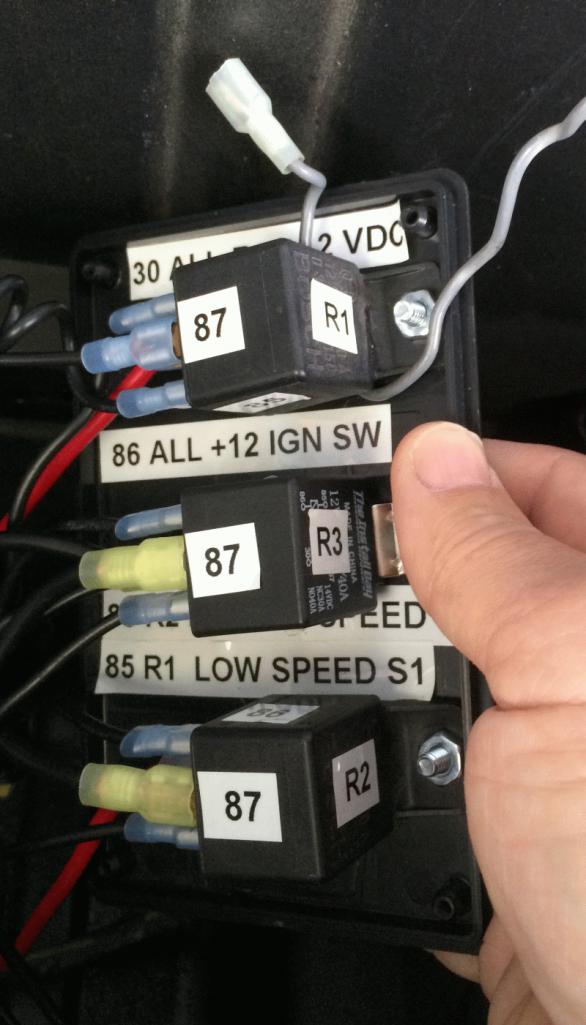 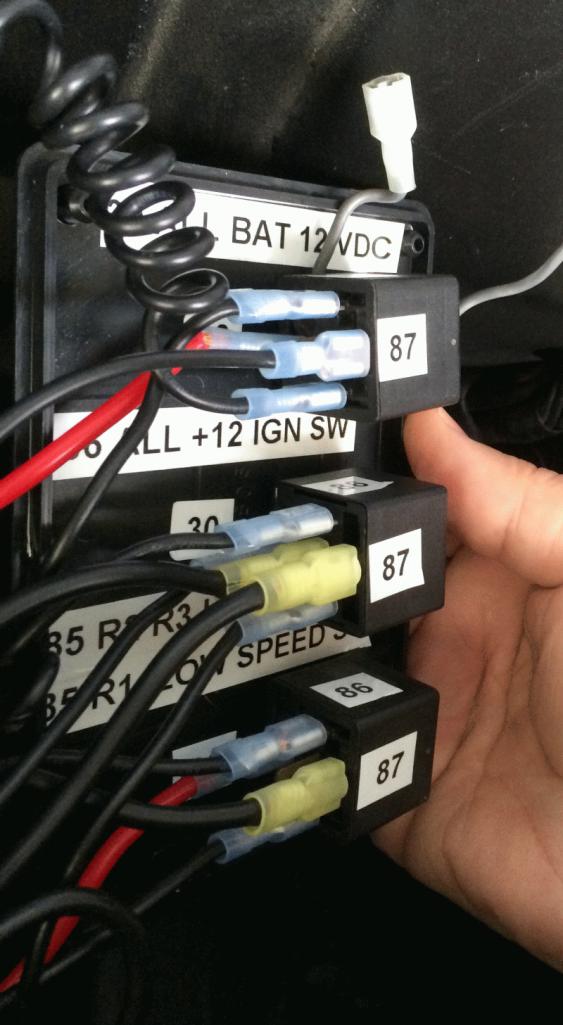 Electrical box 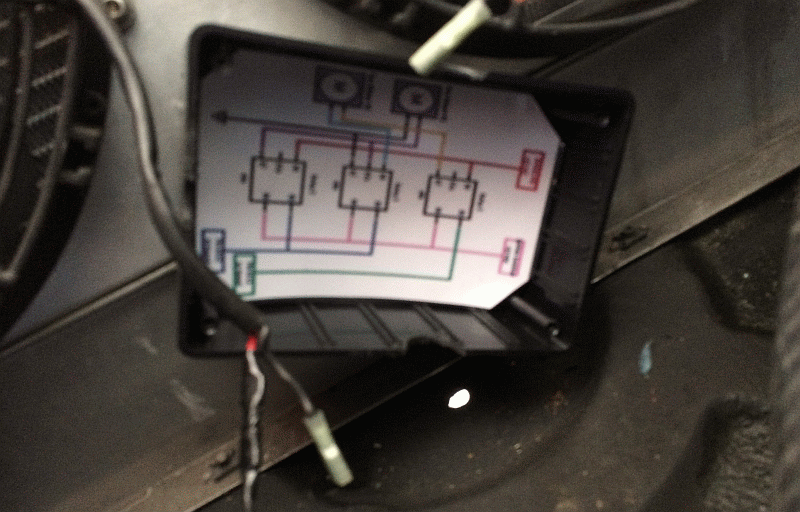 Done. I can't believe how quiet the fans are now at 1/2 speed. I've been very fortunate to have a cooling system that works awesome and can get away most of the time on the slower fan speeds. Sensor 1 triggers at 180 degrees both fans at 1/2 speed Sensor 2 triggers at 200 degrees at full speed on both fans 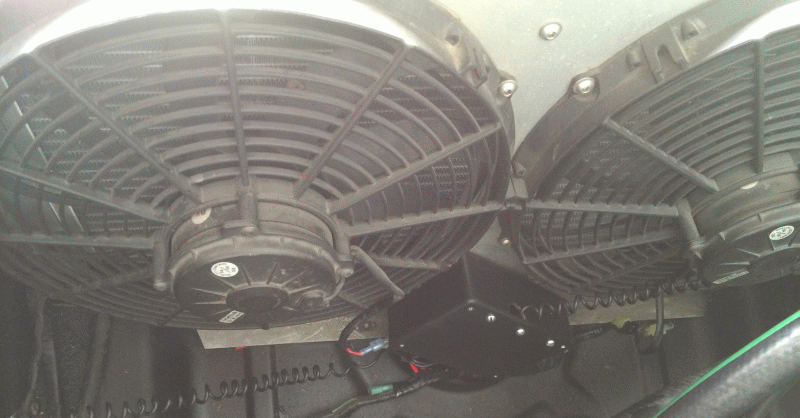 |
|
|
|
| 76-914 |
Feb 9 2014, 09:29 AM
Post
#255
|
|
Repeat Offender & Resident Subaru Antagonist Group: Members Posts: 13,893 Joined: 23-January 09 From: Temecula, CA Member No.: 9,964 Region Association: Southern California |
Glad to see you finally got that ironed out. (IMG:style_emoticons/default/beerchug.gif)
|
|
|
|
| computers4kids |
Feb 9 2014, 11:22 AM
Post
#256
|
|
Love these little cars! Group: Members Posts: 2,443 Joined: 11-June 05 From: Port Townsend, WA Member No.: 4,253 Region Association: None |
5. Integrated a AEM Wideband A/F gauge in the housing of a spare 911 clock.
 6. And of course, everything once going to the battery positive terminal (OEM and what I added) is now fused with one of Tom's kits. 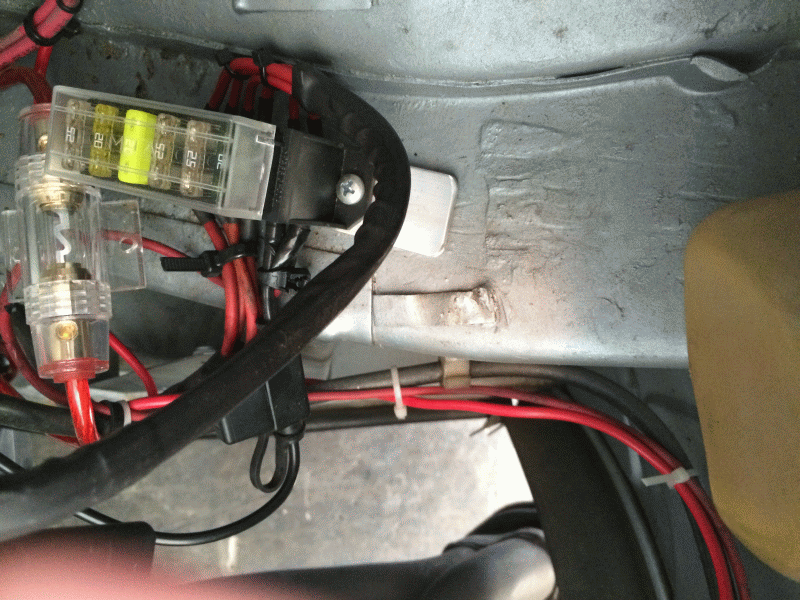 |
|
|
|
| callplatinum |
Apr 2 2014, 10:25 PM
Post
#257
|
|
Newbie Group: Members Posts: 38 Joined: 30-April 13 From: Snohomish Member No.: 15,820 Region Association: None |
WOW!
|
|
|
|
| Tomgayer |
Feb 23 2018, 09:31 AM
Post
#258
|
|
Newbie Group: Members Posts: 7 Joined: 16-January 18 From: Bossier City , LA Member No.: 21,804 Region Association: None |
I put shroud around fans for better cooling
 fanstemplate.bmp ( 920.44k )
Number of downloads: 188
fanssteelshroud.bmp ( 944.14k )
Number of downloads: 192
fanstemplate.bmp ( 920.44k )
Number of downloads: 188
fanssteelshroud.bmp ( 944.14k )
Number of downloads: 192 |
|
|
|
|
1 User(s) are reading this topic (1 Guests and 0 Anonymous Users)
0 Members:

|
Lo-Fi Version | Time is now: 9th June 2026 - 04:45 AM |
Invision Power Board
v9.1.4 © 2026 IPS, Inc.