|
|
|
Porsche, and the Porsche crest are registered trademarks of Dr. Ing. h.c. F. Porsche AG.
This site is not affiliated with Porsche in any way. Its only purpose is to provide an online forum for car enthusiasts. All other trademarks are property of their respective owners. |
|
|

  |

| Mikey914 |
 Jun 9 2008, 08:39 PM Jun 9 2008, 08:39 PM
Post
#1
|
|
The rubber man  Group: Members Posts: 12,638 Joined: 27-December 04 From: Hillsboro, OR Member No.: 3,348 Region Association: None |
Well it's official, completed the drawings and have put deposit on the die. will look for these to be available in 35 days. Cost will be $22 (possibly less if I can get enough people that want these.
These are the one that go right at the base of the windshield. I have designed these to be able to install without taking out the windshield. These will be easier to install and remove than the originals. Let me know who needs these, I'm starting a list. |
   |

 
|
| kconway |
Jun 9 2008, 11:29 PM
Post
#2
|
|
Senior Member Group: Members Posts: 1,347 Joined: 6-December 04 From: Monrovia, CA Member No.: 3,231 Region Association: Southern California |
Me, for 1.
|
|
|
|
| tango-52 |
Jun 10 2008, 10:22 AM
Post
#3
|
|
Member Group: Members Posts: 149 Joined: 18-October 07 From: San Diego County Member No.: 8,243 Region Association: Southern California |
I'm in for two.
|
|
|
|
| rfuerst911sc |
Jun 10 2008, 05:18 PM
Post
#4
|
|
Advanced Member Group: Members Posts: 2,158 Joined: 4-May 06 From: Dahlonega , Georgia Member No.: 5,980 Region Association: South East States |
I'm down for one.
|
|
|
|
| evan |
Jun 12 2008, 05:49 PM
Post
#5
|
|
Little Bean Group: Members Posts: 117 Joined: 8-September 05 From: Gaithersburg, MD Member No.: 4,767 |
(IMG:style_emoticons/default/smilie_pokal.gif) Call me uh, dumb but this for the base of windshield on inside between glass and dash right? How hard to install with out removal of windshield? Does it come with "Installation for Dummy's" cliff notes? I may want one! Let me know.
Evan ( ekatz2@verizon.net ) |
|
|
|
| Mikey914 |
Jun 13 2008, 12:20 AM
Post
#6
|
|
The rubber man Group: Members Posts: 12,638 Joined: 27-December 04 From: Hillsboro, OR Member No.: 3,348 Region Association: None |
QUOTE(evan @ Jun 12 2008, 04:49 PM)  (IMG:style_emoticons/default/smilie_pokal.gif) Call me uh, dumb but this for the base of windshield on inside between glass and dash right? How hard to install with out removal of windshield? Does it come with "Installation for Dummy's" cliff notes? I may want one! Let me know. Evan ( ekatz2@verizon.net ) Yes, this is the one at the base of the windshield. The only hard part is removing the old one as the internal clip was steel and tended to rust to the sheet metal that it attached to. I have had luck using a pick to remove what was left of my seal. the other problem is the old one tends to fall apart. I will include installation instructions when I get my first article in to show how to remove and install properly. Thanks, Mark |
|
|
|
| flat4 |
Jun 27 2008, 09:41 PM
Post
#7
|
|
Member Group: Members Posts: 120 Joined: 13-December 07 From: Australia Member No.: 8,459 |
How are these progressing? I need one.
Cheers, Steve |
|
|
|
| Mikey914 |
Jun 28 2008, 01:45 AM
Post
#8
|
|
The rubber man Group: Members Posts: 12,638 Joined: 27-December 04 From: Hillsboro, OR Member No.: 3,348 Region Association: None |
These are still in progress. The tolerance on the clip portion was too tight on the die an we blew out the die. Currently re-tooling. Trying to have another die up to get first article next week. With the holiday it may stretch out to the following week. These will be available the following week. I'm trying to get these together to take to Issaquah for the soggy side of nowhere meet.
|
|
|
|
| evan |
Jun 29 2008, 03:29 PM
Post
#9
|
|
Little Bean Group: Members Posts: 117 Joined: 8-September 05 From: Gaithersburg, MD Member No.: 4,767 |
QUOTE(Mikey914 @ Jun 12 2008, 10:20 PM) QUOTE(evan @ Jun 12 2008, 04:49 PM) (IMG:style_emoticons/default/smilie_pokal.gif) Call me uh, dumb but this for the base of windshield on inside between glass and dash right? How hard to install with out removal of windshield? Does it come with "Installation for Dummy's" cliff notes? I may want one! Let me know. Evan ( ekatz2@verizon.net ) Yes, this is the one at the base of the windshield. The only hard part is removing the old one as the internal clip was steel and tended to rust to the sheet metal that it attached to. I have had luck using a pick to remove what was left of my seal. the other problem is the old one tends to fall apart. I will include installation instructions when I get my first article in to show how to remove and install properly. Thanks, Mark Keep me posted on the cost, instructions, and progress. thanks evan |
|
|
|
| Mikey914 |
Jun 30 2008, 01:27 AM
Post
#10
|
|
The rubber man Group: Members Posts: 12,638 Joined: 27-December 04 From: Hillsboro, OR Member No.: 3,348 Region Association: None |
QUOTE(evan @ Jun 29 2008, 02:29 PM) QUOTE(Mikey914 @ Jun 12 2008, 10:20 PM) QUOTE(evan @ Jun 12 2008, 04:49 PM) (IMG:style_emoticons/default/smilie_pokal.gif) Call me uh, dumb but this for the base of windshield on inside between glass and dash right? How hard to install with out removal of windshield? Does it come with "Installation for Dummy's" cliff notes? I may want one! Let me know. Evan ( ekatz2@verizon.net ) Yes, this is the one at the base of the windshield. The only hard part is removing the old one as the internal clip was steel and tended to rust to the sheet metal that it attached to. I have had luck using a pick to remove what was left of my seal. the other problem is the old one tends to fall apart. I will include installation instructions when I get my first article in to show how to remove and install properly. Thanks, Mark Keep me posted on the cost, instructions, and progress. thanks evan Will do, blew out that first die, trying to get the new revised die on line before the holiday. I will be posting as soon as I get in. This will be very shortly. Thanks, Mark |
|
|
|
| computers4kids |
Jul 4 2008, 05:51 PM
Post
#11
|
|
Love these little cars! Group: Members Posts: 2,443 Joined: 11-June 05 From: Port Townsend, WA Member No.: 4,253 Region Association: None |
QUOTE(Mikey914 @ Jun 28 2008, 12:45 AM) These are still in progress. The tolerance on the clip portion was too tight on the die an we blew out the die. Currently re-tooling. Trying to have another die up to get first article next week. With the holiday it may stretch out to the following week. These will be available the following week. I'm trying to get these together to take to Issaquah for the soggy side of nowhere meet. Hey Mike... Could you bring a set of the seals that go on the doors (both sides) and a windshield lower seal to WCR2008? My project is stalled until I get the windshield lower seal...I have to install it first before I can install my Ghetty dash. Thanks, Mark |
|
|
|
| Mikey914 |
Jul 6 2008, 11:22 PM
Post
#12
|
|
The rubber man Group: Members Posts: 12,638 Joined: 27-December 04 From: Hillsboro, OR Member No.: 3,348 Region Association: None |
QUOTE(computers4kids @ Jul 4 2008, 04:51 PM) QUOTE(Mikey914 @ Jun 28 2008, 12:45 AM) These are still in progress. The tolerance on the clip portion was too tight on the die an we blew out the die. Currently re-tooling. Trying to have another die up to get first article next week. With the holiday it may stretch out to the following week. These will be available the following week. I'm trying to get these together to take to Issaquah for the soggy side of nowhere meet. Hey Mike... Could you bring a set of the seals that go on the doors (both sides) and a windshield lower seal to WCR2008? My project is stalled until I get the windshield lower seal...I have to install it first before I can install my Ghetty dash. Thanks, Mark I will be there on Saturday, I should be able to have a sample from the production run available. I'm curious as to where these other seals are coming from, if it was a production run, it would appear that more would be available. By the way, pricing will be less than stated for the initial run, check the revised heading. |
|
|
|
| computers4kids |
Jul 7 2008, 04:12 PM
Post
#13
|
|
Love these little cars! Group: Members Posts: 2,443 Joined: 11-June 05 From: Port Townsend, WA Member No.: 4,253 Region Association: None |
If you have a windshield seal ready on Saturday, I will definitely take it...also, please bring a set of seals that go on the doors for driver and passenger.
Thanks, Mark As far as the other windshield seals go...not to sure where there coming from, other than Craig now or did have 14 of them from someone. |
|
|
|
| Mikey914 |
Jul 7 2008, 09:16 PM
Post
#14
|
|
The rubber man Group: Members Posts: 12,638 Joined: 27-December 04 From: Hillsboro, OR Member No.: 3,348 Region Association: None |
I'll be there with lots of seals on Saturday morning. Just wish I could bring one of my 914s.
|
|
|
|
| Mikey914 |
Jul 9 2008, 01:28 AM
Post
#15
|
|
The rubber man Group: Members Posts: 12,638 Joined: 27-December 04 From: Hillsboro, OR Member No.: 3,348 Region Association: None |
After blowing out the die, we started from scratch and modified the lower shape where it clips on. We changed the shape slightly. This will ensure that we do not have the die problems we had previously. Unfortunately, this will push the first article into next week, so I will not have for the show.
But, I will be unveiling a new product at the meet. Attached image(s) 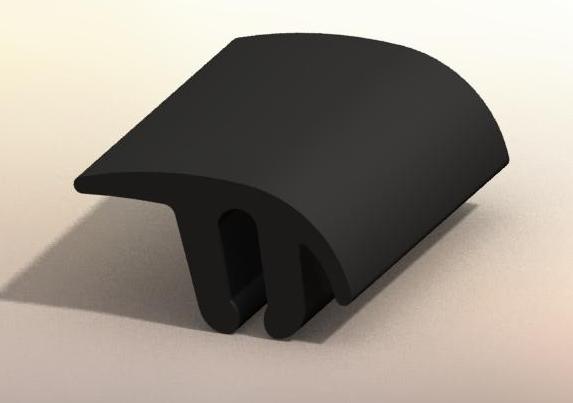
|
|
|
|
| flat4 |
Jul 9 2008, 04:23 AM
Post
#16
|
|
Member Group: Members Posts: 120 Joined: 13-December 07 From: Australia Member No.: 8,459 |
Put me out of my misery... What is it? Looks like I need one of them as well :-)
Do you do the outer windshield seal as well? Cheers, Steve |
|
|
|
| VaccaRabite |
Jul 9 2008, 10:14 AM
Post
#17
|
|
En Garde! Group: Admin Posts: 13,426 Joined: 15-December 03 From: Dallastown, PA Member No.: 1,435 Region Association: MidAtlantic Region |
Outside windshield trim to replace the chrome?
By the way, I need one of the windshield to dash pieces. Zach |
|
|
|
| Mikey914 |
Jul 18 2008, 10:59 PM
Post
#18
|
|
The rubber man Group: Members Posts: 12,638 Joined: 27-December 04 From: Hillsboro, OR Member No.: 3,348 Region Association: None |
The first one has been tested these will ship the 28th or sooner.
Below are pictures of the old seal and the tool we used to remove it. it was quite effective. I notched the end to mirror the pillar on both ends, making the seal about 1/4" londer than the opening to allow it to compress into the channel. The problem I ran into was there were some larger beads of caulking for the windshield. I will be taking some more time tomorrow to trim with an exacto knife. As you can see from the picture the seal has a bulge where the rubber from the windshield interferes with the clearance. I hadn't anticipated there to be this much rubber interfering with the channel. The windshield was installed with a piece of the old seal missing in this area, so it appears that the void allowed the windshield glazing to pool here. The production piece will be made slightly harder to allow it to force it's way into a void if there is windshield rubber in contact with the old seal. You can also see that my dash "pad" is quite old. I will be replacing it and doing more pictures shortly, I just wanted to check the fit. Attached image(s)   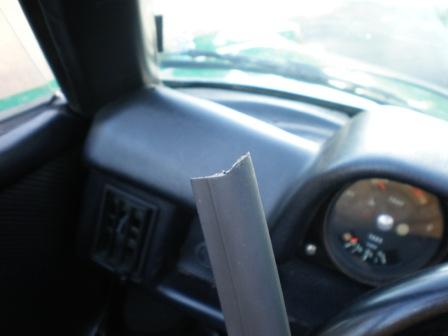  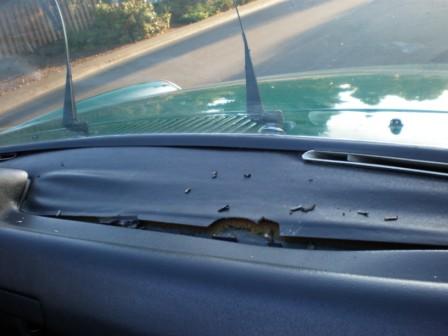
|
|
|
|
| SirAndy |
Jul 20 2008, 11:46 PM
Post
#19
|
|
Resident German Group: Admin Posts: 41,606 Joined: 21-January 03 From: Oakland, Kalifornia Member No.: 179 Region Association: Northern California |
|
|
|
|
| Mikey914 |
Jul 21 2008, 12:29 AM
Post
#20
|
|
The rubber man Group: Members Posts: 12,638 Joined: 27-December 04 From: Hillsboro, OR Member No.: 3,348 Region Association: None |
QUOTE(SirAndy @ Jul 20 2008, 10:46 PM) Done, Here's some more pictures of it installed with the dash pad replaced. Attached image(s) 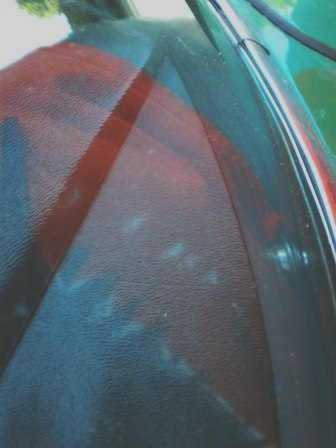 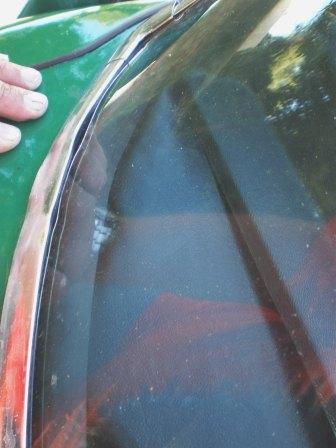
|
|
|
|
|
1 User(s) are reading this topic (1 Guests and 0 Anonymous Users)
0 Members:

|
Lo-Fi Version | Time is now: 28th April 2024 - 01:14 PM |
Invision Power Board
v9.1.4 © 2024 IPS, Inc.