|
|
|
Porsche, and the Porsche crest are registered trademarks of Dr. Ing. h.c. F. Porsche AG.
This site is not affiliated with Porsche in any way. Its only purpose is to provide an online forum for car enthusiasts. All other trademarks are property of their respective owners. |
|
|

  |

| Dr Evil |
 Aug 28 2011, 06:48 PM Aug 28 2011, 06:48 PM
Post
#181
|
|
Send me your transmission!  Group: Members Posts: 23,041 Joined: 21-November 03 From: Loveland, OH 45140 Member No.: 1,372 Region Association: MidAtlantic Region |
|
   |

 
|
| stephenaki |
Apr 1 2012, 08:35 AM
Post
#182
|
|
Can I get this one dad?? Group: Members Posts: 1,191 Joined: 11-August 07 From: Palmetto, FL Member No.: 7,987 Region Association: None |
OK, so, after a rather frigid friggin winter here in Germany and a lot of travel, I finally started working on the car again. As noted previously, I got the transmission done thanks to the helpful advice of Herr Evil (IMG:style_emoticons/default/beerchug.gif)
So, I began working on the shift linkage assembly to hopefully remove some of the slop; yeah I know, the only way to really get rid of it is to get me a side shifter. Eventually but right now the Tail shifter is what I have to work with. I looked up some of the threads on PP and began down that road rebuilding the shifter assembly first then moving on to doing some other parts inspections and replacements. I replaced some bushings and balls and, after close inspection and cleaning of the shift rod, had to replace that as well. towards the front of the rod where it mates to the balls on the back of the firewall, there was a rather large 'slice' for lack of a better word that split the rod. It was about 2 inches long and about 3mm wide. Luckily, there is a guy here in Germany who has a lot of used parts that I was able to get a new/used rod from. After all that was done I began cleaning the engine tin screws. Discovered an interesting phenomenon. If you put the screws into 'rust treatment' solution, a German brand, and forget about it for a week, when you get back, you have what looks like a fossilized rock from a tar pit. (IMG:style_emoticons/default/blink.gif) The solution solidified around all the screws! Guess I'll be getting new screws. (IMG:style_emoticons/default/happy11.gif) So I decided to tackle the re-threading of the heater cables. WHAT A ROYAL PAIN IN THE ASS!!! Not that I wasn't expecting that, as I searched the forum for 'solutions' to get the driver side cable through the bend it was clearly evident that this was not going to be easy. I did it though and got a good layer of grease on the inside of the tubes to keep em moving smoothly. Time to replace the heater hoses, that was easy, check the flapper boxes, they are ugly but move fine. Still need to wire the heater lever to the control panel but I may actually have heat in the car this winter! So what do I have left? Well here is my list at the moment. 1. Replace exhaust studs. 2. Install new exhaust gaskets. 3. Fill up transmission with fluid. 4. Finish assembling motor with transmission. 5. Clean up the carbs (they have been sitting so I am pretty sure the gas has crystallized on the needles.) 6. Finish wiring the heater lever to the control box. 7. install the motor. 8. Time the motor. 9. Get it inspected. At this point I just need her to run reliably without any major exhaust or oil leaks. Once this is done, I can get her registered and then she is ready to ship back stateside next year. I have one more year here in Germany then I head back to the states. After I put my MG back together, I'll completely tear the 914 down to the frame and start all over again! (IMG:style_emoticons/default/av-943.gif) (IMG:style_emoticons/default/av-943.gif) But this time it will be a methodical and deliberate process that gets her completely up to snuff. I sometimes wonder if I have taken leave of my senses but then I remember that I re-married and had another kid so the answer is...yes. (IMG:style_emoticons/default/rolleyes.gif) |
|
|
|
| stephenaki |
Apr 6 2012, 07:52 AM
Post
#183
|
|
Can I get this one dad?? Group: Members Posts: 1,191 Joined: 11-August 07 From: Palmetto, FL Member No.: 7,987 Region Association: None |
OK, I'm on the home stretch, exhaust studs...good, gaskets...good. Air flap roller...what? Well this sucks, I don't have one.
So, I can't finish putting in the bellows and hook it up to the cooling flap assembly without this piece. I have an email out to Patrik Hess here in Germany to see if he has one then it struck me, it's just a pulley wheel, wonder if I could just buy the wheel at a hardware store and retrofit it? Here is my question, anyone know the diameter of the pulley wheel? |
|
|
|
| rick 918-S |
Apr 6 2012, 07:59 AM
Post
#184
|
|
Hey nice rack! -Celette Group: Members Posts: 21,060 Joined: 30-December 02 From: Now in Superior WI Member No.: 43 Region Association: Northstar Region |
I have no idea what a air flap roller is. (IMG:style_emoticons/default/confused24.gif) Gottsa picture? (IMG:style_emoticons/default/thisthreadisworthlesswithoutpics.gif)
|
|
|
|
| stephenaki |
Apr 6 2012, 08:20 AM
Post
#185
|
|
Can I get this one dad?? Group: Members Posts: 1,191 Joined: 11-August 07 From: Palmetto, FL Member No.: 7,987 Region Association: None |
QUOTE(rick 918-S @ Apr 6 2012, 05:59 AM)  I have no idea what a air flap roller is. (IMG:style_emoticons/default/confused24.gif) Gottsa picture? (IMG:style_emoticons/default/thisthreadisworthlesswithoutpics.gif) 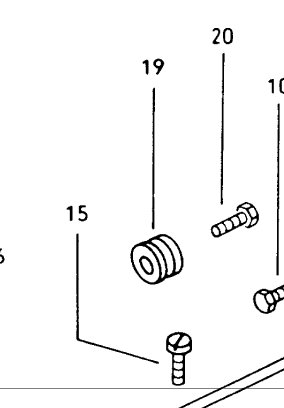 ITEM# 19 ITEM# 19Porsche Part# 021 119 769 A. The thermostat attaches to the lower portion of the crankcase, the cable runs up towards the cooling flaps but goes 'around' the roller to facilitate the expansion and collapse of the bellows as the motor heats up and cools down. Most no longer have this on their cars, I got the set up so see if it would help with starting in the lovely cold weather here in Germany. |
|
|
|
| stephenaki |
Apr 10 2012, 10:34 AM
Post
#186
|
|
Can I get this one dad?? Group: Members Posts: 1,191 Joined: 11-August 07 From: Palmetto, FL Member No.: 7,987 Region Association: None |
OK, looks like we're going to plan 'B' for the roller as my supplier here doesn't have any so, off to Hornbach this week to find a suitable replacement.
I do have a question though, since the hole goes all the way through I would assume that the bolt holding the roller is fairly tight to keep oil from leaking. This of course means the 'roller' doesn't really 'roll' now does it. (IMG:style_emoticons/default/blink.gif) So is it a safe assumption to say that I should, 'grease' the cable lightly and the surface of the roller where the cable makes contact heavily or is the friction so slight that it doesn't really matter? Inquiring minds want to know! (IMG:style_emoticons/default/popcorn[1].gif) |
|
|
|
| ArtechnikA |
Apr 10 2012, 10:46 AM
Post
#187
|
|
rich herzog Group: Members Posts: 7,390 Joined: 4-April 03 From: Salted Roads, PA Member No.: 513 Region Association: None |
Could be (I have no first-hand experience...) the roller has a sleeve bushing/bearing on which it rotates. That would be my guess.
Alternatively, your bolt #20 could be a shoulder screw with a long unthreaded portion to act as an axle. If you're building up something from generic industrial parts, either approach could work. You could possibly just use a stud and add spacers to secure a bushing/bearing for the roller to spin on, with a locking nut on the outside. I'd think there's no hope of a threadlocker actually sealing a threaded hole with oil in it. |
|
|
|
| ChrisFoley |
Apr 10 2012, 10:47 AM
Post
#188
|
|
I am Tangerine Racing Group: Members Posts: 8,001 Joined: 29-January 03 From: Bolton, CT Member No.: 209 Region Association: None |
QUOTE(stephenaki @ Apr 10 2012, 11:34 AM) OK, looks like we're going to plan 'B' for the roller as my supplier here doesn't have any so, off to Hornbach this week to find a suitable replacement. I do have a question though, since the hole goes all the way through I would assume that the bolt holding the roller is fairly tight to keep oil from leaking. This of course means the 'roller' doesn't really 'roll' now does it. (IMG:style_emoticons/default/blink.gif) So is it a safe assumption to say that I should, 'grease' the cable lightly and the surface of the roller where the cable makes contact heavily or is the friction so slight that it doesn't really matter? Inquiring minds want to know! (IMG:style_emoticons/default/popcorn[1].gif) The bolt has a shoulder so when its tight the pulley will move freely. |
|
|
|
| stephenaki |
Apr 11 2012, 12:22 AM
Post
#189
|
|
Can I get this one dad?? Group: Members Posts: 1,191 Joined: 11-August 07 From: Palmetto, FL Member No.: 7,987 Region Association: None |
QUOTE(Racer Chris @ Apr 10 2012, 08:47 AM) QUOTE(stephenaki @ Apr 10 2012, 11:34 AM) OK, looks like we're going to plan 'B' for the roller as my supplier here doesn't have any so, off to Hornbach this week to find a suitable replacement. I do have a question though, since the hole goes all the way through I would assume that the bolt holding the roller is fairly tight to keep oil from leaking. This of course means the 'roller' doesn't really 'roll' now does it. (IMG:style_emoticons/default/blink.gif) So is it a safe assumption to say that I should, 'grease' the cable lightly and the surface of the roller where the cable makes contact heavily or is the friction so slight that it doesn't really matter? Inquiring minds want to know! (IMG:style_emoticons/default/popcorn[1].gif) The bolt has a shoulder so when its tight the pulley will move freely. hmm, well, I can't get the original bolt so I'll just do some experimenting but if I understand you correctly the roller should actually roll at least enough to facilitate cable movement. I have an engineer in my office who builds airplanes; he recommended using the sleeve for a bicycle cable to run the cable through with grease. He used this type of set up for his ultra-light aircraft and stated that the sleeve would be resistent to heat. The concept is secure the puller, run the cable over it to the cooling flaps or, use some type of clip to secure the cable in place using the existing bolt and do away with the puller entirely. Thoughts? |
|
|
|
| rick 918-S |
Apr 11 2012, 04:19 PM
Post
#190
|
|
Hey nice rack! -Celette Group: Members Posts: 21,060 Joined: 30-December 02 From: Now in Superior WI Member No.: 43 Region Association: Northstar Region |
Oh ya, Duh! (IMG:style_emoticons/default/icon_bump.gif) Here's a bump. Maybe someone has the correct bolt and roller they can send you.
|
|
|
|
| stephenaki |
Apr 14 2012, 03:54 AM
Post
#191
|
|
Can I get this one dad?? Group: Members Posts: 1,191 Joined: 11-August 07 From: Palmetto, FL Member No.: 7,987 Region Association: None |
QUOTE(rick 918-S @ Apr 11 2012, 02:19 PM) Oh ya, Duh! (IMG:style_emoticons/default/icon_bump.gif) Here's a bump. Maybe someone has the correct bolt and roller they can send you. Thanks Rick problem solved though. I went to the trusty ol Hornbach here in Germany and then did some creative problem solving. So, Hornbach didn't have any 'rollers' or pulley type wheels that were not attached to something. After looking around, I found this. 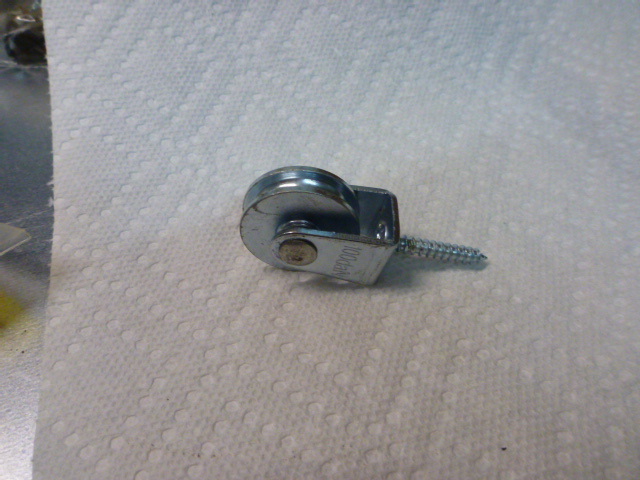 It has the right size roller, now I just gotta get it out for use. So the following ensued. 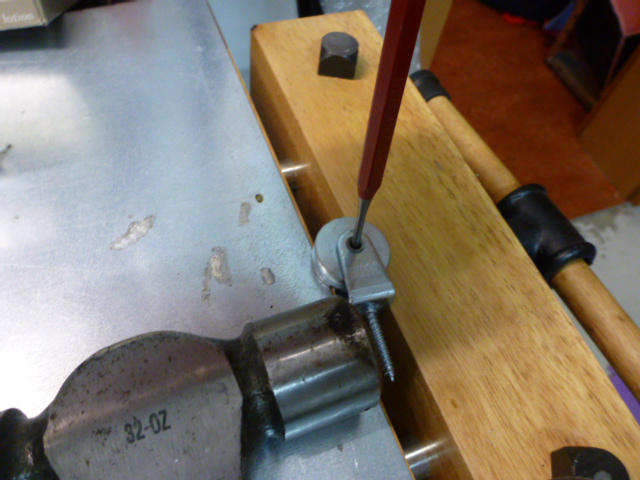 Resulting in... 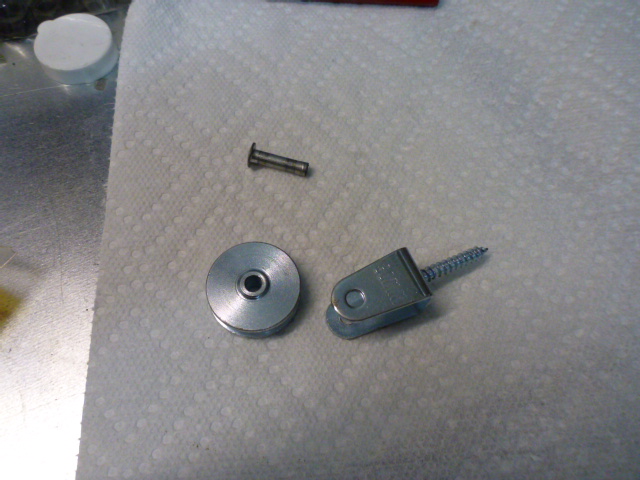 Of course the M6 bolt didn't quite fit so I had to drill it out a smidge to make it work. Once this was done, I took a day of rest. 6 Year old decided to share here stomach virus with me...not fun. (IMG:style_emoticons/default/barf.gif) Today, I feel better, some minor stomach cramping but nothing I can't deal with. Time to install my new roller and set up the cooling flaps. But before I started that, I tested the bellows I got a while back. YEP, it works! (IMG:style_emoticons/default/piratenanner.gif) (IMG:style_emoticons/default/piratenanner.gif) So off to the tiny space the Germans consider a garage, move the Beemer out, flip up the motor onto a thick rubber pad and lets get to work. When it was all said and done I was left with the following. 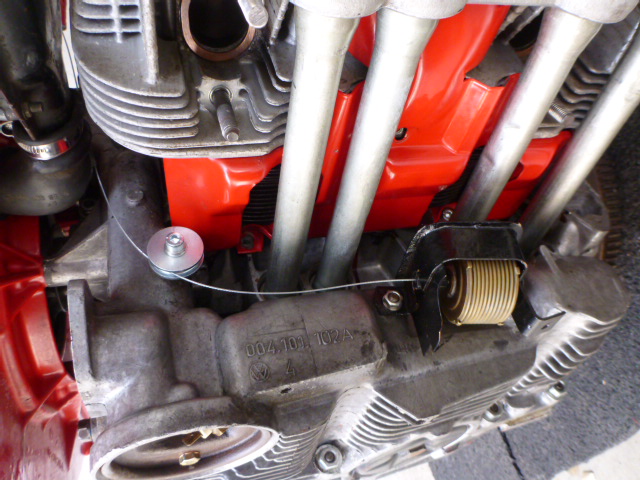 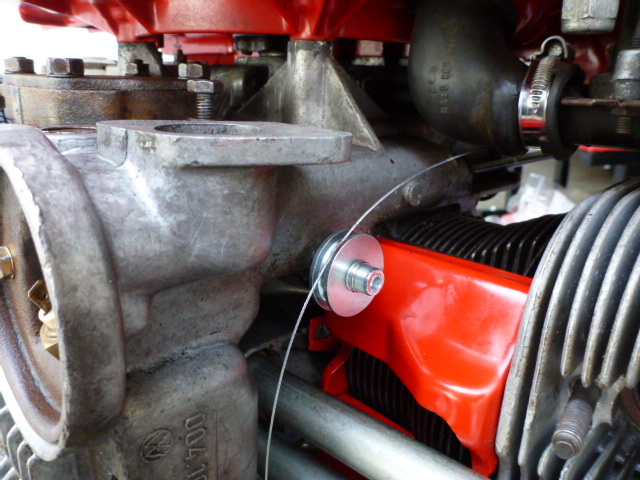 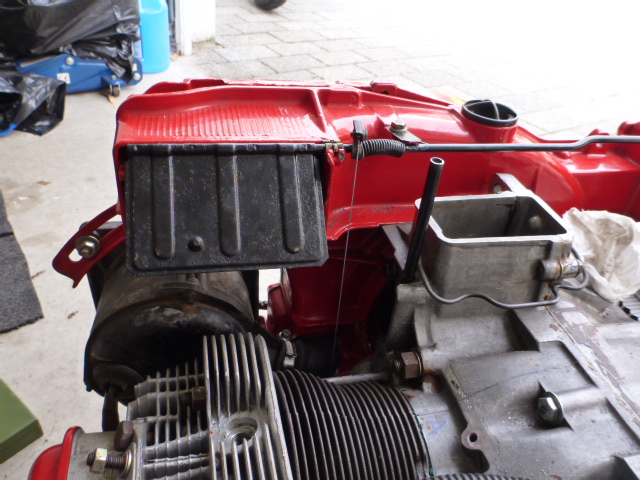 So we're making progress. I'm heading off to ATU to see if I can find a paint pen to better mark TDC and then hopefully get the motor, transmission and all that is the FUPP (Army term for Full Up Power Pack, refers to M1 engines and transmission assemblies) assembled and ready for installation into the car. I have to finish cleaning one of the carbs and will need to install new hinges for the motor deck lid as well as install the oil catcher but should be ready for the motor to go in by next weekend. Need to do as much as possible as I start traveling again towards the end of April and will be gone through most of May. Goal now is to have it operational and re-registered by the end of June. We'll see what happens! |
|
|
|
| stephenaki |
Jun 9 2012, 12:37 PM
Post
#192
|
|
Can I get this one dad?? Group: Members Posts: 1,191 Joined: 11-August 07 From: Palmetto, FL Member No.: 7,987 Region Association: None |
Well, the new clutch disc came in this past week and worked perfectly. Clearly, I managed to screw up the old clutch disc which is why she wasn't cooperating.
So, progress was made today and the motor and tranny are mated. 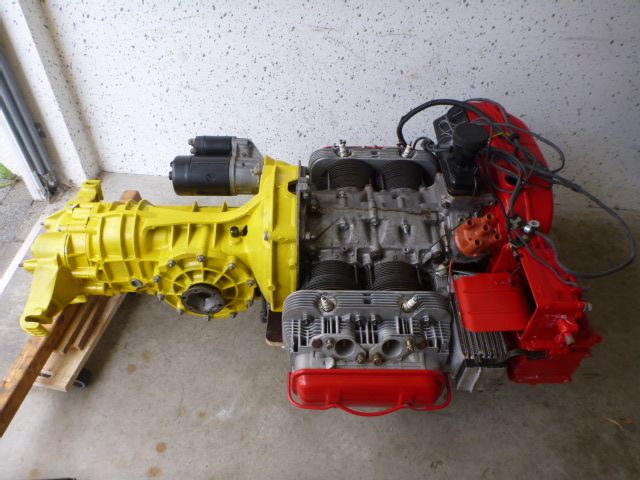 I need to put on the tin and she'll be ready for installation. In the mean time, I started tackling the engine lid bracket problem. The drivers side bracket was cracked at the bend and the passenger bracket was clearly an 'add on.' So I started to remove both. Before: 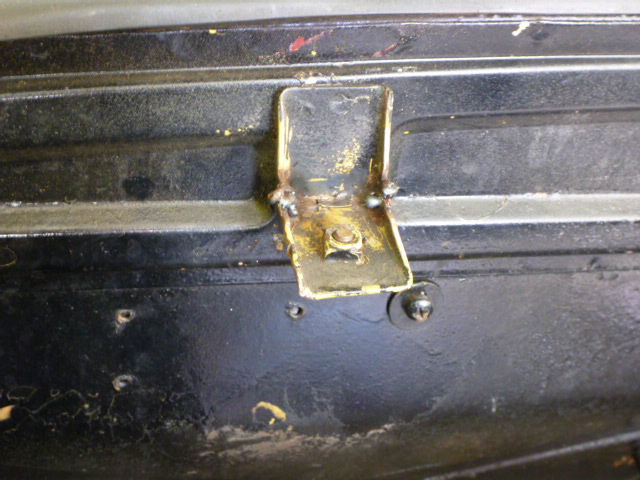 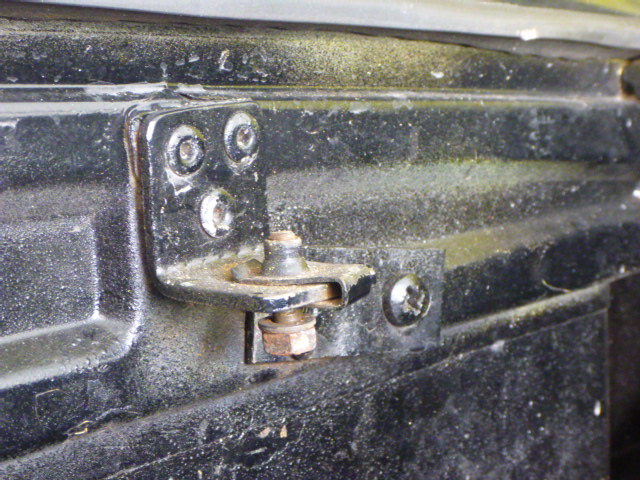 After...not quite done yet: 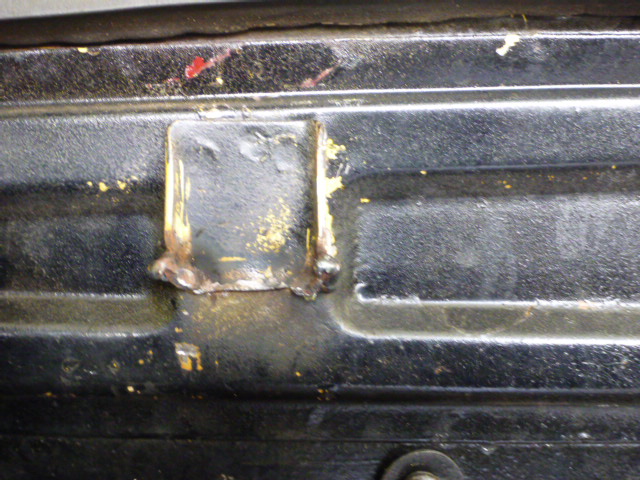 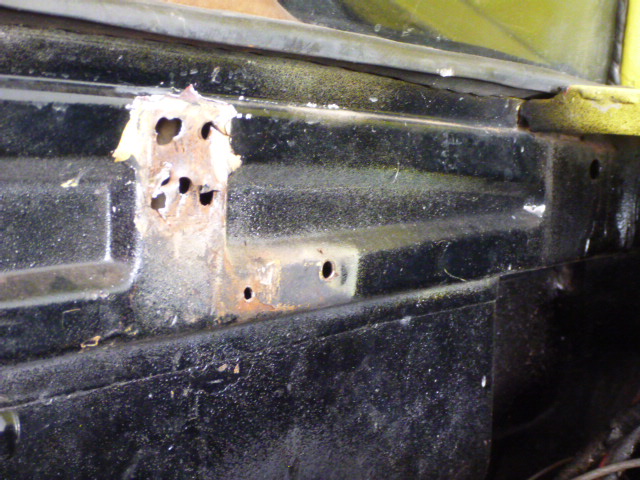 As one can see, a bit of some metal work is going to be in order. Anyone got any tricks on this one before I continue? I miss my tools, I could have easily cut out the bad patch if I had just had all my tools brought over. (IMG:style_emoticons/default/headbang.gif) Guess I'll go and see if I can find someone with a 220 dremel so I can cut out the rest of the driver's side bracket. Then I'll need to do some patching and welding before I can get the new brackets in. Nothing is ever easy with this car! (IMG:style_emoticons/default/rolleyes.gif) |
|
|
|
| seanery |
Jun 9 2012, 03:15 PM
Post
#193
|
|
waiting to rebuild whitey! Group: Retired Admin Posts: 15,857 Joined: 7-January 03 From: Indy Member No.: 100 Region Association: None |
Damn, Stephen! You are a heck of a trooper!! I just read the whole thread, what a journey. I hope you get it back together and get to finally enjoy it!
Thanks for your service (IMG:style_emoticons/default/flag.gif) |
|
|
|
| stephenaki |
Jul 5 2012, 10:55 AM
Post
#194
|
|
Can I get this one dad?? Group: Members Posts: 1,191 Joined: 11-August 07 From: Palmetto, FL Member No.: 7,987 Region Association: None |
OK, got a lot of work done this past 4th of July. Spent it in the garage working on the teener...I can see the finish line!
So, got the other bracket cut out and treated both with a rust preventer to stop any flash rust. 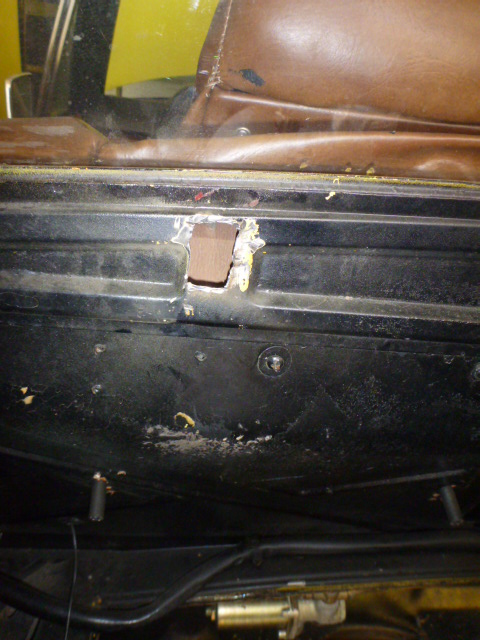 Next I went to work on assembling the tin and getting things put back together. 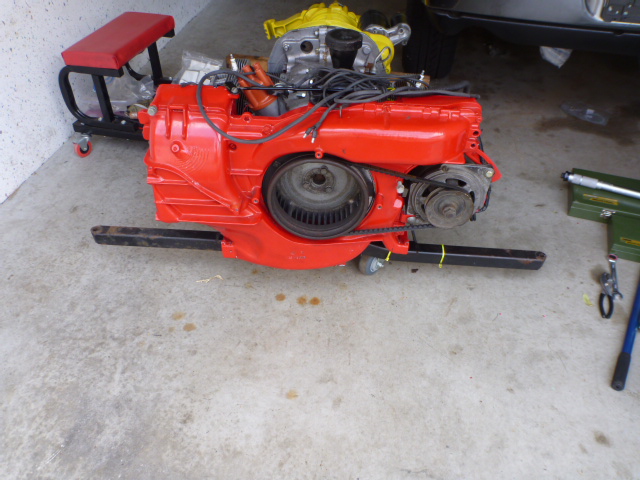 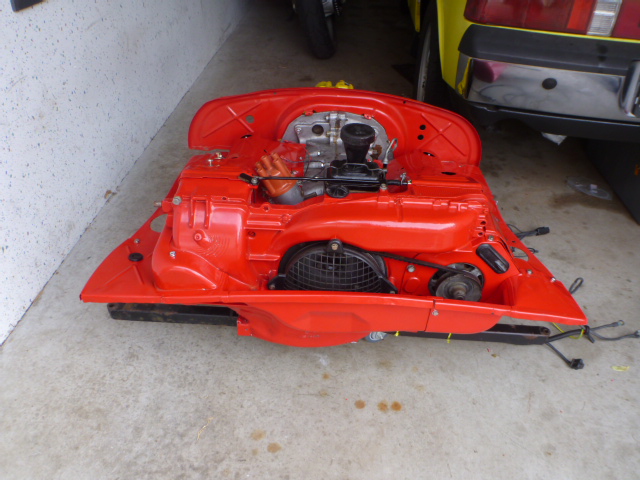 She's pretty much ready to go; I will need to get the brackets for the engine lid put in first though before I reinstall the motor. Gonna go talk to the body shop down the street tomorrow to see how much the Germans will charge me to do the work. Hopefully I don't have to put a lien on the new car to get this done (IMG:style_emoticons/default/rolleyes.gif) Speaking of which...new car, picked it up today; 2013 Volvo XC70. We transer our 2005 Toyota Sienna to its new owner tomorrow.  So, I have looked at some threads but would like some recommendations on what type of oil to use. Mind you, I can't get the special stuff that Jake R has available as it won't ship here so looking for what is the best oil weight to use and brand. I'm a bit limited on what I can get here, recommendations? |
|
|
|
| stephenaki |
Jul 10 2012, 08:56 AM
Post
#195
|
|
Can I get this one dad?? Group: Members Posts: 1,191 Joined: 11-August 07 From: Palmetto, FL Member No.: 7,987 Region Association: None |
So, the body shop down the street will be coming by to pick up the car and put in the new engine lid brackets today. (IMG:style_emoticons/default/piratenanner.gif)
Had to roll her out of the garage in preparation of the pick up. I also got the carbs put back on this past weekend as well. I need to run the fuel lines to the carbs and get them ready then need to re-route and attach the wiring harness to there respective connections. I always forget what goes where, I guess this is the difference between a shade tree mechanic and a professional. (IMG:style_emoticons/default/happy11.gif) I'll just have to do some reading and research to make sure I put everything back where they belong. It will take some time but that is not an issue as I'll be in Africa again on Thursday and won't be back for about a week and a half. I am hoping the work is done when I get back so I can finish up a few other things and put the motor back in after I get back. I would like to get everything re-installed before my motorcycle trip in August as she'll need to get re-registered by September. After searching I found the Jake Raby thread on oil. Well, I can't get Brad Penn oil here so I called Royal purple and talked to one of their technicians who recommended using their Maxcycle 20/50 oil. Anyone have any experience with Royal Purple oils? My choices here in Deutschland are a bit limited so I'm looking for options. They also thought I could use their XPR 20/50 but thought it might be a bit of overkill. |
|
|
|
| stephenaki |
Oct 18 2012, 10:59 PM
Post
#196
|
|
Can I get this one dad?? Group: Members Posts: 1,191 Joined: 11-August 07 From: Palmetto, FL Member No.: 7,987 Region Association: None |
OK, I've been a bit busy between traveling for work and working on two major exercises that I am running logistics for. Add on the fact that my eldest daughter came over from Italy last week and I just haven't had time to work on the teener. (IMG:style_emoticons/default/sad.gif)
Well, the eldest went back to Italy and the wife is off to meet her in Paris this week leaving me with the newly minted 7 year old, she had her birthday on the 8th of this month. (IMG:style_emoticons/default/birthday3.gif) The neighbor has invited her for a sleep over so she'll be over there all day which means...I GET TO WORK ON THE CAR THIS WEEKEND!! (IMG:style_emoticons/default/piratenanner.gif) (IMG:style_emoticons/default/piratenanner.gif) She came back from the body shop and they did a good job of re-welding and mounting the engine lid. My NCO who is a mechanic may come over to help but I think it is only so I give him free beer (IMG:style_emoticons/default/beer3.gif) No matter, I told him he can't have beer until AFTER we get the motor in and hooked up. With any luck, I'll have her running by Sunday, hmm, where have I heard that before... (IMG:style_emoticons/default/dry.gif) I'll post some pictures of the newly mounted lid tomorrow along with, hopefully, a remounted motor. Wish me luck! |
|
|
|
| stephenaki |
Oct 20 2012, 12:09 PM
Post
#197
|
|
Can I get this one dad?? Group: Members Posts: 1,191 Joined: 11-August 07 From: Palmetto, FL Member No.: 7,987 Region Association: None |
OK, the plan didn't quite go as I wanted it to as the neighbor went shopping with Rianna's buddy so I had to find ways to keep the munchkin entertained while I worked on the car. (IMG:style_emoticons/default/dry.gif)
I did get pics of the work on the new mounting brackets for the lid. 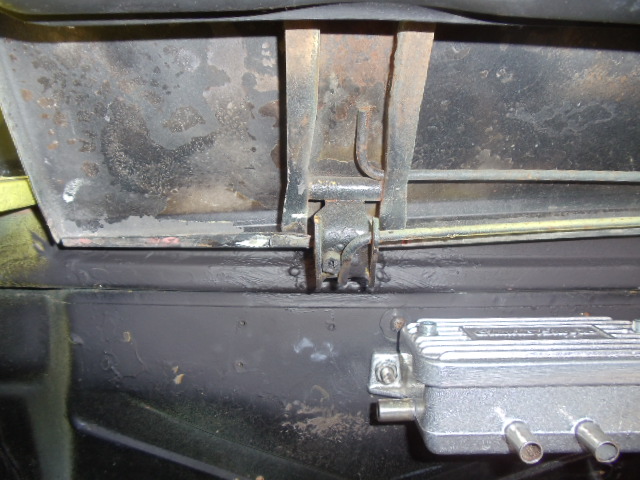 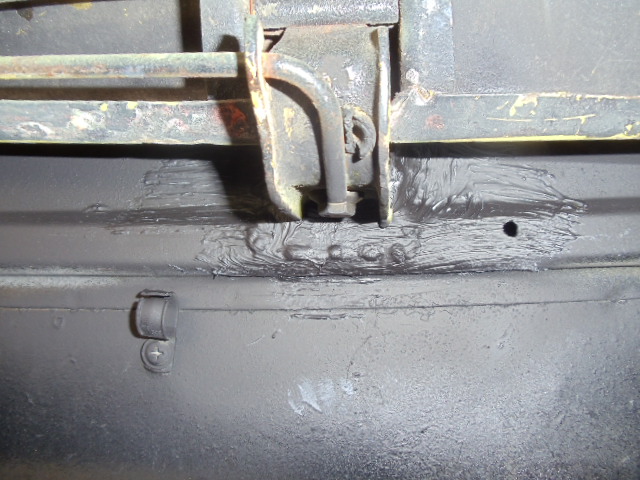 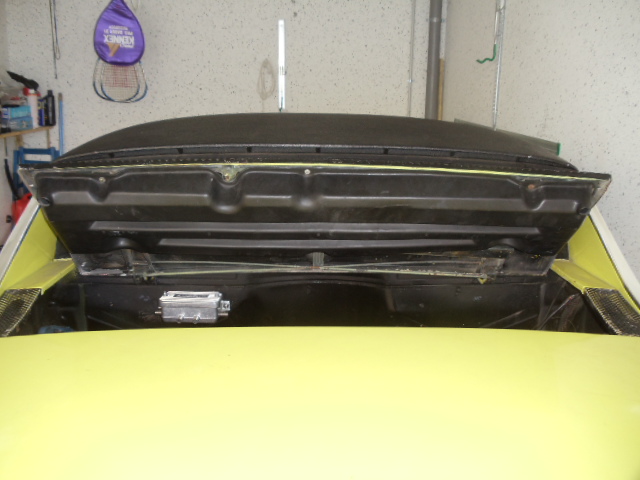 So, after making sure I had all the necessary bolts, brackets, nuts, etc. I started the process of getting the motor in the car. First order of business, pull out the bikes, back out the car and center it in my tiny German garage. Because I share a driveway, I can't just pull her out and work on her in the driveway. 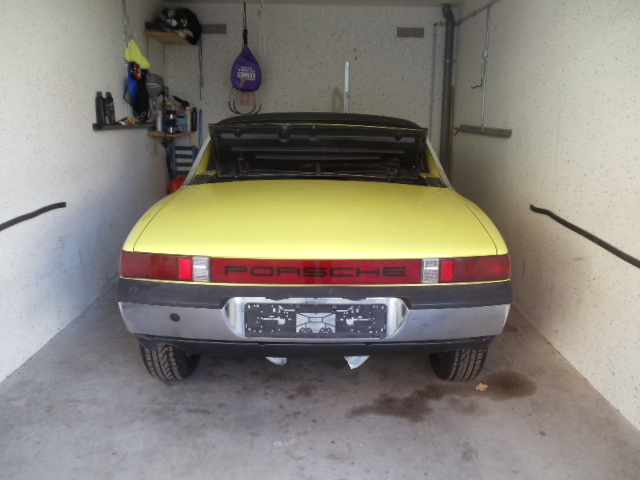 Ready to start. 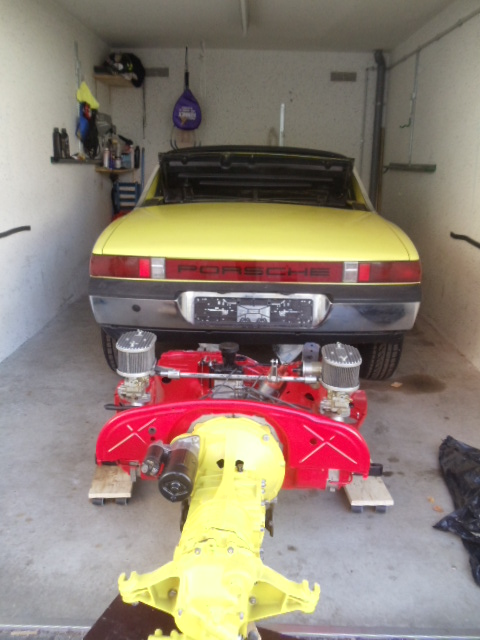 OK, were ready to go! During the process of jacking the car up I had Rianna come out about every 15 minutes, 'I'm bored! I have no one to play with!' OK, we can fix that... (IMG:style_emoticons/default/happy11.gif) 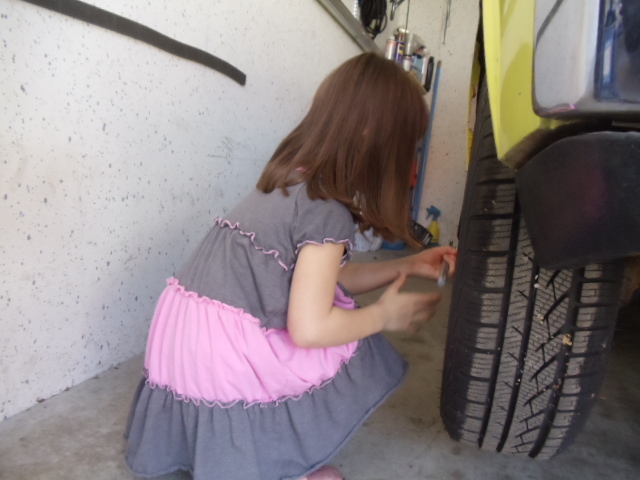 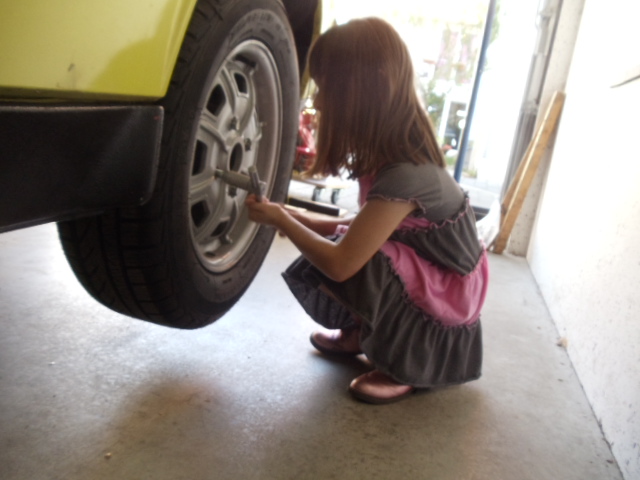 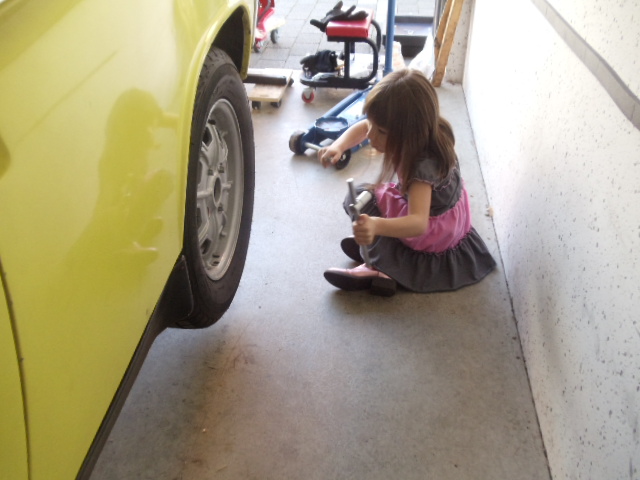 OOPS! Pulled the bolt out and lost my balance! I only let her unscrew and pull out two bolts on each wheel, she wanted to do all of them but I explained that the tire would fall on her so she was happy to do the two bolts on each tire instead. Since I was also waiting for some of the brackets to dry before I could proceed, I decided to cut the grass as it sorely needed it. Guess who wanted to help again...   I bet she won't want to do this when she is a teenager! I probably would have gotten all the grass done a lot quicker had I not had her 'helping.' Oh well, it kept her busy until lunch. Thankfully she started on her Lego Friends kit after lunch so stayed self entertained the rest of the afternoon. At least most of the time. She'd come out every now and again to get me to help her with her little project. By around 1800 I got the motor in and the axles connected to the gearbox. I still need to run the fuel electrical and oil collection lines. I don't know how much I will get done tomorrow since you aren't allowed to do anything on Sundays in Germany but I will do what I can. In the mean time, here are the remaining pics for the day. 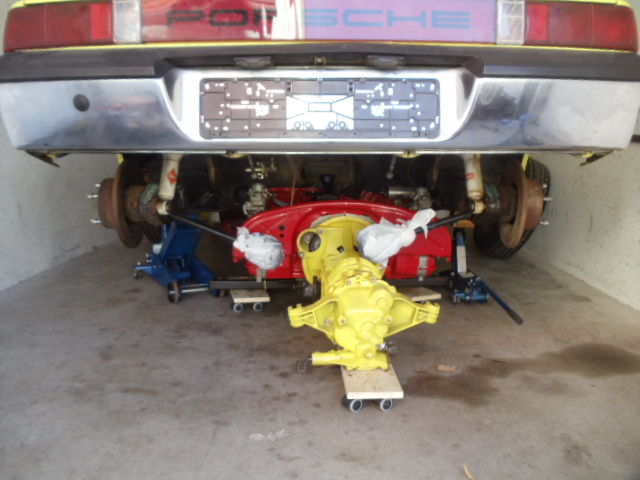 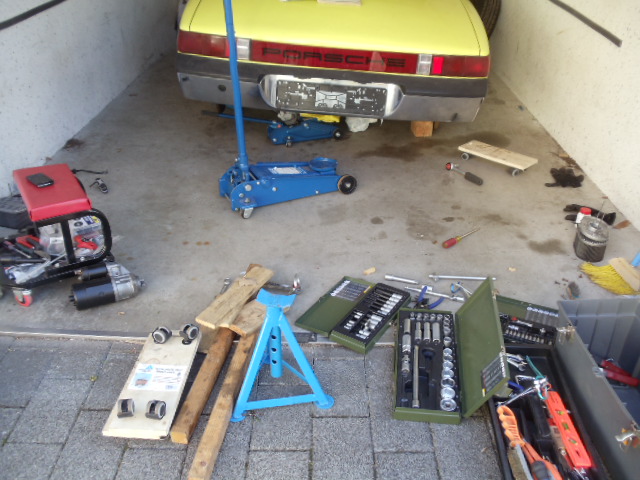 I REALLY NEED A BIGGER WORK AREA!! 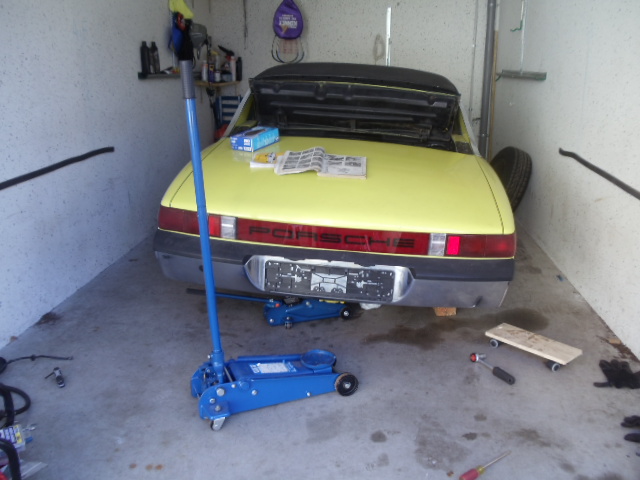 We'll see how much I get done tomorrow; gotta help Rianna with her homework and clean and oil the chain on the BMW. Hopefully I can tackle most of the electrical and fuel lines tomorrow. |
|
|
|
| stephenaki |
Nov 4 2012, 03:40 PM
Post
#198
|
|
Can I get this one dad?? Group: Members Posts: 1,191 Joined: 11-August 07 From: Palmetto, FL Member No.: 7,987 Region Association: None |
Well now, here I sit in the lovely Atlanta airport. (IMG:style_emoticons/default/dry.gif) I'm waiting for my connecting flight to Fayetteville, NC. Thankfully, I was able to get quite a bit done on the car yesterday. I got the shift linkage hooked up, clutch cable hooked up, heat exchangers in place and the exhaust is ready to be put on. I had hoped to get more done but I had to clean up the heat exchangers before I could put them in and the previous weekend's snow didn't help. (IMG:style_emoticons/default/hissyfit.gif)
I'll be in NC for about two weeks, a week at a planning conference and then a week on a track of sorts for high threat personnel tactical training. I get to spend the week doing silly shit in a car and learning to shoot out of them while moving. Should be fun! (IMG:style_emoticons/default/piratenanner.gif) Hopefully the weather will cooperate when I get back as the finish line isn't far away to getting her on the road and I have a feeling I'll be needing her this winter. So, what do I have left? 1. finish exhaust install 2. hook up heater box cables to the heat exchangers 3. hook up electrical wiring (my biggest weakness) 4. hook up fuel lines 5. hook up oil/vapor lines for carbs 6. adjust clutch and fuel pedal play 7. time the motor Basically ankle biters. My biggest problem will be remembering where the damn wires go, as stated above, I suck at electrical wiring for the car. A house I can do, cars tend to befuddle me. I need to take a class on electrics. I'm hoping that I get some time when I get back as I won't be back for long; I have to head to Africa again right after Turkey Day. I didn't get any pics this time, I'll get some after I get her back up and running. |
|
|
|
| stephenaki |
Dec 28 2012, 08:00 AM
Post
#199
|
|
Can I get this one dad?? Group: Members Posts: 1,191 Joined: 11-August 07 From: Palmetto, FL Member No.: 7,987 Region Association: None |
So relaxing on Christmas day for me was working on the teener. I got the throttle cable hooked up, adjusted the gearshift rod and clutch pedal play. Then finished the heat exchanger hook up, partially, before I called it quits. I have to finish the heat exchanger cable hook up before that is done. I'm getting ready to tackle more this weekend but had a question on setting up the breather and no, I am not running this on the track.
I have the CB performance box which will do for now and have looked at several threads. My question is should the box drain back into the heads or into the carbs? I saw several pictures of different hook ups, some complex some very simple but I thought the whole point of the breather was to catch the oil then let it drain back into the motor. If she drains into the carbs, doesn't that kinda gum them up a bit? Just looking for some advice before I tackle this aspect of the rebuild, any info people can provide will be greatly appreciated. |
|
|
|
| ArtechnikA |
Dec 28 2012, 08:27 AM
Post
#200
|
|
rich herzog Group: Members Posts: 7,390 Joined: 4-April 03 From: Salted Roads, PA Member No.: 513 Region Association: None |
QUOTE I saw several pictures of different hook ups, some complex some very simple but I thought the whole point of the breather was to catch the oil then let it drain back into the motor. If she drains into the carbs, doesn't that kinda gum them up a bit? there should be 4 ports. one from each head. these are 'in' one drainback to the case - this is kind of an in/out, as it relieves crankcase pressure in operation and provides a return path for collected oil, condensed from the mist. one _vent_ to the air cleaner, to burn the partially oxidized blowby and some of the oil vapor. Some simply vent this to the atmosphere. I ran mine to the air cleaner, the way carbureted Porsche engines always were from the factory. With - I should note - a flame arrestor, because having an intake backfire propagate into the possibly combustible crankcase vapor is definitely A Bad Thing. |
|
|
|
|
1 User(s) are reading this topic (1 Guests and 0 Anonymous Users)
0 Members:

|
Lo-Fi Version | Time is now: 23rd August 2025 - 12:56 AM |
Invision Power Board
v9.1.4 © 2025 IPS, Inc.