Help - Search - Members - Calendar
Full Version: Steve's unending Progress thread
914World.com > The 914 Forums > 914World Garage
Pages: 1, 2, 3, 4, 5, 6, 7, 8, 9, 10
stephenaki
OK, this will be the thread that I keep updated as I make progress. I showed up at 0800 at Christoph's place and he was ready for me with a not so glamorous chunk of metal that is my cars heart and soul.

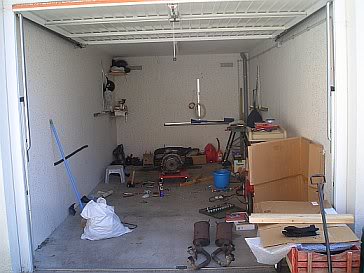
With a little assistance, we loaded it into my Toyota Sienna, not quite I envisioned a mini-van for, and I was headed back to the house. Upon getting home I had to first make coffee then clear out some space in my tiny German garage. So that everyone has a frame of reference to the area that I am working in I have enclosed this lovely 4x6 glossy of my garage in Germany.
IPB Image

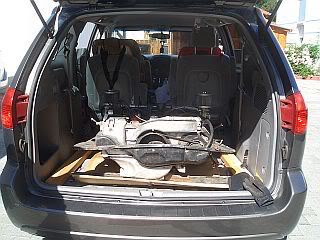
And, for those of you not familiar with the Toyota Sienna, a shot of the engine in the back of the van. There's a lot of room back there for the motor but, it is awkward to get in and out of when loading a motor.
IPB Image

Now to summarize what was accomplished on the 4th of July, engine brought home, tin, impeller and housing, exhaust, cylinder head and cylinders removed. I had difficulty removing the impeller hub. OK, I didn't get it removed, will need a puller and I don't have one unless anyone can give me any ideas how to get it off without a puller.

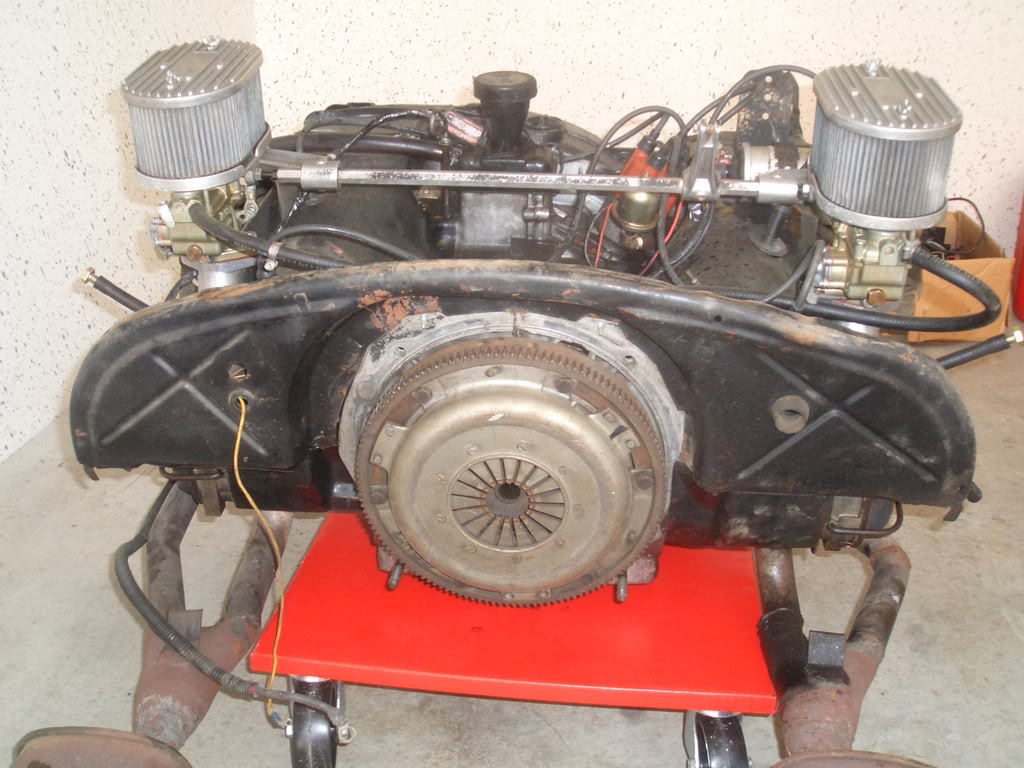
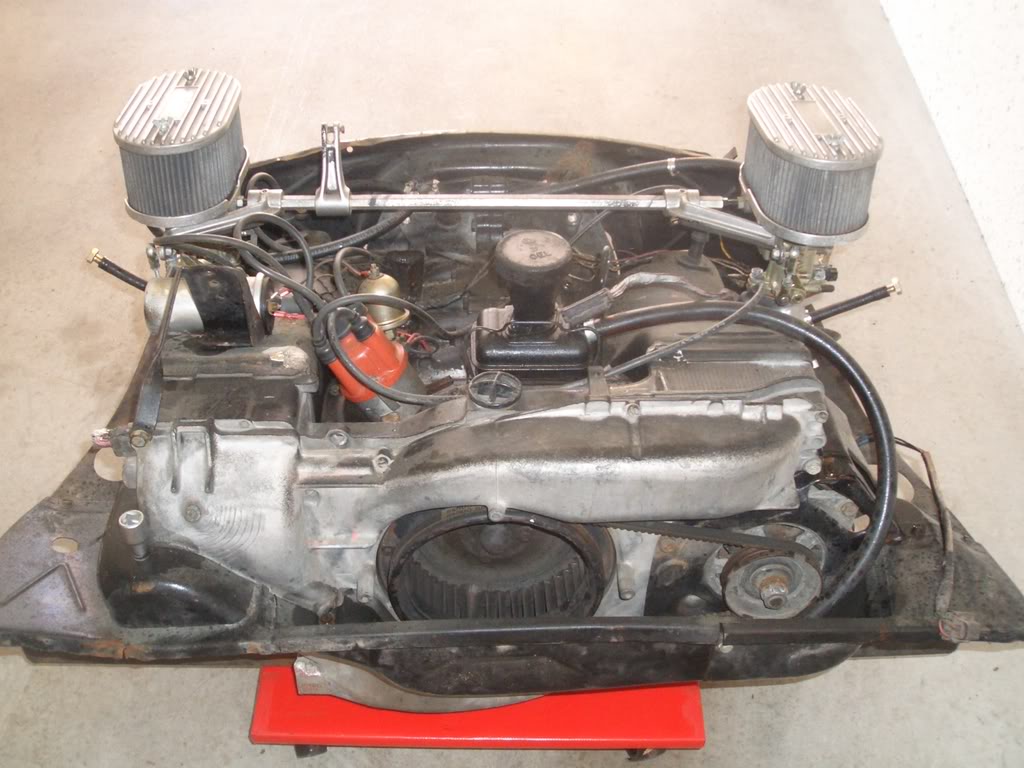
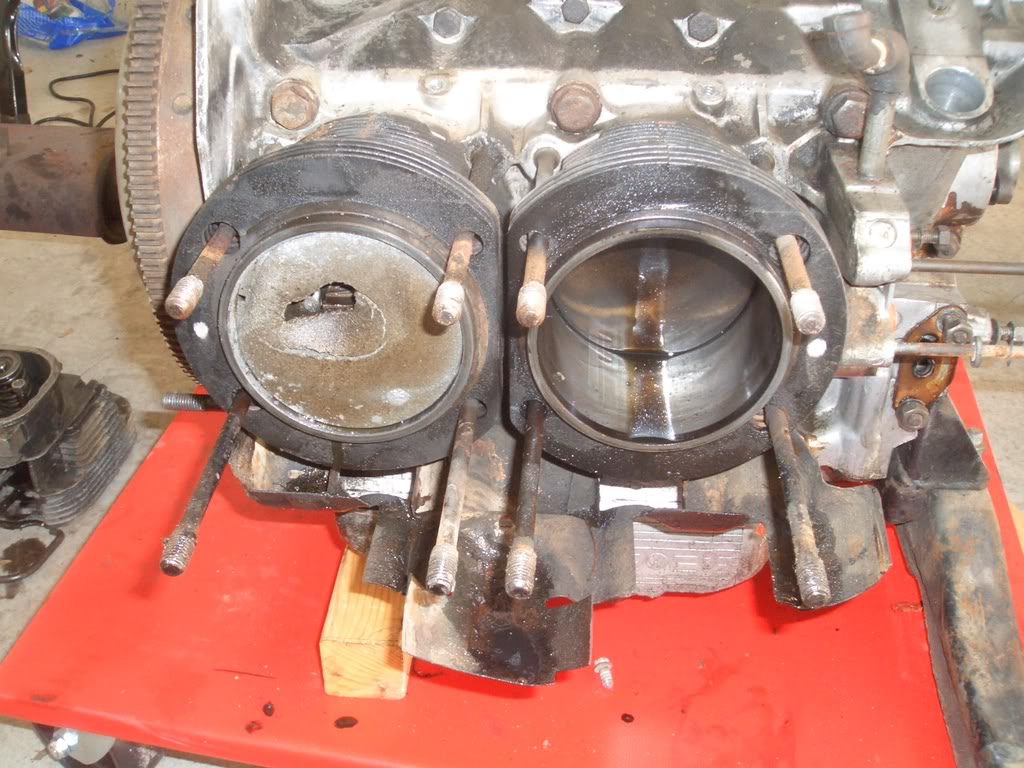
Now for the requisite pictures of the motor unmolested.
IPB Image
IPB Image

Now based on the initial tear down two problems presented it self first the primary issue with a lack of compression...HOLY SHIT!!! Here is what I found.
IPB Image
blink.gif blink.gif blink.gif blink.gif
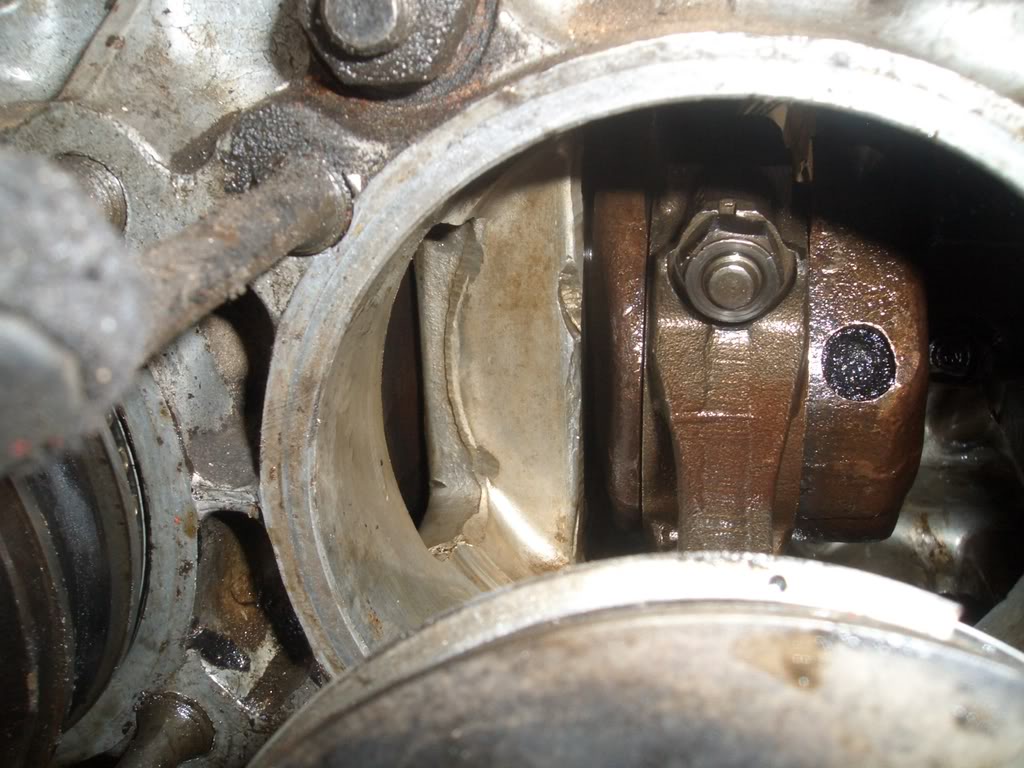
Now the cylnder itself was not pitted, it had a build up of corrosion but otherwise in good condition. So I was thinking, maybe I can just clean hone and replace the piston. Well that thought went out the window when I pulled the cylinder directly opposite to it. As you can see by the photo, problem #2.
IPB Image

More importantly, where did that piece of metal go? An initial look behind the piston shows a knick in the inner portion of the crankcase.
IPB Image

I will see if there is more significant damage when I split the case; so it begins and were off to a rocket start here at the 914 follies! Stay tuned for the next exciting episode of "never buy a car sight unseen" later in the week! happy11.gif

Gonna go shower and start working on the motor some more. Plan is to have it completely torn down befor the end of this weekend. I will load up some pictures to my photo bucket album and post the link a bit later.
Gustl
QUOTE(stephenaki @ Jul 5 2008, 11:39 AM) *

Gonna go shower and start working on the motor some more. Plan is to have it completely torn down befor the end of this weekend. I will load up some pictures to my photo bucket album and post the link a bit later.

Steve, this looks like a lot of work rolleyes.gif
so ... I guess you won't show up at Toni's BBQ today idea.gif

I'll start within the next couple of minutes and will be there at about 1600 - already talked on the phone with Toni, the weather is brilliant, as he told me

I hope I can take some nice photos and show 'em tomorrow

bye1.gif Gustl
hcdmueller
This whole scene looks very familiar. Your garage is exactly the same as mine. I have my 914 in there up on jack stands and I have been rebuilding the motor in the basement of my house.

If it turns out your block is not good let me know. I have a good one sitting at my house right now. It is all cleaned up and tapped for the oil galley plugs.

Don't feel too bad about not being able to drive it. I pulled my engine last august but work and the wife have conspired to keep me from finishing the install. I am close now. Next couple weeks.

Good luck.

Gustl, I can't wait to see pictures from Austria.
VaccaRabite
I bet you will find all that metal in the sump when you split the case. You need new P/C for sure. Build a 1911/2056? May as well, as you have to buy new parts anyhow.

Zach
ericread
Get serious. With a bit of Mother's, it'll buff right out.... biggrin.gif

stephenaki
OK, so I didn't get as much done today as I wanted. Wife went off somewhere so I was watching the crazy child part of the morning; at least until she went over to play at the neighbors.

I did get all the pistons out, clutch plate and flywheel pulled and started to loosen the bolts to crack the case. Clutch was cracked so I will have to replace that, not a big issue.

So, as I read through Jake's process of doing the conversion from 1.7 to 2.0 I recall the mention of machining the heads to a "105mm register." I am not sure I fully understand what is meant by "register." Are we talking about the area where the valves sit that forms part of the combustion chamber? Just want to make sure I know what were talking about.

If this is the case, I did measure the area and it is measuring at 105. So the next question will be the type of crank I have and the piston rod sizes. The pistons are measuring at 94 but I don't know how much the PO prior to the PO I bought if from knew about doing a proper conversion as outlined by Jake. I have the journal and rod specs so can do the measurement for the most part with the exception of the journals as I don't have a micrometer set...yet.

I am hoping that I can formulate a plan and establish what parts I will need by Monday. I will post more pictures tomorrow.

Chris,
I'll let you know if the case is toast or not. My hope is that the chunk of metal made it down to the sump as Zach predicts and didn't tear things up on its way there. Hope to find out tomorrow.

Gustl,
Sorry I didn't make it to Toni's shindig, let me know how it went.
Dave_Darling
Impeller hub: Get some fender washers or other large tough pieces of flat metal. Remove the fan, thread the fan bolts back into the hub. Trap the metal pieces between the ends of the bolts and the crankcase. Give each bolt 1/4 turn at a time, and the hub will pop off.

Register: That's the area of the head that the cylinder fits into.

--DD
stephenaki
QUOTE(Dave_Darling @ Jul 5 2008, 08:59 PM) *

Impeller hub: Get some fender washers or other large tough pieces of flat metal. Remove the fan, thread the fan bolts back into the hub. Trap the metal pieces between the ends of the bolts and the crankcase. Give each bolt 1/4 turn at a time, and the hub will pop off.

Register: That's the area of the head that the cylinder fits into.

--DD


Dave,
Thanks, I would have never thought of that for the hub removal, I believe I have several washers down in the basement that will work.

Thanks for confirming what I thought the "register" was. So now I know for sure the requisite head work was done at least partially. Will need to check valve sizes after I pull them. Hopefully will get the case split today to assess the case interior and the crank.
Gustl
QUOTE(hcdmueller @ Jul 5 2008, 02:04 PM) *

Gustl, I can't wait to see pictures from Austria.


in fact, the BBQ took place in Germany, about 20 min from Munich (direction Stuttgart)

biggrin.gif Gustl
Gustl
QUOTE(stephenaki @ Jul 5 2008, 10:23 PM) *

Gustl,
Sorry I didn't make it to Toni's shindig, let me know how it went.


I'll start a new thread - it would be too much OT here smile.gif
stephenaki
Case is split! biggrin.gif So after we ran around this morning, I finally got to work on the motor some more. You know, Haynes isn't kidding when they say if it doesn't come apart easily there is still a bolt or nut somewhere that you missed! Good lord! I hope I can remember where the hell all the nuts and bolts go!

I did find the missing cylinder pieces, they got kinda chopped up and pieces were in the sump as Zach predicted. So, I did some reading after I split the case and, someone correct me if I am wrong, based on the rods on the crank I would say that I have a 1.7 crank and rod set. Picture below.
IPB Image
Anyone think otherwise? So here then is my question for the group and I am looking for your thoughts and recommendations.

Based on the fact that the head register was machined out to accommodate the larger cylinders but the crank and connecting rods are for a 1.7 vice 2.0. What is the way ahead? I am assuming I can't take her back down to a 1.7 and, based on Jakes article on his site, the 1.7 crank and connecting rods don't work very well with the 2.0 cylinder and re-machined heads.

Recommendations on the way ahead? My gut feeling is to pony up the dough and get a 2.0 crankshaft and just build a semi stock 2.0 with correct cylinders, pistons and connecting rods. What say ye oh omnipotent 914 Meisters? pray.gif

Finally the distributor gear has some nicks, photo below, major problem or can I just lightly file the sucker and smooth it out? I am assuming I will just use the existing gears on the 1.7 crank if I transfer to a 2.0 crank.
IPB Image

For those that want more engine porn, the link to my photo bucket album is as follows:
Steve's 914 photo bucket album

Looking forward to hearing some suggestions from the group.
Joe Bob
If you're married to that motor, get LN Engineering to do up a set of Nickies. Then rebuild it.

Otherwise, I would start with a fresh motor...one THAT YOU want and have it shipped over, use the parts like the carbs. Sell the rest on evilBay.

Doesn't military get a deal on shipping via MAC?
stephenaki
QUOTE(! @ Jul 6 2008, 11:55 AM) *

If you're married to that motor, get LN Engineering to do up a set of Nickies. Then rebuild it.

Otherwise, I would start with a fresh motor...one THAT YOU want and have it shipped over, use the parts like the carbs. Sell the rest on evilBay.

Doesn't military get a deal on shipping via MAC?


Fresh motor is not an option at this point. I am assuming that I can't just pick up a 1.7 mm set of cylinder's and pistons and throw them on based on the fact that the heads were machined out to a 105 register...or is this still an option? BLUF: just want to get it running long enough to finish out my tour in Germany and a year back stateside so I can get my MG put together. After that, I will do a complete tear down and restoration of the engine or buy a rebuilt one from Jake.
hcdmueller
New 96mm pistons and cylinders are available at Jake's store. You would have to reset the deck height and probably get new push rods. Add some new bearings, seals, and a few other odds and ends and you will be back in business. No need to get a 2.0 crank. If you upgrade to IDF or DRLA carbs you should get better performance too.

If you clean the heads up and post good pics of the combustion chamber Jake can usually spot cracks right away. It is actually kind of scary.
Jake Raby
QUOTE(hcdmueller @ Jul 6 2008, 04:04 PM) *

New 96mm pistons and cylinders are available at Jake's store. You would have to reset the deck height and probably get new push rods. Add some new bearings, seals, and a few other odds and ends and you will be back in business. No need to get a 2.0 crank. If you upgrade to IDF or DRLA carbs you should get better performance too.

If you clean the heads up and post good pics of the combustion chamber Jake can usually spot cracks right away. It is actually kind of scary.


Thanks Chris,
We ship to Europe daily and have shipped Chris several items including an entire engine kit and FI retrofit assembly..

My video would have pinpointed EVERY fastener on the case during dis-assembly, one by one and each is counted.

I can provide you with what's needed to just patch this engine up, no worries..
stephenaki
QUOTE(Jake Raby @ Jul 6 2008, 04:02 PM) *

QUOTE(hcdmueller @ Jul 6 2008, 04:04 PM) *

New 96mm pistons and cylinders are available at Jake's store. You would have to reset the deck height and probably get new push rods. Add some new bearings, seals, and a few other odds and ends and you will be back in business. No need to get a 2.0 crank. If you upgrade to IDF or DRLA carbs you should get better performance too.

If you clean the heads up and post good pics of the combustion chamber Jake can usually spot cracks right away. It is actually kind of scary.


Thanks Chris,
We ship to Europe daily and have shipped Chris several items including an entire engine kit and FI retrofit assembly..

My video would have pinpointed EVERY fastener on the case during dis-assembly, one by one and each is counted.

I can provide you with what's needed to just patch this engine up, no worries..

Chris, Jake,
So if I stick to 94s instead of going to 96s I assume that I don't have to reset the deck height and can stick with the same pushrods? I planned on getting new bearings regardless but will stick with the Dellorto carbs I have now.

I set everything up and kept them in order labeling each part so I know where it goes back to with the exception of the case bolts. What about the distributor gear, salvageable with cleaning up or toss and get a new one? I know that this is the cheap way out but I just need her running before it gets cold this season. I don't want to have to ride my motorcycle in the snow again! screwy.gif

Thanks for all the help.
ericread
QUOTE(stephenaki @ Jul 6 2008, 09:50 PM) *

I just need her running before it gets cold this season. I don't want to have to ride my motorcycle in the snow again! screwy.gif

Thanks for all the help.


Now I understand why you picked a 914 to work on. You needed a vehicle designed to perform well in the snow lol3.gif

You might think of beefing up the heater...

Eric

Dr Evil
QUOTE(stephenaki @ Jul 7 2008, 12:50 AM) *

QUOTE(Jake Raby @ Jul 6 2008, 04:02 PM) *

QUOTE(hcdmueller @ Jul 6 2008, 04:04 PM) *

New 96mm pistons and cylinders are available at Jake's store. You would have to reset the deck height and probably get new push rods. Add some new bearings, seals, and a few other odds and ends and you will be back in business. No need to get a 2.0 crank. If you upgrade to IDF or DRLA carbs you should get better performance too.

If you clean the heads up and post good pics of the combustion chamber Jake can usually spot cracks right away. It is actually kind of scary.


Thanks Chris,
We ship to Europe daily and have shipped Chris several items including an entire engine kit and FI retrofit assembly..

My video would have pinpointed EVERY fastener on the case during dis-assembly, one by one and each is counted.

I can provide you with what's needed to just patch this engine up, no worries..

Chris, Jake,
So if I stick to 94s instead of going to 96s I assume that I don't have to reset the deck height and can stick with the same pushrods? I planned on getting new bearings regardless but will stick with the Dellorto carbs I have now.

I set everything up and kept them in order labeling each part so I know where it goes back to with the exception of the case bolts. What about the distributor gear, salvageable with cleaning up or toss and get a new one? I know that this is the cheap way out but I just need her running before it gets cold this season. I don't want to have to ride my motorcycle in the snow again! screwy.gif

Thanks for all the help.


I may be able to get you a 2.0 crank and rods if you need for real cheap. I would have to extract them from a junk core in my friends garage, but if it will help I would be glad to do it.
r_towle
I agree.

what parts do you need? I am sure we all have enough to get you going again.

Rich
rick 918-S
QUOTE(stephenaki @ Jul 6 2008, 08:50 PM) *

QUOTE(Jake Raby @ Jul 6 2008, 04:02 PM) *

QUOTE(hcdmueller @ Jul 6 2008, 04:04 PM) *

New 96mm pistons and cylinders are available at Jake's store. You would have to reset the deck height and probably get new push rods. Add some new bearings, seals, and a few other odds and ends and you will be back in business. No need to get a 2.0 crank. If you upgrade to IDF or DRLA carbs you should get better performance too.

If you clean the heads up and post good pics of the combustion chamber Jake can usually spot cracks right away. It is actually kind of scary.


Thanks Chris,
We ship to Europe daily and have shipped Chris several items including an entire engine kit and FI retrofit assembly..

My video would have pinpointed EVERY fastener on the case during dis-assembly, one by one and each is counted.

I can provide you with what's needed to just patch this engine up, no worries..

Chris, Jake,
So if I stick to 94s instead of going to 96s I assume that I don't have to reset the deck height and can stick with the same pushrods? I planned on getting new bearings regardless but will stick with the Dellorto carbs I have now.

I set everything up and kept them in order labeling each part so I know where it goes back to with the exception of the case bolts. What about the distributor gear, salvageable with cleaning up or toss and get a new one? I know that this is the cheap way out but I just need her running before it gets cold this season. I don't want to have to ride my motorcycle in the snow again! screwy.gif

Thanks for all the help.


Someone will answer your questions soon. icon_bump.gif

popcorn[1].gif

List the parts you need. I'm sure I don't have much but there are alot of guys here that do.
Katmanken
Buy a new one- dstributor gears are cheep. They might even be a beetle part.
Parts book says p/n 111.105.223- Driving gear- same for all years

You have to pull the old gear off to get the old bearings off the crank. The removal can involve heating, a puller and a little cussing. Or a big ass press.

Ken
stephenaki
QUOTE

Someone will answer your questions soon. icon_bump.gif

popcorn[1].gif

List the parts you need. I'm sure I don't have much but there are alot of guys here that do.


OK, in order to do the proper conversion that Jake outlines I am in need of the following items.

2.0 Crank
2.0 connecting rods

I found a set of AA 94mm piston cylinder set so all I need to fully convert this sucker is the crank and connecting rods. If anyone has them please let me know and how much with shipping of course. I would rather do a proper conversion than just a half assed job.

The remaining items, bearings etc, I can get easy once I do the requisite measurements on the crank, etc.
I'll be standing by for any assistance you all can give me. beerchug.gif
Smitty911
QUOTE(stephenaki @ Jul 8 2008, 12:06 AM) *

QUOTE

Someone will answer your questions soon. icon_bump.gif

popcorn[1].gif

List the parts you need. I'm sure I don't have much but there are alot of guys here that do.


OK, in order to do the proper conversion that Jake outlines I am in need of the following items.

2.0 Crank
2.0 connecting rods

I found a set of AA 94mm piston cylinder set so all I need to fully convert this sucker is the crank and connecting rods. If anyone has them please let me know and how much with shipping of course. I would rather do a proper conversion than just a half assed job.

The remaining items, bearings etc, I can get easy once I do the requisite measurements on the crank, etc.
I'll be standing by for any assistance you all can give me. beerchug.gif


http://dprmachine.com/Html%20Files/cranks_type_4a.htm

Here is a place in Santa Ana that has 2.0 cranks and connecting rods. There about 10 miles away from me.

Smitty
stephenaki
QUOTE(Smitty911 @ Jul 8 2008, 07:58 PM) *


http://dprmachine.com/Html%20Files/cranks_type_4a.htm

Here is a place in Santa Ana that has 2.0 cranks and connecting rods. There about 10 miles away from me.

Smitty


Thanks, pretty reasonable price for the stock stuff, any experience with them at all?
stephenaki
OK, edumacate me everyone. I looked at the site that Smitty sent me and on the connecting rods there were two options, stock 2.0 and balanced 2.0. What is the difference and, if I just get a stock 2.0 crank, which set of connecting rods is better? blink.gif
stephenaki
Two things to update today; first is status of crank and connecting rods, second is did some cleaning up of the crankcase and heads.

I called the guys in Santa Ana that Smitty provided the website to and then emailed them requesting a total quote for the crank, a set of connecting rods and shipping. Haven't gotten anything yet; Smitty, I may be hitting you up to go and get what I need from them and arrange to pay you instead.

I took the crankcase and heads over to post today to clean them up and planned on removing the valves and springs to inspect the head further. Didn't get to the valve removal, ran out of time. I did get a good amount of the crankcase cleaned up but still have more to go. The cooling fins are a bit rough but not unserviceable. Cleane quite a lot of gunk off the case halves but sill have more to go. Also got a basic cleaning done on the heads and hope to pull the valves off this week.

I did notice on one of the exhaust manifolds that I was missing a set of studs and one of those holes already had evidence of a helicoil in it. The other hole was completely baren so will need a new stud put in. No problem, I will do that before I re-assemble the engine.

I did a search on media blasting for the case and heads and couldn't find much as most of the posts were on media blasting the car shell. I know that Andy is not a big fan of media blasting, anyone else have any experience? I want to make sure the heads and case are clean enough to eat off of and all the gunk is gone completely and, the solvent tank isn't completely cutting it. Feedback please, thanks. biggrin.gif
stephenaki
OK, so after doing some studying yesterday morning I headed out for the autocraft shop to work on the cylinder heads. piratenanner.gif

The goal was to finish the dismantle and clean up the heads and valves for inspection. First problem, none of the valve compressors they had worked for the cylinder! They didn't have a pneumatic one like I used back state side so after about an hour of screwing around I wound up using a big ass "C" clamp and socket to compress the valve then shake the shit out if to get the keepers to fall off. Typical Army solution to a lack of proper tools. It worked. And for those that are wondering, here is a picture of my solution.
IPB Image

Needless to say I screwed around trying to get the spring compressors to work before I did the "C" clamp solution so only got a couple of valve springs and keepers off. I had to go to Ikea with the wife to get some other things so didn't get to stay as long as I wanted too.

So, today, I finished the job. Again, had to do some studying first for my exam. That's always fun translating sentences into Sie, du and Ihr form then making them questions and imperatives in each form. blink.gif

I went back to the autocraft shop around noon and immediately got a socket and "C" clamp to finish the job. So got all the springs and keepers off but none of the valves would come out. Feel around the top and there was an edge built up of metal, not carbon. Well, no sandpaper so I took a fine file and carefully worked off all the edges. Had to do this to every valve.

After about 3 hours of work I got all the valves our and cleaned up and also cleaned up the heads a bit. As you can see by the pictures, no cracks in the heads, this a good thing! They will still need a valve job though just for GP.
IPB Image
IPB Image
IPB Image
IPB Image

I don't have any good pictures of the valves but they are in good shape overall and can be re-used. The biggest issue is on one of the heads the valve guide on the bottom was flat for a lack of a better description. If you look closely at the picture you will see what I mean.
IPB Image

So, does this mean I will need to replace the guides on this sucker? my assumption is yes but I would like some more experienced input on this. Only one head had this problem, the other head was fine. Play in the valves was very minimal from what I could feel but I didn't have a dial indicator to double check this.

I head back this week after my exam to finish cleaning the crankcase and, when all the Germans come back from vacation, will take the heads and valve's in for cleaning up and a valve job and the crankcase in to be checked for alignment. Will probably take the tin in this week as well and get it cleaned up. I am going to cheap out on the tin and paint it myself once it is completely cleaned and rust treated. When I do the body off restoration I will have it powder coated.

I did get my crankshaft and connecting rods ordered thanks to Smitty's link to the place in California. Once those parts come in I will take everything to get balanced. Slowly making progress; the biggest pain is waiting for parts because even though you can find them here in Deutschland, it is cheaper to buy and ship them from the states. Go figure. Gotta do more studying. beer3.gif
hcdmueller
Glad to see you are making progress. I feel your pain on getting parts. I have spent a lot of time searching for parts over here with very little success. The parts are here but they are usually twice the price at best.

I also feel your pain on getting work done here. I have actually sent stuff back to the states for machine work and gotten it back faster and cheaper than I would here.

I should have mine up and running soon. I hope yours goes well too.
r_towle
To answer your question regarding the valve guides. First, assume they need to be replaced and go from there to prove that assumption wrong.

They all wear out.
Put each valve in its guide and measure the side to side play at the top of the valve stem. The spec and the procedure are in the haynes manual and the shop manual....just read...

The heads may have cracks that you cannot see.
Clean the combustion chamber much better...till there is no carbon left.
If you can find a place to heat them up, great...do that...
If you can get them to 300-400 degrees, the cracks may get large enough to see...then once cool, wipe with ink...ink is super thin and seaps into the crack really well.

Rich
stephenaki
QUOTE(r_towle @ Jul 20 2008, 06:12 PM) *

To answer your question regarding the valve guides. First, assume they need to be replaced and go from there to prove that assumption wrong.

They all wear out.
Put each valve in its guide and measure the side to side play at the top of the valve stem. The spec and the procedure are in the haynes manual and the shop manual....just read...

The heads may have cracks that you cannot see.
Clean the combustion chamber much better...till there is no carbon left.
If you can find a place to heat them up, great...do that...
If you can get them to 300-400 degrees, the cracks may get large enough to see...then once cool, wipe with ink...ink is super thin and seaps into the crack really well.

Rich

I don't think the autocraft shop has a dial indicator but I plan on checking. I need to get a new scotch pad to clean up the heads a bit more, this weekend was the first cleaning.

I will have Christoph do a better check for cracks as I don't have the ability to heat up the head as you recommend. Now, if the valves measure within tollerance the question is do the two guides on the one head have to be changed regardless based on one side being kinda flat.
Smitty911
QUOTE(stephenaki @ Jul 21 2008, 01:12 AM) *

QUOTE(r_towle @ Jul 20 2008, 06:12 PM) *

To answer your question regarding the valve guides. First, assume they need to be replaced and go from there to prove that assumption wrong.

They all wear out.
Put each valve in its guide and measure the side to side play at the top of the valve stem. The spec and the procedure are in the haynes manual and the shop manual....just read...

The heads may have cracks that you cannot see.
Clean the combustion chamber much better...till there is no carbon left.
If you can find a place to heat them up, great...do that...
If you can get them to 300-400 degrees, the cracks may get large enough to see...then once cool, wipe with ink...ink is super thin and seaps into the crack really well.

Rich

I don't think the autocraft shop has a dial indicator but I plan on checking. I need to get a new scotch pad to clean up the heads a bit more, this weekend was the first cleaning.

I will have Christoph do a better check for cracks as I don't have the ability to heat up the head as you recommend. Now, if the valves measure within tollerance the question is do the two guides on the one head have to be changed regardless based on one side being kinda flat.


Forget the ink, if your in an Aircraft Shop or have one nearby ANY of the inspectors should have some Liqued Penetrant. Ask them to check your heads or borrow it. For Aluminum you shouldn't need to heat them up if you use a level I pen. It's either BLUE or RED. You can also ask a Welder for some except you may have to ahh an Explitive to the Blue or Red word. biggrin.gif

Smitty
stephenaki
Well, the crankshaft and rods came in last week Tuesday however, I was on a plane to Tel Aviv, Israel on Wednesday and just got back today. Needless to say I haven't don't anything yet with the engine. I am hoping to drop off the parts to be balanced this week as Christoph should be back from vacation. Will have him order the bearings since their cost is negligible.

If my luck holds I'll have everything back by the end of the month and start re-assembly. beerchug.gif We shall see what the future brings. By the way, Israel, lot like southern California in its terrain except they speak Hebrew. Tel Aviv was similar to NY City in that they didn't seem to sleep there, I got up at 0200 this morning to take an early morning flight and there were all kinds of people out and about. blink.gif
ThinAir
This is a great thread. I really appreciate all the photos and descriptions of what you are finding.

Can you post a link to the article on Jake's site that you've mentioned? I seem to have a collection of 1.7s that could be candidates for 2.0 conversions. I'm really glad to know about DPR since I have a 2.0 with a frozen rod bearing (don't ask) and I know that when I eventually rebuild this engine I'll need their services.
stephenaki
QUOTE(ThinAir @ Aug 9 2008, 02:36 PM) *

This is a great thread. I really appreciate all the photos and descriptions of what you are finding.

Can you post a link to the article on Jake's site that you've mentioned? I seem to have a collection of 1.7s that could be candidates for 2.0 conversions. I'm really glad to know about DPR since I have a 2.0 with a frozen rod bearing (don't ask) and I know that when I eventually rebuild this engine I'll need their services.


Sorry it took me so long to respond but I have been a bit busy at work as of late and not exactly in country. The link is:

http://forums.aircooledtechnology.com/showthread.php?t=2328

you may have to sign up for a free membership to view the forums but he has a lot of great info there.

On a different note, the engine component parts were sent for balancing last week and should be ready. I ordered the gaskets, seals, etc from Jake and they are on the way. Unfortunately, the rebuild is now on hold as I got told this afternoon to pack my stuff cause I'm heading to a country that shall remain un-named to stand a team up to do??? Needless to say I will be gone until mid-October if not longer. Just when I thought I was making progress!! av-943.gif

I had managed to avoid a third trip to Israel but by doing so got tagged with this new mission. Son of a bitch! I am gonna get a quote from Christoph to see how much he'll charge me if I just give him the rest of the parts and let him finish the rebuild and install the engine. I head out this Sunday so need to make some quick arrangements as my wife is currently stateside and my middle son, he's 19, is here. He gets to live alone for a couple of weeks until my wife gets back.
stephenaki
OK, I'm back from my adventures in the Republic of Georgia. piratenanner.gif Did you know that a two lane road can fit 4 cars abreast if you really try? I thought Italians were crazy drivers! blink.gif

I got back this past Friday and, after some honey do's, started to take stock of what I have to to on the engine. I need to pick up some lubricants and get the appropriate assembly chemicals together before I can start. Looks like Christoph ordered me a set of gaskets and seals so now I have two sets.

Took all the tin and pushrod tubes to the powder coater for blasting, metal straightening and powder coating. Doing the tin in Ferarri red! Hope to re-assemble the heads this week once I can find someone with a decent valve spring compressor, may have to buy one as the 'C' clamp and socket solution works great getting the springs off but not so well getting them back on.

I wanted to start this weekend but the wife wants to go to a crystal factory sale near Ansbach and then we are driving over to the Czech Republic for the day so I won't get anything done this weekend.

As I start down the engine re-assembly road, any advice, tips or tricks that will make this job a bit easier? I really miss NAPA, O'Reily's, Autozone, etc.
stephenaki
OK, Tin's back along with the fan housing and push tubes from the powder coater. Yes I know, need pics, will try to get and post some this weekend. I am hoping the Crankcase and rod bearings will be in tomorrow. If everything is in I can finish putting the crankshaft back together this week and hopefully start motor assembly this Sunday.

I would do it on Saturday but we are hosting a party at the house so I have to cook and clean. It's a very non-traditional Christmas with Ceviche, Kalua pig and Chook. chowtime.gif That's what you get from half a Chinaman raised in Hawaii. Hope everyone has a great Christmas and maybe I'll get the motor done before then! santa_smiley.gif
stephenaki
OK, I think my car has a curse on it or something to that effect. huh.gif I called Christoph this morning, bearings are in...WOOHOO! He wants me to bring a connecting rod with me so we can test fit the rod bearings as well, no problem. Take off at ten, swing by the house, pick up the connecting rod and wife and off we go.

Get to Dotternhausen and walk into the shop; for those that are interested, his website is www.boxmot.de, ist nur auf Deutsch.

Christoph pulls out the crank bearings and we slide them on...perfect! He yells for Udo to undo the nuts on the connecting rod then wanders off while Udo takes a rod bearing and puts it in...ok, tries to put it in. NOPE headbang.gif

So he measures the inside of the connecting rod assembled, 52, measures the bearings put together 55. Holy shiessa! Thats waaaaaaaaaay off! Well the next 30 minutes are spent trying to figure out what happened but when it is all said and done the crank and connecting rod are at Christoph's place so he can make sure the next set of bearings are the right fit. Damnit, so close!.

On a positive note, I borrowed a metric tap and die set from the autocraft shop and cleaned up all the holes and studs. Need to finish cleaning the left half of the case and then will stick it into a platic bag to keep the dust off of it. Had the boy clean all the studs before I put them back on and had him cleaning the impeller as well. I had hoped that I could have the engine reassembled before the 24th but that I think is now out the window. Good thing my wife is understanding, for that matter good thing I am otherwise Christoph would have gotten an ear full. Oh well, stuff happens, no sense getting too worked up about it cause it won't change it.

Stay tuned for more misadventures of the 914 chronicles screwy.gif
Dave_Darling
Sounds like you got 1.7/1.8 bearings instead of the 2.0 ones...

--DD
stephenaki
QUOTE(Dave_Darling @ Dec 15 2008, 07:41 AM) *

Sounds like you got 1.7/1.8 bearings instead of the 2.0 ones...

--DD

Dave,
Yep, that would be exactly the problem. I wrote the part number on my hand then cross referenced it with the AA catalog and that is exactly what popped up. Right size, wrong rod. Not sure if I wasn't clear with Christoph that I had 2.0 rods or if the guy he place the order with didn't understand it. Regardless, she ain't getting put together before Christmas as the French say, "Say la vie."

I'll just clean up some of the other parts while I wait for the correct bearings...oh yeah and I gotta drink the beer I have left from my party! Andecks Doppel Bock, 7.1% alcohol content it kicks ass! beer3.gif I'll definitely miss the beer when I leave Germany. huh.gif
stephenaki
Called Christoph today, again I need to reiterate my hypothesis that my car is cursed, he was able to get 2 connecting rod bearings in the right size but was having trouble finding 2 more. Needless to say, I still can't put my damn motor back together yet! mad.gif headbang.gif

So, he is still looking and I sent a couple of emails out and finally found a set at PP; their web-page said they had 4 sets of 2.0L (.25) German bearings in stock and I got an email stating they would ship on Monday. I'm not going to believe it until I get the notification that they actually shipped. So much for my weekend plans to do some final cleaning and then start assembly.

I may yet do the cleaning and do an inventory of parts to make sure I have everything I need then lay it out for assembly. Problem I will run into is I am taking my son skiing end of next week and when I get back we roll into a big exercise that will keep me busy for the next couple of weeks. It is looking now like February before I get the car up and running.
stephenaki
The bearings are in and they fit! The crank is re-assembled, were ready to rock and roll baby!! piratenanner.gif

I got the rod bearings in yesterday and took them out to Christoph at lunch today along with the distributor drive gear Circlip (it was hiding in the packing popcorn of the box that I had the old crank in). So, while I was there, we checked fitment of the rod bearings...perfect and then Christoph began the crank re-assembly while I stood by and observed.

OK, everything says "press" this off, "press" this on...yada, yada, yada. So far none of the Germans that I have worked with have used a press. They used a puller to get the drive gear and timing gear off and then Christoph brought out a high speed heat gun, big ass adjustable wrench and soft face hammer to put the gears back on. They also had the Porsche 914 factory book out and used it as a reference to make sure they put things back together correctly.

Unfortunately, they got the timing gear on the wrong side forward the first time and had to pull the gear and redo it. Christoph did offer to give me the factory book to use for motor re-assembly but between this forum, my Haynes and the other books I have I think I should be good. Besides, mein Deutsch ist nicht sehr gut und, I would spend more time translating than actually working on the car.

I plan on laying everything out and setting up my workspace tomorrow but wont' be able to get to re-assembly until probably next weekend as I head to Oberamergau to go skiing and snowboarding this weekend. Will try to get a picture of everything layed out tomorrow time permitting. Its been almost a full year from the time I picked the car up in Sicily, Italy and this adventure began. Hopefully I will be able to close the first chapter by the end of February and have her on the road. Wish me luck. rolleyes.gif
stephenaki
Finally got around to getting some pictures of the powder coating work that I had done on the tin. The color is Ferarri red for most of it with the push tubes being high temp flat black.

IPB Image

IPB Image

IPB Image

IPB Image

Will take the crankcase halves in this afternoon for a final steam cleaning and wrap them up until I start assembly.
stephenaki
Progress is being made, slow, deliberate and educational but progress never the less. So Friday evening I cleaned up all the case bolts by soaking them in simple green then brushing them with a toothbrush and brass wire brush. Also soaked them in Evaporust to get any rust off them and treat them.

Saturday I got the crankshaft assembled with the rods mounted and properly torqued. I spent the rest of the day reading, researching and taking daughter to a birthday party so didn't get to do much more other than set the garage up for assembly. A picture of the assembled crank.

IPB Image
Put it together in the basement.

After a posting and some answers I was ready to start assembly...oh wait, I don't have a stand that will fit it. Crap, not only was my stand occupied but it wouldn't work for the Porsche motor. So, after some careful thought I chose the redneck solution and built a stand out of 2x2s.
IPB Image
Its actually sitting on oil absorbing material which is set on a furniture mover! Simple and efficient only one problem. I built it for the wrong case half! Dangit! Well, I don't have time to re-build another one so...we move to contingency plan 'b' or what I call the 'ghetto redneck' solution.
IPB Image
Just grab the scrap 2x2 wood, turn the original redneck stand around and carefully place things and...wella!

Thus began the insertion of the bearings, lube, etc. OK, lining up the #1 and 4 crank bearings with the dowel rod is easier said than done. After initial assembly with what I thought was a properly lined up bearing I turned the crank. Didn't turn easy, maybe it's just this type of motor? So, post another question about turn resistance, sit, contemplate, get annoyed, go back out and pull the case apart again and start over!

This time I took off the bearings, placed them in the case and then made alignment tics on the bearing and case. This time when the crank went in my son and I lined up the tick marks before putting the case back on. Finger tighten the nuts and bolts, spin the crank. BEAUTY!! Spun much easier, clearly didn't have the bearings lined up to the dowel pin correctly the first go around. Finished torquing the case bolts and nuts and called it a day. Covered the motor with plastic to keep dust out and closed up the garage.

Would have liked to do more but it was 33 degrees here in Stuttgart and my little heater couldn't keep up. Besides the outlet in the garage and the light don't work very well. Landlord paid the lowest bidder to wire the place so it tends to flip the breaker consistently. Well before I close this out, one last picture. My son Alex with his broken wrist; he broke it snowboarding last weekend which kinda set back his basic training date for the air force.
IPB Image

Hopefully I can slap on the pistons and cylinders next weekend and finish most of it off. Have to check endplay of the crank but will need to get a dial gauge as the autocraft shop here doesn't have one. I feel better now that I am moving closer to finishing the engine. smile.gif
stephenaki
OK, so, after discussion and reading on deck height and some other things I made some progress today. Unfortunately, not as far as I wanted as I was missing some washers. So, I will head out to Boxter tomorrow and get some cylinder head stud nuts and washers.

Still, I got the pistons and cylinders in and heads on along with the oil pump. Of course I had to roll the motor into the living room in the house to do it but it got done. It was a balmy 20 degrees here this morning and there was no way I was going to work in the garage without heat! Good thing the wife had errands to run but she still came back to a bit of a mess that I cleaned up later on. So for those interested, some photos. Yes, that's a Dora the explorer backpack in the background. Had to move the daughters table and chairs out of the way!

IPB Image

IPB Image

IPB Image

IPB Image

stephenaki
Well, did you ever get the feeling the automotive gods gazed down on you and with a twinkle in their omnipotent eyes and smirk they say..."he is not worthy, smite him and cause him pain!!" Yep, I would be the ire of which they speak, the sliver in their finger, the thorn in their side, the fly in their chardonay...

So, I finally got the endplay worked out and had the case cleaned as well as the broken oil dipstick tube removed. The plan was to assemble today, drop off at Christoph's tomorrow and pick up a running car upon my return from Scotland. Well, we have a saying in the Army, maybe I have said it before, I can't remember but, it is simply, "no plan survives first contact." ar15.gif

This is why we develop contingency plans, branches and sequels...That may work in tactical operations but it doesn't do so well with motor assembly. I came home at lunch, cut the grass and then slapped in the crank and put the two case halves together to check end play. Now, my son is now gone, he is probably getting yelled at right now by a drill sergeant so I don't have a second set of hands to help me out. No problem, carefully line up the bearings, check to make sure they are in the correct position, feels good, looks good, must be good! NOT! lol-2.gif lol-2.gif

Crank turns easily and the bearings don't rotate. I am positive number 3 and number 4 are seated and number 1 isn't moving either. Put on the other half and torque the 6 thru bolts. Damn, she doesn't turn! Hell! now what. OK, don't panic, loosen the nuts, take the case apart and make sure things are seated correctly.

hmm, crank still won't turn, damn, I gotta go back to work. Will check when I get back.

So back to work, leave at about 1500 and head home to work on the motor. Pull the crank out of the case, dang, the #1 bearing is stuck! This isn't good, well a little tapping and she comes off. Inspect the crank, no burrs or any damage, inspect the bearing, dang its damage! You can see where its pushed in just a bit and an edge flat. What the hell just happened?! WTF.gif

Well it took me a bit until I figured it out, well, I hadn't noticed it before but there is small hole right next to the dowel pin hole that is just a bit shallower but the same diameter as the dowel pin. Sooooo, when I was checking to see if the bearing was seated it was in the shallow hole and not the correct dowel pin hole. headbang.gif

Because of this when I put the case together and torqued it down the pin pushed the bearing in. Guess I need a new #1 bearing. I can't seem to catch a break on this car! It's a good thing I have become much more patient as I got older or I would have probably torched the car and motor by now. blink.gif

So, tomorrow, since I have off, I will be scrambling to find a new #1 bearing. If I can find one then I can get the motor assembled and get it to Christoph's shop Saturday morning. If not, I'll get it on order and put it together when I get back from Scotland. I will run over to the VW dealer in the morning and see what they can do for me. Wish me luck! In the meantime, I'm gonna drink me a Belgium beer and clean the house so I don't have to do it tomorrow before I depart. beer3.gif beer3.gif
stephenaki
Well, after a couple of weeks and a motorcycle trip to Scotland and back I'm back on track to finishing the motor. I received the new set of crank bearings yesterday from Type IV and got a chance to fit everything together today.

I would have done it yesterday but, I was a bit immobile. I pulled my lower back out of wack at the gym so couldn't really do much other than hobble around and lay around. When the bearings came in it was a bit of a slap in the face as the box looked at me and said, 'HA, WHATCHA GONNA DO ABOUT IT BROKE DICK!!!!' bootyshake.gif

Well, what I did about it was go see the Doc on post who proceeded to unpretzel me with some chiropractic type moves. He said my spine and miscellaneous bones were out of wack and he proceeded to correct that.

It wasn't until I left the office though and stuck the Tens machine on me that the pain went away and I was able to actually do shit! WOOHOO!! piratenanner.gif First things first, check to make sure the bearings are the right size! Yep, now, put the half up with the dowel rods and fit all the bearings properly then mark them!

After that I spent the next couple of hours hand cleaning the mating surfaces and transferring some studs from the old case halves to the new one. Once everything was cleaned up and dry I began to assemble the case with bearings to check endplay. This time I make sure everything was lined up and the crank spun freely before I torqued it down.

That went well but had to have the wife help me get the assembled case down from the work bench. Normally an easy task for me but not when you have a hurt lower back and don't want to re-injure it.

Slapped on three shims, thick ones all at .38mm, torqued the flywheel down and took some measurements. .004mm WOOHOO!! piratenanner.gif piratenanner.gif piratenanner.gif I didn't mess with it anymore but I have more shims than I can shake a stick at in some smaller sizes so all I have to do now is mix and match till I get the right measurement. I will do this tomorrow but sitting on the ground made my back sore so stopped for today.

Hopefully things will go well tomorrow and I can start final assembly; keep your fingers crossed!
stephenaki
Well, after a full day the motor is 98% complete! Why not a 100%? Because the &*&(*&^%$# valve adjustment screw on the #2 cylinder exhaust valve busted!!! I swear their is some mischievous Menehune (Hawaiian Leprechaun) running around my place just mucking things up! mad.gif

Well, be that as it may, he will not defeat me, if nothing else I'm a persistent SOB and will never surrender to defeat! happy11.gif

So, I just finished installing the shims, and flywheel with the seal and put in the front seal as well. I only got the #1 cylinder valve clearance adjusted before the #2 cylinder valve screw issue.

I loaded her up into the van along with the tin and remaining parts and will take it over to Boxter tomorrow to have them finish it up. Not much has to be done but they can get it done faster than I can.

I'm thinking when I get my MG finished and tear the 914 down for a complete resto of doing a subie conversion or just forking out the dough and getting a motor from Jake. Depends on where I am at in the next few years. In the meantime, I am hoping Christoph and his crew can get it up and running by the end of next week. Stay tuned for more 914 follies! blink.gif
stephenaki
Hot damn! After almost about a year and a half she is back up and running! piratenanner.gif piratenanner.gif piratenanner.gif

I called Christoph on Monday and the motor was running great, he was finalizing some brake details and plumbing the heat exchanger system and told me it should be done today.

I called him today, yup, she's done! Couldn't pick her up yet though as he was waiting for the TUV to get me the historical certification so I can be exempt from the Umwelt laws.

So, I am to call him tomorrow to see if the TUV guys need to come out to see the car again, hopefully not and I can pick her up tomorrow. Still will need to do some things like put in new seals to the targa top so she doesn't leak but I can do that after I get her back. Will have to maneuver the car and bike both into the small garage but I am sure it won't be a problem.

Will get some pictures when I get her back. I'm just glad she's finally done! At least until I get my MG back together and strip her down completely for a full resto-mod! But that will have to wait a bit. Anyone want a pair of centerline racing rims? I got 4 that I want to get rid of! I'm going to see what I can find on the local market here in Deutschland. With so many small 4 lug cars I may be able to find a nice set of rims that work.
Gustl
QUOTE(stephenaki @ Jul 10 2009, 06:37 PM) *

Hot damn! After almost about a year and a half she is back up and running! piratenanner.gif piratenanner.gif piratenanner.gif

congrats smilie_pokal.gif

let me know when you're ready for a little tour driving.gif

beerchug.gif Gustl
stephenaki
QUOTE(Gustl @ Jul 10 2009, 11:06 AM) *

QUOTE(stephenaki @ Jul 10 2009, 06:37 PM) *

Hot damn! After almost about a year and a half she is back up and running! piratenanner.gif piratenanner.gif piratenanner.gif

congrats smilie_pokal.gif

let me know when you're ready for a little tour driving.gif

beerchug.gif Gustl


Hopefully, I'll get a chance to run up your way late July or sometime in August. I called and talked to Christoph and the TUV guy wanted him to do some minor welding on the floorboard to repair a crack and there was some fluid leaking out of one of the calipers. I need to call him again on Monday as I forgot to ask which one as he was trying to figure out the English word for caliper. Scheiben?

He did think I would be able to pick it up on Wednesday. I will probably put her up on the lift at the auto shop and do a complete brake system inspection when I get her back to make sure all the pads, rotors, calipers and lines are good. Will more than likely replace all the rotors and pads then rebuild the calipers later on down the road. Especially if I get re-assigned back stateside and plan on running all the way down to Sicilia to put the car on a boat to the states.

Will let you know how things turn out and, once I get the car back, plan a trip to visit you!
This is a "lo-fi" version of our main content. To view the full version with more information, formatting and images, please click here.
Invision Power Board © 2001-2024 Invision Power Services, Inc.