|
|
|
Porsche, and the Porsche crest are registered trademarks of Dr. Ing. h.c. F. Porsche AG.
This site is not affiliated with Porsche in any way. Its only purpose is to provide an online forum for car enthusiasts. All other trademarks are property of their respective owners. |
|
|


| proto31 |
 Sep 8 2008, 12:21 AM Sep 8 2008, 12:21 AM
Post
#41
|
|
Member  Group: Members Posts: 413 Joined: 2-February 06 From: Costa Mesa, CA. Member No.: 5,515 Region Association: None |
So, I started my new project (Thomas's old project). The shell was originally aubergine, then painted yellow. Thomas had stripped all the undercoating and removed all the exterior paint. I plan on having the entire shell walnut shell blasted to remove the last of the interior paint. Thomas had also installed the "6" engine mount and the chassis stiffening kit. I have removed the mounting hardware for the window washer tank. This weekend I have started installing the steel AA GT flares. Front and and rear left GT flares were installed. I dismantled the 3.0 engine that I will be using, the heads are off to be rebuilt, the rods balanced, the crank balanced and micro polished, the rockers rebushed and resurfaced, and the flywheel and pressure plate balanced. I'll be running carbs and a 911-01 transmission. More to follow.
Attached thumbnail(s) 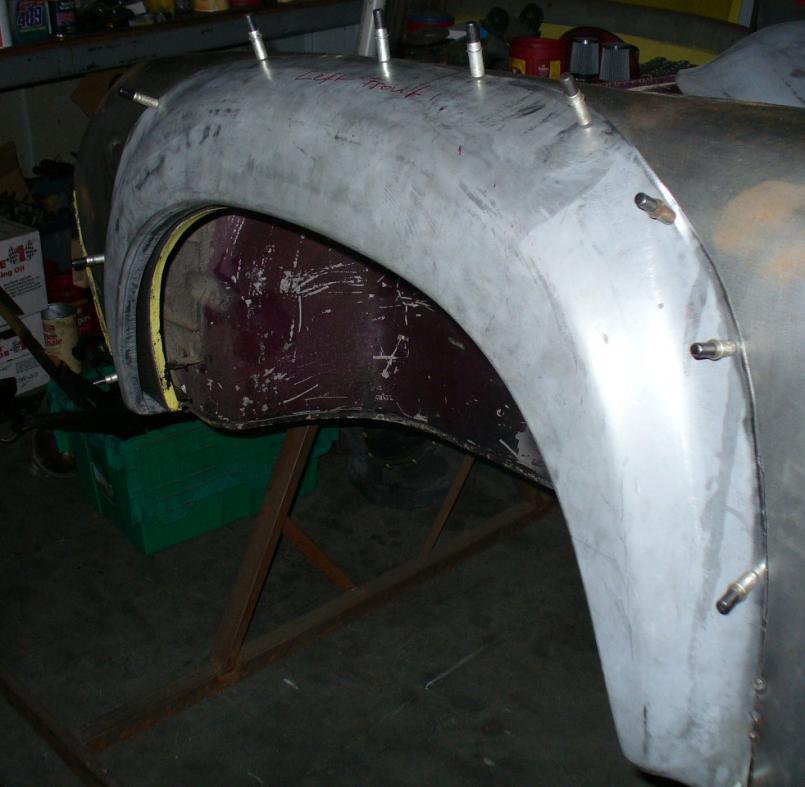 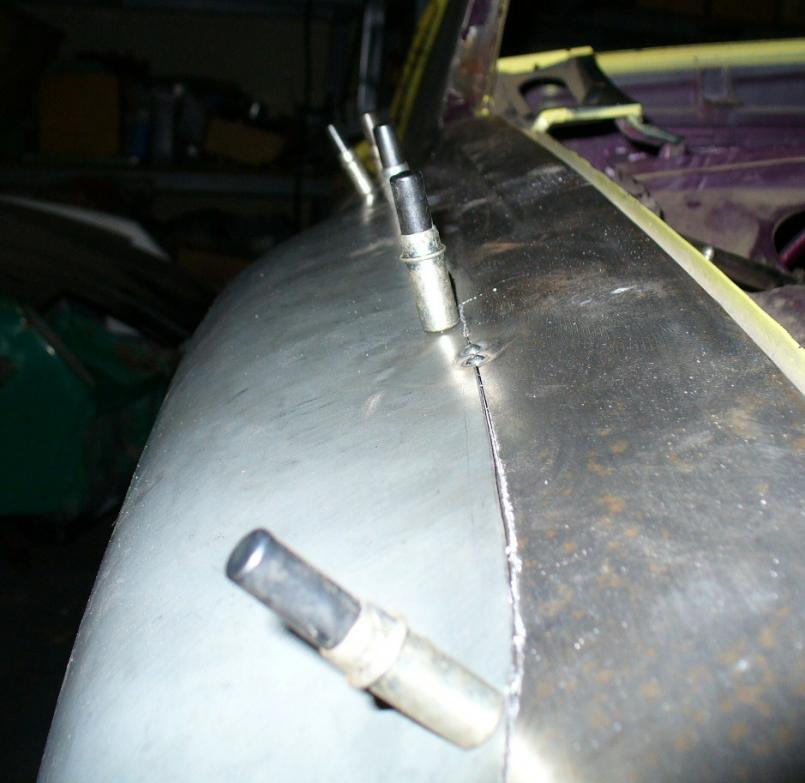
|
   |

 
|
Posts in this topic
 proto31 New Six Conversion Build Thread Sep 8 2008, 12:21 AM
 tronporsche HHHmmmmm, somethin is telling me this is gonna be ... Sep 8 2008, 02:49 AM sww914 Cleco fasteners are good, but this seems like a pe... Sep 8 2008, 12:00 PM proto31 Thanks for the Tip! I had the Clacos lying aro... Sep 8 2008, 01:12 PM LarryR Subscribing looks like it will be an interesting b... Sep 8 2008, 11:41 PM r_towle post some more pics...
Rich Sep 9 2008, 07:36 PM Lou W This is gonna be a great build, I really liked thi... Sep 9 2008, 07:52 PM proto31 So, I finished all the steel flares last weekend. ... Oct 5 2008, 12:20 AM proto31 Some more
Oct 5 2008, 12:25 AM proto31 More
And here's one of Thomas working on ... Oct 5 2008, 12:32 AM Todd Enlund Are you going to return the car to Aubergine? Oct 5 2008, 02:28 AM
tronporsche HHHmmmmm, somethin is telling me this is gonna be ... Sep 8 2008, 02:49 AM sww914 Cleco fasteners are good, but this seems like a pe... Sep 8 2008, 12:00 PM proto31 Thanks for the Tip! I had the Clacos lying aro... Sep 8 2008, 01:12 PM LarryR Subscribing looks like it will be an interesting b... Sep 8 2008, 11:41 PM r_towle post some more pics...
Rich Sep 9 2008, 07:36 PM Lou W This is gonna be a great build, I really liked thi... Sep 9 2008, 07:52 PM proto31 So, I finished all the steel flares last weekend. ... Oct 5 2008, 12:20 AM proto31 Some more
Oct 5 2008, 12:25 AM proto31 More
And here's one of Thomas working on ... Oct 5 2008, 12:32 AM Todd Enlund Are you going to return the car to Aubergine? Oct 5 2008, 02:28 AM
 rick 918-S
Are you going to return the car to Aubergine?
Y... Oct 5 2008, 09:21 AM SLITS Tell that damn Kraut to wear welding goggles befor... Oct 5 2008, 10:10 AM Gint Can't you see the man is trying to get a tan? Oct 5 2008, 12:32 PM dakotaewing Is that beam solid, or rectanglar tubing/channel?
... Oct 5 2008, 05:11 PM proto31 I told Thomas to stop staring into the light... Hi... Oct 5 2008, 07:32 PM jmill Adding that beam is a great mod. I like it. I ju... Oct 5 2008, 08:29 PM proto31 Here are some photos from Armando Serano's web... Oct 5 2008, 10:29 PM ajserrano
Here are some photos from Armando Serano's we... Jan 16 2010, 12:10 PM jmill Thanks for digging those up. Thats just what I wa... Oct 6 2008, 07:27 AM proto31 Well, I finally got around to working on my car ag... Jul 12 2009, 11:36 PM 396 Congrats on your new project! Jul 13 2009, 01:39 AM RobW Neat. Adopt me. Jul 13 2009, 01:47 AM nsr-jamie Cool! Looks like its going to be an excellent ... Jul 13 2009, 06:37 AM proto31 Well, I've made a lot of progress over the las... Aug 6 2009, 05:25 PM 914Sixer Sweet looking !!!!!! Aug 6 2009, 05:28 PM PanelBilly Your working way too fast. Aug 6 2009, 07:36 PM greenie
Your working way too fast.
:agree:
Looking ... Aug 6 2009, 07:48 PM Travis Neff It's been a little later, where's the pics... Aug 7 2009, 11:25 AM proto31
It's been a little later, where's the pic... Aug 7 2009, 11:31 AM jt914-6 What cams are you going to use with the carbs?????... Aug 7 2009, 02:31 PM proto31 You my friend have taken your 3.0 liter to a whole... Aug 8 2009, 12:15 AM proto31 Here's some pics:
Seam sealer
More
Unders... Aug 8 2009, 01:18 AM jt914-6 Since you are using a 3.0 SC engine with carbs, yo... Aug 8 2009, 05:29 AM proto31 So, here are some updates. I'm extremely happy... Aug 23 2009, 11:14 PM proto31 And now for the fun part. I painted the car in my ... Aug 23 2009, 11:27 PM proto31 A few more:
Here's Thomas helping out wit... Aug 23 2009, 11:37 PM Heeltoe914 Very nice job Love the fact that your doing it all... Aug 23 2009, 11:40 PM proto31 And finally the car (not the doors and hoods) are ... Aug 23 2009, 11:48 PM Travis Neff :trophy:
That looks great! Aug 24 2009, 01:23 AM greenie You are doing fantastic work! Great color... Aug 24 2009, 10:33 AM proto31
You are doing fantastic work! Great color... Aug 24 2009, 06:37 PM proto31 It's been a few weeks, I've got some updat... Sep 11 2009, 12:19 AM proto31 another:
Wiring harness installed:
Rebuilt p... Sep 11 2009, 12:27 AM proto31 another:
Rebuilding the shift lever:
Installin... Sep 11 2009, 12:35 AM proto31 Rebuilding the windshield wiper assembly, zinc pla... Sep 11 2009, 12:41 AM rick 918-S That is going to be one fine car. Nice work. Sep 11 2009, 07:41 AM Rod Fabulous build. Looking forward to see how you pr... Sep 11 2009, 02:21 PM proto31 I've got a set of 7 and 8 fuchs that I'll ... Sep 11 2009, 04:05 PM AgPete139 Looks good, Dan! Man, you are moving quickly... Oct 17 2009, 11:10 AM PanelBilly Now I told you this before and you're not payi... Oct 17 2009, 11:40 AM McMark Amazing job.
I would do charcoal/gray on the whee... Oct 17 2009, 11:09 PM pete-stevers you could do something different for the wheels, l... Oct 19 2009, 12:32 AM Gint Just swipe the wheels off Thomas's car. They ... Oct 19 2009, 08:02 AM proto31 Swiping Thomas' wheels would be the easiest ro... Oct 22 2009, 12:14 PM proto31 Here's some pics of the beginning of the engin... Oct 22 2009, 11:08 PM proto31 The carbs, completely rebuilt, ultrasonically clea... Oct 22 2009, 11:10 PM proto31 Rear brake hard lines, with T instead of proportio... Oct 22 2009, 11:15 PM proto31 Headlight installation-
Rear sway bar (stock)-
... Oct 22 2009, 11:18 PM cwpeden It may have already been mentioned, but I think yo... Oct 23 2009, 03:11 AM bcheney You are doing a VERY nice job with all your work. ... Oct 23 2009, 05:50 AM proto31 I got my oil line from Rebel Racing, they are orig... Oct 22 2009, 11:28 PM proto31 Here's some previews of the front and rear sus... Oct 22 2009, 11:35 PM proto31 Front rotor (picture of just one)-
Misc. Cool ... Oct 22 2009, 11:39 PM Travis Neff Bada-bump! Nov 26 2009, 10:40 PM Dr Evil Thanks for the oil hose info. Great build :) Nov 26 2009, 10:47 PM geniusanthony I just went through your thread and I am impressed... Jan 17 2010, 12:09 AM proto31 So, a lot of progress has been made since my last ... Apr 5 2010, 04:05 PM proto31 Engine installed:
Front S Calipers, Thomas and ... Apr 5 2010, 04:12 PM proto31 Thomas' sway bar arms, pre-annodizing. These m... Apr 5 2010, 04:28 PM AgPete139 Any updates? Nov 9 2010, 03:20 PM proto31
Any updates?
A few updates, I've already ... Feb 27 2011, 11:51 PM proto31 The floorboards:
Feb 27 2011, 11:54 PM proto31 wheels and gauges...
Feb 27 2011, 11:56 PM AZ914 :drooley: :drooley: :headbanger: Feb 28 2011, 07:53 AM Root_Werks Man that looks great! Feb 28 2011, 12:04 PM proto31 Thanks! It's been a lot of fun so far. Any... Feb 28 2011, 04:53 PM Ferg I vote for brown/brown hounds tooth, or brown with... Feb 28 2011, 05:23 PM MDG
I vote for brown/brown hounds tooth
Ferg
+1
W... Feb 28 2011, 05:47 PM proto31 I made a shroud for the front oil cooler, I've... Mar 4 2011, 11:22 PM proto31 Some more:
Mar 4 2011, 11:25 PM speed metal army Kickass. :notworthy3d: Ive decided to stash ... Mar 4 2011, 11:56 PM proto31 Thanks man, I've had a lot of fun building it ... Mar 6 2011, 12:14 AM proto31 Dropped the seats, door panels and center armrest ... Mar 7 2011, 05:02 PM Ferg
Dropped the seats, door panels and center armrest... Mar 7 2011, 05:13 PM MDG
I'm going with Cork (original Porsche color) ... Mar 7 2011, 06:55 PM Gint It's going to be tight for Route 66, may just... Mar 21 2011, 05:41 AM Eric_Shea
He just sold it to me. :lol3: Mar 7 2011, 05:16 PM Ferg
He just sold it to me. :lol3:
Get in line..... Mar 7 2011, 05:28 PM proto31 I found some really nice (as close to NOS as you c... Mar 7 2011, 11:45 PM proto31 Some more:
Installed without bumper, stainless ... Mar 7 2011, 11:48 PM proto31 Some updates, Socal Andy came down and polished my... Mar 20 2011, 09:02 PM proto31 Thomas' car, a really nice 97' with a GT3 ... Mar 20 2011, 09:04 PM proto31 Received all the interior pieces, seats and door p... Mar 20 2011, 09:08 PM dw914er wow!!!!!!!!!... Mar 20 2011, 09:10 PM proto31 Installed all the carpet, had to remove the steeri... Mar 20 2011, 09:14 PM proto31 Thanks for the comments!
Here's the inte... Mar 20 2011, 09:17 PM Lou W Absolutley Stunning. :beer2: :beer2: :beer2: Mar 20 2011, 09:51 PM Ferg Wow :worship: Mar 21 2011, 08:16 AM Eric_Shea :confused: Isn't this car already done? :confu... Mar 21 2011, 08:48 AM
rick 918-S
Are you going to return the car to Aubergine?
Y... Oct 5 2008, 09:21 AM SLITS Tell that damn Kraut to wear welding goggles befor... Oct 5 2008, 10:10 AM Gint Can't you see the man is trying to get a tan? Oct 5 2008, 12:32 PM dakotaewing Is that beam solid, or rectanglar tubing/channel?
... Oct 5 2008, 05:11 PM proto31 I told Thomas to stop staring into the light... Hi... Oct 5 2008, 07:32 PM jmill Adding that beam is a great mod. I like it. I ju... Oct 5 2008, 08:29 PM proto31 Here are some photos from Armando Serano's web... Oct 5 2008, 10:29 PM ajserrano
Here are some photos from Armando Serano's we... Jan 16 2010, 12:10 PM jmill Thanks for digging those up. Thats just what I wa... Oct 6 2008, 07:27 AM proto31 Well, I finally got around to working on my car ag... Jul 12 2009, 11:36 PM 396 Congrats on your new project! Jul 13 2009, 01:39 AM RobW Neat. Adopt me. Jul 13 2009, 01:47 AM nsr-jamie Cool! Looks like its going to be an excellent ... Jul 13 2009, 06:37 AM proto31 Well, I've made a lot of progress over the las... Aug 6 2009, 05:25 PM 914Sixer Sweet looking !!!!!! Aug 6 2009, 05:28 PM PanelBilly Your working way too fast. Aug 6 2009, 07:36 PM greenie
Your working way too fast.
:agree:
Looking ... Aug 6 2009, 07:48 PM Travis Neff It's been a little later, where's the pics... Aug 7 2009, 11:25 AM proto31
It's been a little later, where's the pic... Aug 7 2009, 11:31 AM jt914-6 What cams are you going to use with the carbs?????... Aug 7 2009, 02:31 PM proto31 You my friend have taken your 3.0 liter to a whole... Aug 8 2009, 12:15 AM proto31 Here's some pics:
Seam sealer
More
Unders... Aug 8 2009, 01:18 AM jt914-6 Since you are using a 3.0 SC engine with carbs, yo... Aug 8 2009, 05:29 AM proto31 So, here are some updates. I'm extremely happy... Aug 23 2009, 11:14 PM proto31 And now for the fun part. I painted the car in my ... Aug 23 2009, 11:27 PM proto31 A few more:
Here's Thomas helping out wit... Aug 23 2009, 11:37 PM Heeltoe914 Very nice job Love the fact that your doing it all... Aug 23 2009, 11:40 PM proto31 And finally the car (not the doors and hoods) are ... Aug 23 2009, 11:48 PM Travis Neff :trophy:
That looks great! Aug 24 2009, 01:23 AM greenie You are doing fantastic work! Great color... Aug 24 2009, 10:33 AM proto31
You are doing fantastic work! Great color... Aug 24 2009, 06:37 PM proto31 It's been a few weeks, I've got some updat... Sep 11 2009, 12:19 AM proto31 another:
Wiring harness installed:
Rebuilt p... Sep 11 2009, 12:27 AM proto31 another:
Rebuilding the shift lever:
Installin... Sep 11 2009, 12:35 AM proto31 Rebuilding the windshield wiper assembly, zinc pla... Sep 11 2009, 12:41 AM rick 918-S That is going to be one fine car. Nice work. Sep 11 2009, 07:41 AM Rod Fabulous build. Looking forward to see how you pr... Sep 11 2009, 02:21 PM proto31 I've got a set of 7 and 8 fuchs that I'll ... Sep 11 2009, 04:05 PM AgPete139 Looks good, Dan! Man, you are moving quickly... Oct 17 2009, 11:10 AM PanelBilly Now I told you this before and you're not payi... Oct 17 2009, 11:40 AM McMark Amazing job.
I would do charcoal/gray on the whee... Oct 17 2009, 11:09 PM pete-stevers you could do something different for the wheels, l... Oct 19 2009, 12:32 AM Gint Just swipe the wheels off Thomas's car. They ... Oct 19 2009, 08:02 AM proto31 Swiping Thomas' wheels would be the easiest ro... Oct 22 2009, 12:14 PM proto31 Here's some pics of the beginning of the engin... Oct 22 2009, 11:08 PM proto31 The carbs, completely rebuilt, ultrasonically clea... Oct 22 2009, 11:10 PM proto31 Rear brake hard lines, with T instead of proportio... Oct 22 2009, 11:15 PM proto31 Headlight installation-
Rear sway bar (stock)-
... Oct 22 2009, 11:18 PM cwpeden It may have already been mentioned, but I think yo... Oct 23 2009, 03:11 AM bcheney You are doing a VERY nice job with all your work. ... Oct 23 2009, 05:50 AM proto31 I got my oil line from Rebel Racing, they are orig... Oct 22 2009, 11:28 PM proto31 Here's some previews of the front and rear sus... Oct 22 2009, 11:35 PM proto31 Front rotor (picture of just one)-
Misc. Cool ... Oct 22 2009, 11:39 PM Travis Neff Bada-bump! Nov 26 2009, 10:40 PM Dr Evil Thanks for the oil hose info. Great build :) Nov 26 2009, 10:47 PM geniusanthony I just went through your thread and I am impressed... Jan 17 2010, 12:09 AM proto31 So, a lot of progress has been made since my last ... Apr 5 2010, 04:05 PM proto31 Engine installed:
Front S Calipers, Thomas and ... Apr 5 2010, 04:12 PM proto31 Thomas' sway bar arms, pre-annodizing. These m... Apr 5 2010, 04:28 PM AgPete139 Any updates? Nov 9 2010, 03:20 PM proto31
Any updates?
A few updates, I've already ... Feb 27 2011, 11:51 PM proto31 The floorboards:
Feb 27 2011, 11:54 PM proto31 wheels and gauges...
Feb 27 2011, 11:56 PM AZ914 :drooley: :drooley: :headbanger: Feb 28 2011, 07:53 AM Root_Werks Man that looks great! Feb 28 2011, 12:04 PM proto31 Thanks! It's been a lot of fun so far. Any... Feb 28 2011, 04:53 PM Ferg I vote for brown/brown hounds tooth, or brown with... Feb 28 2011, 05:23 PM MDG
I vote for brown/brown hounds tooth
Ferg
+1
W... Feb 28 2011, 05:47 PM proto31 I made a shroud for the front oil cooler, I've... Mar 4 2011, 11:22 PM proto31 Some more:
Mar 4 2011, 11:25 PM speed metal army Kickass. :notworthy3d: Ive decided to stash ... Mar 4 2011, 11:56 PM proto31 Thanks man, I've had a lot of fun building it ... Mar 6 2011, 12:14 AM proto31 Dropped the seats, door panels and center armrest ... Mar 7 2011, 05:02 PM Ferg
Dropped the seats, door panels and center armrest... Mar 7 2011, 05:13 PM MDG
I'm going with Cork (original Porsche color) ... Mar 7 2011, 06:55 PM Gint It's going to be tight for Route 66, may just... Mar 21 2011, 05:41 AM Eric_Shea
He just sold it to me. :lol3: Mar 7 2011, 05:16 PM Ferg
He just sold it to me. :lol3:
Get in line..... Mar 7 2011, 05:28 PM proto31 I found some really nice (as close to NOS as you c... Mar 7 2011, 11:45 PM proto31 Some more:
Installed without bumper, stainless ... Mar 7 2011, 11:48 PM proto31 Some updates, Socal Andy came down and polished my... Mar 20 2011, 09:02 PM proto31 Thomas' car, a really nice 97' with a GT3 ... Mar 20 2011, 09:04 PM proto31 Received all the interior pieces, seats and door p... Mar 20 2011, 09:08 PM dw914er wow!!!!!!!!!... Mar 20 2011, 09:10 PM proto31 Installed all the carpet, had to remove the steeri... Mar 20 2011, 09:14 PM proto31 Thanks for the comments!
Here's the inte... Mar 20 2011, 09:17 PM Lou W Absolutley Stunning. :beer2: :beer2: :beer2: Mar 20 2011, 09:51 PM Ferg Wow :worship: Mar 21 2011, 08:16 AM Eric_Shea :confused: Isn't this car already done? :confu... Mar 21 2011, 08:48 AM  |
1 User(s) are reading this topic (1 Guests and 0 Anonymous Users)
0 Members:

|
Lo-Fi Version | Time is now: 2nd April 2026 - 02:46 PM |
Invision Power Board
v9.1.4 © 2026 IPS, Inc.