|
|
|
Porsche, and the Porsche crest are registered trademarks of Dr. Ing. h.c. F. Porsche AG.
This site is not affiliated with Porsche in any way. Its only purpose is to provide an online forum for car enthusiasts. All other trademarks are property of their respective owners. |
|
|

  |

| computers4kids |
 Oct 15 2008, 10:42 PM Oct 15 2008, 10:42 PM
Post
#61
|
|
Love these little cars!  Group: Members Posts: 2,443 Joined: 11-June 05 From: Port Townsend, WA Member No.: 4,253 Region Association: None |
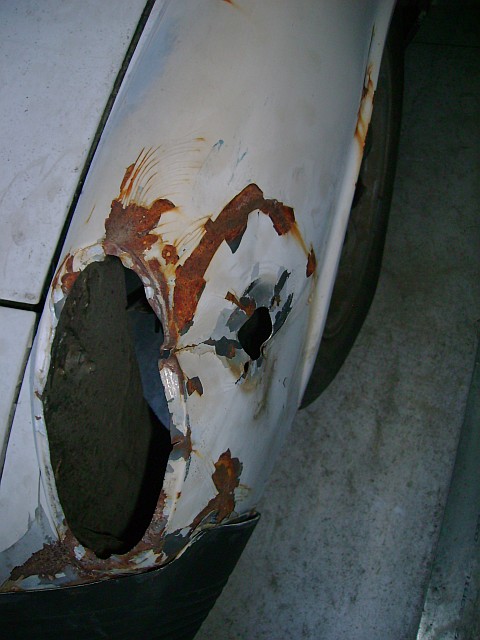
QUOTE(JRust @ Oct 15 2008, 07:44 AM)  I'll let you know Craig. Not sure if I am better of replacing the whole thing or having the current on fixed. Wish I had a body guy close I knew? Anybody know of one close to Corvallis that is reasonable??? Is Visalia, CA close (IMG:style_emoticons/default/driving.gif) ? Jamie, the fender doesn't look that bad...it's amazing what you can straighten with a body hammer and body anvil. |
   |

 
|
| JRust |
Oct 16 2008, 12:49 AM
Post
#62
|
|
914 Guru Group: Members Posts: 6,317 Joined: 10-January 03 From: Albany Oregon Member No.: 129 Region Association: Pacific Northwest |
QUOTE(computers4kids @ Oct 15 2008, 09:42 PM) Is Visalia, CA close (IMG:style_emoticons/default/driving.gif) ? Jamie, the fender doesn't look that bad...it's amazing what you can straighten with a body hammer and body anvil. I have literally never used a body hammer & Anvil. I'd hate to use this car as my practice (IMG:style_emoticons/default/blink.gif) . It is so tight up in there too I can't imagine it would be easy. (IMG:style_emoticons/default/dry.gif) |
|
|
|
| jd74914 |
Oct 16 2008, 07:14 AM
Post
#63
|
|
Its alive Group: Members Posts: 4,876 Joined: 16-February 04 From: CT Member No.: 1,659 Region Association: North East States |
Its really not that hard. The same fender on our newest car looked like that and it straightened pretty well with some ball peen hammers. It is pretty close now. The question is where to go if you get really close, shrinking disk and really nice or a little bit of filler?
There isn't any harm in trying it; Its only metal. Worst case you can replace the fender or have professional try after you if you can't get it done to your satisfaction. (IMG:style_emoticons/default/smile.gif) |
|
|
|
| JRust |
Oct 16 2008, 08:15 PM
Post
#64
|
|
914 Guru Group: Members Posts: 6,317 Joined: 10-January 03 From: Albany Oregon Member No.: 129 Region Association: Pacific Northwest |
What is the best way to get the filler on there out so I can really see the damage?
|
|
|
|
| scotty b |
Oct 16 2008, 08:20 PM
Post
#65
|
|
rust free you say ? Group: Members Posts: 16,375 Joined: 7-January 05 From: richmond, Va. Member No.: 3,419 Region Association: None |
QUOTE(JRust @ Oct 16 2008, 06:15 PM) What is the best way to get the filler on there out so I can really see the damage? Map gas it just until it starts to form small bubbles then pop it off with a screwdriver. the heat will relase it and if it cools it won't reattatch but it won't break free from the surrounding bondo as easily as it will when still hot. Oh and do'nt catch it when it falls |
|
|
|
| computers4kids |
Oct 16 2008, 11:14 PM
Post
#66
|
|
Love these little cars! Group: Members Posts: 2,443 Joined: 11-June 05 From: Port Townsend, WA Member No.: 4,253 Region Association: None |
Jamie...remember this fender, you should...you helped me load this pile of parts. Using body hammers and anvil ($20 kit from harbor freight) I was able to completely reform the fender with practically no plastic filler. Yours doesn't look that bad at all from the pics.
 After After  |
|
|
|
| JRust |
Oct 17 2008, 12:06 AM
Post
#67
|
|
914 Guru Group: Members Posts: 6,317 Joined: 10-January 03 From: Albany Oregon Member No.: 129 Region Association: Pacific Northwest |
Ohhhhhtay! I'll go to harbor freight tommorow & get the body anvil & hammers. I surely can't do any worse than a clutz like you Mark (IMG:style_emoticons/default/happy11.gif) . Okay that is a joke (IMG:style_emoticons/default/bs.gif) I just couldn't resist (IMG:style_emoticons/default/av-943.gif)
Seriously I will give the body work a try. I guess if I screw it up I can always replace the whole dang piece which I considered anyway. So I will see what I can do. I guess I'll have to start an official Creamsicle Restoration thread (IMG:style_emoticons/default/wacko.gif) |
|
|
|
| JRust |
Oct 17 2008, 09:00 PM
Post
#68
|
|
914 Guru Group: Members Posts: 6,317 Joined: 10-January 03 From: Albany Oregon Member No.: 129 Region Association: Pacific Northwest |
QUOTE(scotty b @ Oct 16 2008, 07:20 PM) Map gas it just until it starts to form small bubbles then pop it off with a screwdriver. the heat will relase it and if it cools it won't reattatch but it won't break free from the surrounding bondo as easily as it will when still hot. Oh and do'nt catch it when it falls What is map gas & where do i find it? |
|
|
|
| scotty b |
Oct 17 2008, 09:12 PM
Post
#69
|
|
rust free you say ? Group: Members Posts: 16,375 Joined: 7-January 05 From: richmond, Va. Member No.: 3,419 Region Association: None |
[quote name='JRust' date='Oct 17 2008, 07:00 PM' post='1092327']
(IMG:style_emoticons/default/cool.gif)--><div class='quotetop'>QUOTE(scotty b @ Oct 16 2008, 07:20 PM) </div><div class='quotemain'><!--quotec-->Map gas it just until it starts to form small bubbles then pop it off with a screwdriver. the heat will relase it and if it cools it won't reattatch but it won't break free from the surrounding bondo as easily as it will when still hot. Oh and do'nt catch it when it falls [/quote] What is map gas & where do i find it? [/quote] Methylacetylene propadiene burns higher temp then propane, but for this use propane would be perfectly fine, the extra heat from Mapp isn't necessary. Lowes, HomeDepot etc sell them in small cans I would strongly recommend one of the torch heads with an ignitor button on it too. Attached image(s) 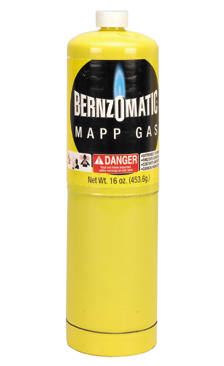 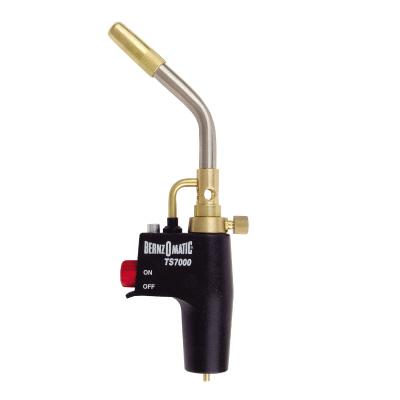
|
|
|
|
| JRust |
Oct 18 2008, 07:41 PM
Post
#70
|
|
914 Guru Group: Members Posts: 6,317 Joined: 10-January 03 From: Albany Oregon Member No.: 129 Region Association: Pacific Northwest |
Okay I went to home depot & got the Mapps just like in the photo above. It works great for loosening everything up. Got it bubbling then used a screwdriver to scrap the filler off. IT was very thick in places. I would say 3/8 of an inch in spot (IMG:style_emoticons/default/WTF.gif) . I also went to harbor freight yesterday for the body hammer & tools. I forgot to take pics before I went to work on it. IT went pretty well & I can see I should be able to get things pretty close. I will definately need finish work by a pro but mostly because of the weld mixed in. I'm not sure how but it looks like it cracked in a long line? Was cut? Anyway there is some weld from just above the tire forward. Then there is a break with some brass weld(?) just above the front turn signal.
Anyone have a trick for getting the top of the fender hammered up some. I can't seem to get up there with the hammer or the small anvils. Also the area below the turn signal is bent down a bit. I don't see how to get up there without some long extension to hammer. I also took it for a 50 mile ride this morning. Drives pretty good but could use a tuneup. Clutch felt good as did the shift linkage. Going to treat the rust in the rear trunk tonight (IMG:style_emoticons/default/dry.gif) Attached image(s) 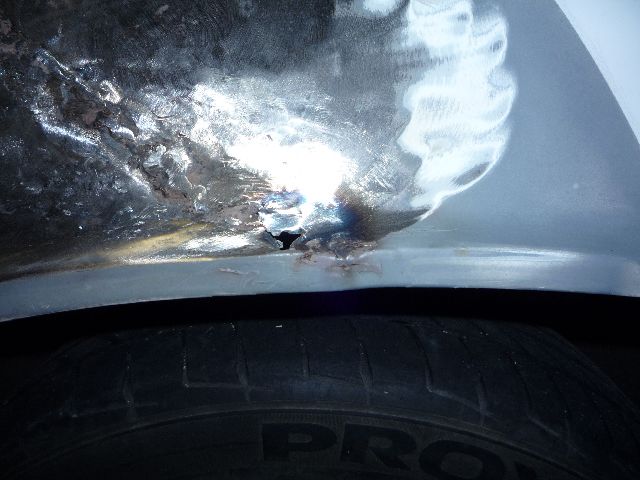 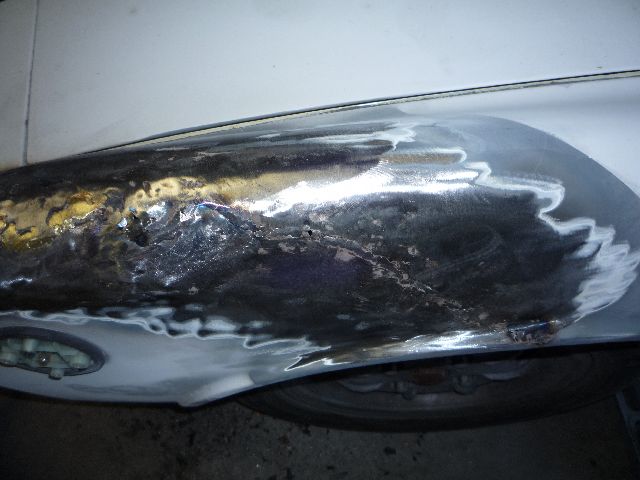 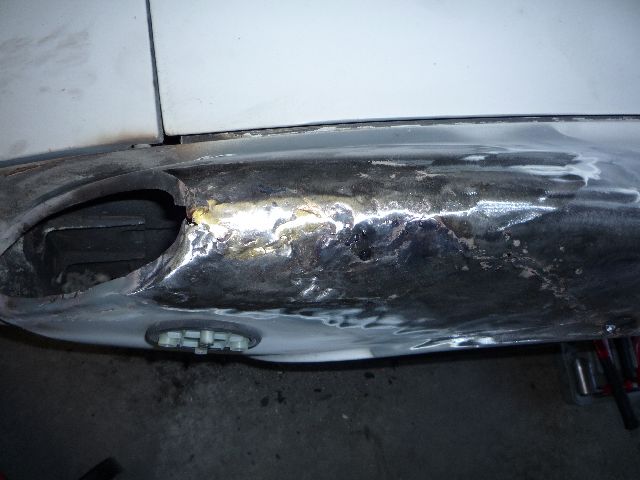 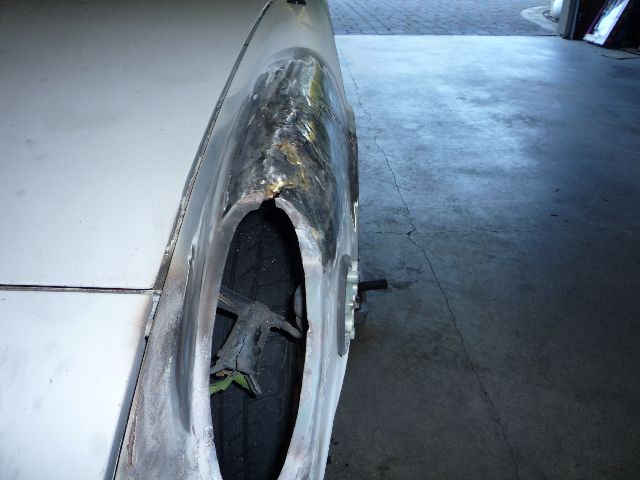 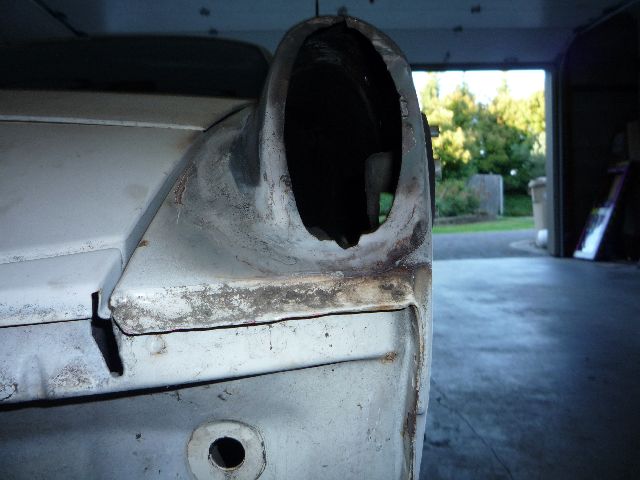
|
|
|
|
| scotty b |
Oct 18 2008, 09:08 PM
Post
#71
|
|
rust free you say ? Group: Members Posts: 16,375 Joined: 7-January 05 From: richmond, Va. Member No.: 3,419 Region Association: None |
That kinda sucks. It has quite obviously had a clip spliced in ( poorly ) previously. As for pushing the area above the t.s. up if you have access to a welder it would be easiest to cut a slice in it, following the brass that has been globbed in there, then push the 2 sides up seperately and re-weld it. The brass will need to be completely removed to mig weld it back together. If you can or know someone that can oxy acetylene brass it could be re-welded with brass.
If you don't want to cut and re-weld you will just need to find some way to get in there und knock it into shape. |
|
|
|
| JRust |
Oct 19 2008, 12:01 AM
Post
#72
|
|
914 Guru Group: Members Posts: 6,317 Joined: 10-January 03 From: Albany Oregon Member No.: 129 Region Association: Pacific Northwest |
I don't think it had a spliced section. I really think something cause the cut where they welded. Not sure how but even the weld does not go from the bottom you see all the way to the fron where the brass is. There is a couple inches with no weld between the bottom weld & where the top brass is. I've got a good body guy in mind. He helped me with the restoration of my 73 8 years ago. Not sure if he is still around. I've got to see monday if he is where he was then. I will get this fixed & soon.
|
|
|
|
| computers4kids |
Oct 19 2008, 01:35 AM
Post
#73
|
|
Love these little cars! Group: Members Posts: 2,443 Joined: 11-June 05 From: Port Townsend, WA Member No.: 4,253 Region Association: None |
I knew you could do it! (IMG:style_emoticons/default/smash.gif) Great step in the right direction. Some body guys use a "slidehammer" to pull out places where you can't get behind. You can make one real cheap. Since you will be having a body guy do the finish work anyway, he will have a slide hammer. When he is done all you will have at most is just a very thin coat of plastic filler...like an 1/8th of an inch.
Lookin good! |
|
|
|
| scotty b |
Oct 19 2008, 09:31 AM
Post
#74
|
|
rust free you say ? Group: Members Posts: 16,375 Joined: 7-January 05 From: richmond, Va. Member No.: 3,419 Region Association: None |
QUOTE(JRust @ Oct 18 2008, 10:01 PM) I don't think it had a spliced section. I really think something cause the cut where they welded. Not sure how but even the weld does not go from the bottom you see all the way to the fron where the brass is. There is a couple inches with no weld between the bottom weld & where the top brass is. I've got a good body guy in mind. He helped me with the restoration of my 73 8 years ago. Not sure if he is still around. I've got to see monday if he is where he was then. I will get this fixed & soon. Ah I couldn't tell there were spots with no weld. In that case it was probably hit and to pull it out it was just cut, pulled back closely by hand then re-welded. The brass may have been used to fill in some deep depressions or possibly to fill in where there was a gap. Back to the issue at hand. If you can get hold of a welder, get the panel as close as possible then you could cut out some of the nastier sections and make some patches to clean it up if you so desire. (IMG:style_emoticons/default/welder.gif) |
|
|
|
| JRust |
Oct 27 2008, 09:18 AM
Post
#75
|
|
914 Guru Group: Members Posts: 6,317 Joined: 10-January 03 From: Albany Oregon Member No.: 129 Region Association: Pacific Northwest |
Okay so I got the fender cutout & replaced thanks to the seattle Work party. Jeff Hines is the man. Between him & Dan Root they got the fender on & very nice. We decided it would be better to replace the area rather than fix it as it was just to hammered. Although we were able to keep all the factory welds in place. It turned out great! I'll need a small amount of filler but just a very small amount. Here are some pics (thanks to John Bovey as I forgot my dang camera).
Attached image(s) 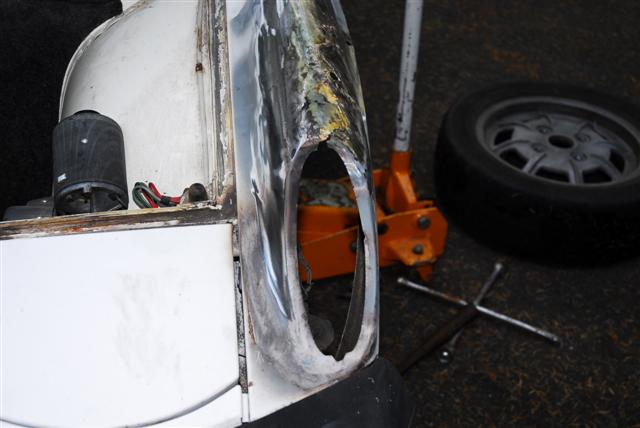 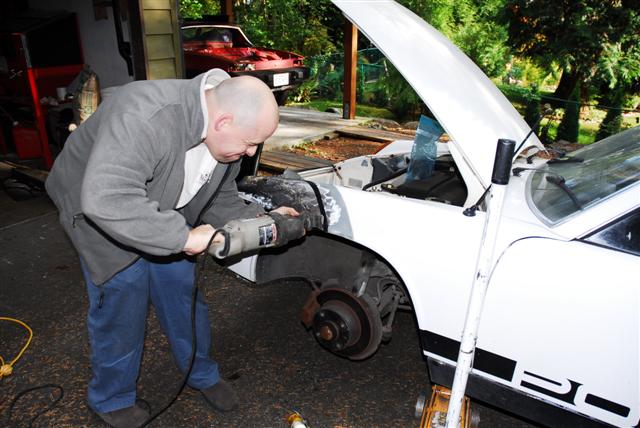 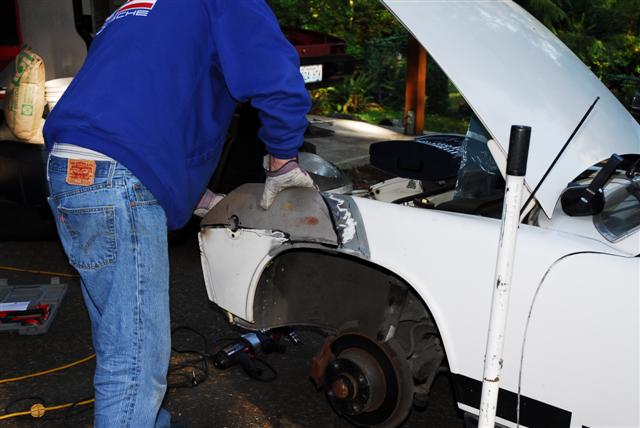 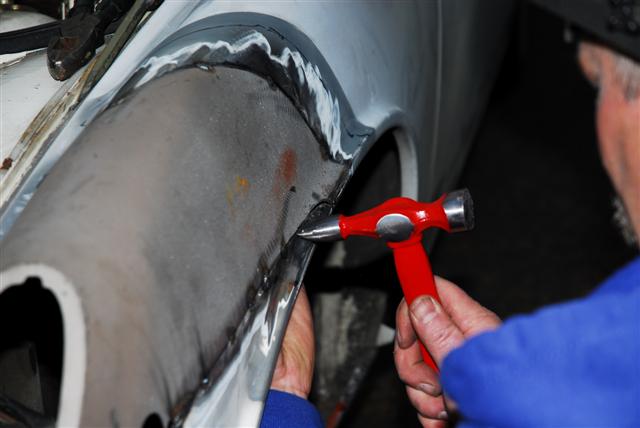 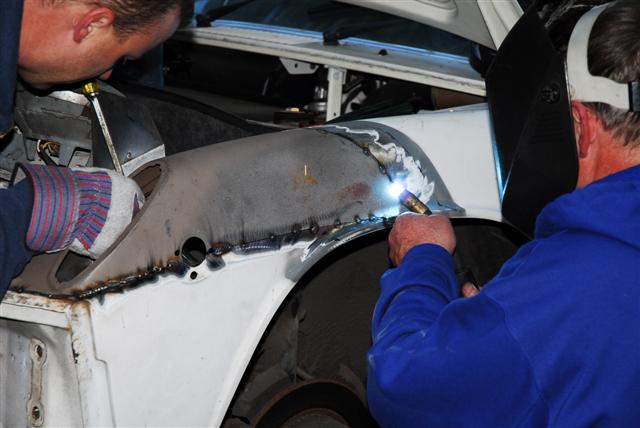 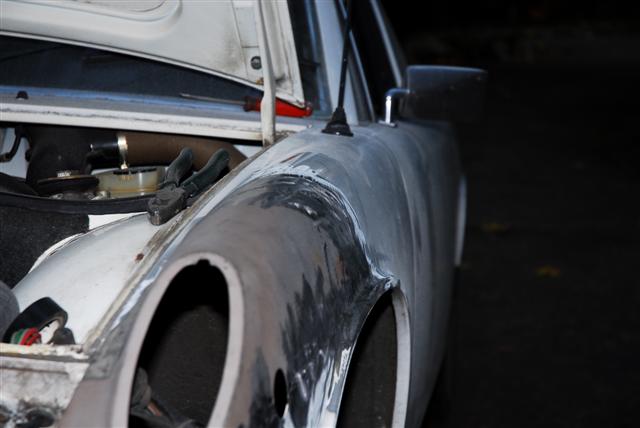 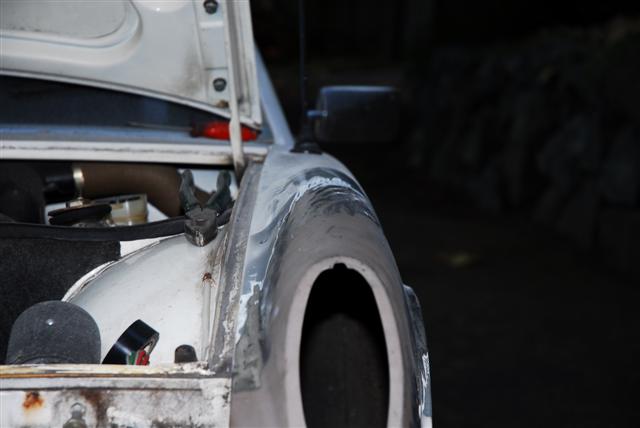
|
|
|
|
| SirAndy |
Oct 27 2008, 01:44 PM
Post
#76
|
|
Resident German Group: Admin Posts: 42,480 Joined: 21-January 03 From: Oakland, Kalifornia Member No.: 179 Region Association: Northern California |
|
|
|
|
| ericread |
Oct 27 2008, 02:03 PM
Post
#77
|
|
The Viper Blue 914 Group: Members Posts: 2,177 Joined: 7-December 07 From: Irvine, CA (The OC) Member No.: 8,432 Region Association: Southern California |
So what's the trick to using a hammer and a body anvil? There must be a "how to" article here somewhere???
Eric Read |
|
|
|
| JRust |
Oct 27 2008, 03:35 PM
Post
#78
|
|
914 Guru Group: Members Posts: 6,317 Joined: 10-January 03 From: Albany Oregon Member No.: 129 Region Association: Pacific Northwest |
QUOTE(ericread @ Oct 27 2008, 01:03 PM) So what's the trick to using a hammer and a body anvil? There must be a "how to" article here somewhere??? Eric Read As you can see in the pics the only thing I did was cut. I am the WRONG guy to give advice on hammer & dolly. Although I did pound on the fender before replacing the section. Just to much crappy weld there to start with & damage. I can see how using the hammer & dolly in most situations you can get it close enough. Then a little filler to smooth things out. I am sure some of the pro's will chime in with good advice (IMG:style_emoticons/default/smile.gif) |
|
|
|
| sixnotfour |
Oct 27 2008, 04:23 PM
Post
#79
|
|
914 Wizard Group: Members Posts: 11,245 Joined: 12-September 04 Member No.: 2,744 Region Association: NineFourteenerVille |
QUOTE Is Visalia, CA close ? Jamie, the fender doesn't look that bad...it's amazing what you can straighten with a body hammer and body anvil. Yes but , in your case some else hadn't worked the heck out of yet, only initial damage. good job. Jamies fender had been heated , hammered ,ground,welded ,brazed, I tried to pound it around , but the metal was already worked to much and it was splitting and tearing holes (thin from grinding).A Lot of the feature in the front section was hammered flat already. With the time we had , this was going to provide the best results and still has the factory attachment points. and an audience. here is some good hammer info , cheap; http://www.914world.com/bbs2/index.php?showtopic=67022 |
|
|
|
| Eric_Shea |
Oct 27 2008, 09:37 PM
Post
#80
|
|
PMB Performance Group: Admin Posts: 19,304 Joined: 3-September 03 From: Salt Lake City, UT Member No.: 1,110 Region Association: Rocky Mountains |
Great job Jeff and Jamie... (IMG:style_emoticons/default/smilie_pokal.gif)
|
|
|
|
|
6 User(s) are reading this topic (6 Guests and 0 Anonymous Users)
0 Members:

|
Lo-Fi Version | Time is now: 16th May 2026 - 12:36 PM |
Invision Power Board
v9.1.4 © 2026 IPS, Inc.