|
|
|
Porsche, and the Porsche crest are registered trademarks of Dr. Ing. h.c. F. Porsche AG.
This site is not affiliated with Porsche in any way. Its only purpose is to provide an online forum for car enthusiasts. All other trademarks are property of their respective owners. |
|
|

  |

| Bartlett 914 |
 Jan 8 2009, 09:21 AM Jan 8 2009, 09:21 AM
Post
#1
|
|
Advanced Member  Group: Members Posts: 2,218 Joined: 30-August 05 From: South Elgin IL Member No.: 4,707 Region Association: Upper MidWest |
We all do it. We sometimes need a tool for a special use. It sometimes makes the difference in how well a job comes out Earlier this year, just for the heck of it, I removed the shaft from the bushings in an old trailing arm. I ended up using heat. I did get it out but what a an awful stinky mess! Yesterday Glenn (gms) stopped by with 2 trailing arms he was cleaning up. He wanted to know if I had a press for the job. With a little scrap metal some machining and welding we came up with a simple tool to remove the shaft. Here are a couple pictures of what we came up with. The tool worked really nice. I think if wanted, this would also work with the trailing arm in the car.
So how about posting some of the special tools you have made. Attached image(s)  
|
   |

 
|
| URY914 |
Jan 8 2009, 09:44 AM
Post
#2
|
|
I built the lightest 914 in the history of mankind. Group: Members Posts: 127,329 Joined: 3-February 03 From: Jacksonville, FL Member No.: 222 Region Association: None |
I kinda like by engine crossbar wheels. It's not something you use everyday but they sure are easy to use. No trying to balance the engine on a jack or dolly.
Attached image(s)  
|
|
|
|
| Bartlett 914 |
Jan 8 2009, 09:52 AM
Post
#3
|
|
Advanced Member Group: Members Posts: 2,218 Joined: 30-August 05 From: South Elgin IL Member No.: 4,707 Region Association: Upper MidWest |
QUOTE(URY914 @ Jan 8 2009, 09:44 AM)  I kinda like by engine crossbar wheels. It's not something you use everyday but they sure are easy to use. No trying to balance the engine on a jack or dolly. Hi Ury That looks good. I did something similar once. I used only 1 wheel on each side. On mine the bar folded over while I was moving the motor and I broke a motor mount (or maybe it folded over because the mount was broken) . On the next one, I will use 2 wheels per side in an effort to keep the bar from folding over. |
|
|
|
| marks914 |
Jan 8 2009, 10:48 AM
Post
#4
|
|
Senior Member Group: Members Posts: 845 Joined: 9-October 04 From: the motor city Member No.: 2,912 Region Association: None |
Here is my version of the engine installation tool. Jack up the car and slide it in! Well woth the hour of "fab" work
Mark (IMG:http://inlinethumb21.webshots.com/4756/2172091620057582025S600x600Q85.jpg) |
|
|
|
| Dr Evil |
Jan 8 2009, 10:56 AM
Post
#5
|
|
Send me your transmission! Group: Members Posts: 23,041 Joined: 21-November 03 From: Loveland, OH 45140 Member No.: 1,372 Region Association: MidAtlantic Region |
I removed my /6 and tranny together last night and just used a furniture dolly. Works good, cost $15, last long time (IMG:style_emoticons/default/smile.gif)
|
|
|
|
| aircooledtechguy |
Jan 8 2009, 11:13 AM
Post
#6
|
|
The Aircooledtech Guy Group: Members Posts: 1,966 Joined: 8-November 08 From: Anacortes, WA Member No.: 9,730 Region Association: Pacific Northwest |
Here's a couple things:
The first is a super cheap and effective DIY Soda Blaster The other is just a couple Spark Plug Tools that make changing the plugs easier |
|
|
|
| Bartlett 914 |
Jan 8 2009, 11:22 AM
Post
#7
|
|
Advanced Member Group: Members Posts: 2,218 Joined: 30-August 05 From: South Elgin IL Member No.: 4,707 Region Association: Upper MidWest |
QUOTE(aircooledtechguy @ Jan 8 2009, 11:13 AM) Here's a couple things: The first is a super cheap and effective DIY Soda Blaster The other is just a couple Spark Plug Tools that make changing the plugs easier I like your soda blaster. For cleaning the carburetor you showed, how much soda did you end up using? |
|
|
|
| SGB |
Jan 8 2009, 11:27 AM
Post
#8
|
|
just visiting Group: Members Posts: 4,086 Joined: 8-March 03 From: Huntsville, AL Member No.: 404 Region Association: South East States |
Yeah Nate, that extended plug socket is good. I did something similar but had interference from the intake manifolds (tall dual weber manifolds), so I just drilled a couple of holes in the socket so I can hook 'it with a stiff wire handle after I put a new plug in. It will always disconnect from the extension, but stays on the plug until I hook it and pull.
|
|
|
|
| aircooledtechguy |
Jan 8 2009, 01:50 PM
Post
#9
|
|
The Aircooledtech Guy Group: Members Posts: 1,966 Joined: 8-November 08 From: Anacortes, WA Member No.: 9,730 Region Association: Pacific Northwest |
QUOTE(Bartlett 914 @ Jan 8 2009, 09:22 AM) I like your soda blaster. For cleaning the carburetor you showed, how much soda did you end up using? For that pair of 356 carbs, I think I used around 2 pounds. I bought a large box (I think it was 3 pounds) and had around 1/3 box left. 'Course @ $1.00 or so for a 1 pound box, it's ridiculously cheap. It's one time use media so no need to splash-out for the "boutique" Arm & Hammer brand, the generic stuff is all you need. . . (IMG:style_emoticons/default/biggrin.gif) |
|
|
|
| JeffBowlsby |
Jan 8 2009, 02:30 PM
Post
#10
|
|
914 Wiring Harnesses & Beekeeper Group: Members Posts: 8,968 Joined: 7-January 03 From: San Ramon CA Member No.: 104 Region Association: None |
My D-Jet break-out box:
Attached image(s) 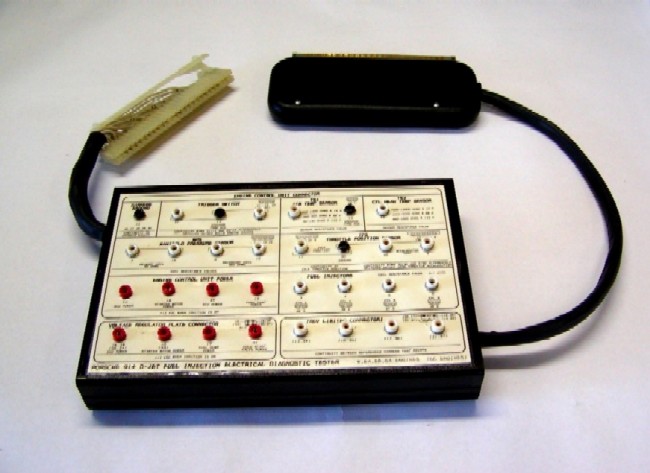
|
|
|
|
| Bartlett 914 |
Jan 8 2009, 03:19 PM
Post
#11
|
|
Advanced Member Group: Members Posts: 2,218 Joined: 30-August 05 From: South Elgin IL Member No.: 4,707 Region Association: Upper MidWest |
My Brake bleeder. Probably the simplest of tools but a great help. I use a bicycle pump to add pressure so I do not accidentally add too much pressure. Makes bleeding the brakes a snap.
Attached image(s) 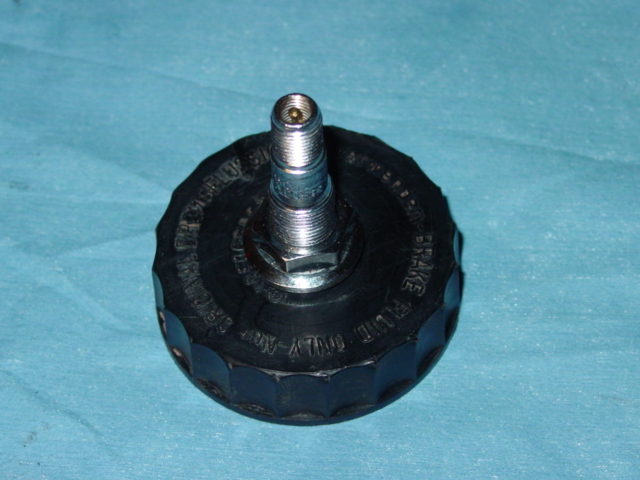
|
|
|
|
| HAM Inc |
Jan 8 2009, 04:06 PM
Post
#12
|
|
Senior Member Group: Members Posts: 850 Joined: 24-July 06 From: Watkinsville,GA Member No.: 6,499 Region Association: None |
Those are some neat tools! I really like the arm shaft puller. I've been using heat and yes it does make a stinky mess!
I came up with this cobbled together piece for pressing out stub axles while the arm is still in the car. Had to beat one out at the track last year and it made me want to throwup. Fortunately all of the beating didn't hurt anything or change my toe, but I decided that was the last time a hammer would be involved in that operation! It works great! An old brake disc, a few minutes on the mill (could have been done without the mill) and a few welds. The giant three jaw puller was given to me years ago so the whole apparatus was damn near free. I lke this thread. Hope more homemade tools follow. Attached thumbnail(s) 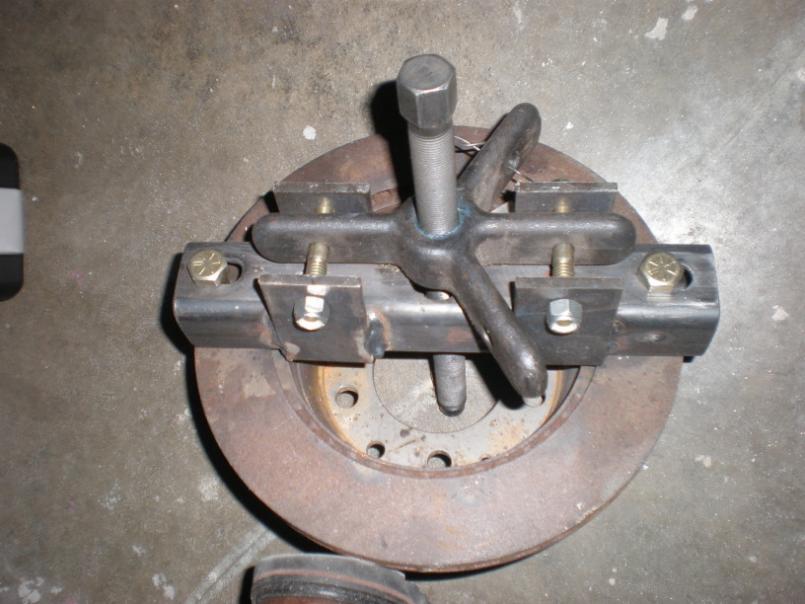
|
|
|
|
| scotty b |
Jan 8 2009, 06:54 PM
Post
#13
|
|
rust free you say ? Group: Members Posts: 16,375 Joined: 7-January 05 From: richmond, Va. Member No.: 3,419 Region Association: None |
My English wheel and my shrinker / stretcher I converted to be pneumatic
Attached image(s) 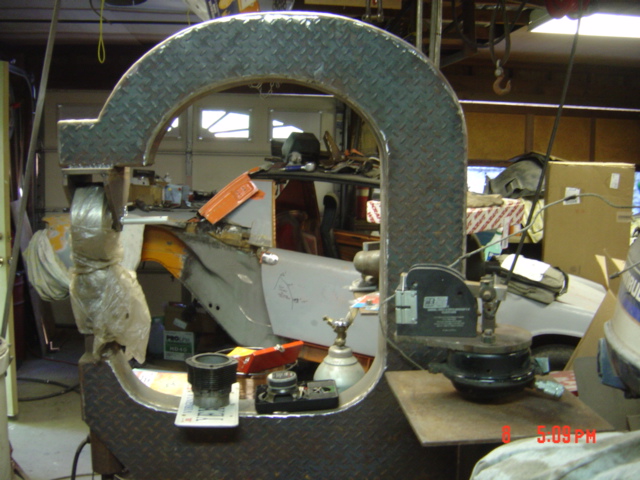
|
|
|
|
| URY914 |
Jan 8 2009, 07:09 PM
Post
#14
|
|
I built the lightest 914 in the history of mankind. Group: Members Posts: 127,329 Joined: 3-February 03 From: Jacksonville, FL Member No.: 222 Region Association: None |
I made an extension for my floor jack. When I jack up my car I get it up high and adding wooden blocks under the car would get scary after awhile.
Attached image(s) 
|
|
|
|
| URY914 |
Jan 8 2009, 07:10 PM
Post
#15
|
|
I built the lightest 914 in the history of mankind. Group: Members Posts: 127,329 Joined: 3-February 03 From: Jacksonville, FL Member No.: 222 Region Association: None |
I welded a old socket on the bottom of it to go in the hole in the jack.
Attached image(s) 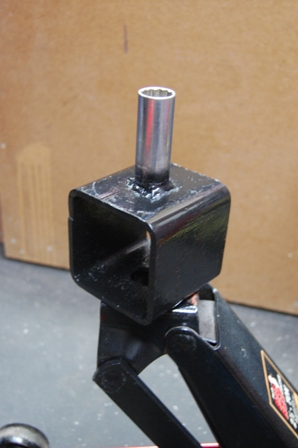
|
|
|
|
| URY914 |
Jan 8 2009, 07:12 PM
Post
#16
|
|
I built the lightest 914 in the history of mankind. Group: Members Posts: 127,329 Joined: 3-February 03 From: Jacksonville, FL Member No.: 222 Region Association: None |
I also get comments on the jack stand blocks. Who would have thought you could improve on a jackstand. (IMG:style_emoticons/default/biggrin.gif)
Attached image(s) 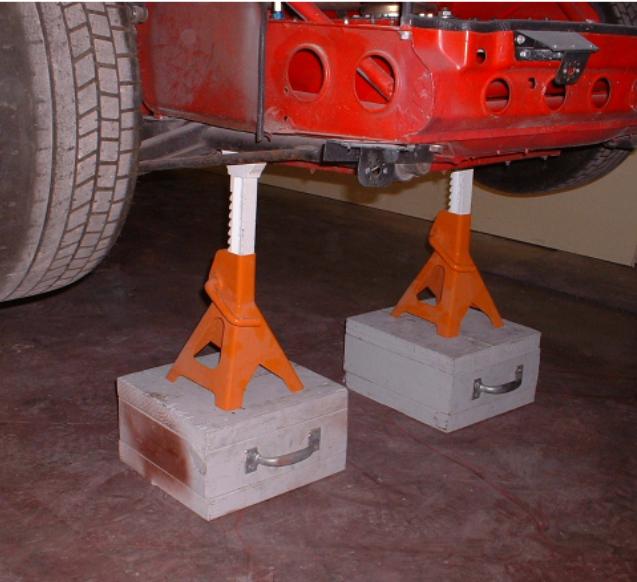
|
|
|
|
| URY914 |
Jan 8 2009, 07:16 PM
Post
#17
|
|
I built the lightest 914 in the history of mankind. Group: Members Posts: 127,329 Joined: 3-February 03 From: Jacksonville, FL Member No.: 222 Region Association: None |
I build this tool box/welding cart too...
Attached image(s) 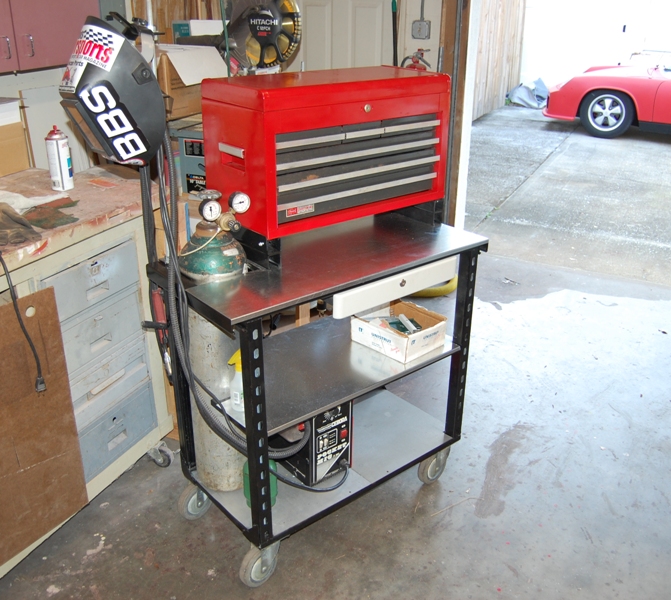
|
|
|
|
| URY914 |
Jan 8 2009, 07:19 PM
Post
#18
|
|
I built the lightest 914 in the history of mankind. Group: Members Posts: 127,329 Joined: 3-February 03 From: Jacksonville, FL Member No.: 222 Region Association: None |
The frame in made of scrap Unistrut steel from a job site. I bought the tool box at a garage for $50 full of tools...
Attached image(s) 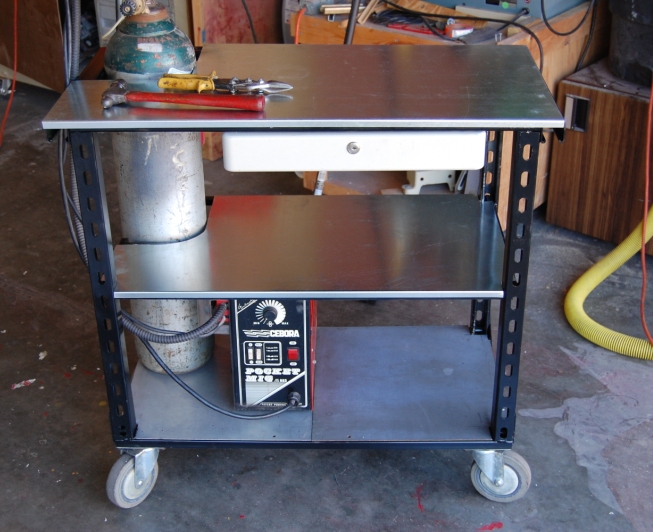
|
|
|
|
| URY914 |
Jan 8 2009, 07:23 PM
Post
#19
|
|
I built the lightest 914 in the history of mankind. Group: Members Posts: 127,329 Joined: 3-February 03 From: Jacksonville, FL Member No.: 222 Region Association: None |
I found these bad boys at a auto show and really wanted them but I was afraid you guys would laugh at me....(IMG:style_emoticons/default/biggrin.gif)
Attached image(s) 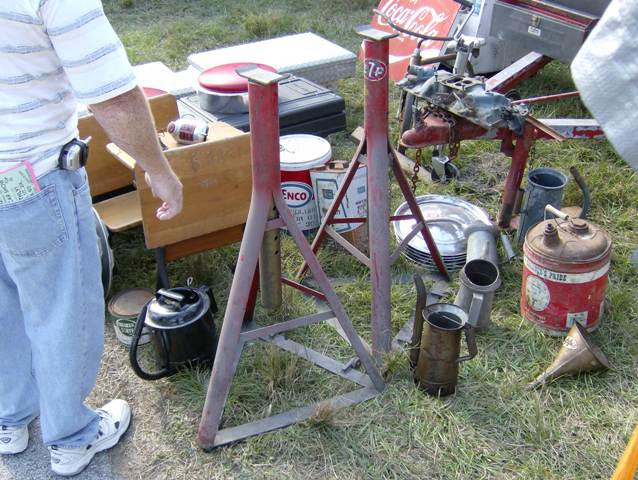
|
|
|
|
| smontanaro |
Jan 8 2009, 07:37 PM
Post
#20
|
|
Senior Member Group: Members Posts: 1,190 Joined: 3-June 05 From: Evanston, IL Member No.: 4,197 Region Association: Upper MidWest |
Can we just skip the obligatory waiting period and make this a Lapuwali classic thread?
|
|
|
|
|
1 User(s) are reading this topic (1 Guests and 0 Anonymous Users)
0 Members:

|
Lo-Fi Version | Time is now: 6th July 2025 - 04:32 AM |
Invision Power Board
v9.1.4 © 2025 IPS, Inc.