|
|
|
Porsche, and the Porsche crest are registered trademarks of Dr. Ing. h.c. F. Porsche AG.
This site is not affiliated with Porsche in any way. Its only purpose is to provide an online forum for car enthusiasts. All other trademarks are property of their respective owners. |
|
|


| Bartlett 914 |
 Jan 8 2009, 09:21 AM Jan 8 2009, 09:21 AM
Post
#161
|
|
Advanced Member  Group: Members Posts: 2,218 Joined: 30-August 05 From: South Elgin IL Member No.: 4,707 Region Association: Upper MidWest |
We all do it. We sometimes need a tool for a special use. It sometimes makes the difference in how well a job comes out Earlier this year, just for the heck of it, I removed the shaft from the bushings in an old trailing arm. I ended up using heat. I did get it out but what a an awful stinky mess! Yesterday Glenn (gms) stopped by with 2 trailing arms he was cleaning up. He wanted to know if I had a press for the job. With a little scrap metal some machining and welding we came up with a simple tool to remove the shaft. Here are a couple pictures of what we came up with. The tool worked really nice. I think if wanted, this would also work with the trailing arm in the car.
So how about posting some of the special tools you have made. Attached image(s) 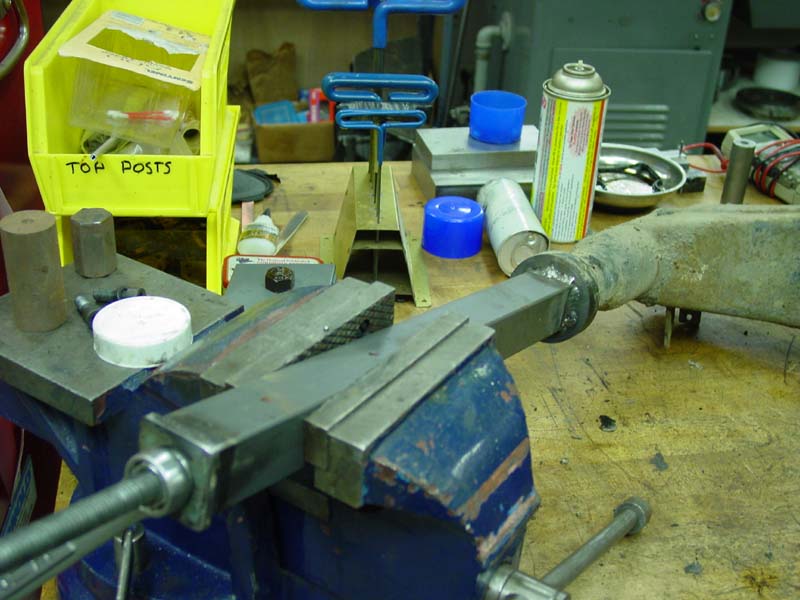 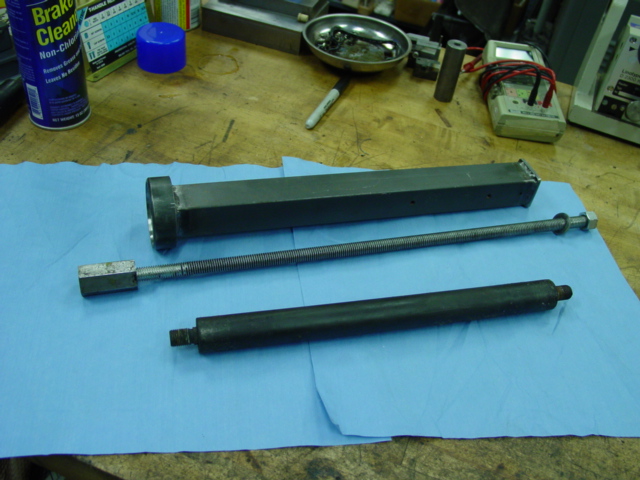
|
   |

 
|
Posts in this topic
 Bartlett 914 Home made tools Jan 8 2009, 09:21 AM
 URY914 I kinda like by engine crossbar wheels. It's n... Jan 8 2009, 09:44 AM
 Bartlett 914
I kinda like by engine crossbar wheels. It's ... Jan 8 2009, 09:52 AM marks914 Here is my version of the engine installation tool... Jan 8 2009, 10:48 AM Dr Evil I removed my /6 and tranny together last night and... Jan 8 2009, 10:56 AM aircooledtechguy Here's a couple things:
The first is a super ... Jan 8 2009, 11:13 AM Bartlett 914
Here's a couple things:
The first is a super... Jan 8 2009, 11:22 AM aircooledtechguy
I like your soda blaster. For cleaning the carbur... Jan 8 2009, 01:50 PM SGB Yeah Nate, that extended plug socket is good. I d... Jan 8 2009, 11:27 AM Jeff Bowlsby My D-Jet break-out box: Jan 8 2009, 02:30 PM Bartlett 914 My Brake bleeder. Probably the simplest of tools b... Jan 8 2009, 03:19 PM HAM Inc Those are some neat tools! I really like the a... Jan 8 2009, 04:06 PM scotty b My English wheel and my shrinker / stretcher I con... Jan 8 2009, 06:54 PM r_towle B)-->
Bartlett 914
I kinda like by engine crossbar wheels. It's ... Jan 8 2009, 09:52 AM marks914 Here is my version of the engine installation tool... Jan 8 2009, 10:48 AM Dr Evil I removed my /6 and tranny together last night and... Jan 8 2009, 10:56 AM aircooledtechguy Here's a couple things:
The first is a super ... Jan 8 2009, 11:13 AM Bartlett 914
Here's a couple things:
The first is a super... Jan 8 2009, 11:22 AM aircooledtechguy
I like your soda blaster. For cleaning the carbur... Jan 8 2009, 01:50 PM SGB Yeah Nate, that extended plug socket is good. I d... Jan 8 2009, 11:27 AM Jeff Bowlsby My D-Jet break-out box: Jan 8 2009, 02:30 PM Bartlett 914 My Brake bleeder. Probably the simplest of tools b... Jan 8 2009, 03:19 PM HAM Inc Those are some neat tools! I really like the a... Jan 8 2009, 04:06 PM scotty b My English wheel and my shrinker / stretcher I con... Jan 8 2009, 06:54 PM r_towle B)-->QUOTE(scotty b @ J... Jan 8 2009, 08:12 PM
 scotty b some guy on E-bay seveal years ago. I really don... Jan 8 2009, 08:17 PM
URY914 I made an extension for my floor jack. When I jack... Jan 8 2009, 07:09 PM
URY914 I welded a old socket on the bottom of it to go in... Jan 8 2009, 07:10 PM
URY914 I also get comments on the jack stand blocks. Who ... Jan 8 2009, 07:12 PM
URY914 I build this tool box/welding cart too... Jan 8 2009, 07:16 PM
URY914 The frame in made of scrap Unistrut steel from a j... Jan 8 2009, 07:19 PM
URY914 I found these bad boys at a auto show and really w... Jan 8 2009, 07:23 PM
smontanaro Can we just skip the obligatory waiting period and... Jan 8 2009, 07:37 PM
Todd Enlund
Can we just skip the obligatory waiting period an... Jan 8 2009, 07:59 PM
911quest Here is my work in progress a P258c for seting pin... Jan 8 2009, 07:45 PM
Dr Evil
Here is my work in progress a P258c for seting pi... Jan 8 2009, 07:46 PM
Zimms
Here is my work in progress a P258c for seting pi... Jan 9 2009, 08:36 PM
911quest
Here is my work in progress a P258c for seting p... Jan 10 2009, 09:31 PM
Zimms
[quote name='Zimms' post='1119775' date='Jan 9 20... Jan 10 2009, 11:22 PM
r_towle I want a plasma cutter...my head hurts thinking ab... Jan 8 2009, 08:20 PM
scotty b Yeah most likely overkill as I used 3/8 plate for ... Jan 8 2009, 08:24 PM
RJMII http://inlinethumb26.webshots.com/43161/2593686280... Jan 8 2009, 11:53 PM
wertygrog here's a super flat 22mm wrench for tensioning... Jan 8 2009, 11:57 PM
zambezi Heres an engine stand I built for storing and runn... Jan 9 2009, 01:18 AM
Bartlett 914
Heres an engine stand I built for storing and run... Jan 9 2009, 08:51 AM
zambezi
Heres an engine stand I built for storing and ru... Jan 11 2009, 12:26 AM
michelko My Engine Test stand
and the tool to check fuel... Jan 9 2009, 08:58 AM
Todd Enlund
and the tool to check fuellevel in zenith carbs
... Jan 9 2009, 12:50 PM
aircooledtechguy Here's my engine run stand and the starter box... Jan 9 2009, 11:25 AM
andys I've got several custom jigs and fixtures, but... Jan 9 2009, 02:56 PM
roadster fan
I've got several custom jigs and fixtures, bu... Jan 9 2009, 04:16 PM
MrKona Here's my transaxle driveshaft holder tool. Ke... Jan 9 2009, 03:19 PM
roadster fan Here is one that I made after having to remove the... Jan 9 2009, 04:37 PM
914dave
Here's the rotisserie pix's Jan 9 2009, 05:15 PM
J P Stein Wanna check backlash on the R&P of your 901? H... Jan 9 2009, 07:34 PM
MrKona
Wanna check backlash on the R&P of your 901? ... Jan 9 2009, 10:23 PM
J P Stein
I like the backlash measurement set up. Do you ... Jan 10 2009, 10:47 AM
carr914 This thread would not be complete without FourBlad... Jan 9 2009, 09:32 PM
sean_v8_914 suspension bushing reamer Jan 10 2009, 10:09 AM
rick 918-S I made these for doing large deep shrinks. You sli... Jan 10 2009, 01:57 PM
rick 918-S Here is the result or close to it.
Jan 10 2009, 01:57 PM
McMark Revival!
I found a tool I made awhile ago. 9... Jan 19 2009, 09:53 PM
highways Here's my favorite 'found object'. My ... Jan 20 2009, 03:49 AM
Dr Evil
Here's my favorite 'found object'. My... Jan 28 2009, 04:46 PM
McMark That's a cool kit! Jan 20 2009, 08:46 PM
URY914 No, it's a TOOL kit. Jan 20 2009, 09:23 PM
MrKona Here's my home made blasting cabinet. I just f... Jan 28 2009, 01:13 AM
Todd Enlund
Here's my home made blasting cabinet. I just ... Feb 1 2009, 11:35 AM
cwpeden I made my own blasting cabinet too and used my sho... Jan 28 2009, 01:41 AM
scotty b Yeah you really can't beat Thompsons prices bu... Jan 28 2009, 06:44 PM
rick 918-S I'm not sure if you would classify 2" mas... Jan 30 2009, 08:39 AM
highways
I couldnt resist this deal on the cigars, but be... Jan 30 2009, 06:51 PM
zig-n-zag tranny nut buster.... http://i631.photobucket.com/... Jan 31 2009, 07:48 PM
majkos I'm suprise no one made a Engine Head Sensor t... Feb 1 2009, 09:59 AM
majkos
Simple 13mm socket, 914 jack handle, cut at a ... Feb 1 2009, 10:20 AM
Sleepin ......and I am missing your Superbowl party.... :W... Feb 1 2009, 11:15 AM
Gint You've never been to Kevin's?!?! ... Feb 1 2009, 11:22 AM
majkos
You've never been to Kevin's?!?! ... Feb 1 2009, 02:16 PM
Wilhelm [size=5]Ball Joint Remover
[center]So I don... Feb 2 2009, 10:11 PM
McMark Nice work. Feb 3 2009, 12:49 AM
Racer Chris Delrin rear bushing cutting tools
Top: Sleeve th... Feb 5 2009, 09:23 AM
larss Rear boot torsion bar tool
Made this tool for fit... Sep 22 2009, 01:15 AM
charliew I don't remember where I saw it but the fiero ... Sep 22 2009, 08:24 AM
jimkelly bearing removal tool - not mine
see thread
http... Apr 28 2010, 07:21 AM
McMark Made another tool today. This piece fits tightly ... Jul 28 2010, 02:01 PM
rdauenhauer Here is one that is surprisingly simple but I find... Jul 30 2010, 09:35 PM
rdauenhauer here is THE tool for unlocking the rear boot :D
... Jul 30 2010, 09:37 PM
Jeff Bowlsby
here is THE tool for unlocking the rear boot :D ... Aug 12 2010, 01:07 PM
charliew
here is THE tool for unlocking the rear boot :D... Aug 13 2010, 05:34 PM
charliew A picture of you using that tool would be interest... Jul 31 2010, 01:05 PM
larss Handle made when fitting the rear window, one in e... Aug 12 2010, 02:50 AM
McMark :lol4: Love it, Lars! That's awesome. Aug 12 2010, 11:22 AM
Richard Casto
:lol4: Love it, Lars! That's awesome.
... Aug 12 2010, 01:13 PM
Phoenix-MN Let's kick it up a notch This isn't 914 ... Aug 12 2010, 06:23 PM
charliew That is neat but it would take me three days to bu... Aug 13 2010, 05:27 PM
Bartlett 914
That is neat but it would take me three days to b... Aug 13 2010, 05:33 PM
rick 918-S
That is neat but it would take me three days to ... Aug 14 2010, 02:42 PM
Phoenix-MN
That is neat but it would take me three days to b... Aug 14 2010, 02:31 PM
qa1142
[quote name='charliew' post='1356147' date='Aug 1... Aug 14 2010, 02:40 PM
rudedude I'd even pay you something for your time :tro... Aug 14 2010, 03:00 PM
qa1142 that is the $25
I would even add a paypal fe... Aug 14 2010, 03:06 PM
charliew I would think 300.00-500.00 might cover the labor Aug 14 2010, 03:09 PM
Phoenix-MN
I would think 300.00-500.00 might cover the labo... Aug 14 2010, 05:15 PM
qa1142
[quote name='charliew' post='1356452' date='Aug 1... Aug 14 2010, 05:22 PM
sixnotfour Towing aid without removing axles. Aug 28 2010, 05:56 PM
Dr Evil That looks dangerous :blink: Aug 28 2010, 07:03 PM
John
First pic shows:
914 Rotisserie
Engine stand
My... Aug 28 2010, 09:06 PM
rick 918-S I had a very rusty caliper I made this clamp with ... Sep 21 2010, 10:43 PM
rick 918-S :) Sep 21 2010, 10:44 PM
rick 918-S :) Sep 21 2010, 10:46 PM
rick 918-S :) Sep 21 2010, 10:48 PM
scotty b some guy on E-bay seveal years ago. I really don... Jan 8 2009, 08:17 PM URY914 I made an extension for my floor jack. When I jack... Jan 8 2009, 07:09 PM URY914 I welded a old socket on the bottom of it to go in... Jan 8 2009, 07:10 PM URY914 I also get comments on the jack stand blocks. Who ... Jan 8 2009, 07:12 PM URY914 I build this tool box/welding cart too... Jan 8 2009, 07:16 PM URY914 The frame in made of scrap Unistrut steel from a j... Jan 8 2009, 07:19 PM URY914 I found these bad boys at a auto show and really w... Jan 8 2009, 07:23 PM smontanaro Can we just skip the obligatory waiting period and... Jan 8 2009, 07:37 PM Todd Enlund
Can we just skip the obligatory waiting period an... Jan 8 2009, 07:59 PM 911quest Here is my work in progress a P258c for seting pin... Jan 8 2009, 07:45 PM Dr Evil
Here is my work in progress a P258c for seting pi... Jan 8 2009, 07:46 PM Zimms
Here is my work in progress a P258c for seting pi... Jan 9 2009, 08:36 PM 911quest
Here is my work in progress a P258c for seting p... Jan 10 2009, 09:31 PM Zimms
[quote name='Zimms' post='1119775' date='Jan 9 20... Jan 10 2009, 11:22 PM r_towle I want a plasma cutter...my head hurts thinking ab... Jan 8 2009, 08:20 PM scotty b Yeah most likely overkill as I used 3/8 plate for ... Jan 8 2009, 08:24 PM RJMII http://inlinethumb26.webshots.com/43161/2593686280... Jan 8 2009, 11:53 PM wertygrog here's a super flat 22mm wrench for tensioning... Jan 8 2009, 11:57 PM zambezi Heres an engine stand I built for storing and runn... Jan 9 2009, 01:18 AM Bartlett 914
Heres an engine stand I built for storing and run... Jan 9 2009, 08:51 AM zambezi
Heres an engine stand I built for storing and ru... Jan 11 2009, 12:26 AM michelko My Engine Test stand
and the tool to check fuel... Jan 9 2009, 08:58 AM Todd Enlund
and the tool to check fuellevel in zenith carbs
... Jan 9 2009, 12:50 PM aircooledtechguy Here's my engine run stand and the starter box... Jan 9 2009, 11:25 AM andys I've got several custom jigs and fixtures, but... Jan 9 2009, 02:56 PM roadster fan
I've got several custom jigs and fixtures, bu... Jan 9 2009, 04:16 PM MrKona Here's my transaxle driveshaft holder tool. Ke... Jan 9 2009, 03:19 PM roadster fan Here is one that I made after having to remove the... Jan 9 2009, 04:37 PM 914dave
Here's the rotisserie pix's Jan 9 2009, 05:15 PM J P Stein Wanna check backlash on the R&P of your 901? H... Jan 9 2009, 07:34 PM MrKona
Wanna check backlash on the R&P of your 901? ... Jan 9 2009, 10:23 PM J P Stein
I like the backlash measurement set up. Do you ... Jan 10 2009, 10:47 AM carr914 This thread would not be complete without FourBlad... Jan 9 2009, 09:32 PM sean_v8_914 suspension bushing reamer Jan 10 2009, 10:09 AM rick 918-S I made these for doing large deep shrinks. You sli... Jan 10 2009, 01:57 PM rick 918-S Here is the result or close to it.
Jan 10 2009, 01:57 PM McMark Revival!
I found a tool I made awhile ago. 9... Jan 19 2009, 09:53 PM highways Here's my favorite 'found object'. My ... Jan 20 2009, 03:49 AM Dr Evil
Here's my favorite 'found object'. My... Jan 28 2009, 04:46 PM McMark That's a cool kit! Jan 20 2009, 08:46 PM URY914 No, it's a TOOL kit. Jan 20 2009, 09:23 PM MrKona Here's my home made blasting cabinet. I just f... Jan 28 2009, 01:13 AM Todd Enlund
Here's my home made blasting cabinet. I just ... Feb 1 2009, 11:35 AM cwpeden I made my own blasting cabinet too and used my sho... Jan 28 2009, 01:41 AM scotty b Yeah you really can't beat Thompsons prices bu... Jan 28 2009, 06:44 PM rick 918-S I'm not sure if you would classify 2" mas... Jan 30 2009, 08:39 AM highways
I couldnt resist this deal on the cigars, but be... Jan 30 2009, 06:51 PM zig-n-zag tranny nut buster.... http://i631.photobucket.com/... Jan 31 2009, 07:48 PM majkos I'm suprise no one made a Engine Head Sensor t... Feb 1 2009, 09:59 AM majkos
Simple 13mm socket, 914 jack handle, cut at a ... Feb 1 2009, 10:20 AM Sleepin ......and I am missing your Superbowl party.... :W... Feb 1 2009, 11:15 AM Gint You've never been to Kevin's?!?! ... Feb 1 2009, 11:22 AM majkos
You've never been to Kevin's?!?! ... Feb 1 2009, 02:16 PM Wilhelm [size=5]Ball Joint Remover
[center]So I don... Feb 2 2009, 10:11 PM McMark Nice work. Feb 3 2009, 12:49 AM Racer Chris Delrin rear bushing cutting tools
Top: Sleeve th... Feb 5 2009, 09:23 AM larss Rear boot torsion bar tool
Made this tool for fit... Sep 22 2009, 01:15 AM charliew I don't remember where I saw it but the fiero ... Sep 22 2009, 08:24 AM jimkelly bearing removal tool - not mine
see thread
http... Apr 28 2010, 07:21 AM McMark Made another tool today. This piece fits tightly ... Jul 28 2010, 02:01 PM rdauenhauer Here is one that is surprisingly simple but I find... Jul 30 2010, 09:35 PM rdauenhauer here is THE tool for unlocking the rear boot :D
... Jul 30 2010, 09:37 PM Jeff Bowlsby
here is THE tool for unlocking the rear boot :D ... Aug 12 2010, 01:07 PM charliew
here is THE tool for unlocking the rear boot :D... Aug 13 2010, 05:34 PM charliew A picture of you using that tool would be interest... Jul 31 2010, 01:05 PM larss Handle made when fitting the rear window, one in e... Aug 12 2010, 02:50 AM McMark :lol4: Love it, Lars! That's awesome. Aug 12 2010, 11:22 AM Richard Casto
:lol4: Love it, Lars! That's awesome.
... Aug 12 2010, 01:13 PM Phoenix-MN Let's kick it up a notch This isn't 914 ... Aug 12 2010, 06:23 PM charliew That is neat but it would take me three days to bu... Aug 13 2010, 05:27 PM Bartlett 914
That is neat but it would take me three days to b... Aug 13 2010, 05:33 PM rick 918-S
That is neat but it would take me three days to ... Aug 14 2010, 02:42 PM Phoenix-MN
That is neat but it would take me three days to b... Aug 14 2010, 02:31 PM qa1142
[quote name='charliew' post='1356147' date='Aug 1... Aug 14 2010, 02:40 PM rudedude I'd even pay you something for your time :tro... Aug 14 2010, 03:00 PM qa1142 that is the $25
I would even add a paypal fe... Aug 14 2010, 03:06 PM charliew I would think 300.00-500.00 might cover the labor Aug 14 2010, 03:09 PM Phoenix-MN
I would think 300.00-500.00 might cover the labo... Aug 14 2010, 05:15 PM qa1142
[quote name='charliew' post='1356452' date='Aug 1... Aug 14 2010, 05:22 PM sixnotfour Towing aid without removing axles. Aug 28 2010, 05:56 PM Dr Evil That looks dangerous :blink: Aug 28 2010, 07:03 PM John
First pic shows:
914 Rotisserie
Engine stand
My... Aug 28 2010, 09:06 PM rick 918-S I had a very rusty caliper I made this clamp with ... Sep 21 2010, 10:43 PM rick 918-S :) Sep 21 2010, 10:44 PM rick 918-S :) Sep 21 2010, 10:46 PM rick 918-S :) Sep 21 2010, 10:48 PM  |
1 User(s) are reading this topic (1 Guests and 0 Anonymous Users)
0 Members:

|
Lo-Fi Version | Time is now: 9th May 2025 - 11:44 PM |
Invision Power Board
v9.1.4 © 2025 IPS, Inc.
| All rights reserved 914World.com © since 2002 |
|
914World.com is the fastest growing online 914 community! We have it all, classifieds, events, forums, vendors, parts, autocross, racing, technical articles, events calendar, newsletter, restoration, gallery, archives, history and more for your Porsche 914 ... |