|
|
|
Porsche, and the Porsche crest are registered trademarks of Dr. Ing. h.c. F. Porsche AG.
This site is not affiliated with Porsche in any way. Its only purpose is to provide an online forum for car enthusiasts. All other trademarks are property of their respective owners. |
|
|

  |

| yeahmag |
 May 1 2009, 10:20 AM May 1 2009, 10:20 AM
Post
#1
|
|
Advanced Member  Group: Members Posts: 2,421 Joined: 18-April 05 From: Pasadena, CA Member No.: 3,946 Region Association: Southern California |
So I've overcome most of my sway bar hurdles. Turned down stock bushings to fit the odd ball sized droplink "hoop". Made "press fit" reducers for the heim joint out of metal fuel line (kinda proud of that one), spacers made from the "old" metal sleeves to center the heim joint, and now it's install time.
The bar is in, but I'm wondering (since I have the option) what I should shoot for as far as orientation of the arm and droplinks when the car is at rest. I would guess I want the arm perpendicular to the ground, but thought I'd ask. -Aaron |
   |

 
|
| PeeGreen 914 |
May 1 2009, 11:19 AM
Post
#2
|
|
Just when you think you're done...wait, there is more..lol Group: Members Posts: 10,219 Joined: 21-September 06 From: Seattle, WA... actually Everett Member No.: 6,884 Region Association: Pacific Northwest |
|
|
|
|
| yeahmag |
May 1 2009, 11:21 AM
Post
#3
|
|
Advanced Member Group: Members Posts: 2,421 Joined: 18-April 05 From: Pasadena, CA Member No.: 3,946 Region Association: Southern California |
Good grief... I'll shoot some at lunch.
|
|
|
|
| Dr. Roger |
May 1 2009, 11:26 AM
Post
#4
|
|
A bat out of hell. Group: Members Posts: 3,944 Joined: 31-January 05 From: Hercules, California Member No.: 3,533 Region Association: Northern California |
(IMG:style_emoticons/default/happy11.gif)
Ya' walked right into that one. LOL We love to see other peoples injenuity, not just hear about it. (IMG:style_emoticons/default/beerchug.gif) I want to see it too. (IMG:style_emoticons/default/popcorn[1].gif) |
|
|
|
| yeahmag |
May 1 2009, 02:11 PM
Post
#5
|
|
Advanced Member Group: Members Posts: 2,421 Joined: 18-April 05 From: Pasadena, CA Member No.: 3,946 Region Association: Southern California |
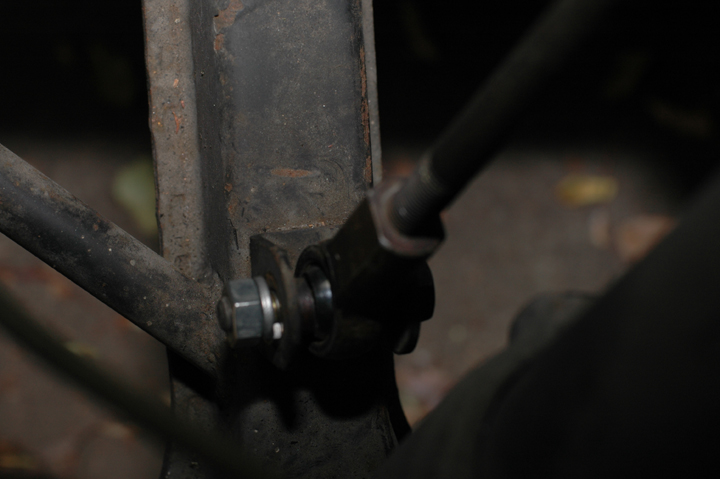
The "grey" color in the center of the joint is the metal brake/fuel line that I cut down to fit. It's a perfect interference fit. Just a light touch with a nylon mallet.
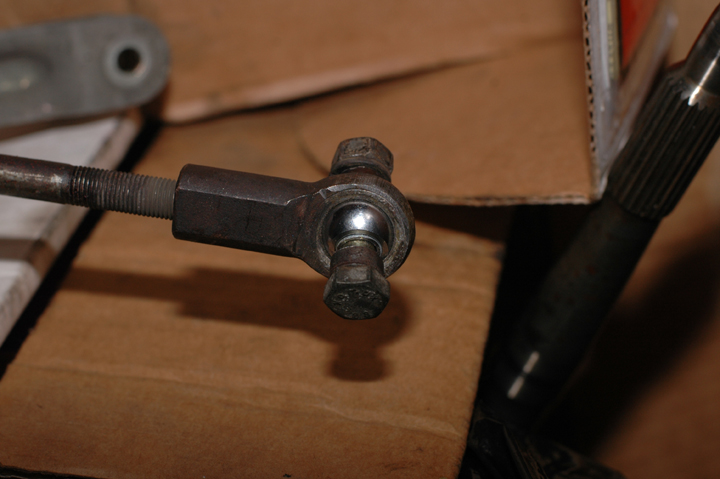 The bushings are standard Weltmeister Droplink replacements that have the radius ground down to fit the opening and then the overall width of the shoulder(s) ground down to fit the arm. I may want to take it down even further so I'm rubbing the bushing less on the arms. 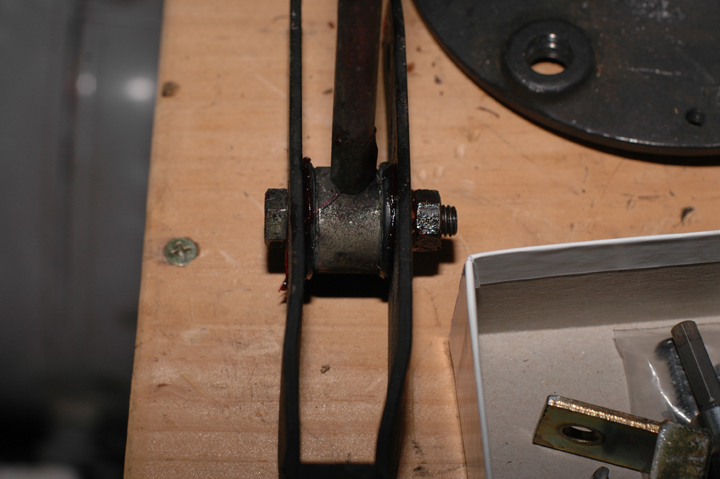 |
|
|
|
| yeahmag |
May 1 2009, 02:12 PM
Post
#6
|
|
Advanced Member Group: Members Posts: 2,421 Joined: 18-April 05 From: Pasadena, CA Member No.: 3,946 Region Association: Southern California |
Here are the spacers made out of the old metal inserts. The overall width is close to that of the insert (or what it originally was).
 Droplink installed. 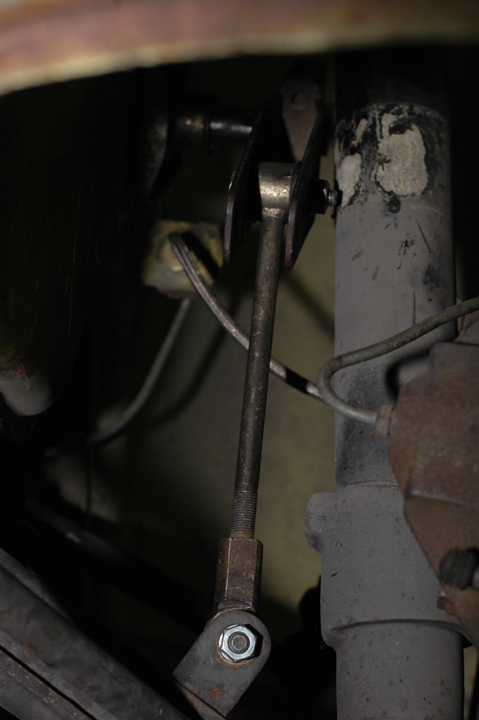 |
|
|
|
| yeahmag |
May 1 2009, 02:13 PM
Post
#7
|
|
Advanced Member Group: Members Posts: 2,421 Joined: 18-April 05 From: Pasadena, CA Member No.: 3,946 Region Association: Southern California |
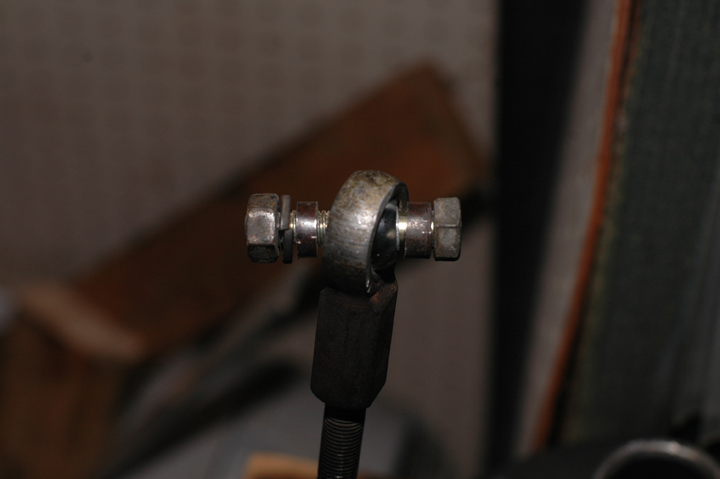
View from above showing the spacers at work.
 One thing I'm tempted to change is to make the sleeve act as the spacer too. That way if I ever have to remove it I don't have to fiddle with the small, steel spacers. |
|
|
|
| yeahmag |
May 1 2009, 02:18 PM
Post
#8
|
|
Advanced Member Group: Members Posts: 2,421 Joined: 18-April 05 From: Pasadena, CA Member No.: 3,946 Region Association: Southern California |
So now can I get some advice??? (IMG:style_emoticons/default/smile.gif)
|
|
|
|
| SirAndy |
May 1 2009, 02:49 PM
Post
#9
|
|
Resident German Group: Admin Posts: 41,640 Joined: 21-January 03 From: Oakland, Kalifornia Member No.: 179 Region Association: Northern California |
QUOTE(yeahmag @ May 1 2009, 01:18 PM)  Yes. It looks like the top part is going to rub on the struts ... (IMG:style_emoticons/default/shades.gif) Andy |
|
|
|
| 6freak |
May 1 2009, 02:54 PM
Post
#10
|
|
MR.C Group: Members Posts: 4,740 Joined: 19-March 08 From: Tacoma WA Member No.: 8,829 Region Association: Pacific Northwest |
Rotate that bolt on the top it MITE gain you enough space..so it wont rub as it already was ...JMO
|
|
|
|
| yeahmag |
May 1 2009, 02:59 PM
Post
#11
|
|
Advanced Member Group: Members Posts: 2,421 Joined: 18-April 05 From: Pasadena, CA Member No.: 3,946 Region Association: Southern California |
Will do. FWIW that is in full droop and is not touching. The arm will move away from the strut once it's on all fours.
Any opinions on geometry? |
|
|
|
| 6freak |
May 1 2009, 03:09 PM
Post
#12
|
|
MR.C Group: Members Posts: 4,740 Joined: 19-March 08 From: Tacoma WA Member No.: 8,829 Region Association: Pacific Northwest |
QUOTE(yeahmag @ May 1 2009, 01:59 PM) Will do. FWIW that is in full droop and is not touching. The arm will move away from the strut once it's on all fours. Any opinions on geometry? It appears from the pix that you "could" over tight`n that nut and bolt on the top and would cause it to actualy bind? try a nylock nut and tighten just pass the end of the bolt.You want that part to move freely |
|
|
|
| SirAndy |
May 1 2009, 03:16 PM
Post
#13
|
|
Resident German Group: Admin Posts: 41,640 Joined: 21-January 03 From: Oakland, Kalifornia Member No.: 179 Region Association: Northern California |
QUOTE(yeahmag @ May 1 2009, 01:59 PM) Any opinions on geometry? Parallel to the ground under load so it can freely move both ways. Does the top part have multiple holes to move the droplink? (IMG:style_emoticons/default/idea.gif) Andy |
|
|
|
| yeahmag |
May 1 2009, 03:17 PM
Post
#14
|
|
Advanced Member Group: Members Posts: 2,421 Joined: 18-April 05 From: Pasadena, CA Member No.: 3,946 Region Association: Southern California |
Yes. 4 holes. It's in the 3rd (one from all the way in - towards the bar).
|
|
|
|
| 6freak |
May 1 2009, 03:23 PM
Post
#15
|
|
MR.C Group: Members Posts: 4,740 Joined: 19-March 08 From: Tacoma WA Member No.: 8,829 Region Association: Pacific Northwest |
QUOTE(yeahmag @ May 1 2009, 02:17 PM) Yes. 4 holes. It's in the 3rd (one from all the way in - towards the bar). That will put more wieght on the front ..more stable at high speed..mine slides and i like it more toward the front !makes for what i call happy steering and the car rotate`s nice ...you will have to play with it to get the feel you like ..but i bet you move it out to the end when its all said and done.....good luck and nice work |
|
|
|
| yeahmag |
May 1 2009, 03:26 PM
Post
#16
|
|
Advanced Member Group: Members Posts: 2,421 Joined: 18-April 05 From: Pasadena, CA Member No.: 3,946 Region Association: Southern California |
"In" effectively stiffens the bar and "out" (due to leverage) softens it. Correct? I was told by several sources that you want all the front bar you can get in these cars!
|
|
|
|
| SirAndy |
May 1 2009, 03:39 PM
Post
#17
|
|
Resident German Group: Admin Posts: 41,640 Joined: 21-January 03 From: Oakland, Kalifornia Member No.: 179 Region Association: Northern California |
QUOTE(yeahmag @ May 1 2009, 02:26 PM) I was told by several sources that you want all the front bar you can get in these cars! Not true ... How did the car handle before you installed the bar? Just adding the bar and setting it to full soft will give you more grip in the front. So, if your car was slightly understeering in corners (front end pushing), this would be a good point to start. If your car was oversteering (rear end lose), start with a stiffer setting. Full soft is towards the front of the car, full stiff is towards the rear of the car. (IMG:style_emoticons/default/bye1.gif) Andy |
|
|
|
| yeahmag |
May 1 2009, 10:20 PM
Post
#18
|
|
Advanced Member Group: Members Posts: 2,421 Joined: 18-April 05 From: Pasadena, CA Member No.: 3,946 Region Association: Southern California |
It's on! I'm disappointed that none of you caught that It would be in bind the way I was mounting the droplinks. The heim joint needs to be at the top!
The car handled OK. with the stock bar and 21mm torsion bars. Rears are 180lb springs. I had to remove the rear bar to even begin to get the front top push. |
|
|
|
| SirAndy |
May 1 2009, 10:51 PM
Post
#19
|
|
Resident German Group: Admin Posts: 41,640 Joined: 21-January 03 From: Oakland, Kalifornia Member No.: 179 Region Association: Northern California |
QUOTE(yeahmag @ May 1 2009, 09:20 PM) I had to remove the rear bar to even begin to get the front top push. So put the rear bar back on and start the front bar at full stiff ... (IMG:style_emoticons/default/shades.gif) Andy |
|
|
|
|
1 User(s) are reading this topic (1 Guests and 0 Anonymous Users)
0 Members:

|
Lo-Fi Version | Time is now: 17th May 2024 - 12:18 PM |
Invision Power Board
v9.1.4 © 2024 IPS, Inc.