|
|
|
Porsche, and the Porsche crest are registered trademarks of Dr. Ing. h.c. F. Porsche AG.
This site is not affiliated with Porsche in any way. Its only purpose is to provide an online forum for car enthusiasts. All other trademarks are property of their respective owners. |
|
|

  |

| tradisrad |
 Aug 21 2009, 09:03 AM Aug 21 2009, 09:03 AM
Post
#1
|
|
Senior Member  Group: Members Posts: 985 Joined: 11-September 06 From: San Mateo, CA Member No.: 6,815 Region Association: Northern California |
I purchased Elephant Racing poly bronze bushings for the rear. I spent a ton of time and several broken drill bits removing the stock rubber from one trailing arm.
This task was a big PIA. Is there another way, for those who don't have a 20-ton press, to remove these bushings? Any advice is appreciated. |
   |

 
|
| jaxdream |
Aug 21 2009, 09:10 AM
Post
#2
|
|
Senior Member Group: Members Posts: 974 Joined: 8-July 08 From: North Central Tennessee Member No.: 9,270 Region Association: South East States |
Have you tryed heating with a propane tourch to melt / burn the rubber out of the arm ?? The propane tourch shouldn't get the metal too hot to ruin the heat treatment of the shaft and arm. (IMG:style_emoticons/default/blowtorch.gif)
Jaxdream |
|
|
|
| tradisrad |
Aug 21 2009, 09:25 AM
Post
#3
|
|
Senior Member Group: Members Posts: 985 Joined: 11-September 06 From: San Mateo, CA Member No.: 6,815 Region Association: Northern California |
yes, I applied heat and had them smoking. Worked great for the front, but not so great for the rears I am working on.
The elephant set comes with special shafts, so I am not worried about getting those hot. I did not want to use heat on the painted surface 'cause I don't want to repaint, but it's too late now! |
|
|
|
| McMark |
Aug 21 2009, 11:19 AM
Post
#4
|
|
914 Freak! Group: Retired Admin Posts: 20,179 Joined: 13-March 03 From: Grand Rapids, MI Member No.: 419 Region Association: None |
Here's what I do. They come out smoothly. No broken tools, no cursing, 20 minutes for both sides.
Attached image(s) 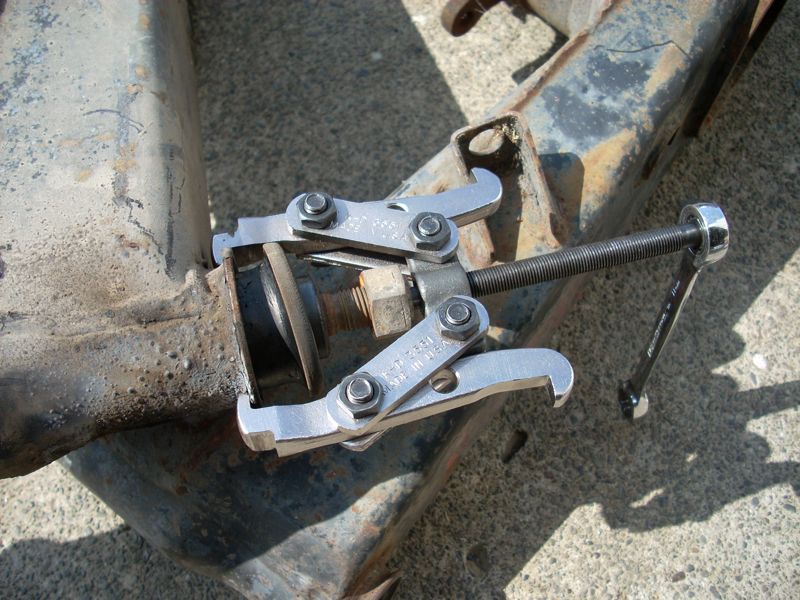 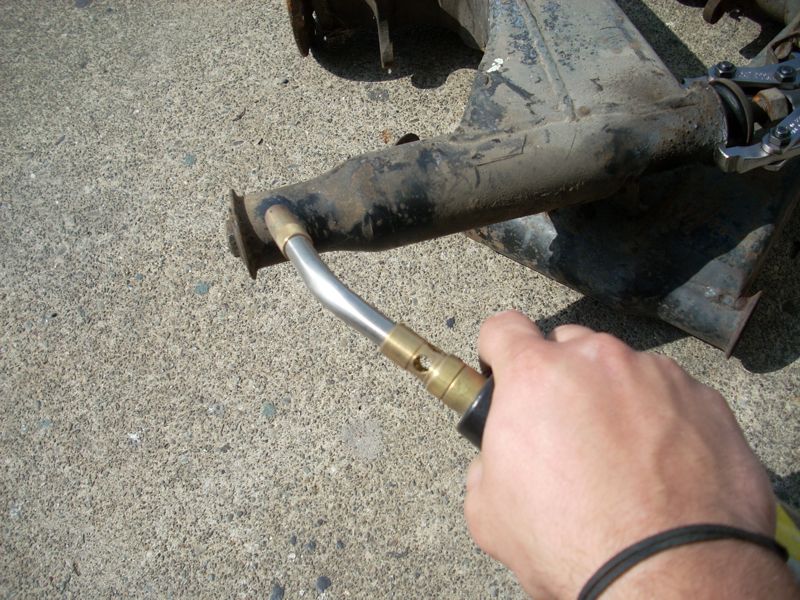
|
|
|
|
| tradisrad |
Aug 21 2009, 11:53 AM
Post
#5
|
|
Senior Member Group: Members Posts: 985 Joined: 11-September 06 From: San Mateo, CA Member No.: 6,815 Region Association: Northern California |
McMark, thanks I'll give that a try! I'm working on the Green 14 I bought from LarryR.
|
|
|
|
| J P Stein |
Aug 21 2009, 12:02 PM
Post
#6
|
|
Irrelevant old fart Group: Members Posts: 8,797 Joined: 30-December 02 From: Vancouver, WA Member No.: 45 Region Association: None |
Fire is your friend....unless you live in CA. (IMG:style_emoticons/default/biggrin.gif)
|
|
|
|
| Chris Pincetich |
Aug 21 2009, 12:02 PM
Post
#7
|
|
B-) Group: Members Posts: 2,082 Joined: 3-October 05 From: Point Reyes Station, CA Member No.: 4,907 Region Association: Northern California |
Yes, they are a pain to get out! I found that my 2 favorite tools helped a lot
(IMG:style_emoticons/default/smash.gif) (IMG:style_emoticons/default/welder.gif) After heating, I pounded the thing (pulling looks nicer). Then I used a razor blade to cut out what was showing of the bushing. This helped get more access for the heat to melt away the bushing inside. It took like 2 hrs to do the first one, 1 hr to do the second one. Good luck (IMG:style_emoticons/default/beerchug.gif) |
|
|
|
| kconway |
Aug 21 2009, 12:14 PM
Post
#8
|
|
Senior Member Group: Members Posts: 1,347 Joined: 6-December 04 From: Monrovia, CA Member No.: 3,231 Region Association: Southern California |
QUOTE(McMark @ Aug 21 2009, 09:19 AM)  Here's what I do. They come out smoothly. No broken tools, no cursing, 20 minutes for both sides. Mark, So are you pushing the rod through the bushings and out the other side of the swingarm? Kev |
|
|
|
| sean_v8_914 |
Aug 21 2009, 12:15 PM
Post
#9
|
|
Chingon 601 Group: Members Posts: 4,011 Joined: 1-February 05 From: San Diego Member No.: 3,541 |
a press works best
|
|
|
|
| jaxdream |
Aug 21 2009, 12:21 PM
Post
#10
|
|
Senior Member Group: Members Posts: 974 Joined: 8-July 08 From: North Central Tennessee Member No.: 9,270 Region Association: South East States |
QUOTE(McMark @ Aug 21 2009, 09:19 AM) Here's what I do. They come out smoothly. No broken tools, no cursing, 20 minutes for both sides. This is exactly what I did , pushed the shaft out one side , got the bushing out , put the puller / pusher on the other side pushed the shaft back through the bushing and then removed that side using heat from a propane tourch - both sides done (IMG:style_emoticons/default/piratenanner.gif) Jaxdream |
|
|
|
| tradisrad |
Aug 22 2009, 09:50 AM
Post
#11
|
|
Senior Member Group: Members Posts: 985 Joined: 11-September 06 From: San Mateo, CA Member No.: 6,815 Region Association: Northern California |
McMark: (IMG:style_emoticons/default/pray.gif) You saved me hours on the second trailing arm. So why does Chuck at Elephant recomment drilling the bushings out?
To anyone doing this job. DO NOT DRILL, use McMarks method. Minutes compared hours... |
|
|
|
| SKL1 |
Mar 24 2013, 06:37 PM
Post
#12
|
|
Senior Member Group: Members Posts: 1,600 Joined: 19-February 11 From: north Scottsdale Member No.: 12,732 Region Association: Upper MidWest |
Now what?
Pushing out the hubs with a 12 ton press and bang! Hub came out taking one of the bearing races with it, on each side!! (IMG:style_emoticons/default/headbang.gif) (IMG:style_emoticons/default/headbang.gif) 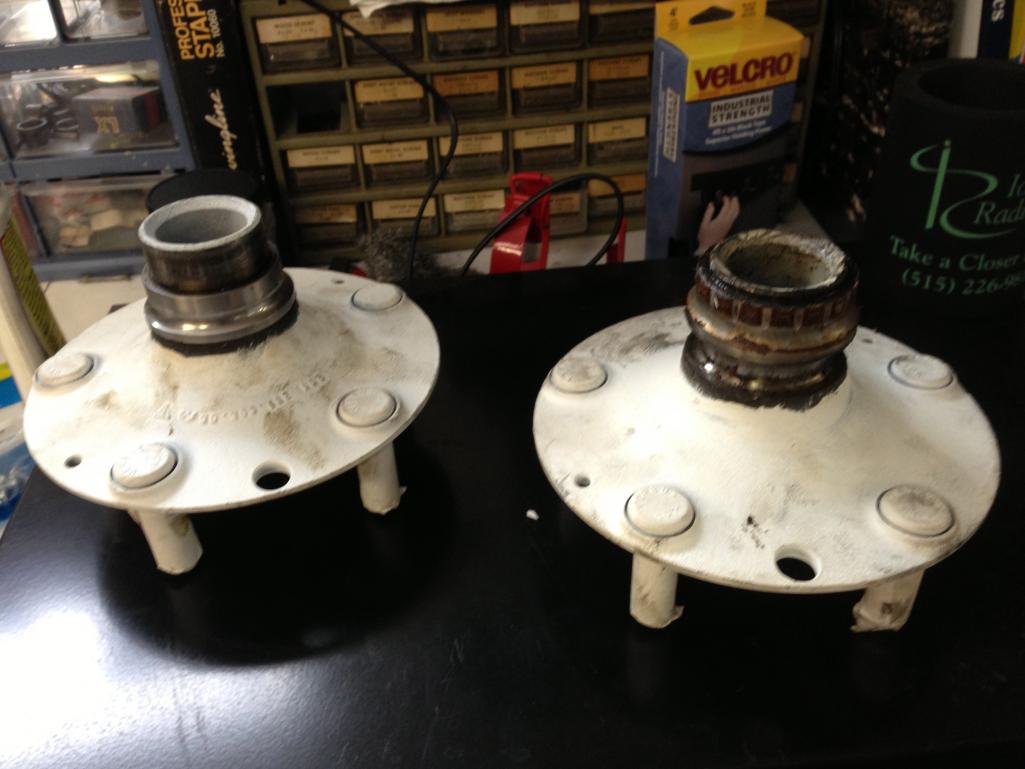 |
|
|
|
| bandjoey |
Mar 24 2013, 06:42 PM
Post
#13
|
|
bandjoey Group: Members Posts: 4,926 Joined: 26-September 07 From: Bedford Tx Member No.: 8,156 Region Association: Southwest Region |
WAtch this for the hubs and bearings:
http://www.pmbperformance.com/video.html (IMG:style_emoticons/default/sawzall-smiley.gif) |
|
|
|
| SKL1 |
Mar 24 2013, 07:23 PM
Post
#14
|
|
Senior Member Group: Members Posts: 1,600 Joined: 19-February 11 From: north Scottsdale Member No.: 12,732 Region Association: Upper MidWest |
Figured Eric would have the answer!
Bet I'll need the dremel as hard as the hubs came out!! Sounded like an explosion when they finally "fell" out!!! Damn they were under a lot of pressure!!! |
|
|
|
| SKL1 |
Mar 24 2013, 07:35 PM
Post
#15
|
|
Senior Member Group: Members Posts: 1,600 Joined: 19-February 11 From: north Scottsdale Member No.: 12,732 Region Association: Upper MidWest |
Installing rear bearing video won't work- hopefully just a temporary problem...
|
|
|
|
| Eric_Shea |
Mar 24 2013, 07:53 PM
Post
#16
|
|
PMB Performance Group: Admin Posts: 19,275 Joined: 3-September 03 From: Salt Lake City, UT Member No.: 1,110 Region Association: Rocky Mountains |
Do you have a press?
|
|
|
|
| SKL1 |
Mar 25 2013, 05:41 AM
Post
#17
|
|
Senior Member Group: Members Posts: 1,600 Joined: 19-February 11 From: north Scottsdale Member No.: 12,732 Region Association: Upper MidWest |
Yep a 12 ton HF that looks like the one in one of your videos... used it to pop out the hubs along with one of the bearing races (IMG:style_emoticons/default/smile.gif)
|
|
|
|
| 02loftsmoor |
Mar 25 2013, 09:36 AM
Post
#18
|
|
Senior Member Group: Members Posts: 577 Joined: 26-June 11 From: Ft. Worth TX Member No.: 13,243 Region Association: Southwest Region |
I looks like you came from cold country, is there rust in bearing seats??
|
|
|
|
| Eric_Shea |
Mar 25 2013, 04:05 PM
Post
#19
|
|
PMB Performance Group: Admin Posts: 19,275 Joined: 3-September 03 From: Salt Lake City, UT Member No.: 1,110 Region Association: Rocky Mountains |
QUOTE Yep a 12 ton HF that looks like the one in one of your videos... used it to pop out the hubs along with one of the bearing races I simply press the shafts out. As follows: 1. Set the shelf at the 4th hole from the top. Heat the shaft with a MAPP torch (the threaded section sticking out from the bushing) until there are wisps of smoke from the rubber. 2. Press the shaft through the first bushing. 3. Using the largest flat head screw driver you can, pry the rubber bushing up and out from the inside. Go back and forth and you'll see it move upward and eventually out. Not hard at all. 4. Drop the shelf to the 5th hole down. 5. heat and press the shaft through the other bushing. Get the shaft very hot so it can press through the bushing without binding. Otherwise the bushing can bind and go into the arm. 6. The press will not have enough travel to get the shaft through the second bushing. Move the shelf back to the 4th hole and finish the job. 7. Repeat step 3. Very easy. No mess. Not much stink. Yada, yada, yada... |
|
|
|
|
1 User(s) are reading this topic (1 Guests and 0 Anonymous Users)
0 Members:

|
Lo-Fi Version | Time is now: 15th May 2024 - 07:11 AM |
Invision Power Board
v9.1.4 © 2024 IPS, Inc.