|
|
|
Porsche, and the Porsche crest are registered trademarks of Dr. Ing. h.c. F. Porsche AG.
This site is not affiliated with Porsche in any way. Its only purpose is to provide an online forum for car enthusiasts. All other trademarks are property of their respective owners. |
|
|

  |

| JOE M |
 Aug 29 2009, 10:31 AM Aug 29 2009, 10:31 AM
Post
#21
|
|
Member  Group: Members Posts: 293 Joined: 27-August 07 From: N.H Member No.: 8,042 Region Association: None |
QUOTE(aircooledtechguy @ Aug 29 2009, 09:14 AM)  QUOTE(McMark @ Aug 28 2009, 05:43 PM) I think this is a slightly improper description, which I've seen reiterated many times. The symmetry of the linkage is irrelevant as long as the butterflies are both closed completely at idle and hit WOT at the same time. I fear that emphasizing the symmetry leads people to focus too much on the looks of the linkage and takes away what they should be focusing on, the actual operation. I've heard of people pulling out tape measures to equalize their linkage. Which is the WRONG approach. I've synched a linkage that was certainly NOT symmetrical, but hit idle and WOT perfectly. I'm not trying to attack you, Nate. Just a general perspective of mine. I understand what you're saying and your right; no need to be identical so leave the tape measures in the tool bag. (IMG:style_emoticons/default/smile.gif) I only bring that up because I see all the time where a client will bring in a car with duals complaining that they just won't run right and they have one drop vertical and one at about a 45 degree angle. . . (IMG:style_emoticons/default/rolleyes.gif) They have no idea that it makes a difference. You get the drops closer to each other and magically things begin to fall into place and work as they should. What is your take on the ports on the intakes. Should I link them together? |
   |

 
|
| McMark |
Aug 29 2009, 11:11 AM
Post
#22
|
|
914 Freak! Group: Retired Admin Posts: 20,180 Joined: 13-March 03 From: Grand Rapids, MI Member No.: 419 Region Association: None |
Yup. VW did it with their dual single throat Solex setup on the busses.
|
|
|
|
| McMark |
Aug 29 2009, 11:27 AM
Post
#23
|
|
914 Freak! Group: Retired Admin Posts: 20,180 Joined: 13-March 03 From: Grand Rapids, MI Member No.: 419 Region Association: None |
Oh, just remember to pull the balance tube and plug the ports before you attempt to use a sync gauge to balance the carbs. The balance tube can affect those readings.
|
|
|
|
| hi4head |
Aug 30 2009, 08:48 PM
Post
#24
|
|
Member Group: Members Posts: 69 Joined: 4-April 06 From: Lexington, NC Member No.: 5,819 Region Association: None |
I installed a set of the Weber 34 ICT's last year and have been pleased with them overall. (Especially since the car is now back on the road.)
There is a fairly good set of instructions at http://www.cbperformance.com/weberict.asp On mine, I did run a balance line to connect the barbs on the two manifolds. Also, I ran a vacuum line from one carb to the vacuum advance. On the retard side (?) of the vaccum, I ran a short line and plugged it with a golf tee.  Also, don't forget about possibly needing to swap out some of the jets. I have the ICT's installed on my 2 liter. I would guess that your set up should be different than mine. Mine came equipped with 1.30 for the main jets; I am running well with 1.35. The idle jet was a .52 and now I run with .60. The biggest issues that I had was balancing the airflow and getting the right jets. With the stock jets, the carbs ran way too lean for my car. There are good articles on jetting at aircooled.net . I have more pictures available of my setup if needed. Regards, Chris |
|
|
|
| JOE M |
Aug 31 2009, 11:12 AM
Post
#25
|
|
Member Group: Members Posts: 293 Joined: 27-August 07 From: N.H Member No.: 8,042 Region Association: None |
QUOTE(hi4head @ Aug 30 2009, 07:48 PM) I installed a set of the Weber 34 ICT's last year and have been pleased with them overall. (Especially since the car is now back on the road.) There is a fairly good set of instructions at http://www.cbperformance.com/weberict.asp On mine, I did run a balance line to connect the barbs on the two manifolds. Also, I ran a vacuum line from one carb to the vacuum advance. On the retard side (?) of the vaccum, I ran a short line and plugged it with a golf tee. Also, don't forget about possibly needing to swap out some of the jets. I have the ICT's installed on my 2 liter. I would guess that your set up should be different than mine. Mine came equipped with 1.30 for the main jets; I am running well with 1.35. The idle jet was a .52 and now I run with .60. The biggest issues that I had was balancing the airflow and getting the right jets. With the stock jets, the carbs ran way too lean for my car. There are good articles on jetting at aircooled.net . I have more pictures available of my setup if needed. Regards, Chris Thanks Chris, If you have more pics that would be great. I have not had any problems balancing air flow. I think I am at about 7~8 on both carbs. I am not sure if that is acceptable but it seems to run good. Also you said you just ran a line between both manifold barbs.So they just tie together and thats it. A friend of mine who has an old Nova told me to run them together to a "t" and then run a small piece off of the "t" open? I was not sure why so i did not do it. |
|
|
|
| McMark |
Aug 31 2009, 01:38 PM
Post
#26
|
|
914 Freak! Group: Retired Admin Posts: 20,180 Joined: 13-March 03 From: Grand Rapids, MI Member No.: 419 Region Association: None |
You don't want to T your vacuum lines to atmosphere/outside air.
|
|
|
|
| r_towle |
Aug 31 2009, 05:02 PM
Post
#27
|
|
Custom Member Group: Members Posts: 24,705 Joined: 9-January 03 From: Taxachusetts Member No.: 124 Region Association: North East States |
Two type of vacuum ports bud.
the manifold vacuum gets tied together, and thats it. The vacuum you want for the distributor is above the throttle plate so it uses the itty bitty ports on the carb itself, not the big ass ports on the manifolds. So, tie the two Manifold ports together. Tie the little carb vacuum ports together at a "t" and run the third leg to the distributor advance. You never want an open vacuum port on any part of the carb or manifold, it will run to lean and it will be impossible to tune. Rich |
|
|
|
| hi4head |
Sep 1 2009, 07:39 PM
Post
#28
|
|
Member Group: Members Posts: 69 Joined: 4-April 06 From: Lexington, NC Member No.: 5,819 Region Association: None |
Joe,
Rich is right on with his comments. If it helps to clarify any, I'm added some more pictures. Here is a pic I took while doing the prep for my installation. Note the big barb fitting on the manifold. There should be one of these on each manifold. A hose simply runs between the two barb fittings. According to what I've read, this balances the carbs and helps in the lower rpm range.  Next is a pic that shows a couple of things. One thing that you'll need to do is to build a bracket for your throttle cable. (Or maybe there are some around for puchase now.) You can see the high-tech model that I created with some 1"x1/8" stock and some heavy duty washers. (It may not look like much, but it works.) Also in the photo is the line coming from vacuum port of the carb connecting to the front of the vacuum advance. My method is slightly different that what Rich described. I simply ran a line from one of the carbs to the vacuum advance. I have a T around so maybe I'll try Rich's recommendation. Finally, I have a short length of hose connected to the back nipple of the vacuum advance. I have plugged this off with a golf tee. I understand that not all dizzies have vacuum advance modules and that not all vacuum advance modules have the nipple on the back side. If yours doesn't have it, don't worry about this step. Also, if someone reads this section and really knows what should be done here, please advise. 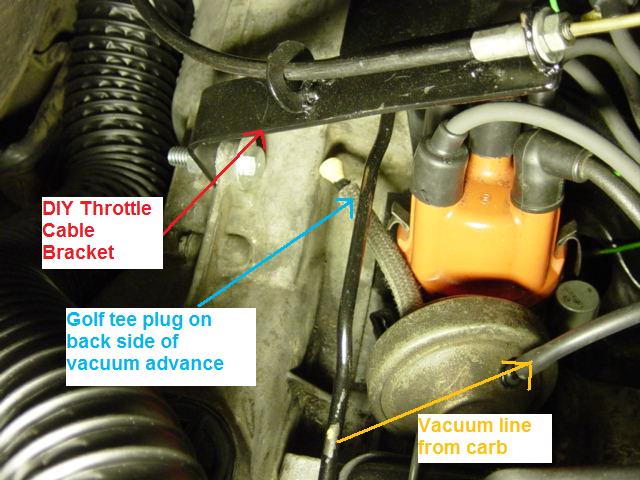 Finally, here is a shot of how my linkage setup looks. My understanding is that there are a number of ways to accomplish the same thing. 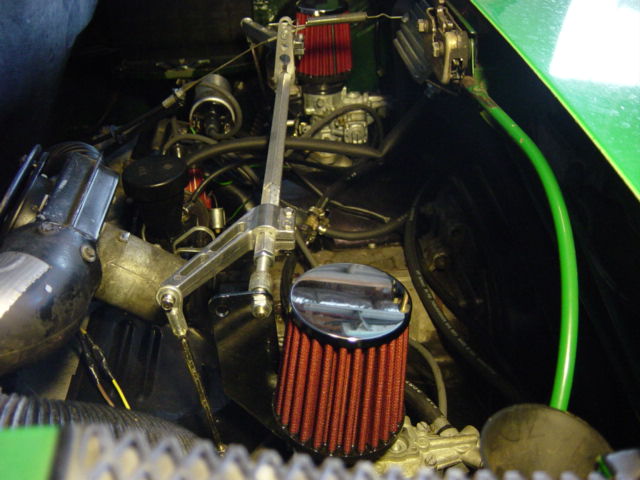 I hope that this helps at least a little. Chris |
|
|
|
| JOE M |
Sep 2 2009, 05:02 AM
Post
#29
|
|
Member Group: Members Posts: 293 Joined: 27-August 07 From: N.H Member No.: 8,042 Region Association: None |
Thanks for all your help. I installed all the connections and the did a quick baseline tune. The engine runs great until I hook up my crossbar linkage.I need to balance the rods because as soon as I hook them up I can hear a difference in engine sound and it starts to pop a little only at idle. When I take the linkage off and the speed screws re seat it smoothes out and runs good again. The ggod news is that it is close.
|
|
|
|
| r_towle |
Sep 2 2009, 06:59 AM
Post
#30
|
|
Custom Member Group: Members Posts: 24,705 Joined: 9-January 03 From: Taxachusetts Member No.: 124 Region Association: North East States |
Flip the carbs side for side and flip the linkage around.
It will be a lot easier to get it tuned....and you will need tokeep tuning... Also...I am not a huge fan of the drop links you have that came with the kit...they seem a bit loosey goosey...might make it really hard to get them perfect. Tune the linkage with one drop link in place....get it running great. Then...ever so gentle, put the other link in place so it takes no pressure to attach the link...it should fall into place...no pushing up or down on the cross bar arm, or the carb. Rich |
|
|
|
| JOE M |
Sep 2 2009, 11:08 AM
Post
#31
|
|
Member Group: Members Posts: 293 Joined: 27-August 07 From: N.H Member No.: 8,042 Region Association: None |
QUOTE(r_towle @ Sep 2 2009, 05:59 AM) Flip the carbs side for side and flip the linkage around. It will be a lot easier to get it tuned....and you will need tokeep tuning... Also...I am not a huge fan of the drop links you have that came with the kit...they seem a bit loosey goosey...might make it really hard to get them perfect. Tune the linkage with one drop link in place....get it running great. Then...ever so gentle, put the other link in place so it takes no pressure to attach the link...it should fall into place...no pushing up or down on the cross bar arm, or the carb. Rich It looks like I have the same drop linkage as Chris. It is what came with the kit and I agree that it is not great. I did see a cool setup and I want to look into it deeper to see if it something I can make at my shop. See pic below. If I cant make it I will stay with what I have for now. As for now I am going to to flip the linkage around to face the other side and tune it. 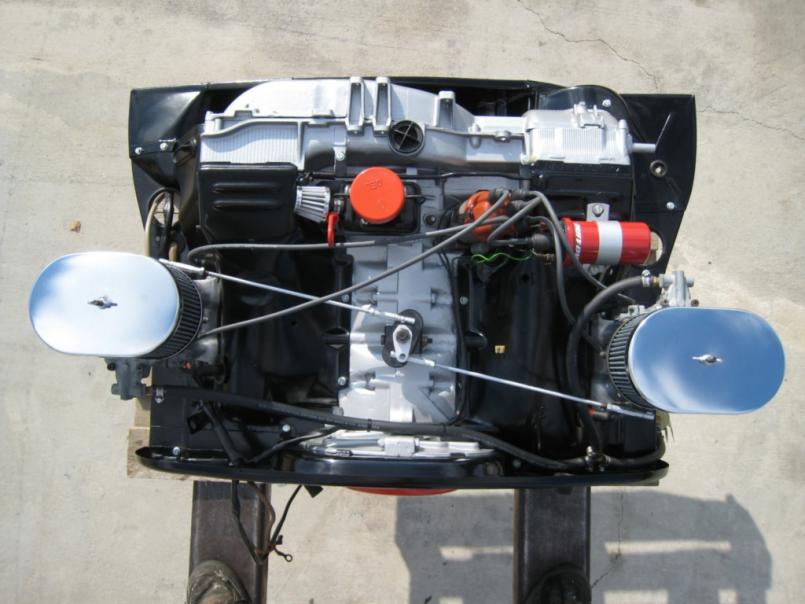 |
|
|
|
| r_towle |
Sep 2 2009, 12:33 PM
Post
#32
|
|
Custom Member Group: Members Posts: 24,705 Joined: 9-January 03 From: Taxachusetts Member No.: 124 Region Association: North East States |
You can get what you have to work fine...really.
I would agree, flip them around...what the hell, its only another two hours or your life... Then, as you set it up for the new location, do it in such a way as to shorten the drop links...it can be done. the shorter the better... They were right on the hairy edge of not having enough thread....which I think may cause yet another issue if the drop link is wobbling. If you reposition the main arm that you attach the cable to, then you reduce the drop link length by that much...it should be a bit more solid of a setup. Rich Rich |
|
|
|
| jcd914 |
Sep 2 2009, 01:43 PM
Post
#33
|
|
Advanced Member Group: Members Posts: 2,098 Joined: 7-February 08 From: Sacramento, CA Member No.: 8,684 Region Association: Northern California |
QUOTE(hi4head @ Sep 1 2009, 06:39 PM) Finally, I have a short length of hose connected to the back nipple of the vacuum advance. I have plugged this off with a golf tee. I understand that not all dizzies have vacuum advance modules and that not all vacuum advance modules have the nipple on the back side. If yours doesn't have it, don't worry about this step. Also, if someone reads this section and really knows what should be done here, please advise. Chris, You don't want to plug the rear port on the vacuum advance/retard unit. Both the advance diaphragm and the retard diaphragm are connected together and have to move together. The retard side needs to be vented so the diaphragm can move when there is vacuum to the advance. The short chunk of hose there will help keep moisture or dirt from getting in to the retard side of the vacuum unit. Jim |
|
|
|
| hi4head |
Sep 3 2009, 06:55 PM
Post
#34
|
|
Member Group: Members Posts: 69 Joined: 4-April 06 From: Lexington, NC Member No.: 5,819 Region Association: None |
Joe,
Sorry if this is hijacking your thread a little. Jim, Thanks for the insight. I will unplug the tee form the back of the advance unit and try it vented. Chris |
|
|
|
| JOE M |
Sep 4 2009, 07:21 AM
Post
#35
|
|
Member Group: Members Posts: 293 Joined: 27-August 07 From: N.H Member No.: 8,042 Region Association: None |
QUOTE(hi4head @ Sep 3 2009, 05:55 PM) Joe, Sorry if this is hijacking your thread a little. Jim, Thanks for the insight. I will unplug the tee form the back of the advance unit and try it vented. Chris It`s all good Chis. Thanks for all your help. Last night I took my carbs out and pre-set everything on a bench. I re-installed them and the car seems to run real good. Today I am going to make a bracket to hook up the throttle cable and than I will adjust the drop linkage. Thanks for all the help everyone. |
|
|
|
|
1 User(s) are reading this topic (1 Guests and 0 Anonymous Users)
0 Members:

|
Lo-Fi Version | Time is now: 27th July 2026 - 03:48 PM |
Invision Power Board
v9.1.4 © 2026 IPS, Inc.