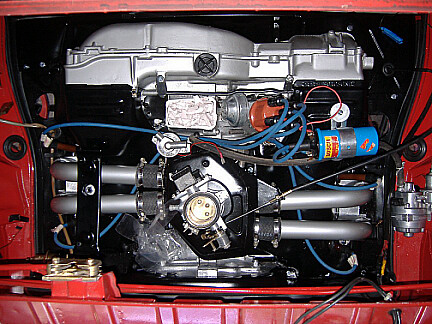
im trying to see what i have and don't have in my engine bay and why i seem to have missing vacuum hoses.
can i get a few pictures of peoples engine bays. possibly one with smog equipment and one without. and what is an anti flash back valve?
Full Version: engine pictures
What model or engine number do you have in there? There are more variations on a theme than you might know.
I can tell you there are folks here that can tell from your picture what you may be missing, but that picture you should put up is key.
Everyone wants to see what you are missing!
John
avidfanjpl
I can tell you there are folks here that can tell from your picture what you may be missing, but that picture you should put up is key.
Everyone wants to see what you are missing!
John
avidfanjpl
75 2l djet. i can get pictures but im missing the evaporative filter and anti flash back pieces. and also when i was out checking out the vacuum lines we created suction on both sides of the distributor and it caused it to idle a lot smoother. although not perfect.
ill try and get pictures in a couple of minutes
ill try and get pictures in a couple of minutes
http://www.914world.com/bbs2/index.php?sho...c=97278&hl=
that is a picture of the engine. although not a great picture its something ill brb with more
that is a picture of the engine. although not a great picture its something ill brb with more
hoses that are disconnected are to the air filter, and there is one that goes to the oil that connects to the air filter.
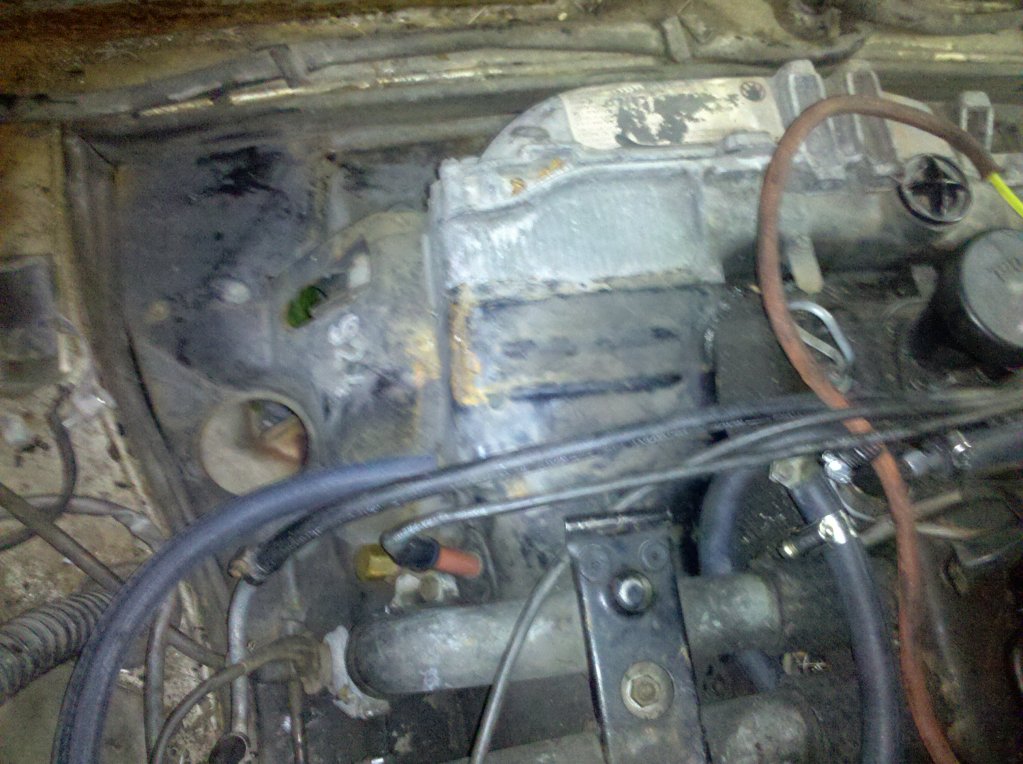
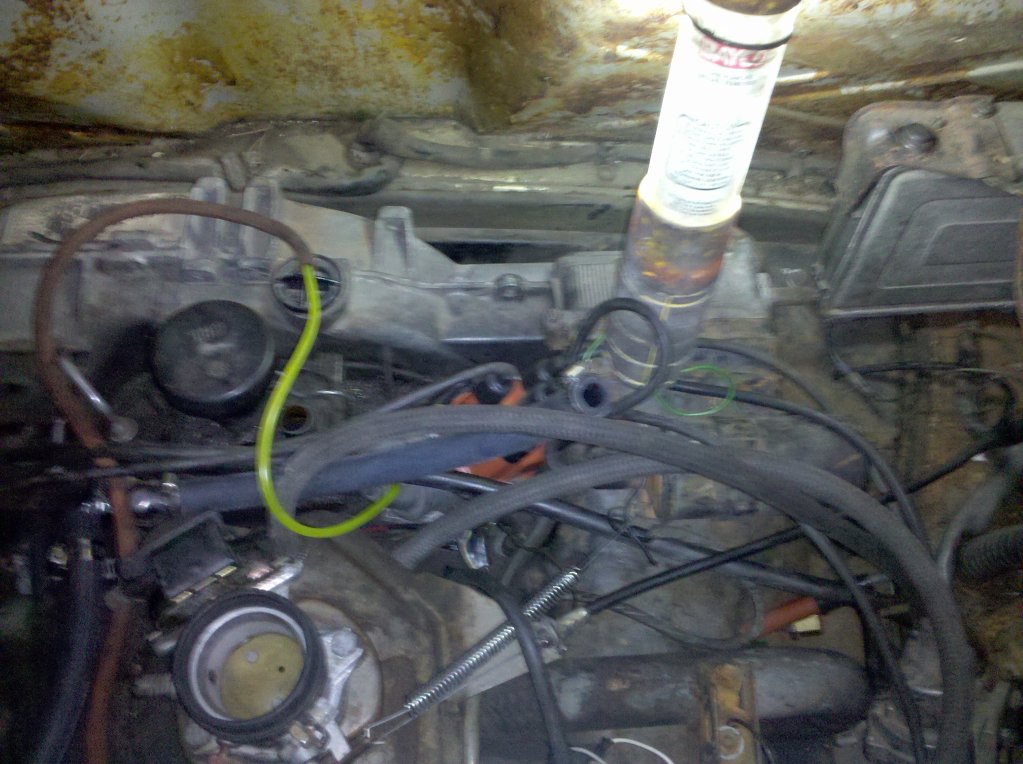
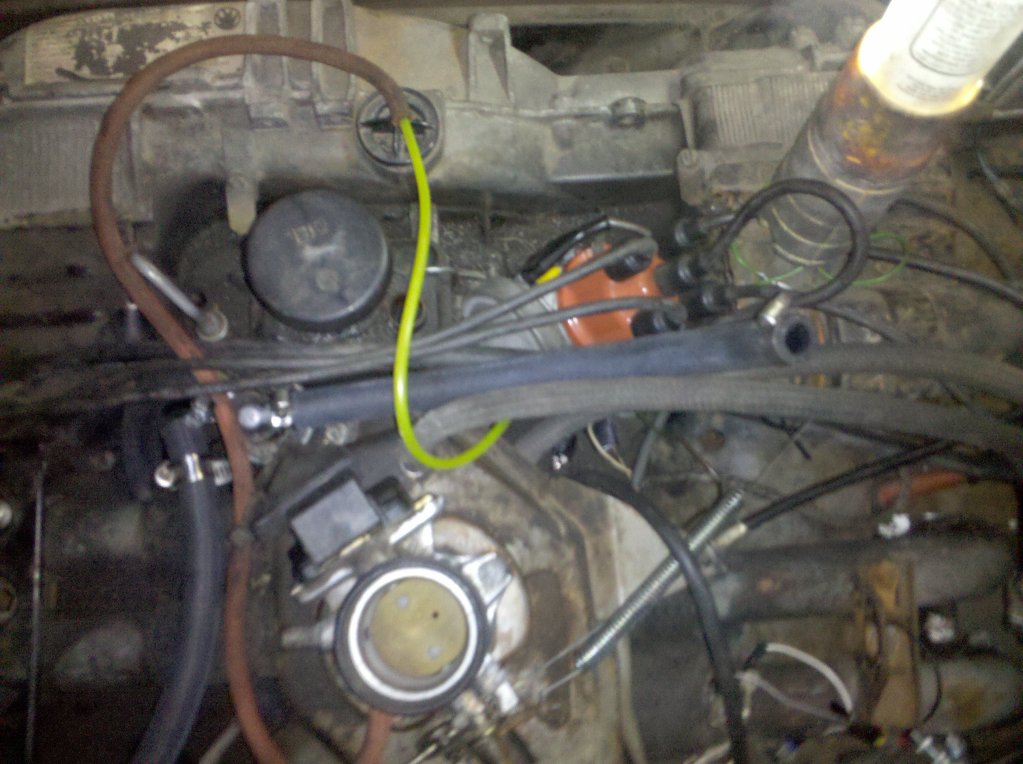
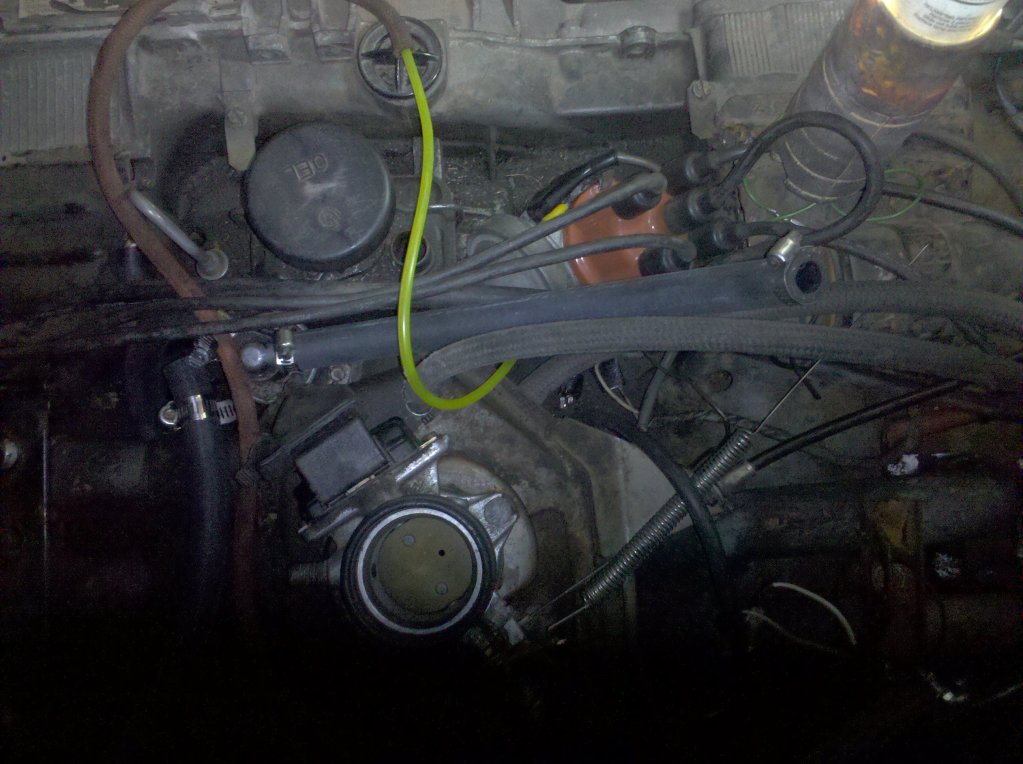
disregard that yellow hose there it is just an extension while testing. it connects from the intake manifold to the distributor (back side)
but when i connected it to the front of the distributor it ran better????? why?
im also confused about the oil(oel) hose. in all the pictures it looks like it connects underneath the intake housing but my engine doesn't have that connector?
why does the distributor have 2 vacuum connects and only one has to be connected?
Ok. I see some things.
The PCV Valve is the OEL connection toward the distributor. Important connection. When connected it really lowers the idle. This needs a hose going to the manifold, but I am not that familiar with your model engine as I am with the 73 engines.
Another missing hose is the aux air valve hose that goes from near the drivers front (with a red wire coming out the bottom of the valve) over to the airbox, which you seem to maybe not have?
The aux air valve is important too, but go to Pelican Parts and start reading the whitepapers on the site. They even have all the hose paths laid out there.
I have printed them myself and they are pretty damn good.
I think someone here with your exact model can really help much more.
Best of luck!
John
avidfanjpl
i have the aux air valve with both of its plugs in it. but one is disconnected from the filter housing.
as for the OEL lowering the idle i need to seriously raise the idle. it basically doesn't idle and just dies. i have a lot of pictures of the hose diagrams
http://members.rennlist.org/chuxter/914Hoses.html
like those and a few more... im jjust so lost i need to disconnect everything and start over i think
i'd still like to see an engine like mine with the smog equipment and without just to see what it should sorta look like.

so i got to messing with this again today. i removed the AAR completely and the engine idles fine at barely over 1k. although it doesn't run any different when its hot or cold without the AAR.


aar valve shows the correct ohms and it seems to be opening and closing. although it obviously doesn't let as much air through when its on as when its completely off... anyone got any ideas? anything to try? its sittin the fridge right now to test how open it gets.
i just took it out and it definitely is opening and closing.
i just took it out and it definitely is opening and closing.
You can look in the originality and history section for a lot of engine bay pics. Just remember that they will be stock.
Looking at your pictures I see a lot of rust. Have you checked out the longs and hell hole?
You may be better off droping the engine/trans and cleaning everything up good and rewiring/rehosing with the engine out of the bay. So much easier to work on. Then when you have it all sorted, it shouldn't be too much trouble to get the idle straightened out. This is what I did to mine as it wasn't running very well when I first got it. I found and repaired a lot of bad wires and connections, but when I pulled the tin I got my biggest surprise. Lots of "stuff" up under the tins blocking cooling air.
With everything I found repaired and the engine back in, it ran great. So those bad wires and connections really made a difference. Plus it looks really nice now and clean too.
While the engine is out, you can better address the rust issues.
Good luck,
Tom
If you haven't found this yet http://members.rennlist.com/pbanders/djetfund.htm
It helped me out a bunch when I was still messing with the stock system.
It helped me out a bunch when I was still messing with the stock system.
QUOTE(mipstien @ May 22 2010, 03:42 PM) 
so i got to messing with this again today. i removed the AAR completely and the engine idles fine at barely over 1k. although it doesn't run any different when its hot or cold without the AAR.
Mipstien, I gave you all the links showing hose diagrams including the elbow w/ dual connections from the manifiold. Also a couple links to trouble shooting and if you read into those you will find out how to recondition your AAR valve.. and how to test it ect.. see below.. you have all thew info from your previous threads, I hope you read them , I feel fopr you trying to uncover and discover without yet knowing what is supposed to be there and what it is supposed to do.. see your previous posts for the links, here is a cut and paste from a portion of the links..
good luck..
Function: Provides additional air to the engine during warm-up to overcome drag due to internal friction of a cold engine.
Normal Value(s): about 14 ohms of resistance from the connector to the body of the unit.
Failure Modes
Stuck open: Fast idle. Check by removing input hose to the regulator after the car has been running for 10-15 minutes. If you feel suction on this line, the regulator is stuck open. See below for rebuild and rejuvenation procedures.
Stuck closed: Poor running (low idle) after cold start. Check on cold engine by removing the input hose immediately after starting. If you do not feel suction, the regulator is stuck closed. See below for rebuild and rejuvenation procedures.
Broken heater lead or heater coil: Engine stays at fast idle for a long time after starting (more than 10 minutes). Check by removing the regulator and grounding the case and applying +12V to the input lead. In a few minutes, if your heater is working, you should feel the base of the AAR getting warmer - eventually, it gets quite warm. If the lead is broken where it enters the AAR, you're out of luck. It is actually insulated through the crimped connector into the AAR - a really crappy design, as it's easy for the insulation to break down and short it, or for it simply to break off due to stress from handling. If it's broken right at the connector, you may be able to salvage it by rebuilding (see below)
Shorted heater lead or heater coil: Check this if you blow the 25A (red) fuse on the relay board every time you try to start the car. See below for rebuild procedures.
Notes: The regulator is open when cold, and closes over time as a heater inside the unit (+12V supply) acts on a bimetallic strip. The opening inside the AAR has a slot that starts off wide and gets narrow. The idle stays high while the wide part is open (~3-4 minutes), then drops off as the narrow part remains exposed (~10 minutes for fully closed). Even if the heater is non-functional, the engine heat will eventually close the regulator. Because the regulator is no longer available new or rebuilt, you will have to obtain a used unit or repair your own unit - you are on your own here!
Does Yours Close Too Fast?: If you'd like for the AAR to stay open longer, try adding 2.5 ohms (four 10 ohm/10W power resistors in parallel) in series with the heater. This will reduce the heater power from ~14W down to ~10W, and cause the AAR to close more slowly. Should add a few minutes to the fast idle part of the cycle. Please exercise caution - that resistor pack can get hot, make sure it is safely secured.
Rebuilding and Rejuvenation: These things are NLA and working units don't show up for sale very often. I recently sacrificed a frozen unit to figure out the best ways to revive them and/or rebuild them.
How does it work?: First, you have to understand how the AAR works inside. Click here to see a diagram of its guts. It's not so clear from the diagram, but the way this thing works is that in the top part of the unit, there's a cylinder with a slot cut in the side. The cylinder is open on the top, and rotates in the bore of the top part of the body. When the cylinder rotates, the slot moves past the opening in the side, so that air flows from the top port, through the open cylinder, through the slot, and out the side port. When the slot rotates away from the side port, air flow is shut off. The cylinder rotates because it's driven by a shaft on the bottom, that has a bimetallic strip connected to a slot cut in the bottom of the shaft. The other end of the bimetallic strip is secured by a screw to the body of the AAR. It's adjustable so that the AAR can be temperature calibrated. In the bottom of the AAR is a heating coil that warms the bimetallic strip when the car is running.
Rejuvenation: This is your best bet, if your heater is still working and the lead is in good condition. AAR's are exposed to all kinds of muck in the airflow path, and are often stuck. The bimetallic strip can't provide very much torque to turn the shaft, so the cylinder has to move freely in the bore. Remove the AAR from the car. Turn it upside down and flush the side port with penetrating lubricant (e.g. WD-40). Flush, flush, flush, and flush some more. Plug the top port, fill it up with penetrating lubricant, and let it sit upside down for at least a day. Clean it out, flush it a few more times, then try again. If it still doesn't open and close, repeat the procedure until you tire of doing it and give up, and proceed to the rebuild procedure.
Rebuilding: This is NOT a guaranteed process, take this on only as a last resort. Your first challenge is to get inside of the AAR. This is not an easy task. I have heard that you can "pop" the top of the AAR off by jamming a large round screwdriver in the side port, securing the base in a vice, and levering the top. Personally, from my tries at doing this, I suspect that you will instead break off the side port, and/or destroy the guts when it comes flying open, or chop you hands to pieces. Your call, several people have told me that they've done this and it works, I couldn't get it to work for me. An alternative procedure is to take a Dremel cut-off wheel (please use safety glasses, and perhaps, a full face shield), and to very carefully go around the perimeter of the flange on the body and cut it off, so that you're removing just the top part of the flange (it should form a ring). Your goal here is to leave a shoulder of the flange, so that you can epoxy the top back on when you're done. Good luck.
Assuming you're successful and haven't been fatally injured by this process, remove the top. You should see the ceramic insulator with the heating coil in the bottom of the unit. If yours is in good shape, DON'T TOUCH IT. Put it aside. If your heater lead is broken or your heater is burned out, you have to remove the ceramic part completely. I don't believe you can do this without destroying it, because the ground pin and the heater lead pins are riveted through. Before proceeding, try to open the crimp that's holding the heater lead on the bottom of the AAR as much as possible, so the wire can slide through. You can get the ceramic heater out by inverting the unit, then using an awl or a punch to punch-out the center rivet. Rip it all out and toss it. You will be replacing the heater with three small 5 ohm, 5 Watt rated, wire wound resistors in series. Arrange all three in the bottom of the unit, and secure them to the base with epoxy or JB weld. One end goes to the ground pin in the base, the other goes to a wire that exits the AAR through the port in the bottom. Set aside. BTW, I HAVE NEVER DONE THIS - Dave Darling said he did it and it works.
Next step is to get the cylinder freed up. If yours is really stuck tight, you will probably have to remove the top port to be able to extract it. First, mark the angle of the top port to the top assembly of the AAR with a marker or a piece of tape. Clamp the top, stick a round screwdriver into the top port, and lever it off the top of the AAR. You can press it back on later with a vice and peen the edge to make sure it's secure. You should now be able to see the top of the cylinder in the bore when looking in where the top port was attached. Below, you'll see that the bimetallic coil is held on by a small screw. Carefully mark the exact position of the slot where the screw is attached - this is the temperature calibration position, you'll need to attach it later to this exact spot. Remove the screw, and pull off the bimetallic coil, the other end is engaged in a slot in the shaft that drives the cylinder. Soak everything in penetrating lube - the shaft, cylinder, etc. Next, you'll notice a small pin in the shaft, that limits the rotation of the shaft, and that must pass through a key slot in the body of the AAR if you want to remove the cylinder. Stick a flat end screwdriver in the slot in the end of the shaft, and GENTLY try to turn the shaft. Won't budge, right? OK, here's what I did. Invert the top and gently tap on the bottom of the shaft with a hammer a couple of times. Not too hard - you'll break off the pin. Now, turn the unit back over, find a small round end tool (I used the butt of a scredriver), and use it to tap the cylinder back down into the bore. Repeat this process until you can start to turn the shaft. Once you can get it to rotate, move it to the position where the pin is lined up with the slot, and then drive it through, and remove the cylinder. You'll find the bore is full of rust and muck. Keep cleaning, lubing, and testing the cylinder in the bore until it moves with almost no effort.
Reassemble, I would press on top port AFTER I put the cylinder back in, but BEFORE, I put the bimetallic coil back on. Make certain you DO NOT use the shaft of the cylinder for a pressure point, push from the body of the unit with a vice. Peen the top to hold it in place. Reattach the bimetallic coil to the exact position you marked when removing it. Use high-temperature epoxy to form a complete seal between the top and bottom of the unit, and wait 24 hours before testing to make sure the epoxy is fully set. Congrats, you should have a fully-functional AAR!
A little cleaning wouldn't hurt either ...
 Andy
Andy
Andy
im confused as to why you folks won't answer my questions. they are questions about WHY not how to.
i would like to know why my car idles perfect with the valve off whether hot or cold.
also want to know why putting the vacuum hose on the front of the distributor it runs smoother than on the back where it was intended to go?
i have read every single thing on the rennlist site. but im still confused which is why im asking questions. im not sure why everyone wants to send me to another web page every time i ask something its kinda frustrating when a straight answer is easier than pointing me down the road and having me walk there. i understand if you teach a man to fish, but i learned to fish. i have an actual question because the other sites, including searching on here for hours, has turned up no answer's to my questions.

and i cleaned the thing, the previous owner cleaned it. a lot of trial and error has already happened.
i would like to know why my car idles perfect with the valve off whether hot or cold.
also want to know why putting the vacuum hose on the front of the distributor it runs smoother than on the back where it was intended to go?
i have read every single thing on the rennlist site. but im still confused which is why im asking questions. im not sure why everyone wants to send me to another web page every time i ask something its kinda frustrating when a straight answer is easier than pointing me down the road and having me walk there. i understand if you teach a man to fish, but i learned to fish. i have an actual question because the other sites, including searching on here for hours, has turned up no answer's to my questions.
and i cleaned the thing, the previous owner cleaned it. a lot of trial and error has already happened.
and im sorry im frustrated and really don't like the way forums work sometimes.
also at this moment i do believe that my plug wires are off and the fireing order is obviously not right. i need to find out TDC and get the wires on correctly.
also at this moment i do believe that my plug wires are off and the fireing order is obviously not right. i need to find out TDC and get the wires on correctly.
Hi,
Can't offer up any how or why, but can offer sympathy and encouragement... Hang in there. It'll be worth it in the end.
Can't offer up any how or why, but can offer sympathy and encouragement... Hang in there. It'll be worth it in the end.
QUOTE(mipstien @ May 23 2010, 10:55 AM)
im confused as to why you folks won't answer my questions. they are questions about WHY not how to.
i would like to know why my car idles perfect with the valve off whether hot or cold.
also want to know why putting the vacuum hose on the front of the distributor it runs smoother than on the back where it was intended to go?
i have read every single thing on the rennlist site. but im still confused which is why im asking questions. im not sure why everyone wants to send me to another web page every time i ask something its kinda frustrating when a straight answer is easier than pointing me down the road and having me walk there. i understand if you teach a man to fish, but i learned to fish. i have an actual question because the other sites, including searching on here for hours, has turned up no answer's to my questions.
and i cleaned the thing, the previous owner cleaned it. a lot of trial and error has already happened.
Don't get your panties in a bunch

Your AAR is stuck. It needs to come out and soak overnight in PB blater, or it's not getting voltage. Thats the first one.
Idle's better with the line on the front- it's advancing the distributor. Some cars have a line on both sides of the distributor, some only on the front. That is basic for any old car. So more learning to fish is in order.
QUOTE(BigDBass @ May 23 2010, 02:06 PM)
Hi,
Can't offer up any how or why, but can offer sympathy and encouragement... Hang in there. It'll be worth it in the end.
no doubt its my dream car and i can't wait. the car isn't the frustrating part :/

QUOTE(underthetire @ May 23 2010, 02:10 PM)
QUOTE(mipstien @ May 23 2010, 10:55 AM)
im confused as to why you folks won't answer my questions. they are questions about WHY not how to.
i would like to know why my car idles perfect with the valve off whether hot or cold.
also want to know why putting the vacuum hose on the front of the distributor it runs smoother than on the back where it was intended to go?
i have read every single thing on the rennlist site. but im still confused which is why im asking questions. im not sure why everyone wants to send me to another web page every time i ask something its kinda frustrating when a straight answer is easier than pointing me down the road and having me walk there. i understand if you teach a man to fish, but i learned to fish. i have an actual question because the other sites, including searching on here for hours, has turned up no answer's to my questions.
and i cleaned the thing, the previous owner cleaned it. a lot of trial and error has already happened.
Don't get your panties in a bunch
Your AAR is stuck. It needs to come out and soak overnight in PB blater, or it's not getting voltage. Thats the first one.
Idle's better with the line on the front- it's advancing the distributor. Some cars have a line on both sides of the distributor, some only on the front. That is basic for any old car. So more learning to fish is in order.
i understand advance and retard, what i don't understand is why plugging the one everyone says to use and using the one everyone says to plug is causing faster idle with the AAR on.
if the AAR is stuck then why would it run like crap when warmed up and that hose plugged?
you still didn't answer my questions.
if i have normal idle with the line OPEN and engine WARM then what ELSE could be causing my problem?
Did you look at the engine bay pictures on the originality and history section on this forum? If and when you do, pay attention to the vacuum advance can on the distributors in those pics. Now look at yours. Something seems wrong there!
Also, I'm surprised someone hasn't mentioned this before - trying to diagnose a running problem over the Internet is difficult at best. AND when your engine is new to you, you should always go back to basics. Tune up, valve adj., and timing at the very least.
Hope this helps,
Tom
Also, I'm surprised someone hasn't mentioned this before - trying to diagnose a running problem over the Internet is difficult at best. AND when your engine is new to you, you should always go back to basics. Tune up, valve adj., and timing at the very least.
Hope this helps,
Tom
If you have normal idle with the aar open and pulling vacuum, ad it idles higher with the front of the vac can plugged in, you need to re-check your timing, ECU knob, head temp sensor. Also check that your MPS is working and holds vacuum, and the throttle position switch is set right. You also need to check that all the sensors are compatible with the ECU you have. Seems like you want a quick answer to me. Ain't gonna happen without seeing it in person. Pelican articles, banders site, and the chilton all have vacuum diagrams in them. All the distributors have a line on the front, not all on the back. It also makes a huge difference what line goes where on the throttle body. One is switched the other is not.
Make a list of everything you check, like this..
Fuel pressure xx
compression xx
Timing xx
Valve clearance XX
Etc.....
Make a list of everything you check, like this..
Fuel pressure xx
compression xx
Timing xx
Valve clearance XX
Etc.....
i have a head temp sensor on its way and that was a lot more help than you know
im not asking for quick and easy. i was asking outa curiosity. rather idc if it makes my car run i just want to understand.
im not asking for quick and easy. i was asking outa curiosity. rather idc if it makes my car run i just want to understand.
i have been reading a little more on
http://members.rennlist.com/pbanders/manif...sure_sensor.htm
(mps) and looked at mine and it has been 'played with' basically the seal on it is broke and someone has been turning the screw. can this cause a stall in power at around XXXX rpms or bad idle? if its been adjusted wrong should i look into purchasing another one or should i just try to readjust it assuming that it is electronically sound?
i know i need to make sure that the whole thing is mechanically and electronically working testing ohms and pressure being held.
one last question about the MPS. if the 'glue' seal that it has is broke on the screw adjuster would that cause it not to hold a vacuum and basically need that screw filled in. i didn't see that on the rennlist sight.
if that is broke does it not keep vacuum basically?
and is this the answer to my question....
QUOTE
Q: I've heard that all I have to do to get my car to run right is to remove the epoxy, unscrew the plug (whoops, I stripped/lost/broke it when I did this), and use a screwdriver to adjust that center screw until I think it's running smooth? What do you think?
A: Some of the old D-Jet references suggested a procedure like this to fix part-load mixture issues. The problem with this procedure is that it doesn't comprehend that the full-load stop (the "plug") is a critical adjustment in this system. Removing the plug and either not replacing it or screwing it in randomly will likely result in either a rich or lean full-load mixture, and possible premature failure of the diaphragm due to mechanical stress. Also, depending on the vacuum level in the MPS, turning the inner screw usually turns the outer screw at the same time, due to friction on the threads. This causes the part-load mixture to remain unchanged, but changes the full-load mixture. I strongly suggest that you do not adjust the MPS without using an LCR55 to first characterize the secondary inductance vs. vacuum characteristic. Otherwise, you will lose your reference point for all three adjustments and probably won't be able to get back to them by random adjustments.
A: Some of the old D-Jet references suggested a procedure like this to fix part-load mixture issues. The problem with this procedure is that it doesn't comprehend that the full-load stop (the "plug") is a critical adjustment in this system. Removing the plug and either not replacing it or screwing it in randomly will likely result in either a rich or lean full-load mixture, and possible premature failure of the diaphragm due to mechanical stress. Also, depending on the vacuum level in the MPS, turning the inner screw usually turns the outer screw at the same time, due to friction on the threads. This causes the part-load mixture to remain unchanged, but changes the full-load mixture. I strongly suggest that you do not adjust the MPS without using an LCR55 to first characterize the secondary inductance vs. vacuum characteristic. Otherwise, you will lose your reference point for all three adjustments and probably won't be able to get back to them by random adjustments.
weirdest thing just happened.
earlier we regaped the spark plugs and the distributor and it was running the same way (AAR valve off) and running like a champ
went out there to see if it had vacuum off the MPS and started it up and ran really high rpm. its warm but not hot by any means maybe 3 hours of sitting. i actually plugged up the hose where the AAR should be and it idled PERFECT.
im just thinking and posting my results so i have something to look back on if i forget/change something. and if anyone has any input.
so im starting to talk to myself.
anyways
after a lot of searching on rennlist site i can't quite grasp what the air temp sensor/intake temp sensor affects. mine is apparently unplugged. it can cause the engine to run rich but what other symptoms could it cause?
this is a question and for my curiosity if someone has a link to 'all about the air temp sensor' then post it.
QUOTE(mipstien @ May 23 2010, 07:11 PM)
weirdest thing just happened.
earlier we regaped the spark plugs and the distributor and it was running the same way (AAR valve off) and running like a champ
went out there to see if it had vacuum off the MPS and started it up and ran really high rpm. its warm but not hot by any means maybe 3 hours of sitting. i actually plugged up the hose where the AAR should be and it idled PERFECT.
im just thinking and posting my results so i have something to look back on if i forget/change something. and if anyone has any input.
You AAR has been stuck open..
QUOTE(detoxcowboy @ May 24 2010, 07:45 PM)
QUOTE(mipstien @ May 23 2010, 07:11 PM)
weirdest thing just happened.
earlier we regaped the spark plugs and the distributor and it was running the same way (AAR valve off) and running like a champ
went out there to see if it had vacuum off the MPS and started it up and ran really high rpm. its warm but not hot by any means maybe 3 hours of sitting. i actually plugged up the hose where the AAR should be and it idled PERFECT.
im just thinking and posting my results so i have something to look back on if i forget/change something. and if anyone has any input.
You AAR has been stuck open..
the aar isn't on the car right now, hasn't been for a few days. ran like a champ with it off for a few days then yesterday just started running like it should with it off.
are you saying that it caused it to act up even after the aar was removed? if so when i put it back on this evening it should run like its supposed to?
QUOTE(mipstien @ May 24 2010, 03:57 PM)
so im starting to talk to myself.
anyways
after a lot of searching on rennlist site i can't quite grasp what the air temp sensor/intake temp sensor affects. mine is apparently unplugged. it can cause the engine to run rich but what other symptoms could it cause?
this is a question and for my curiosity if someone has a link to 'all about the air temp sensor' then post it.
It has very little efect on the enitre djet system, unpluged can make it runner slightly richer, actually have read that unplugging it was an old mechanics trick to richen the mixture when needed..
here is a cut and paste from THE ECU rennilist Doc.. ( alot of info there you probably just missed it)
http://members.rennlist.com/pbanders/DJetParts.htm
Intake Air Temperature Sensor
Function: Senses intake air temperature and sends signal to the ECU to provide mixture compensation.
Normal Value(s): 300 ohms @ 68 deg. F, about 100 ohms @ 122 deg. F.
Failure Modes
Open: Makes the mixture somewhat richer. Check with an ohmmeter.
Shorted: Makes the mixture somewhat leaner. Check with an ohmmeter.
THIOS IS THE IMPORTANT PART.. NOTICE SMALL EFFECT ECT..
Notes: The output of this sensor is used by the ECU to adjust the mixture for the intake air temperature. This is a secondary adjustment and has a small effect on the mixture. The sensor corrects for the decrease in air density with increasing temperature by leaning out the mixture. Disconnecting this sensor has the effect of richening the mixture, a common mechanic's trick.
THAK GOD for CUTTING AND PASTEING CUASE i TYPE LIKE _____!
QUOTE(detoxcowboy @ May 24 2010, 07:51 PM)
QUOTE(mipstien @ May 24 2010, 03:57 PM)
so im starting to talk to myself.
anyways
after a lot of searching on rennlist site i can't quite grasp what the air temp sensor/intake temp sensor affects. mine is apparently unplugged. it can cause the engine to run rich but what other symptoms could it cause?
this is a question and for my curiosity if someone has a link to 'all about the air temp sensor' then post it.
It has very little efect on the enitre djet system, unpluged can make it runner slightly richer, actually have read that unplugging it was an old mechanics trick to richen the mixture when needed..
here is a cut and paste from THE ECU rennilist Doc.. ( alot of info there you probably just missed it)
http://members.rennlist.com/pbanders/DJetParts.htm
Intake Air Temperature Sensor
Function: Senses intake air temperature and sends signal to the ECU to provide mixture compensation.
Normal Value(s): 300 ohms @ 68 deg. F, about 100 ohms @ 122 deg. F.
Failure Modes
Open: Makes the mixture somewhat richer. Check with an ohmmeter.
Shorted: Makes the mixture somewhat leaner. Check with an ohmmeter.
Notes: The output of this sensor is used by the ECU to adjust the mixture for the intake air temperature. This is a secondary adjustment and has a small effect on the mixture. The sensor corrects for the decrease in air density with increasing temperature by leaning out the mixture. Disconnecting this sensor has the effect of richening the mixture, a common mechanic's trick.
THAK GOD for CUTTING AND PASTEING CUASE i TYPE LIKE _____!
i guess i coudln't find that its a small part in that huge wall of text on that page. but i did a google search over his whole site and none of that showed up
is the wire that goes that thing red or white? anyone have any idea what the stock wire color is?
QUOTE(mipstien @ May 23 2010, 07:04 PM)
i have been reading a little more on
http://members.rennlist.com/pbanders/manif...sure_sensor.htm
(mps) and looked at mine and it has been 'played with' basically the seal on it is broke and someone has been turning the screw. can this cause a stall in power at around XXXX rpms or bad idle? if its been adjusted wrong should i look into purchasing another one or should i just try to readjust it assuming that it is electronically sound?
i know i need to make sure that the whole thing is mechanically and electronically working testing ohms and pressure being held.
one last question about the MPS. if the 'glue' seal that it has is broke on the screw adjuster would that cause it not to hold a vacuum and basically need that screw filled in. i didn't see that on the rennlist sight.
if that is broke does it not keep vacuum basically?
If the mps has been tampered with it can cause all types of drivabilty porblems, including lost idle, power loss at certain power bands, ect. ect. the plug is just a cover. my plug was missing for a year , then i tamperewd with the screws and ooooops!! Screwed myself into a hole.. Luckily my mechanic diod not laugh at me and had an NOS unit, they are expensive and NLA.. BUt there is another solution..
Jeff Bolwsby can recalibrate and replug the mps, he is a memebr here, well known for his 914 knowledge and has a website below...
Basically the MPS is one of the most important sensors on the car, if not the most important..
http://members.rennlist.com/914_wiring_harnesses/
and is this the answer to my question....
QUOTE
Q: I've heard that all I have to do to get my car to run right is to remove the epoxy, unscrew the plug (whoops, I stripped/lost/broke it when I did this), and use a screwdriver to adjust that center screw until I think it's running smooth? What do you think?
A: Some of the old D-Jet references suggested a procedure like this to fix part-load mixture issues. The problem with this procedure is that it doesn't comprehend that the full-load stop (the "plug") is a critical adjustment in this system. Removing the plug and either not replacing it or screwing it in randomly will likely result in either a rich or lean full-load mixture, and possible premature failure of the diaphragm due to mechanical stress. Also, depending on the vacuum level in the MPS, turning the inner screw usually turns the outer screw at the same time, due to friction on the threads. This causes the part-load mixture to remain unchanged, but changes the full-load mixture. I strongly suggest that you do not adjust the MPS without using an LCR55 to first characterize the secondary inductance vs. vacuum characteristic. Otherwise, you will lose your reference point for all three adjustments and probably won't be able to get back to them by random adjustments.
A: Some of the old D-Jet references suggested a procedure like this to fix part-load mixture issues. The problem with this procedure is that it doesn't comprehend that the full-load stop (the "plug") is a critical adjustment in this system. Removing the plug and either not replacing it or screwing it in randomly will likely result in either a rich or lean full-load mixture, and possible premature failure of the diaphragm due to mechanical stress. Also, depending on the vacuum level in the MPS, turning the inner screw usually turns the outer screw at the same time, due to friction on the threads. This causes the part-load mixture to remain unchanged, but changes the full-load mixture. I strongly suggest that you do not adjust the MPS without using an LCR55 to first characterize the secondary inductance vs. vacuum characteristic. Otherwise, you will lose your reference point for all three adjustments and probably won't be able to get back to them by random adjustments.
QUOTE(mipstien @ May 24 2010, 04:48 PM)
if so when i put it back on this evening it should run like its supposed to?
No ...
Randomly removing and adding components will not help you to diagnose your problem.
You need to start with the basics and methodically work through each of the components.
- Adjust valves
- Grab your timing light and time the engine.
- Take your multimeter and trace each and every wire in the engine harness. If in question, cut back the plastic sheeting and look for brittle or broken wires.
- Check your relay board. Check all relays. Check all connectors.
- Check your spark plus, plug wires and distributor.
- Check all your vacuum hoses.
- Report back here.
Right now, you are going in circles ...
 Andy
Andy
QUOTE(SirAndy @ May 24 2010, 04:58 PM)
QUOTE(mipstien @ May 24 2010, 04:48 PM)
if so when i put it back on this evening it should run like its supposed to?
No ...
Randomly removing and adding components will not help you to diagnose your problem.
You need to start with the basics and methodically work through each of the components.
- Adjust valves
- Grab your timing light and time the engine.
- Take your multimeter and trace each and every wire in the engine harness. If in question, cut back the plastic sheeting and look for brittle or broken wires.
- Check your relay board. Check all relays. Check all connectors.
- Check your spark plus, plug wires and distributor.
- Check all your vacuum hoses.
- Report back here.
Right now, you are going in circles ...
Andy method to the madness, or your chaisng your tail whacking moles. I am not discouraging or chatising you, I have been there and have been my own worst enemy.. You have alot of heart,, and you will get this. alot of people say screw it and get carbs then have carb issues.. once you get it you will see its simplicity and still chase aghost once in a while but know where to look here after.. I like the Djet.. before whacking moles I feared it..
I'm only asking questions I n theory. I want to understand its how I learn. I know the steps I have read them many many times now but most of you have done a lot of this stuff. I want your opinions not "well you need to stop asking questions and go do thiks blah blah blah." I have a lot more time at work to sit at the computer and theorize about what if situations I just would like opinions and input because that is how I understand things.
If you know qn engineer then you would understand how I learn things please accept that I do not expect nor want an easy answer. I just what group discussion.
If you know qn engineer then you would understand how I learn things please accept that I do not expect nor want an easy answer. I just what group discussion.
i know you said im chasing my tail but as of today the car is running great. battery was dead so i had to charge it. started it up and about 2 minutes into running i was able to plug the AAR valve hose and it ran like it was supposed to at just under 1k rpm but this is without messing with the air idle screw and the ECU idle control. now to get ready to do a valve job and the rest of the tune up.
thanks for the input and such!!
ryan
thanks for the input and such!!
ryan
did some more testing and playing around yesterday and found that there was a leak in the MPS vacuum. that leak is/was causing it to idle really rough. when i plug the leak it runs good or rather like it should. when i open the leak back up or unplug the vacuum line it runs horrible again. for one the mps has been tampered with and there is a hole drilled through it. for two and for good news. i have another one comming in a few days so i can hopefully swap the two out and have better luck with the new one.
couldn't see the leak because of the cloth covered hoses... blah
couldn't see the leak because of the cloth covered hoses... blah
QUOTE(mipstien @ May 26 2010, 03:25 AM)
.... when i plug the leak it runs good or rather like it should. when i open the leak back up or unplug the vacuum line it runs horrible again.
Where are you able to plug and un-plug? Are you removing the MPS from the system? If you are unplugging the hose and leaving it OPEN to the atmosphere, the MPS might not have a problem. To test the MPS, you put a vacuum on the port of the MPS (5-10 lbs) and observe leakage. There is also an electrical test of an MPS.
The mps isn't bad but it has been tampered with and it is stilll working and we played with it a little and got it to do different stuff. But its. Still set wrong.
The leak was with the hose not the mps itself
I picked up a 1.7L d-jet a year and a half ago and these are all the things that were not working correctly I would recommend checking...
MPS
Fuel pressure regulator
All the air and fuel hoses
Injectors
Screen in the gas tank
Deceleration valve
AAR
Throttle position sensor
Fuel leaks are dangerous and air leaks suck, make sure the hoses fit tightly.
MPS
Fuel pressure regulator
All the air and fuel hoses
Injectors
Screen in the gas tank
Deceleration valve
AAR
Throttle position sensor
Fuel leaks are dangerous and air leaks suck, make sure the hoses fit tightly.
for one the forum user that owned the car before me has checked most of this and as have i at this point.
injectors are working, screen is clean, AAR is getting cleaned and is working correctly right now. tps is working fine and is electronically ohm set now all fuel hoses and fuel pump are good, air hoses are all replaced except for the mps which is my current problem. decel valve doesn't seem to have any affect on anything that i have been messing with because im not driving it and whether it is on or off it has been idling the same way. Fuel pressure regulator is working although it needs to be set perfect but i haven't got a gauge yet.
ive checked quite a few other things also but those are the things you mentioned and of all of them the MPS is showing biggest problems right now. i do have another mps on its way though.
which direction does the AAR valve go. top hose on the driver side and bottom towards passenger or other way around? any pictures? ive seen them both ways and i would guess by the way the thing is made it doesn't matter but i noticed it kinda affects the hose on it.
QUOTE(mipstien @ May 30 2010, 04:07 PM)
which direction does the AAR valve go. top hose on the driver side and bottom towards passenger or other way around? any pictures? ive seen them both ways and i would guess by the way the thing is made it doesn't matter but i noticed it kinda affects the hose on it.
Click to view attachment
well take this for example
and this one
so which way is correct?
does it work both ways or just angle it the best way for the hose?
and this one
so which way is correct?
does it work both ways or just angle it the best way for the hose?
ok i think i found 'stock' pictures so ill go by this stuff.
with the mps unattached the car runs a little strange fluctuating in rpms quite a bit. with it attached it runs decent although after a little while of idling probably 10 minutes it will eventually drop rpms slowly and die.
the mps hasn't been 'tuned' yet because it was tampered with but as it sits at the moment it will flood also. i know tuning the mps or tightening the screw will cause it to get less gas so it will probably fix that but why would it just eventually die after a little bit?
the mps hasn't been 'tuned' yet because it was tampered with but as it sits at the moment it will flood also. i know tuning the mps or tightening the screw will cause it to get less gas so it will probably fix that but why would it just eventually die after a little bit?
This is a "lo-fi" version of our main content. To view the full version with more information, formatting and images, please click here.