Ok - so I've sealed up all the potential exhaust leaks except the one possible leak coming from the back of my muffler which may be small - unable to tell.
However, I started noticing a popping noise. I recall it a few times when I first started driving the car but it was so small I couldn't really make out what the noise was.
The other day after fixing the exhaust I rolled down the windows and listened more carefully. The same odd "poof" noise I heard behind me was audibly from the engine area. I had my wife get in the car while the car was cold and blip the throttle while it was in neutral to see if it would do it again - it did. It was unmistakably some sort of pop from the intake. It's more of a "poof" than a loud "bang" ...
I've heard the noise before on my 924 when the exhaust was partially torn apart - but that was a HUGE lack of back pressure. So that kind of (lack of)back pressure wasn't there since the exhaust is complete, no leak at the heads anymore, and as well only a small one up near the muffler - but even then it's tiny.
I remember hearing that popping through the intake is either running too rich, timing off (retarded) or a huge exhaust leak.
Since the popping on decel seems to happen very frequently - and just as much so (sometimes more) after the exhaust leaks were taken care of, I'm noticing this more as well. Since decel popping would be culprit to a lean condition - and intake popping would be culprit to a rich condition (at least as far as I know, I may be off on that); My assumption would then be my timing is off? (since obviously you can't have both lol)
Wanted to bounce this off everyone here in case I'm crazy. Again - new to working on these little air cooled engines. I'm gonna go put it back up on stands tonight and crawl under and check.
A family member also suggested I may have valves that are too tight, but I recall Jim saying he already adjusted the valves and they were adjusted to the .006" mark they were supposed to be at. I plan on replacing the pushrod tube seals here soon - he sent me a procedure on how to do it (i also found a wonderful article on the forum about it) so I will end up double checking them anyway.
Any ideas? I'm gonna go get a pot of coffee going and go get it up on stands once I have a brew going and get acquainted with the car some more.
Full Version: Confirmed popping through intake
QUOTE(corsepervita @ Jun 2 2010, 09:20 PM) 
A family member also suggested I may have valves that are too tight, but I recall Jim saying he already adjusted the valves and they were adjusted to the .006" mark they were supposed to be at. I plan on replacing the pushrod tube seals here soon - he sent me a procedure on how to do it (i also found a wonderful article on the forum about it) so I will end up double checking them anyway.
Good advice. Start by adjusting the valves, then go from there ...
 Andy
Andy
So check valves first - then check timing... etc etc....
Will do - coffee is done - gonna head out Will report my findings as usual. Thank you kindly, Andy!
Will do - coffee is done - gonna head out
Will report my findings as usual. Thank you kindly, Andy!
Ok minor update - Heat exchangers are off and I'm about to dive in and check valve clearances.
On a simple note - the seals I did on the heat exchangers took great on driver's side. Appears the surface area was perfectly flat and I got the seals heated up just right - they took perfect, no leaks on that side what so ever.
On passenger side - it would appear I crunched a seal at an angle just a hair. It still took the seal. Looks like I had a tiny pinhole type leak on one seal but it wasn't too bad - I retorqued them not long afterwards - so it is hard to tell if that one got sealed before or after the re-torque. You can tell it wasn't flat though as part of the seal actually had a small dive in it where it sort of edged in a hair. This also explains why it required more torque to seal it...
Aside from that - everything else looks great thus far as far as the heat exchanger job I did. I'm about to take the exhaust out from the rear and drop the bumper so I can inspect the muffler. I do see some weird rust and a water-like rundown from the rusted area - so It may be that it has a crack as mentioned earlier in another thread? Won't know till it's out.
Ordered new gaskets and seals just to be on the safe side - have my pushrod seals ready to go (in case I do decide to do it all tonight) etc etc.
Taking a minor coffee break right now and having a snack though.
The pushrod seals are leaking a good bit though so I guess I may as well just do it all and be done with it so I can get back to enjoying it all.
Valves are out of spec.
Now... correct me if I'm wrong but I'm using the same method of checking valves as I would my 250. Rotate the engine till you can see the rockers at their low point on the cam lobe. You rotate it till you see it push, then keep going till you see no more movement (when the rocker is at it's neutral point) then measure the clearance. Obviously when the lobe is doing it's job you can't measure clearance, that would make no sense. Once the lobe is away and the rocker is at furthest point, measure clearance. Continue for each valve, so on and so forth. At least that is the method I use on my 250 Ninja, this seemed no different, unless i'm crazy. Indeed, I Could be. And wouldn't dispute it.
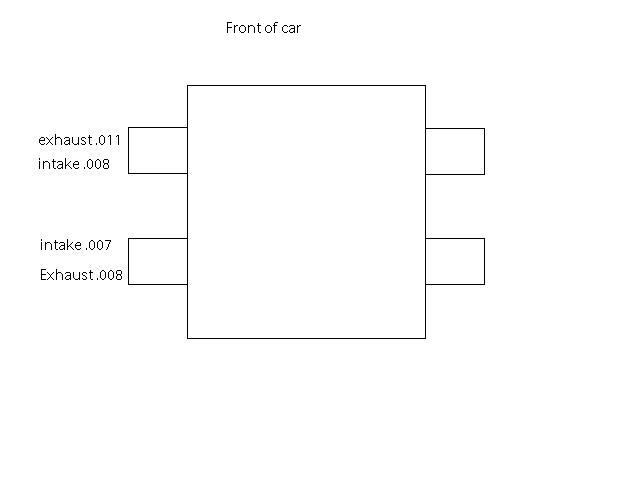
IF that is the correct method... then indeed, we are out of spec. My intake valve on one side was .006" then the other side was .009" - mind you it was closer to .008" but I could BARELY fit a .009" in there, that's way off.
Now I know these engines on this model are supposed to be .006" all around unless at some point they were adjusted to .008" intake and .006" exhaust? I'm not sure. But it seems the one side is off. I didn't get to measure them all, it's almost 3:00am and I doze off a few times inbetween checks and figured I may as well come back inside before I fell asleep and woke up drooling under the car with oil all over my face.
Now... correct me if I'm wrong but I'm using the same method of checking valves as I would my 250. Rotate the engine till you can see the rockers at their low point on the cam lobe. You rotate it till you see it push, then keep going till you see no more movement (when the rocker is at it's neutral point) then measure the clearance. Obviously when the lobe is doing it's job you can't measure clearance, that would make no sense. Once the lobe is away and the rocker is at furthest point, measure clearance. Continue for each valve, so on and so forth. At least that is the method I use on my 250 Ninja, this seemed no different, unless i'm crazy. Indeed, I Could be. And wouldn't dispute it.
IF that is the correct method... then indeed, we are out of spec. My intake valve on one side was .006" then the other side was .009" - mind you it was closer to .008" but I could BARELY fit a .009" in there, that's way off.
Now I know these engines on this model are supposed to be .006" all around unless at some point they were adjusted to .008" intake and .006" exhaust? I'm not sure. But it seems the one side is off. I didn't get to measure them all, it's almost 3:00am and I doze off a few times inbetween checks and figured I may as well come back inside before I fell asleep and woke up drooling under the car with oil all over my face.
http://www.914world.com/bbs2/index.php?showtopic=28758
From the classic forum. Good info. I see you were tired and had the clearances backwards. Intake .006, EX .008 is the correct clearance. Very good article and good read.
Tom
From the classic forum. Good info. I see you were tired and had the clearances backwards. Intake .006, EX .008 is the correct clearance. Very good article and good read.
Tom
QUOTE(corsepervita @ Jun 3 2010, 05:13 AM)
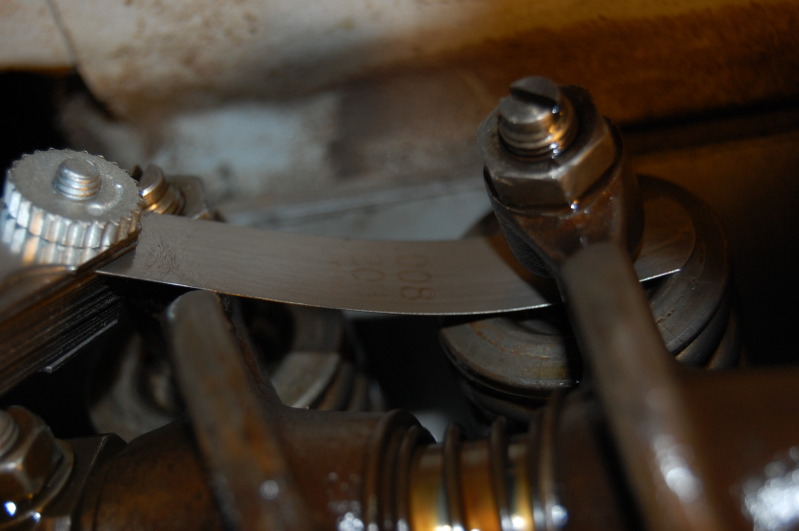
This picture shows the valve being dead nuts correct.
Inner valves are intake. Outer valves are exhaust. intake valves are set to .006. Exhaust is set to .008.
Zach
QUOTE(Tom @ Jun 3 2010, 05:55 AM)
http://www.914world.com/bbs2/index.php?showtopic=28758
From the classic forum. Good info. I see you were tired and had the clearances backwards. Intake .006, EX .008 is the correct clearance. Very good article and good read.
Tom
I didn't actually adjust anything, I was just checking them. I have not yet set anything.
QUOTE(Vacca Rabite @ Jun 3 2010, 06:11 AM)
QUOTE(corsepervita @ Jun 3 2010, 05:13 AM)
This picture shows the valve being dead nuts correct.
Inner valves are intake. Outer valves are exhaust. intake valves are set to .006. Exhaust is set to .008.
Zach
Are you guys sure? I read that the 1.7 motors are .006/.006? Am I incorrect on that?
 I'm kind of confused because my manual says for the 1.7 and 1.8 they are .006/.006 and the 2.0 was .006/.008 unless it was a 1.8 with different valves to go .006/.008?
Way confused which one it is now. Krusty's guide says the 1.7 is .006" both. I just see so many different answers - i'm confused.
Didn't mean that you misadjusted, just that you had the clearences reversed in your post. In your case,( 1.7), as per the first paragraph in the Cap'ns article, 1.7's set both to .006. Also explains that slightly loose would be preferred rather than too tight. I would trust this article.
Tom
Tom
A few thousandths will not make it spit out the carb. Either timing or a very lean mixture will do that. You get "sneezes" out of the carb when it's cold too...
QUOTE(corsepervita @ Jun 2 2010, 11:20 PM)
Since decel popping would be culprit to a lean condition - and intake popping would be culprit to a rich condition (at least as far as I know, I may be off on that); My assumption would then be my timing is off? (since obviously you can't have both lol)
You have that backwards.
QUOTE(Tom @ Jun 3 2010, 05:55 AM)
http://www.914world.com/bbs2/index.php?showtopic=28758
From the classic forum. Good info. I see you were tired and had the clearances backwards. Intake .006, EX .008 is the correct clearance. Very good article and good read.

The Krusty method of adjusting is the way to go! When i had my 2056, i set them all to .006 and that worked fine for me ...
 Andy
AndyPS: I have no idea what a '250 Ninja' is but remember that on a T4, each cam-lobe is shared, so whatever method you are used to might not work correctly here ...
The feeler gauge being bent like that will give you a false reading. You don't need to drop the HEs to adjust valves, and the muffler just tucks up behind the bumper. No need to remove bumper or valance.
QUOTE(SirAndy @ Jun 3 2010, 01:45 PM)
QUOTE(Tom @ Jun 3 2010, 05:55 AM)
http://www.914world.com/bbs2/index.php?showtopic=28758
From the classic forum. Good info. I see you were tired and had the clearances backwards. Intake .006, EX .008 is the correct clearance. Very good article and good read.
The Krusty method of adjusting is the way to go! When i had my 2056, i set them all to .006 and that worked fine for me ...
AndyTaking nothing away from the Krusty method, I have to say that my method works pretty good for me. It's quick and precise. It assumes you have your flywheel marked at TDC and 180 degrees from TDC.
I pop the dizzy cover off and spin one rotor (the other is locked) until I approach #1. Then, using the small window in the notch at the bottom of the tranny, I simply spin the brake rotor until the mark appears and I adjust #1. Then I spin 90 degrees at a time and do #4, 3, then 2. I'm done. Once the car was jacked up and the wheels removed, it took me less than 10 minutes to check all 8 valves.
I think it's 180 degrees at a time that you spin it...
Thank you for the correction and info everyone. Looks like I need to get back out there and check again. The help is much appreciated.
..............good grief guys.....006---.008--.009...ths will work fine....THE PROBLEM to check for is valve lash that is WAY too tight...(popping is most noticable)....most noticable when the engine is just started ,and not warmed up yet....If the valve lash is truly correct starting looking at carburator problems,..unbalanced, plugged idle jets, intake air leak(s)......and as crusty suggested MAKE certain the timing is correct and the distributor advance mechanism is working........
QUOTE(ME733 @ Jun 3 2010, 01:31 PM)
..............good grief guys.....006---.008--.009...ths will work fine....THE PROBLEM to check for is valve lash that is WAY too tight...(popping is most noticable)....most noticable when the engine is just started ,and not warmed up yet....If the valve lash is truly correct starting looking at carburator problems,..unbalanced, plugged idle jets, intake air leak(s)......and as crusty suggested MAKE certain the timing is correct and the distributor advance mechanism is working........
Thus far i've only checked one side. So it may be possible I have one that is too tight on the other side. I'll check the timing as well.
QUOTE(vsg914 @ Jun 3 2010, 10:49 AM)
The feeler gauge being bent like that will give you a false reading. You don't need to drop the HEs to adjust valves, and the muffler just tucks up behind the bumper. No need to remove bumper or valance.
I actually just put it there so i could take a picture and show the clearance. I got at it with the feelers at a different angle so you don't bend them.
I took the HE's off so I could mostly verify my job I did on sealing up the exhaust was done properly since it was my first time doing heat exchangers. It does make the procedure a bit easier. But I want to hunt down the exhaust leak as well. I do believe I found it - it did appear to be the muffler as well.
I did figure out how to get the muffler out without taking the bumper off as well, lol it took me a few but I finally went "Hmm... ok if i turn this at this angle... AHA!" lol glad I didn't take off the bumper!
QUOTE(jmill @ Jun 3 2010, 10:41 AM)
QUOTE(corsepervita @ Jun 2 2010, 11:20 PM)
Since decel popping would be culprit to a lean condition - and intake popping would be culprit to a rich condition (at least as far as I know, I may be off on that); My assumption would then be my timing is off? (since obviously you can't have both lol)
You have that backwards.
Thank you - I wasn't quite entirely sure, thank you for the correction.
QUOTE(SirAndy @ Jun 3 2010, 10:45 AM)
QUOTE(Tom @ Jun 3 2010, 05:55 AM)
http://www.914world.com/bbs2/index.php?showtopic=28758
From the classic forum. Good info. I see you were tired and had the clearances backwards. Intake .006, EX .008 is the correct clearance. Very good article and good read.
The Krusty method of adjusting is the way to go! When i had my 2056, i set them all to .006 and that worked fine for me ...
AndyPS: I have no idea what a '250 Ninja' is but remember that on a T4, each cam-lobe is shared, so whatever method you are used to might not work correctly here ...
Hm - it's a motorcycle, kawasaki ninja 250. Basically you'd rotate the engine until the lobe was rested at a point that it wasn't moving that rocker arm, you knew at that point you could insert a feeler gauge to check the valve clearance.
I understand these are a different valvetrain, however, at some point the cam lobe is moving onto do it's job with another valve, so at some point the one you're looking at will be at the low point of the lobe where nothing is happening, this is where you check your clearance, correct? But from my understanding you go to TDC, check them, then rotate it, check it again, etc...
It seems from what I've read from Capt'n and his post is sort of similar, you just rotate the engine till you sort of see what the diagram listed in his post shows up (not necessarily tdc or anything specific) so that means those particular rockers are at their low point on the lobes (doing nothing, ready to check clearances). Please correct me if I'm wrong, just trying to make sense of it since it's new to me. I'm used to doing motorcycles - so the concept is similar but these are ol' pushrod engines which i've not ever done before.
QUOTE(corsepervita @ Jun 3 2010, 03:40 PM)
It seems from what I've read from Capt'n and his post is sort of similar, you just rotate the engine till you sort of see what the diagram listed in his post shows up (not necessarily tdc or anything specific) so that means those particular rockers are at their low point on the lobes (doing nothing, ready to check clearances). Please correct me if I'm wrong, just trying to make sense of it since it's new to me. I'm used to doing motorcycles - so the concept is similar but these are ol' pushrod engines which i've not ever done before.
You pretty much have it. On T1 - T4 engines, one cam lobe works both left and right sides. So if you know the pairings that share the lobe, you know that one valve is 100% off cam when you see its pair is on cam. You don't have to start at TDC. You just need to know your intake valves (always the inside valves) from your exhaust valves (always the outside valves) and also know what cylinder is which from under the engine. Your eyes never need to leave your valves. Its impossible for one valve to be on cam while its pair is also on cam - once you see one start turning in, its pair is ready for adjustment.
I don't know the pairings by heart, but they are easy to find in the Classics forum. I printed them out and put them in my haynes manual.
Zach
Awesome, that is a great explanation, thank you, Zach!
Ok enough procrastinating - I'm just gonna go get'r'done. Shall report back findings.
QUOTE(yeahmag @ Jun 3 2010, 03:45 PM)
I think it's 180 degrees at a time that you spin it...
Oppps. I guess I shouldn't try and work and play at the same time. Yes, 180 degrees at a time.
Alright - got the pushrod seals replaced on driver side. Only needed to have one tube replaced. Jim had done that side already - but one of the seals was leaking so I did it while I was down there.
Valves were as follows on driver side.
Valves were as follows on driver side.
Loose valves will not cause your problem. Only tight valves, too lean, or timing issues.
Yeah, I still have to get to the other side still and do the pushrod seals though. Check and adjust the valves. I think he mentioned something about timing and checking it. I'll be checking the timing when i'm all said and done.
Thank you for the feedback, yeahmag. I'll at least have valves checked and out of the way here in a few. Coffee break for now.
Thank you for the feedback, yeahmag. I'll at least have valves checked and out of the way here in a few. Coffee break for now.
Down to the last 2 pushrod seals. Taking forever since i keep taking computer breaks XD coffee...mmm haha.
The last 2 valves were alright but not perfect. .005 on one and .008 on the other. I'm adjusting the valves again after I've replaced the pushrod seals to be on the safe side of course. Then turning the engine over 2 times, then repeating the procedure to ensure consistency.
The last 2 valves were alright but not perfect. .005 on one and .008 on the other. I'm adjusting the valves again after I've replaced the pushrod seals to be on the safe side of course. Then turning the engine over 2 times, then repeating the procedure to ensure consistency.
All done. Putting the exchangers on, checking the timing and then it's go for a drive time and a much needed beer.
This is a "lo-fi" version of our main content. To view the full version with more information, formatting and images, please click here.