I finally got my oil tank installed last night - what a trial and error process. I had already cut the holes and did a trial fit and everything went together great. Took it all apart, painted everthing, ordered all of the needed parts from Rich Johnson and went for the final install last night. That bottom oil line was my absolute nemisis. I attached it prior to installing the tank and quickly found that if not postioned exactly right, it would interfere with anything and everything. I had the tank in and out probably 5 times, which was pretty tedious when trying not to scratch things. I think it took me nearly 3 hours to complete the install. Love the end result however (trying to pull pics off the camera right now - not sure what the issue is...)
As an FYI, I bought a "new to me" 914-6 oil filler neck/cap from Rich, as I thought the one I had was from a 911. Well, as usual, I was wrong. If anyone needs a factory oil fill/cap, I have an extra. I am sending it to Eric Shea this weekend with some other parts to have it replated, so other than the cap needing a new gasket, it will be in perfect condition. No dipstick however. I will throw a post in the classifieds as well.
(damn camera.... sorry - give a me few minutes.....)
Full Version: Quite the puzzle.... fun with the oil tank
that bottom line is a bugger..
and I had to pull the tank once, to tighten it a bit and fix a seep...
a real bugger!
and I had to pull the tank once, to tighten it a bit and fix a seep...
a real bugger!
Aaarrrggghhhhh... that thing sucks. You have to rotate the tank as you move it up and in with that hose installed. And there's only one sequence of moves to get it done.
Scott, while you are taking pics, would you mind taking a pic of where the lower line exits the body and how/where it is secured to the body (if at all)?
I can't seem to figure out if that hose simply dangles or if there is actually some holes in the body it needs to pass through.
Thanks a lot.
Rob
I can't seem to figure out if that hose simply dangles or if there is actually some holes in the body it needs to pass through.
Thanks a lot.
Rob
On a 914/6 there is a bracket the hose sits in, attached to the body. The supply hose does not pass thru any body panels.
The scavenge hose passes thru the body (actually the engine shelf, driver's side, to the oil tank.
Anyway, on my conversion it dangles.
The scavenge hose passes thru the body (actually the engine shelf, driver's side, to the oil tank.
Anyway, on my conversion it dangles.
conversions dangle:
and:
Thanks guys, dangle it shall be.
Much appreciated.
Much appreciated.
QUOTE(Scott Schroeder @ Feb 18 2011, 12:01 PM) 
I finally got my oil tank installed last night - what a trial and error process. I had already cut the holes and did a trial fit and everything went together great. Took it all apart, painted everthing, ordered all of the needed parts from Rich Johnson and went for the final install last night. That bottom oil line was my absolute nemisis. I attached it prior to installing the tank and quickly found that if not postioned exactly right, it would interfere with anything and everything. I had the tank in and out probably 5 times, which was pretty tedious when trying not to scratch things. I think it took me nearly 3 hours to complete the install. Love the end result however (trying to pull pics off the camera right now - not sure what the issue is...)
As an FYI, I bought a "new to me" 914-6 oil filler neck/cap from Rich, as I thought the one I had was from a 911. Well, as usual, I was wrong. If anyone needs a factory oil fill/cap, I have an extra. I am sending it to Eric Shea this weekend with some other parts to have it replated, so other than the cap needing a new gasket, it will be in perfect condition. No dipstick however. I will throw a post in the classifieds as well.
(damn camera.... sorry - give a me few minutes.....)
Scott,
You figure out that camera yet? I need to see those photo!
Kev
I am interested in your spare oil fill PM me with details.
So the tank must be installed with the lower oil line in place?
So the tank must be installed with the lower oil line in place?
QUOTE(brant @ Feb 18 2011, 08:09 PM)
and:
Brandt,
Where did you buy the turnbuckles for rear toe and for bracing the dog-ear?
I typically make two hoses for that connection, and use a T fitting with a cap to drain the tank for oil changes.
I have never had the outer dog ear move. If you have bigger tiars than I or drive on rougher venues, you may need it.
The inner ear is subject to breaking and rust from the inside out. I put the effort towards reinforcing that side.
The inner ear is subject to breaking and rust from the inside out. I put the effort towards reinforcing that side.
QUOTE
(trying to pull pics off the camera right now - not sure what the issue is...)
Hello... your a "drummer".

(sorry... it's a genetic response, as a guitar player I "had to do it")

QUOTE(Scott Schroeder @ Feb 18 2011, 12:01 PM)
I finally got my oil tank installed last night - what a trial and error process. I had already cut the holes and did a trial fit and everything went together great. Took it all apart, painted everthing, ordered all of the needed parts from Rich Johnson and went for the final install last night. That bottom oil line was my absolute nemisis. I attached it prior to installing the tank and quickly found that if not postioned exactly right, it would interfere with anything and everything. I had the tank in and out probably 5 times, which was pretty tedious when trying not to scratch things. I think it took me nearly 3 hours to complete the install. Love the end result however (trying to pull pics off the camera right now - not sure what the issue is...)
As an FYI, I bought a "new to me" 914-6 oil filler neck/cap from Rich, as I thought the one I had was from a 911. Well, as usual, I was wrong. If anyone needs a factory oil fill/cap, I have an extra. I am sending it to Eric Shea this weekend with some other parts to have it replated, so other than the cap needing a new gasket, it will be in perfect condition. No dipstick however. I will throw a post in the classifieds as well.
(damn camera.... sorry - give a me few minutes.....)
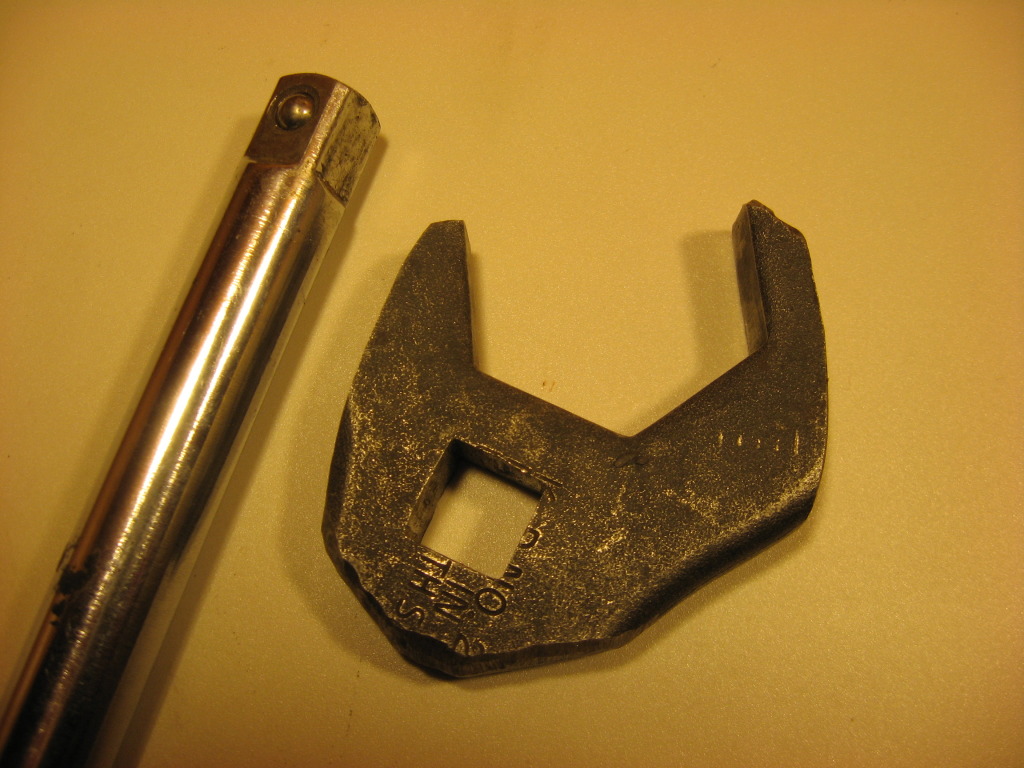
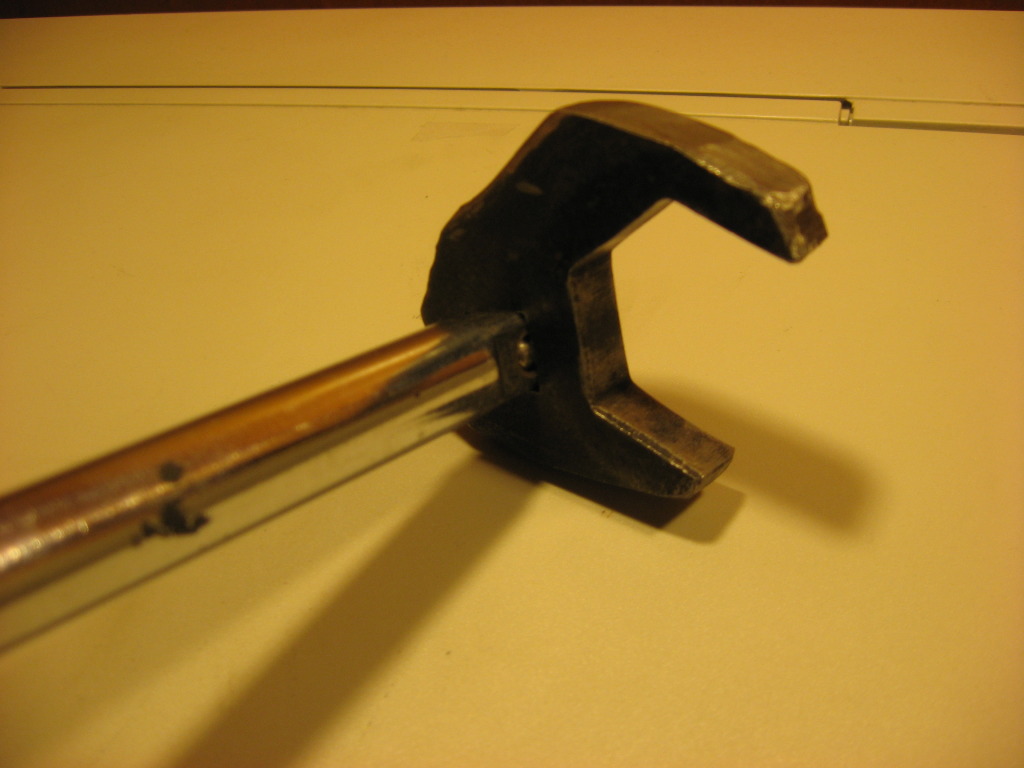
I made a tool for that. This applies to those using original type 36mm fittings
I got one of those blister pack tools for old beetle rear drums. It is a flat piece of steel with a 36mm hole in it.
I whittled it down to it's barest size after putting a hole in it to accept a 1/2" extension.
The hardest part was finding a drill for square holes.... just kidding.
I filed a round hole square so that the extension would fit snugly. It a just a very big crows foot
Using this I can install my tank and then attach, position and tighten the fitting in place.
Now lets see if I can attach pictures.
Rory

This is a "lo-fi" version of our main content. To view the full version with more information, formatting and images, please click here.